
- Joined
- Mar 13, 2006
- Messages
- 498 (0.08/day)
For starters, it's not mine or any one else's fault if you or your stuff gets F'ed up doing this. Attempting this will void your warranty and my result in injury to yourself and property. This mod requires the use of tools that can cause severe injuries so use precautions ")
Now that you've been warned, let me say this is not an exact HOW TO. This only shows how I modded a LITE-ON Black SATA DVD-ROM Drive Model SHD-16S1S-05 , not all drives are the same. You my find the original thread about this mod useful, it shows a different type of drive and shows the process of troubleshooting the drives working. http://forums.techpowerup.com/showthread.php?t=24174
The tools you will need include:
Phillips screw driver
something to cut metal [ dremel tool/ ban saw]
something to drill holes with [drill or dremel]
soldering iron
glue
tools you will find very useful:
multi meter
grinder/sander
flathead screw driver
tape
clamps
A lot of what you need depends on the desired outcome of your mod. I chose acrylic as a top to match my case and was going for an open look. Here are my results

So lets rip a drive open and look at it's guts. I'm not going to post pics for all the steps just the one for the manual eject which some may have never used.

The first step is opening the drive using the manual eject as shown [ this will take some force and a little wiggling], second is pushing in the tabs that hold the face plate on and now remove the screws on the bottom. Lastly, you have to remove the tray by pressing in a tab and pulling down and out. Now you have exposed the gearing and optic carriage, you will see something like this:

It's time to I.D the parts we will be concerned with and their functions. Remember if not using the lite-on drive you will most likely see a different layout but the parts should have the same function. This is where you have to do some research and a multi meter is handy.
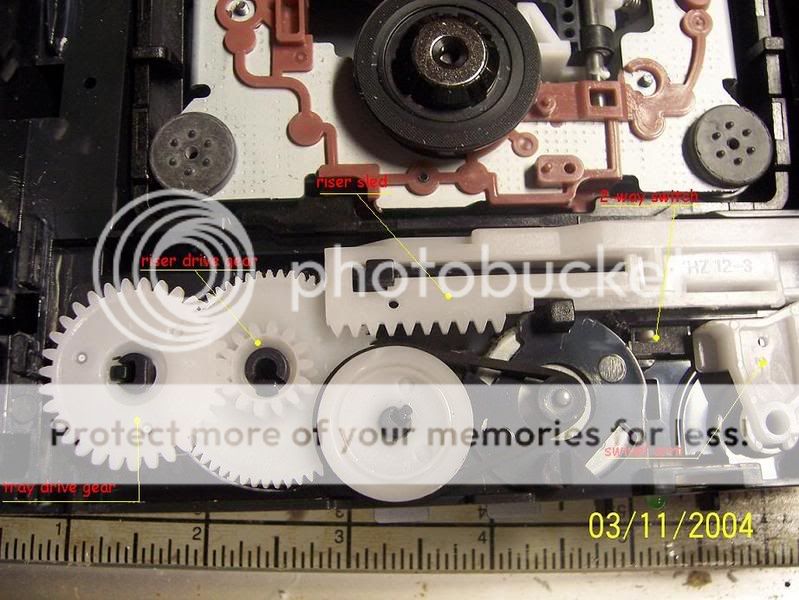
Everything labeled appears to be featured on all drives and their functions are:
2-way switch which tells the controller IC when the tray is open, closed, or in motion. It also starts/stops the spindle that the media sets on.
Riser sled: lowers/raises the optic carriage and activates the 2-way switch.
Riser drive gear: Drives the sled and is controlled by the 2-way switch.
tray drive gear: Drives the tray when opening and closing.
Riser sled knob [not shown]: This small plastic knob is used to push the gears on the riser sled into the riser drive gear, it is moved by a groove in the bottom of the tray.
For the mod we have to prevent the tray from moving,this means that the switch will have to be tricked into thinking the tray has opened and closed so the spindle will stop and we can change the media. Since we no longer have the tray to push the riser sled into the gear, we have to prevent it from moving past the gear in the first place. To do this we have to mark where the sleds drive gear meets the gears on the sled and where the sled would clear the 2-way switch. Now the plastic has to be removed from the underside of the sled so that when the sled is stopped short of it's normal place the switch can be in an up position.

The two switches you see are really only one with two contacts and they both need to be open to indicate the tray is open. The other drive I modded used a different type of 2-switch but the concept was the same. I used the etcher bit from my dremel to clear the plastic out but a drill bit or sharp knife should work just fine. After the switch is taken care of the sled will have to be stopped for traveling beyond the drive gears. This is done by simply putting something in it's way.

I happened to have some styrofoam that fit the bill so I jammed it in, you may have to do some work though. On the other drive I would have needed some screws as a stop and a catch for the switch.
The last steps for disabling the tray is to remove the plastic knob. This can be done with nail clippers or side snips and then pulling off the tray drive gear.
We're not done yet, we still need to add the flip top plus rewire the eject button and L.E.D.
This is where your artistic side shows Some of this my not apply to your mod.
There's not a lot to the top of an optic drive, actually only one thing of importance. That thing is very important as it stabilizes the media at high speed and without it being lined up right, the drive will not work. I'll call it the hub and it consists of a metal ring and a magnet set in a plastic hat-looking thing. The hub locks the media onto the spindle and prevents any wobbling. I chose to completely remove the hub from the top for this mod by cutting it out and grinding the sides till the ring came loose.

Now the hub has to be attached precisely to the new top. This is where acrylic is nice to work with because you can set it on the drive upside down and glue the ring directly over the hub by eye. It also works well for marking the cuts as long as you leave the protective film on.

I made my own automated doors out of some scrap acrylic and fishing line tied to the swivel arm but I wouldn't get too into it since you probably have a different idea. This pic should be enough for you to get the jist of it. The tape is a temporary thing till I get a small drill bit.
Moving the eject switch [momentarily closed switch like the on button for a PC] and L.E.Ds is up to you. The 2-way switch can also be moved to any stop that works better for you as long as it's triggered properly, like the door. If you decide to leave the back plate off, a heat sink will be needed for the IC marked

I've found the optic drive to be very moddable and that almost any part of it can be moved. This mod could be used in a lot of settings from hidden drives to small top loading HTPC or even mounted in the fan hole of a case.
After I get my case done I'll add a video off the drive in action with the door opening and the blue L.E.D shining through.
Now that you've been warned, let me say this is not an exact HOW TO. This only shows how I modded a LITE-ON Black SATA DVD-ROM Drive Model SHD-16S1S-05 , not all drives are the same. You my find the original thread about this mod useful, it shows a different type of drive and shows the process of troubleshooting the drives working. http://forums.techpowerup.com/showthread.php?t=24174
The tools you will need include:
Phillips screw driver
something to cut metal [ dremel tool/ ban saw]
something to drill holes with [drill or dremel]
soldering iron
glue
tools you will find very useful:
multi meter
grinder/sander
flathead screw driver
tape
clamps
A lot of what you need depends on the desired outcome of your mod. I chose acrylic as a top to match my case and was going for an open look. Here are my results
So lets rip a drive open and look at it's guts. I'm not going to post pics for all the steps just the one for the manual eject which some may have never used.
The first step is opening the drive using the manual eject as shown [ this will take some force and a little wiggling], second is pushing in the tabs that hold the face plate on and now remove the screws on the bottom. Lastly, you have to remove the tray by pressing in a tab and pulling down and out. Now you have exposed the gearing and optic carriage, you will see something like this:
It's time to I.D the parts we will be concerned with and their functions. Remember if not using the lite-on drive you will most likely see a different layout but the parts should have the same function. This is where you have to do some research and a multi meter is handy.
Everything labeled appears to be featured on all drives and their functions are:
2-way switch which tells the controller IC when the tray is open, closed, or in motion. It also starts/stops the spindle that the media sets on.
Riser sled: lowers/raises the optic carriage and activates the 2-way switch.
Riser drive gear: Drives the sled and is controlled by the 2-way switch.
tray drive gear: Drives the tray when opening and closing.
Riser sled knob [not shown]: This small plastic knob is used to push the gears on the riser sled into the riser drive gear, it is moved by a groove in the bottom of the tray.
For the mod we have to prevent the tray from moving,this means that the switch will have to be tricked into thinking the tray has opened and closed so the spindle will stop and we can change the media. Since we no longer have the tray to push the riser sled into the gear, we have to prevent it from moving past the gear in the first place. To do this we have to mark where the sleds drive gear meets the gears on the sled and where the sled would clear the 2-way switch. Now the plastic has to be removed from the underside of the sled so that when the sled is stopped short of it's normal place the switch can be in an up position.
The two switches you see are really only one with two contacts and they both need to be open to indicate the tray is open. The other drive I modded used a different type of 2-switch but the concept was the same. I used the etcher bit from my dremel to clear the plastic out but a drill bit or sharp knife should work just fine. After the switch is taken care of the sled will have to be stopped for traveling beyond the drive gears. This is done by simply putting something in it's way.
I happened to have some styrofoam that fit the bill so I jammed it in, you may have to do some work though. On the other drive I would have needed some screws as a stop and a catch for the switch.
The last steps for disabling the tray is to remove the plastic knob. This can be done with nail clippers or side snips and then pulling off the tray drive gear.
We're not done yet, we still need to add the flip top plus rewire the eject button and L.E.D.
This is where your artistic side shows
Some of this my not apply to your mod.There's not a lot to the top of an optic drive, actually only one thing of importance. That thing is very important as it stabilizes the media at high speed and without it being lined up right, the drive will not work. I'll call it the hub and it consists of a metal ring and a magnet set in a plastic hat-looking thing. The hub locks the media onto the spindle and prevents any wobbling. I chose to completely remove the hub from the top for this mod by cutting it out and grinding the sides till the ring came loose.
Now the hub has to be attached precisely to the new top. This is where acrylic is nice to work with because you can set it on the drive upside down and glue the ring directly over the hub by eye. It also works well for marking the cuts as long as you leave the protective film on.
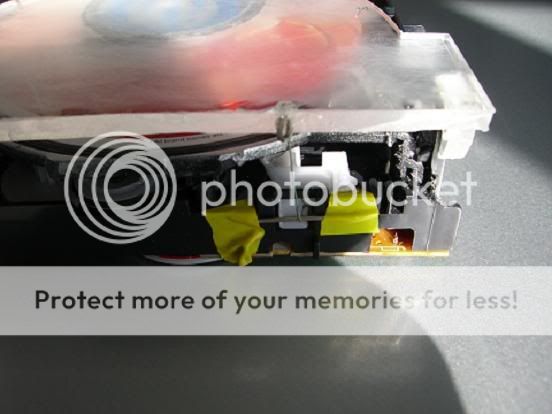
I made my own automated doors out of some scrap acrylic and fishing line tied to the swivel arm but I wouldn't get too into it since you probably have a different idea. This pic should be enough for you to get the jist of it. The tape is a temporary thing till I get a small drill bit.
Moving the eject switch [momentarily closed switch like the on button for a PC] and L.E.Ds is up to you. The 2-way switch can also be moved to any stop that works better for you as long as it's triggered properly, like the door. If you decide to leave the back plate off, a heat sink will be needed for the IC marked
I've found the optic drive to be very moddable and that almost any part of it can be moved. This mod could be used in a lot of settings from hidden drives to small top loading HTPC or even mounted in the fan hole of a case.
After I get my case done I'll add a video off the drive in action with the door opening and the blue L.E.D shining through.

 it's just cool to have something I made my self.
 When I get to fixing it I'm going to disable the optic carriage, remove the tray and put the back on. Right now I'm trying to fix my x1900gt he killed but I think it's a lost cause
 Never leave your door open with your PC on the floor if you have kids


