• Welcome to TechPowerUp Forums, Guest! Please check out our forum guidelines for info related to our community.

Project F1 Dream - Another level 10

peche

Thermaltake fanboy
Joined
Nov 7, 2014
Messages
6,709 (1.94/day)
Location
San Jose, Costa Rica
System Name Athenna
Processor intel i7 3770 *Dellided*
Motherboard GIGABYTE GA-Z68X-UD3H-B3 Rev. 1.1
Cooling Thermaltake Water 3.0 Pro + Tt Riing12 x2 / Tt ThunderBlade / Gelid Slim 120UV fans
Memory 16GB DRR3 Kingoston with Custom Tt spreaders + HyperX Fan
Video Card(s) GeForce GTX 980 4GB Nvidia Sample
Storage Crucial M4 SSD 64GB's / Seagate Barracuda 2TB / Seagate Barracuda 320GB's
Display(s) 22" LG FLATRON 1920 x 1280p
Case Thermaltake Commander G42 Window
Audio Device(s) On-board Dolby 5.1+ Kingston HyperX Cloud 1
Power Supply Themaltake TR2 700W 80plus bronce & APC Pro backup 1000Va
Mouse Tt eSports Level 10M Rev 1.0 Diamond Black & Tt Conkor "L" mouse pad
Keyboard Tt eSports KNUCKER
Software windows 10x64Pro
Benchmark Scores well I've fried a 775' P4 12 years ago, that counts?
:eek:
i just want to see the complete biuld on !!
:toast:nice work fella on my favorite case!
 
Joined
Feb 16, 2012
Messages
158 (0.04/day)
Its all happening at the moment, just waiting on 5960x to arrive and got to paint those panels and it will all start coming together with plenty more pics, you notice in last post I drilled through the panels so I can use them nice bolts and washers all the way around, the odd place holes though are the the window stand-offs :)
 
Joined
Feb 16, 2012
Messages
158 (0.04/day)
Just a small little update with some pics of the keyboard close up.


As you can see from photo, what you cant see from the first ones is the keyboard is covered in flakes all over, here are a few more shots.


I think it looks amazing and the issue I have is that I think I am addicted to flakes, I have to say despite the price of them, they do add something to the paintwork... ill leave you guys with another sneak peek.


Now looking at the mouse a bit closer you may notice the edges are not smooth, this is because they guy that is teaching me redone the mouse after my mess up on it, but he just smacked me in the face by saying you need to learn more first and redone all artwork on palm and button section of the mouse in flakes (red HAM is done in red metalflakes only) enjoy for now
 
Joined
Feb 16, 2012
Messages
158 (0.04/day)
Another small little update for you guys, some goodies this time, big thanks goes out to hyper X team for supporting me with these goodies.


So memory and SSD wise going into this build we have the 256gb Hyper X predator M2 SSD drive, this is standalone rather than with pcie adaptor, the good thing is the MSI X99 Xpower AC contains a M2 turbo slot, which should theoretically provide much higher speeds with this drive than the actual pcie adaptor and I cannot wait to see it in action. The memory is a Predator - 16GB Kit* (4x4GB) - DDR4 3000MHz CL15 Intel XMP and finally the 2X SSD’s are HyperX 256GB versions.


Due to the motherboards layout of the M2 slot I am going to have to cover the current logo on the Predator M2 SSD otherwise it will look upside down in case, a Minor thing, but if I can see it, then it simply will not do.

Both the SSD’s will be covered, too and again, maybe you will see them maybe you will not, but it still matters to me, if I know it is there it is not good enough.


MMM memory and some bitspower boxes, could only mean one thing.


OMG 1 hour later (yep it took that long as one side of the spreader was stuck to stick almost like it was cemented there, I had to be so careful with this, heating up spreader with hair drier why feeling modules temp to make sure both did not get to hot, lift up a small piece then reheat again.


Bitspower spreaders ready to be attached, so as normal had to do some cutting with the heat pads.


Finally we are there, now these will be put under some memory Waterblocks so they wont be visible in build, but as it’s a dedication build to F1 and lasts years F1 champion and constructor champions, I thought I would just add something, again maybe not visible when built, but I will know its there.

Now why I was attaching bitspower items, I thought I better get the GPU blocks on the 2 Nvidia 980 GTX cards.


As I showed in the pictures before, I went with the Gold style block and the white backplate.


This was the original design, but I did decide to change one thing for the GPU backplate that will be sitting on top.


How about some Heat reactive material for the Nvidia claw  I love the way it reacts to heat now before I move any further at this point I need to check some clearances in the rig so lets get these cards and motherboard in and work out the layout.


Ha ha ha that moment you realise the GPU will not be able to fit in the top slot oops, ok time for a quick rearrangement.


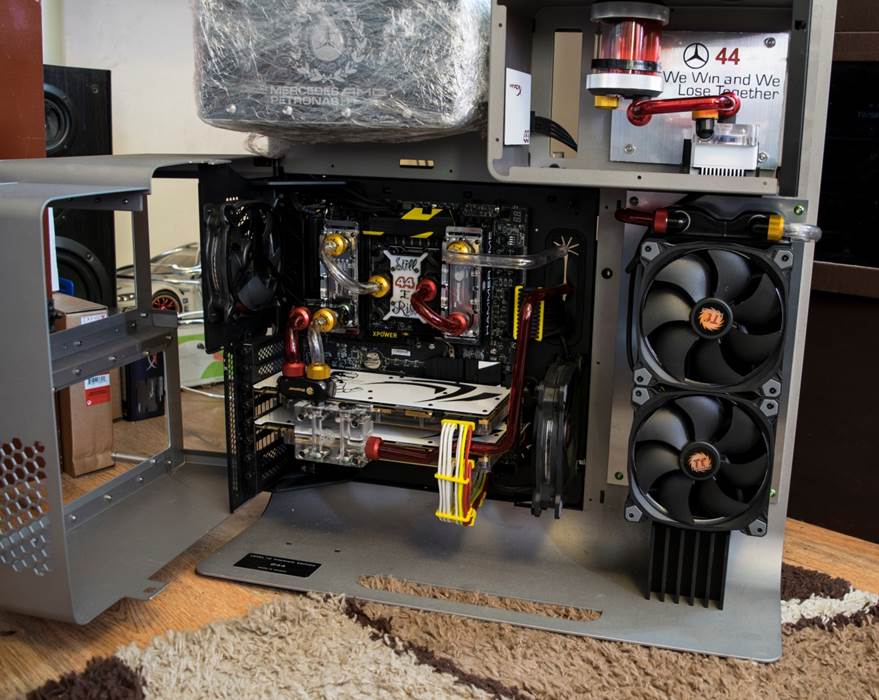
Now that’s better, now let’s see how it hooks up in the case


That’s better, gone a bit over the top with the Primochill raceways, but it’s just a test at the moment, let’s throw some connectors on there


Just messing about checking connection options, waiting for the gpu multilink to turn up so I might as well move onto another piece to do before continuing on.


So a big thanks goes out to the guys over at Primochill for the couple of custom plates I have received the first one is to cover the PSU mount, I’ll show the second one once I get onto it, for now though I need to do some cutting to the case, time to whip out the dremel and one of my smaller used cutting disks that’s worn to a small size.


Scary moment taking a Dremel to this case, but it needs to be done as I need whole in this area to allow the rad inlet and outlet pass through the case to be routed around the back of it.


This is the mock up plate in place (what the radiator will be mounted too, although raised above), just have to work out tube placement when the pass through connectors get here, this is a tight case to work with from the beginning but I am attempting to keep the tubing inside despite the two small pipes that will come out of the rad into the pass through connections.
That’s all for today but will be back soon with more updates as I try to get this ready for insomnia 55 to be in exhibition area.
 

HammerON

The Watchful Moderator
Staff member
Joined
Mar 2, 2009
Messages
8,397 (1.52/day)
Location
Up North
System Name Threadripper
Processor 3960X
Motherboard ASUS ROG Strix TRX40-XE
Cooling XSPC Raystorm Neo (sTR4) Water Block
Memory G. Skill Trident Z Neo 64 GB 3600
Video Card(s) PNY RTX 4090
Storage Samsung 960 Pro 512 GB + WD Black SN850 1TB
Display(s) Dell 32" Curved Gaming Monitor (S3220DGF)
Case Corsair 5000D Airflow
Audio Device(s) On-board
Power Supply EVGA SuperNOVA 1000 G5
Mouse Roccat Kone Pure
Keyboard Corsair K70
Software Win 10 Pro
Benchmark Scores Always changing~
Coming along nicely! Thanks for the update/pics:)
 
Joined
Feb 16, 2012
Messages
158 (0.04/day)
Another small little update for you guys,

The panel I cut out for mobo section are finally ready, the lacquer has hardened so time to get a few little bits done.


Ermm it looks the same, well in fact it is, it’s the closest I could match to the case, although saying that there is one slight difference in the panels.


Yes its metallic silver rather than a flat powder coat :p, so really all that’s left to do is mount the pieces onto the case with the window risers.

Now they were ready to go, also as I have the mobo tray out, I thought I would go ahead and put the Bitspower SLI bridge in place, with the CPU block.


The loop is not final as I am experimenting still with it, although I have to first organise the mounting of the rad on the gold plate on the case as well as mounting the pump, res and f1 display into the ODD, remember its going to be quite a task on this as I don’t want the loop to hang out the case, but also want a way to insure I can take the mobo tray out still without draining the system. Stay tuned for more updates soon.
 

peche

Thermaltake fanboy
Joined
Nov 7, 2014
Messages
6,709 (1.94/day)
Location
San Jose, Costa Rica
System Name Athenna
Processor intel i7 3770 *Dellided*
Motherboard GIGABYTE GA-Z68X-UD3H-B3 Rev. 1.1
Cooling Thermaltake Water 3.0 Pro + Tt Riing12 x2 / Tt ThunderBlade / Gelid Slim 120UV fans
Memory 16GB DRR3 Kingoston with Custom Tt spreaders + HyperX Fan
Video Card(s) GeForce GTX 980 4GB Nvidia Sample
Storage Crucial M4 SSD 64GB's / Seagate Barracuda 2TB / Seagate Barracuda 320GB's
Display(s) 22" LG FLATRON 1920 x 1280p
Case Thermaltake Commander G42 Window
Audio Device(s) On-board Dolby 5.1+ Kingston HyperX Cloud 1
Power Supply Themaltake TR2 700W 80plus bronce & APC Pro backup 1000Va
Mouse Tt eSports Level 10M Rev 1.0 Diamond Black & Tt Conkor "L" mouse pad
Keyboard Tt eSports KNUCKER
Software windows 10x64Pro
Benchmark Scores well I've fried a 775' P4 12 years ago, that counts?
what a ice work lad!
moar pics please!!
 
Joined
Feb 16, 2012
Messages
158 (0.04/day)
Tiny update, please ignore quality of the pics as I took them on phone, first up mock fitting the radiator to see how it sits.


It’s only a mock up (support brackets were made from a bit of hard line tubing temp to get the right size for the job), going to replace with carbon fibre effect steel ones, you may have also noticed the pump and res mounted in ODD bay, this is done like this so I can still open the bay to fill ect ect. The mount is temp (behind pump and res) why I wait for real carbon fibre panel to turn up.

Also, you may have notice the rad has 90 degree connectors, well the tubing will be coming around the side and going into the connectors behind which then passes into the case will go through inside and pop out the motherboard section. This should give you a rough idea of what I am trying to do.

Before I go, I’ll leave you with a shot of how the etching on the back panel is coming along.


So far so good, still some other things to add in there, but these are smaller and smaller things to do and with everything going to plan, I just need to ensure I nail it.

Back soon with more on this build.
 
Joined
Feb 16, 2012
Messages
158 (0.04/day)
Sorry about the lack of updates guys, got quite a bit going on including a planned move of home to a bigger place (from 1 bed flat/apartment to a 2 bed house with garden), which off topic means I can only get better with my modding as I now will be able to build a little workshop… :)

Anyway back on track and first up, I have to say thanks to MAX keyboard for the custom key set, I did want white, but system is not quite ready for that yet so they were kind enough to supply some of their transparent keys for the keyboard.


I only had a few keys customised though, but love the result.


Minor customisations, but I still like it, but of course I will be even more happy once the white backlit keys are ready to be made.

Moving onto the main rig I decided to start doing the hardline, it has been a mad process, due to there being two pipes that are long, twisty and go from inside the mobo section, the return from GPU going out through mobo tray opening along the inside of case to the back of the pass through at the back of the radiator. Then the last tricky one will be from the back pump, all the way from the pump in the ODD bay, out through the gap in this section and along the inside and out into the tray to the memory block.


Thank god for the Primochill bender, made process a lot easier, anyway here are some pics of how the inside of the motherboard tray is looking.


I may make changes to this, but its roughly what it should be, I know the 2 pipe in from mem block is not something that makes sense really, but I like how it looked so I will be keeping it.

There are a few other things I need to test out with this plan, but for now I like it.


Now why I am here I just thought I would quickly test rad grill/model mount to see roughly how it looks.


Looking at this, despite the writing on the model being the right way up, I am not 100% sure it looks right so Ill flip it around to see what it looks like.


Ermmm, see not 100% sure on placement up or down, what do you guys think?.

Before I leave you today to get stuck in with some more pipe bending let me just show you how the engraving is coming along.


Slowly but surely she is coming together, one thing that is on my mind is my own deadline of the 20th to finish the build to get software ect installed to be on display at i55. Let’s hope I match the deadline.
 

peche

Thermaltake fanboy
Joined
Nov 7, 2014
Messages
6,709 (1.94/day)
Location
San Jose, Costa Rica
System Name Athenna
Processor intel i7 3770 *Dellided*
Motherboard GIGABYTE GA-Z68X-UD3H-B3 Rev. 1.1
Cooling Thermaltake Water 3.0 Pro + Tt Riing12 x2 / Tt ThunderBlade / Gelid Slim 120UV fans
Memory 16GB DRR3 Kingoston with Custom Tt spreaders + HyperX Fan
Video Card(s) GeForce GTX 980 4GB Nvidia Sample
Storage Crucial M4 SSD 64GB's / Seagate Barracuda 2TB / Seagate Barracuda 320GB's
Display(s) 22" LG FLATRON 1920 x 1280p
Case Thermaltake Commander G42 Window
Audio Device(s) On-board Dolby 5.1+ Kingston HyperX Cloud 1
Power Supply Themaltake TR2 700W 80plus bronce & APC Pro backup 1000Va
Mouse Tt eSports Level 10M Rev 1.0 Diamond Black & Tt Conkor "L" mouse pad
Keyboard Tt eSports KNUCKER
Software windows 10x64Pro
Benchmark Scores well I've fried a 775' P4 12 years ago, that counts?
amazing work !
thanks for sharing !
 
Joined
Feb 16, 2012
Messages
158 (0.04/day)
So have been quite busy with the project, so I’ll just run through the things I have done.

So as we have seen the poles for window mount on the case, let us attached the windows to it shall we.


One simple task out of the way onto the next one, this time it was back to finishing the loop.


So on this build, I wanted no angle connectors inside the motherboard section and also want to ensure that the tubes were one piece, boy did I not realise what I had let myself in for, do you want a clue… well here are the total tubes including the bends for the build.


So tubing aside its going well, although I have to say its been a bit down heartening knowing that I have to pull all the tubes out to give them a polish after mocking up. Let me show you why. By using an earlier pic before final tube was put in place.


This tube end to end is one piece and runs along the back of the case inside, now look at all the bends after I remove the tubing.


I can tell you straight taking these out and putting them back in was a complete nightmare and a almost like a brain puzzler :p time to move on from the puzzler now.


Second on the agenda was the front plate for the odd, I had a piece of dark smoked acrylic lasered with Mercedes logo, but there was an issue, due to the way the ODD bay opens, if this was fixed to the ODD it would interfere with the correct operation as the edge would just hit the case when trying to open. Simple solution is to grab out the dremel and table router accessories.


With the 45 degree angle router part in the table it was just a case of taping up the surface that was going to be flat down when using the router and sliding it through the end result is this.


As you can see there is now a 45 degree angle on the edge that sits near to the main part of the case which will make the bay still open as intended.


Faceplate on front of the ODD, not final though as I plan to blacken it out so it’s not transparent, and yes that is the F1 style rpm, gear and info device that reports cpu usage, temps ect.

A couple of other things what had to be done were done, first lay down the vinyl for the build, this luckily for me is a simple one as I have a plotter to do this.


List of participants that helped to create this rig and build…

Now for the vinyl from nose cone from last year’s champion winning team and driver


I am starting to love the way this is coming along, but before I leave you on this post, I think I should show you the amazing piece of hand engraving done, remember like all my previous builds I am lucky to have a wife that is very artistic when it comes to engraving.


All done with 1000s of dots to create what you see, simply amazing, here is the picture she used for reference.


You can see her art on www.xtreme-etching.co.uk. Sorry about late posts it has been hectic around here, but I will keep you updated on the progress as much as I can as I reach the latter stages of the build now.
 
Joined
Feb 16, 2012
Messages
158 (0.04/day)
So after yesterdays work spent a little time messing about with the f1 wheel display behind the ODD panel after blacking out surrounding areas, this is what it looks like.


peche

Thermaltake fanboy
Joined
Nov 7, 2014
Messages
6,709 (1.94/day)
Location
San Jose, Costa Rica
System Name Athenna
Processor intel i7 3770 *Dellided*
Motherboard GIGABYTE GA-Z68X-UD3H-B3 Rev. 1.1
Cooling Thermaltake Water 3.0 Pro + Tt Riing12 x2 / Tt ThunderBlade / Gelid Slim 120UV fans
Memory 16GB DRR3 Kingoston with Custom Tt spreaders + HyperX Fan
Video Card(s) GeForce GTX 980 4GB Nvidia Sample
Storage Crucial M4 SSD 64GB's / Seagate Barracuda 2TB / Seagate Barracuda 320GB's
Display(s) 22" LG FLATRON 1920 x 1280p
Case Thermaltake Commander G42 Window
Audio Device(s) On-board Dolby 5.1+ Kingston HyperX Cloud 1
Power Supply Themaltake TR2 700W 80plus bronce & APC Pro backup 1000Va
Mouse Tt eSports Level 10M Rev 1.0 Diamond Black & Tt Conkor "L" mouse pad
Keyboard Tt eSports KNUCKER
Software windows 10x64Pro
Benchmark Scores well I've fried a 775' P4 12 years ago, that counts?
wanna see it running :roll:
amazing joB!
 
Joined
Feb 16, 2012
Messages
158 (0.04/day)
had it up and running, but powered down again to take back of frame of case of(once more) as the top is not sticking to the 3m bonding tape near the handle and its bugging me out, also waiting for 99.9% pure alcohol to turn up to clean it up (dirty finger prints ect on this finish are only removable with this really)..
 

peche

Thermaltake fanboy
Joined
Nov 7, 2014
Messages
6,709 (1.94/day)
Location
San Jose, Costa Rica
System Name Athenna
Processor intel i7 3770 *Dellided*
Motherboard GIGABYTE GA-Z68X-UD3H-B3 Rev. 1.1
Cooling Thermaltake Water 3.0 Pro + Tt Riing12 x2 / Tt ThunderBlade / Gelid Slim 120UV fans
Memory 16GB DRR3 Kingoston with Custom Tt spreaders + HyperX Fan
Video Card(s) GeForce GTX 980 4GB Nvidia Sample
Storage Crucial M4 SSD 64GB's / Seagate Barracuda 2TB / Seagate Barracuda 320GB's
Display(s) 22" LG FLATRON 1920 x 1280p
Case Thermaltake Commander G42 Window
Audio Device(s) On-board Dolby 5.1+ Kingston HyperX Cloud 1
Power Supply Themaltake TR2 700W 80plus bronce & APC Pro backup 1000Va
Mouse Tt eSports Level 10M Rev 1.0 Diamond Black & Tt Conkor "L" mouse pad
Keyboard Tt eSports KNUCKER
Software windows 10x64Pro
Benchmark Scores well I've fried a 775' P4 12 years ago, that counts?
ad it up and running, but powered down again to take back of frame of case of(once more) as the top is not sticking to the 3m bonding tape near the handle and its bugging me out, also waiting for 99.9% pure alcohol to turn up to clean it up (dirty finger prints ect on this finish are only removable with this really)..
want to see all the lights and shit ya know...
level 10 is my all time favorite case.
 

peche

Thermaltake fanboy
Joined
Nov 7, 2014
Messages
6,709 (1.94/day)
Location
San Jose, Costa Rica
System Name Athenna
Processor intel i7 3770 *Dellided*
Motherboard GIGABYTE GA-Z68X-UD3H-B3 Rev. 1.1
Cooling Thermaltake Water 3.0 Pro + Tt Riing12 x2 / Tt ThunderBlade / Gelid Slim 120UV fans
Memory 16GB DRR3 Kingoston with Custom Tt spreaders + HyperX Fan
Video Card(s) GeForce GTX 980 4GB Nvidia Sample
Storage Crucial M4 SSD 64GB's / Seagate Barracuda 2TB / Seagate Barracuda 320GB's
Display(s) 22" LG FLATRON 1920 x 1280p
Case Thermaltake Commander G42 Window
Audio Device(s) On-board Dolby 5.1+ Kingston HyperX Cloud 1
Power Supply Themaltake TR2 700W 80plus bronce & APC Pro backup 1000Va
Mouse Tt eSports Level 10M Rev 1.0 Diamond Black & Tt Conkor "L" mouse pad
Keyboard Tt eSports KNUCKER
Software windows 10x64Pro
Benchmark Scores well I've fried a 775' P4 12 years ago, that counts?
Joined
Feb 16, 2012
Messages
158 (0.04/day)
So my last few days were spent leak testing and just ensuring everything was running as it should be.

Few things to do first was a quick power up.


Love the way this is coming out, and the mobo section has surpised me as all that light in there is coming from the CPU block.


I had to drop the ev down – 4 to get this picture otherwise it would be just one big glowing white thing in the center.


This is how you see the block when its all bright, of course once finished I will need to take more proper pictures to show the block and the light from cpu block. The next picture should show you in a better way how much light comes off the cooler into the compartment.


That’s how light it is in there, you may have noticed the backplate nvidia claw logo has change colors. This is because its made out of some nice heat reactive material. I did have heat reactive paint, but it had too much of a yellowing effect. So I rubbed it down and put the heat reactive vinyl down instead. Oops I nearly forgot to put this in, here is what one of the hyperX SSD’s looks like, you may have glimpsed it before but here is a better picture.


Last but not least, added the two tributes to the back panel, the one for #keepfightingmicheal and for the sports most recent sad loss #JB17.


Until next time.
 

peche

Thermaltake fanboy
Joined
Nov 7, 2014
Messages
6,709 (1.94/day)
Location
San Jose, Costa Rica
System Name Athenna
Processor intel i7 3770 *Dellided*
Motherboard GIGABYTE GA-Z68X-UD3H-B3 Rev. 1.1
Cooling Thermaltake Water 3.0 Pro + Tt Riing12 x2 / Tt ThunderBlade / Gelid Slim 120UV fans
Memory 16GB DRR3 Kingoston with Custom Tt spreaders + HyperX Fan
Video Card(s) GeForce GTX 980 4GB Nvidia Sample
Storage Crucial M4 SSD 64GB's / Seagate Barracuda 2TB / Seagate Barracuda 320GB's
Display(s) 22" LG FLATRON 1920 x 1280p
Case Thermaltake Commander G42 Window
Audio Device(s) On-board Dolby 5.1+ Kingston HyperX Cloud 1
Power Supply Themaltake TR2 700W 80plus bronce & APC Pro backup 1000Va
Mouse Tt eSports Level 10M Rev 1.0 Diamond Black & Tt Conkor "L" mouse pad
Keyboard Tt eSports KNUCKER
Software windows 10x64Pro
Benchmark Scores well I've fried a 775' P4 12 years ago, that counts?
what a amazing work lad!
thanks for sharing it with us!
 

peche

Thermaltake fanboy
Joined
Nov 7, 2014
Messages
6,709 (1.94/day)
Location
San Jose, Costa Rica
System Name Athenna
Processor intel i7 3770 *Dellided*
Motherboard GIGABYTE GA-Z68X-UD3H-B3 Rev. 1.1
Cooling Thermaltake Water 3.0 Pro + Tt Riing12 x2 / Tt ThunderBlade / Gelid Slim 120UV fans
Memory 16GB DRR3 Kingoston with Custom Tt spreaders + HyperX Fan
Video Card(s) GeForce GTX 980 4GB Nvidia Sample
Storage Crucial M4 SSD 64GB's / Seagate Barracuda 2TB / Seagate Barracuda 320GB's
Display(s) 22" LG FLATRON 1920 x 1280p
Case Thermaltake Commander G42 Window
Audio Device(s) On-board Dolby 5.1+ Kingston HyperX Cloud 1
Power Supply Themaltake TR2 700W 80plus bronce & APC Pro backup 1000Va
Mouse Tt eSports Level 10M Rev 1.0 Diamond Black & Tt Conkor "L" mouse pad
Keyboard Tt eSports KNUCKER
Software windows 10x64Pro
Benchmark Scores well I've fried a 775' P4 12 years ago, that counts?
Joined
Feb 16, 2012
Messages
158 (0.04/day)
Hi guys, really sorry about the lack of updates on this went through big home move and had to take rig (not fully completed to show at i55) here is a few shots of it on display at the show. I will follow up with final pictures once I have completed the tubing change over.


Will follow up with more as soon as I get desk built and change over a few things, for now enjoy.
 
Joined
Feb 16, 2012
Messages
158 (0.04/day)
Sorry about any updates, changed a few things round on build (we moved home and popped out a little one).. anyway ill start with some shots of the mouse/keyboard on desk.


will follow up with full shots of whole rig once monitor arrives
 
Top