• Welcome to TechPowerUp Forums, Guest! Please check out our forum guidelines for info related to our community.

TOXIC CHROME (modded Corsair 250D)

Joined
Apr 12, 2015
Messages
269 (0.08/day)


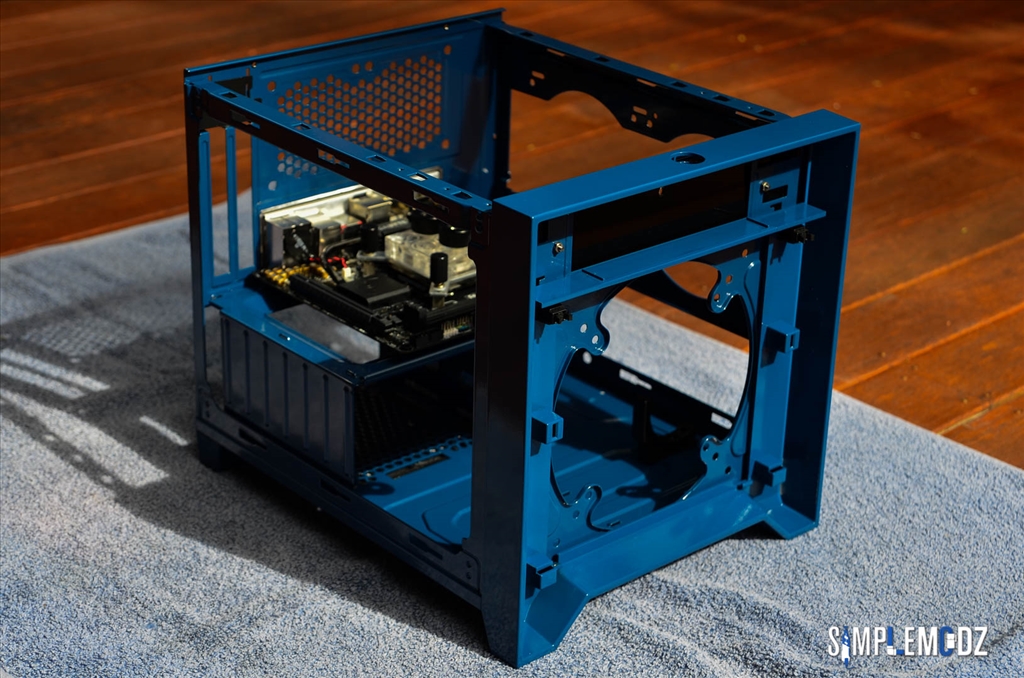
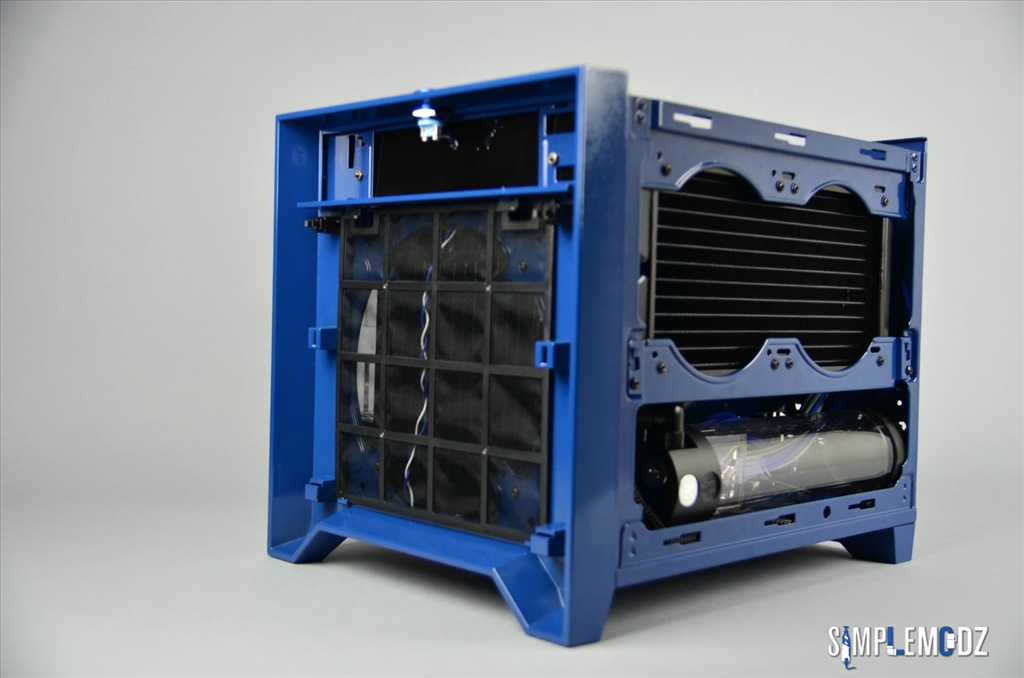
Time for another update! Slowly getting everything in the case to figure out the loop layout and if I need any more fittings :)


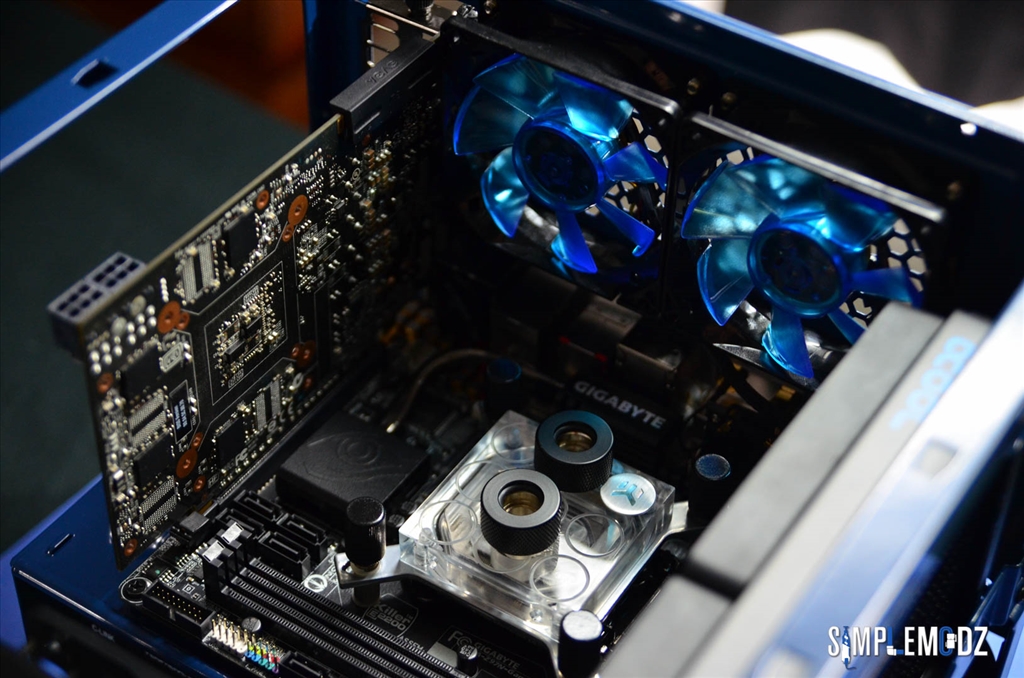
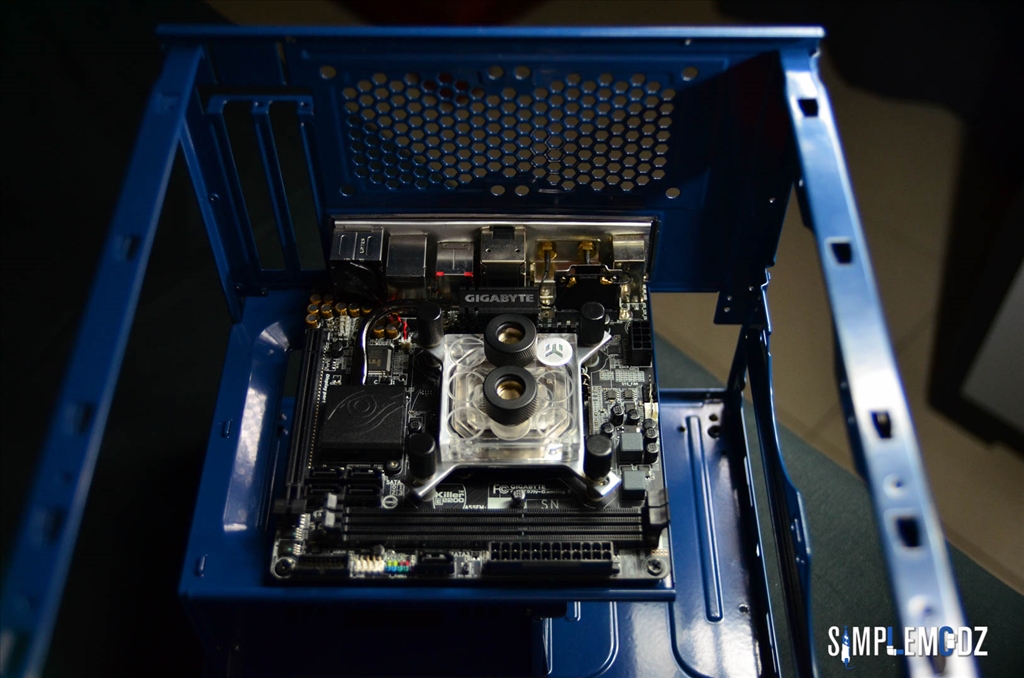
Painted the thumbscrews for the EK Supremacy black, think it goes better with the motherboard like this.


The little Pentium is in :D


I might change the CPU block layout, depending on the way I want to go with the loop.


Also here it the GPU, this was in the Green Molecule build in SLI before the tear down.


Will cut some vinyl to cover those pink and purple capacitors.


Thanks for checking it out!


Cheers,


Alex


Joined
Apr 12, 2015
Messages
269 (0.08/day)


Things are getting a little bit tight in the case!


I figured out the loop for the build, I might need some more fittings to make it work and keep it nice and clean. Need to get the cables in first and see, they're currently on the way from Icemodz :D


I really like the way this build is taking shape, let me know what you guys think.


Cheers,


Alex


Joined
Apr 12, 2015
Messages
269 (0.08/day)


Hey guys,


Here's the package that came from Bill over at MNPCTECH. Thanks a lot for the support, I really appreciate it and I hope you guys like the build once it's finished. I'm sure the modding supplies will come in handy for a lot of future builds to come.


For a lot more awesome stuff check out MNPCTECH on Facebook , YouTube and their mod store mnpctech.com


And while you're on Facebook check out my page too, Simple Modz.


3M Red Scotchbrite Scuff Pads


Mnpctech PC Case Mod Ruler & Reference Tool


This was an extra item included, I will surely put it to good use, cheers Bill!


PC Case Panel Modding Nibbler Tool


Reinforced Dremel cutting wheels


Vandal PC Push Button Switch Blue anodized


Nickel Plated Vandal PC Push Button Switch


And finally, the awesome Mod Zoo case badge. I have a special spot for this on the back of the case!


The quality of everything received is just excellent and I can truly see the effort put into all these items, thanks a lot for the support guys!


Cheers,


Alex


Joined
Apr 12, 2015
Messages
269 (0.08/day)


Okay guys, here it is! The case is nearly done, just need to get the acrylic windows on get the front panel Corsair piece on after cutting.


Maybe some of you have been waiting to see this since I announce the chrome painting. I hope you guys won't be disappointed as it this is not chrome but still looks very very good and I really like it. Like I explained, actual chrome paint or chrome plating would have been too expensive for my budged.


The panels are spot on and any imperfections you may see are all reflections from the surroundings. Though to bring the case outside to really showcase the paint job.


The front panel and also the rear case feet have been colour matched to the blue powder coat!


You can also see I made an acrylic piece and mounted it on the inside to cover the 5.25" bay. Drilled a small hole in the middle for the power button cable.


Dust filter


And the front panel cover, might need some cleaning up around the edges but really happy with the glossy look


Here is a good look at the side panel paint job


Will end up using the Blue vandal switch, fits better than the nickel plated one. Lucky Bill sent me this one too!


And this is the front panel cover, the Corsair shape will be cut out and then painted same as the side panels. This will be stuck over the original front panel cover and still be able to use the clip on feature and access the dust filter behind it.


Let me know what you guys think! Shady here seems to approve!


Thanks for checking it out!


Cheers,


Alex


Joined
Apr 12, 2015
Messages
269 (0.08/day)


Hey guys,


Small update on the build and a very special announcement!


Firstly the announcement!


I'm very proud to say that the TOXIC CHROME build has been nominated in the Bit-Tech Mod of the Month for May 2015. You can find the voting link here if you want to show some love for my build!


Such an honor to have been nominated!


And now on to the build! I have the windows on, 3mm thick clear acrylic. Hope you guys like!


Think the windows look very good on the outside, something different! What do you guys think?


Thanks for checking it out!


Cheers,


Alex


Joined
Apr 12, 2015
Messages
269 (0.08/day)


Hey guys,


Here's the work I did on the front panel mod.


The piece is 1.2mm aluminum and what I used for the cutting is a Dremel Moto-Saw as you can see from the pictures. It's like a mini portable scroll saw, very handy and really good for the price.


I drilled small holes in the panel first so that I can begin the cutting with the scroll saw.


Bit of a learning curve with this but once you get the hang of it, it's pretty easy. And it cut through this aluminum panel with no effort at all.


As you can see, the vinyl is my guide.


Here all the cutting was done and it was time for the filing to make it nice, smooth and even


I cut the corners same shape as the windows, gave it a scuff everywhere and it was done.


The whole thing took me about 3 hours to do. Now to get it sprayed!


I think it came out looking awesome and was surprised how easy it was to cut it once I got the hang of the scroll saw.


The Dremel Moto-Saw will definitely come in handy from now on, I wonder how it will do on some steel or thicker panels.


Let me know what you guys think?


Cheers,


Alex


Joined
Apr 12, 2015
Messages
269 (0.08/day)


Hey guys!


After a lot of exiting news from E3 as well as AMD and watching a bunch of press conferences over the past few days, it's time to get back to work on the build!


Those of you who know me and also my Vault Boy case mod can absolutely guarantee that I jumped on the Fallout 4 Pip-Boy Edition straight after the Bethesda press conference! There are also a lot of ideas spinning around in my head about another Fallout case mod, a different one this time with a more post-apocalyptic look! If and when I decide to do that you will all surely find out :D


Back to the build!


Here is all the vinyl work I did for some of the components with some chrome vinyl!


You can see the SSD has been painted black. Also the fans cables have been shortened, crimped and re-sleeved, only some that needed it. I chose the toxic symbol for them, think it suits the build and also just a circle on the back to cover the fan housing.


Let me know what you guys think.


And guys the Mod of the Month voting is still going on Bit-Tech until the 28th of June and the race is really close! Have a look and cast a vote if you haven't done so already.


Cheers,


Alex


Joined
Apr 12, 2015
Messages
269 (0.08/day)


Hey guys,


Today I shortened and sleeved the DDC pump and added one missing piece to the pump and res combo in order to be able to properly bring the loop back to the top of the res.


It's sort of like a Bitspower aquapipe but out of a piece of acrylic that EK offer for these reservoir tops.


Originally I wanted to use the Bitspower aquapipe as I have quite a few laying around however EK chose to have larger than G1/4" threads on the inside of these tops for some reason so the aquapipe didn't work. Luckily I found the acrylic tube that EK offer locally.


Once I received it, just had to shorten it to fit this res.


These are the threads on the inside of the res top.


Easily done :)


Thanks for checking it out and stay tuned for more to come over the weekend!


Cheers,


Alex


Joined
Apr 12, 2015
Messages
269 (0.08/day)


Here's the new EK stuff I received. Nickel plated mounting bracket and a new clear Supremacy EVO top, part of the upgrade kit. Also new RAM modules to replace the ones that were powder coated before.


Made some decal stickers for the RAM modules to go with the toxic theme :)


Pretty nice looking little combo!


Starting to get components back in the case. Still waiting on fittings, tubing and cables to arrive.

Thanks for checking it out!

Cheers,

Alex


peche

Thermaltake fanboy
Joined
Nov 7, 2014
Messages
6,709 (1.94/day)
Location
San Jose, Costa Rica
System Name Athenna
Processor intel i7 3770 *Dellided*
Motherboard GIGABYTE GA-Z68X-UD3H-B3 Rev. 1.1
Cooling Thermaltake Water 3.0 Pro + Tt Riing12 x2 / Tt ThunderBlade / Gelid Slim 120UV fans
Memory 16GB DRR3 Kingoston with Custom Tt spreaders + HyperX Fan
Video Card(s) GeForce GTX 980 4GB Nvidia Sample
Storage Crucial M4 SSD 64GB's / Seagate Barracuda 2TB / Seagate Barracuda 320GB's
Display(s) 22" LG FLATRON 1920 x 1280p
Case Thermaltake Commander G42 Window
Audio Device(s) On-board Dolby 5.1+ Kingston HyperX Cloud 1
Power Supply Themaltake TR2 700W 80plus bronce & APC Pro backup 1000Va
Mouse Tt eSports Level 10M Rev 1.0 Diamond Black & Tt Conkor "L" mouse pad
Keyboard Tt eSports KNUCKER
Software windows 10x64Pro
Benchmark Scores well I've fried a 775' P4 12 years ago, that counts?
nice mod!! excellent paint job on cube case, sexy subaru impreza blue!
thanks for sharing!
 
Joined
Apr 12, 2015
Messages
269 (0.08/day)


Hey guys,


Front panel is done and here is how I applied it on, very simple with some double sided 3M tape.


For some reason these following pics I only have from my phone, not sure what happened with the ones from the camera :(


Thanks for checking it out and hope you guys like the finished front panel!


Cheers,


Alex


Joined
Apr 12, 2015
Messages
269 (0.08/day)


Hey guys,


Another quick update. The GPU is good to go and I also cut up these fan frames that will go around all the fans in the build to give them more colour.


You can see on the GPU the pink and purple caps have been covered with chrome vinyl.


This is the design I went for with the frames to just cover the edges of the fans.


Just need to get painted and filed down a little bit more, will be same silver colour as the side and front panel.


Thanks for checking it out.


Cheers,


Alex


Joined
Apr 12, 2015
Messages
269 (0.08/day)


Hey guys,


Sorry for the lack of updates on the build. I have been very busy moving houses over the last few weeks.


All done now but no internet at home yet, so posting update from work. Should have a lot more room and time to work on builds from now on and will hopefully wrap this build log up soon but I'm still waiting on custom cables to arrive.


Here are the finished grills/covers I made for the fans.


Stay tuned for more.


Cheers,


Alex


Joined
Apr 12, 2015
Messages
269 (0.08/day)


Hey guys,

More work in progress! Found a nice spot for The Mod Zoo monkey badge and it looks pretty nice in there.

Just a few things to fix up and start working on some cable management for the fans and LEDs. Once the sleeved cables arrive and I can get everything in and start tubing up finally!


The two mounting holes for the 80mm fan grill don't really match unfortunately so will need to fix that :)


And here's a better look at the finished front panel.


Stay tuned for more!

Cheers,

Alex

 
D

Deleted member 41019

Guest
Love the custom Corsair front. Inside the system is such a treat for the eyes too.

Lovely build, can't wait to see more!
 
Joined
Apr 12, 2015
Messages
269 (0.08/day)


Thanks to Primochill for sending me a set of their awesome fittings to use in the build!


Most of the final pieces for this build are here now. Stay tuned for more!


Cheers,


Alex


Joined
Apr 12, 2015
Messages
269 (0.08/day)


Hey guys,


I have some more fittings to show, this time some extensions. Thanks a lot to Hugh from mydiy.com.au for helping out with these Barrow fittings. You can check out his eBay store HERE with some good prices on fittings.


Not sure if I will use all of them yet but they will definitely come in handy for all the small tight corners in this build. I also need some spots to be really strong so just tubing won't do. Will make sure to show once ready.


Thanks for checking it out.


Cheers,


Alex


Joined
Apr 12, 2015
Messages
269 (0.08/day)


Hey guys!

Here are the awesome cables from Icemodz! Thanks a lot to Mundi for making and sending me this kit. It's made from nice flexible paracord sleeve and should fit nicely in the system. Make sure to check out the icemodz.com website for all your custom cable and LED needs.


Thanks for checking it out!

Cheers,

Alex

 
Joined
Apr 12, 2015
Messages
269 (0.08/day)


Hey guys,

Here's another update on this build! Most of the fittings and cables are now in and it's ready for tubing up! Just wanted to give you guys a quick look inside before tubing up.


That chrome colored fittings is the only straight rotary fittings that I had. Once the front radiator is in that fittings is not seen.


You can also see the LED strips are in, these are UV LEDs from Icemodz.


Not sure if you notice but I bent a piece of acrylic around the 80mm fans and also around the 140mm fan, thought it cleans things up a bit.


Thanks for checking it out!

Cheers,

Alex

 
Top