 3
3
G.Skill Trident 2000 MHz DDR3 CL9 8GB Kit Review
Value & Conclusion »Test Setup
| Test System | |
|---|---|
| CPU: | Intel Core i7 860 2.8 GHz, 2 MB Cache |
| Cooling: | Noctua U12P with SecuFirm 2 Mounting Kindly supplied by Noctua |
| Motherboard: | ASUS P7P55D-E Pro Kindly supplied by ASUS |
| Video Card: | Sapphire Radeon 4350 256MB |
| Harddisk: | OCZ SOLID 2 SERIES SATA II 2.5" SSD Kindly supplied by OCZ Technology |
| Power Supply: | Jersey Power 550W Modular Edition Kindly supplied by Jersey Power |
| Case: | DimasTech Bench Table Easy V2.5 Kindly supplied by DimasTech |
| Software: | Windows 7, Catalyst 10.4 |

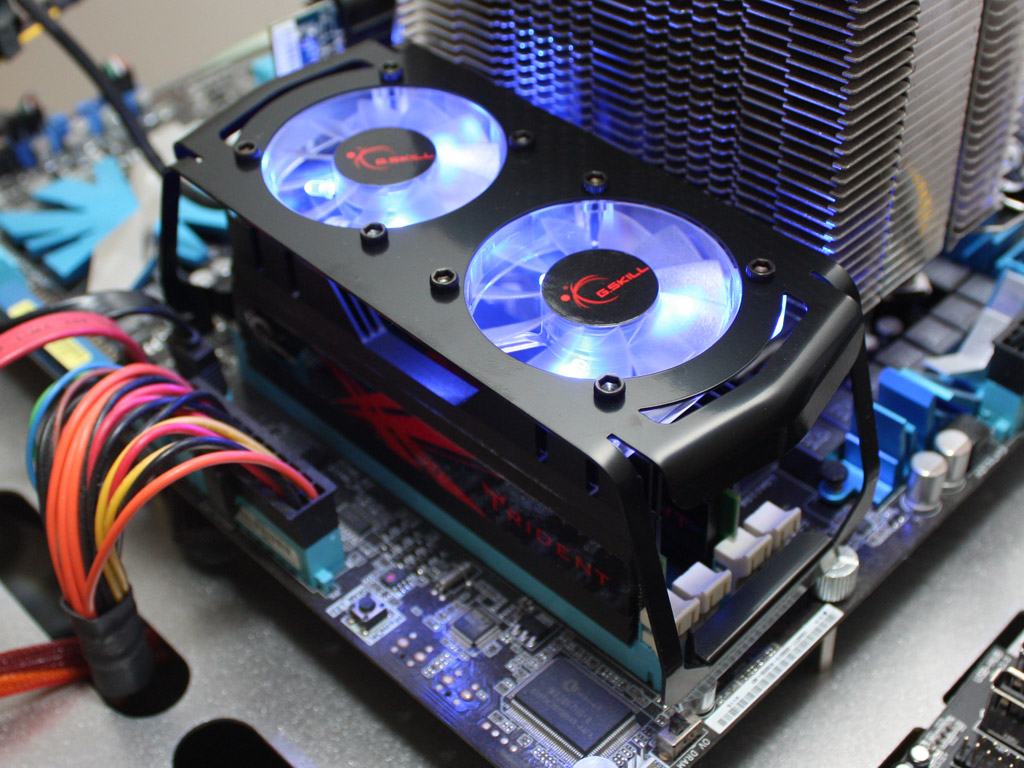
As you can see, the fan contraption barely fits on our testing station. In fact due to the one sided clips on the P55 board from Asus, there is nothing for the metal to hold unto, so it would just fall off in a normal usage scenario. Once turned on, the blue LEDs of the fan turn on as well. From an aesthetics point of view, the mix with red on the Trident modules and blue color LEDs in the fans do not make any sense. It would have been much cooler for G.Skill to use red LEDs instead. That said, the color happens to go well with the theme of the Asus P55 board in our case.
Performance & Overclocking
First off, this is a so-called high-capacity kit. This means that each module is 4 GB large and as we all know the bigger the modules the thougher they become to overclock. The same goes for the number of DIMMs in a kit. That said, getting the G.Skill Trident 8 GB kit to run at 2000 MHz CL9 is very easy by simply setting the XMP profile in the BIOS. There seems to be some headroom for overclocking, as I managed to hit 2133 MHz with them at this setting and 1.7 V. This seemed to be the end of the line, as higher voltage did not yield more performance with the system becoming unstable with just one or two MHz more on the base clock. The next step meant trying out CL5-5-5-15 to see if the kit could handle that. It was no big surprise that the system did not boot with that latency no matter what voltage was supplied. The first bootable scenario was a CL6-6-6-18 setting in combination with 1.6 V. Keeping the latency, each bump in voltage meant an increase of 20 to 30 MHz up to a maximum of 1474 MHz.The step up to 7-7-7-21 bore the first pleasant surprise. The 8 GB kit booted right up at 1.5 V and 1600 MHz with no problems, but at such low voltage, 1660 MHz was the end of the line. Pushing it to 1.6 V also allowed us to run it at a slightly higher MHz, while the memory hit a ceiling at 1.8 V and 1712 MHz. Increasing the voltage did not result in better overclockability. Relaxing the timings to CL8-8-8-24 and climbing the voltage ladder the 8GB kit, I was suprised that it managed 1938 MHz. It would have been nice if the kit could have broken the 2000 MHz barrier at CL8, but no matter how much voltage we applied, the memory did not perform any better. Due to the high frequency, the multipier was changed from 2:10 to 2:12 during the benchmarking process at this latency. With CL9 the kit managed to push the limits of the entire test bench and ran fine at 2133 Mhz, but anything above that resulted in an unstable system. This is most likely due to the system itself and not the memory kit.


As you can see, the memory scales very well with voltage, climbing steadily when increased. The memory performance did not degrade past 1.7 or 1.8 V, but did not translate into higher overclockability.
Apr 25th, 2024 11:42 EDT
change timezone
Latest GPU Drivers
New Forum Posts
- WCG Daily Numbers (12495)
- TPU's Rosetta Milestones and Daily Pie Thread (1859)
- ThrottleStop 9.6 Voltage won't change (4)
- Folding Pie and Milestones!! (9008)
- Making Audio Enhancers Work on Windows (2649)
- Random blue screen from winload.efi error (0xc000000e) (1)
- which new soundcard or which 4.1 speakers kits ? (10)
- Alphacool CORE 1 CPU block - bulging with danger of splitting? (8)
- Free Games Thread (3767)
- Only EDP Other in Core? (0)
Popular Reviews
- Fractal Design Terra Review
- Thermalright Phantom Spirit 120 EVO Review
- Corsair 2000D Airflow Review
- Minisforum EliteMini UM780 XTX (AMD Ryzen 7 7840HS) Review
- ASUS GeForce RTX 4090 STRIX OC Review
- NVIDIA GeForce RTX 4090 Founders Edition Review - Impressive Performance
- ASUS GeForce RTX 4090 Matrix Platinum Review - The RTX 4090 Ti
- MSI GeForce RTX 4090 Suprim X Review
- MSI GeForce RTX 4090 Gaming X Trio Review
- Gigabyte GeForce RTX 4090 Gaming OC Review
Controversial News Posts
- Sony PlayStation 5 Pro Specifications Confirmed, Console Arrives Before Holidays (116)
- NVIDIA Points Intel Raptor Lake CPU Users to Get Help from Intel Amid System Instability Issues (106)
- AMD "Strix Halo" Zen 5 Mobile Processor Pictured: Chiplet-based, Uses 256-bit LPDDR5X (101)
- US Government Wants Nuclear Plants to Offload AI Data Center Expansion (98)
- Windows 11 Now Officially Adware as Microsoft Embeds Ads in the Start Menu (92)
- Developers of Outpost Infinity Siege Recommend Underclocking i9-13900K and i9-14900K for Stability on Machines with RTX 4090 (85)
- Windows 10 Security Updates to Cost $61 After 2025, $427 by 2028 (84)
- AMD's RDNA 4 GPUs Could Stick with 18 Gbps GDDR6 Memory (83)