 5
5
Lamptron Fan Controller Touch Review
Value & Conclusion »Assembly


Installing the Lamptron Touch requires at least two small screws placed in standardized 5.25" optical bay slots. Installing the Touch in a Corsair Obsidian 800D did require removal of the quick locking optical bay sliders. Due to the weight proportion of the Touch I did not feel comfortable using the locking tabs to simply hold it in place. Perhaps if the weight of the Touch were not simply hanging out the front of the case it could have been installed without screws.


After mounting the fan controller the 3 pin fan adapters were connected as well as the power connector. These cables were ran through the available grommets but with six lengthy cables connected on the backside of a case, cable management becomes quite the task.


Returning the case panels the Lamptron Touch looks at home. The brushed aluminum frame matches the Obsidian's matching appearance. Thoroughly impressive in any case, the Lamptron Touch will simply add to the ambiance.
In Action

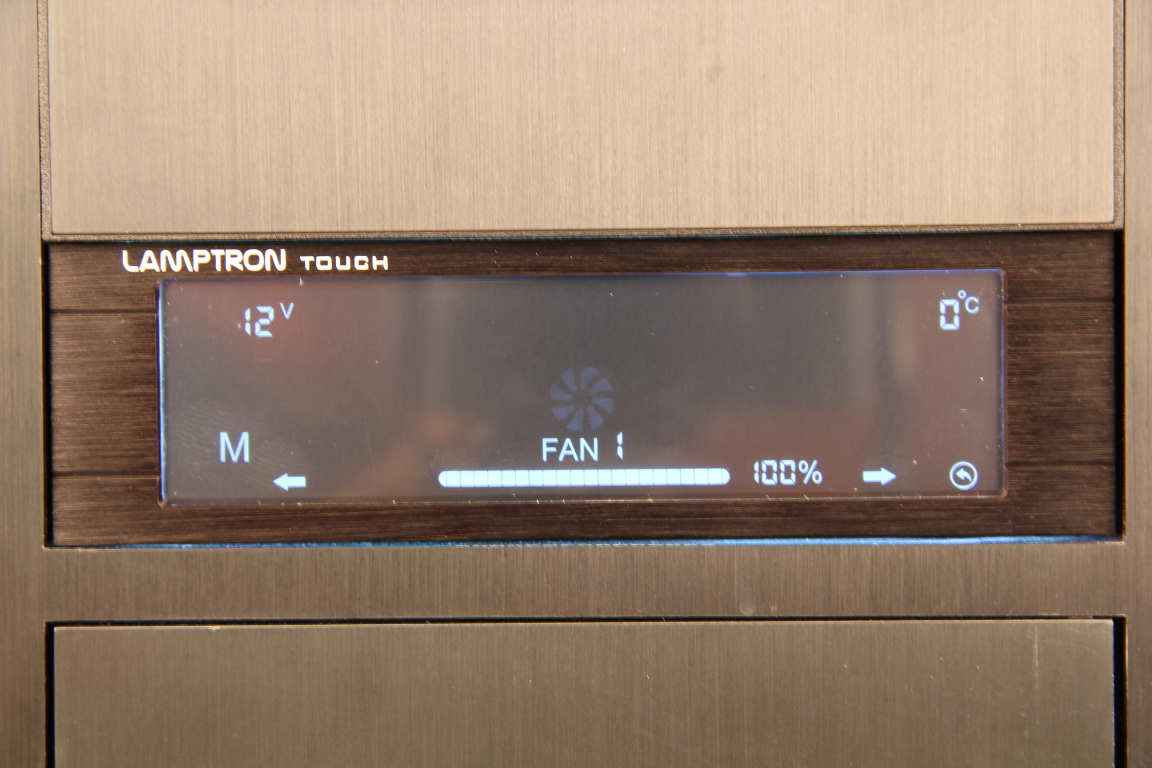
Powering on the Touch the main "home" screen allows selections to any of the six fans. Matching the simplistic look this main screen is concise with the fan selection and a simple power on/off button. The on/off button simply turns the display on or off and leaves the current fan settings in place, interestingly it does not loose "memory" of settings between power cycles.


When a fan is selected there are multiple options for adjustments. The easiest I found was to simply use the long slider bar across the bottom to dictate what percentage of the fan you would like it to run at. Whether it be a single press on the exact location or running a finger across to ramp up or turn down the fan, both are equivalent actions. There is a very small arrow for incremental increases of 1% but this is tedious and very awkward. Each fan can be simply turned to 0% and effectively turned off. Additionally shown in the top left corner is the voltage being supplied to the fan. The top right displays the temperature of the corresponding probe, showing 0º when there is no probe connected. Additionally there is a larger arrow pointing at the back button in the lower right corner, this is to cycle to the next fan.
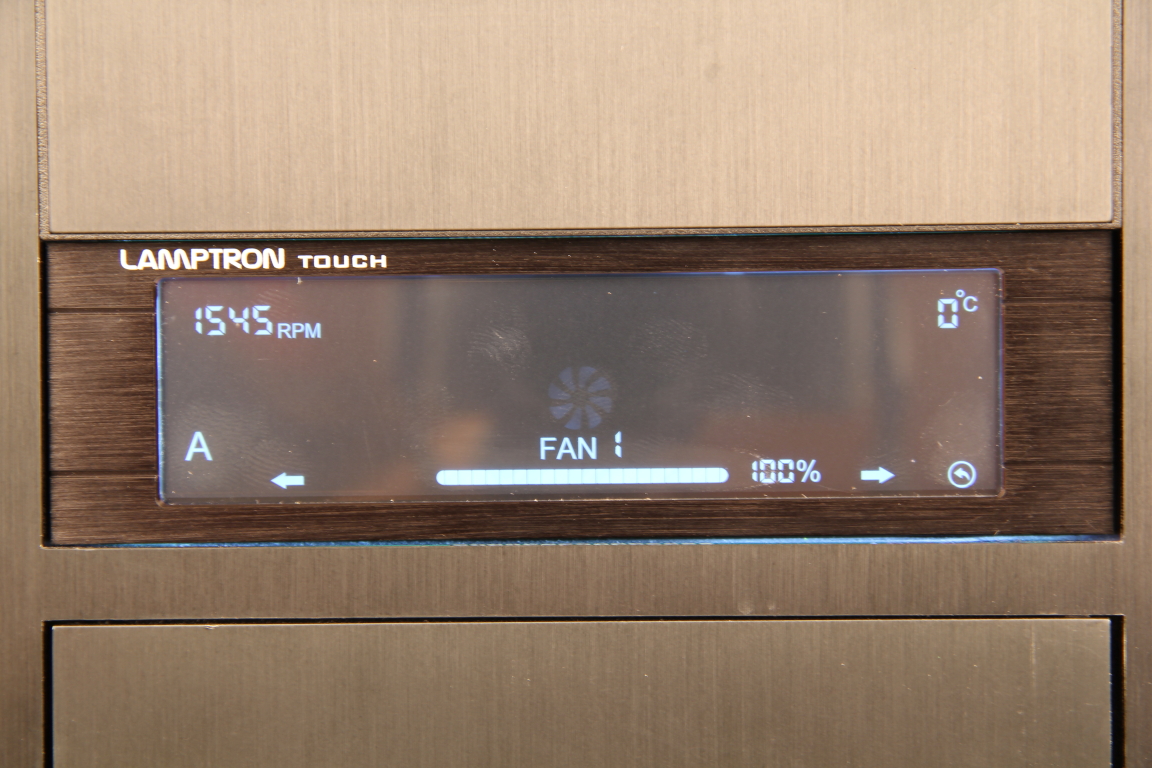
More interactivity with the Touch is available by touching on the voltage icon in the top left corner which can display the current rotation per minute (RPM) of that fan. Also present is a customizable Auto feature which is engaged by pressing the letter in the lower left. Switching to the "A" turns on the automatic control which is user definable and fully explained in the instructions.
Apr 25th, 2024 19:26 EDT
change timezone
Latest GPU Drivers
New Forum Posts
- Best SSD for system drive (80)
- Dell Workstation Owners Club (3055)
- Core PL1 + GPU PL1 + Ring EDP OTHER (9)
- Which new games will you be buying? (315)
- BSOD if I touch the pcache offset voltage in throttlestop (i9-13900hx lenovo pro 7i) (23)
- Alphacool CORE 1 CPU block - bulging with danger of splitting? (16)
- How to check flatness of CPUs and coolers - INK and OPTICAL INTERFERENCE methods (112)
- TPU's Nostalgic Hardware Club (18464)
- Post your Cinebench 2024 score (450)
- Ubuntu 24.04 LTS released (2)
Popular Reviews
- Fractal Design Terra Review
- Thermalright Phantom Spirit 120 EVO Review
- Corsair 2000D Airflow Review
- Minisforum EliteMini UM780 XTX (AMD Ryzen 7 7840HS) Review
- ASUS GeForce RTX 4090 STRIX OC Review
- NVIDIA GeForce RTX 4090 Founders Edition Review - Impressive Performance
- ASUS GeForce RTX 4090 Matrix Platinum Review - The RTX 4090 Ti
- MSI GeForce RTX 4090 Suprim X Review
- MSI GeForce RTX 4090 Gaming X Trio Review
- Gigabyte GeForce RTX 4090 Gaming OC Review
Controversial News Posts
- Sony PlayStation 5 Pro Specifications Confirmed, Console Arrives Before Holidays (117)
- Windows 11 Now Officially Adware as Microsoft Embeds Ads in the Start Menu (106)
- NVIDIA Points Intel Raptor Lake CPU Users to Get Help from Intel Amid System Instability Issues (106)
- AMD "Strix Halo" Zen 5 Mobile Processor Pictured: Chiplet-based, Uses 256-bit LPDDR5X (101)
- US Government Wants Nuclear Plants to Offload AI Data Center Expansion (98)
- AMD's RDNA 4 GPUs Could Stick with 18 Gbps GDDR6 Memory (87)
- Developers of Outpost Infinity Siege Recommend Underclocking i9-13900K and i9-14900K for Stability on Machines with RTX 4090 (85)
- Windows 10 Security Updates to Cost $61 After 2025, $427 by 2028 (84)