Sunday, October 10th 2021

Windows 11 TPM Requirement? Bypass it in 5 Minutes
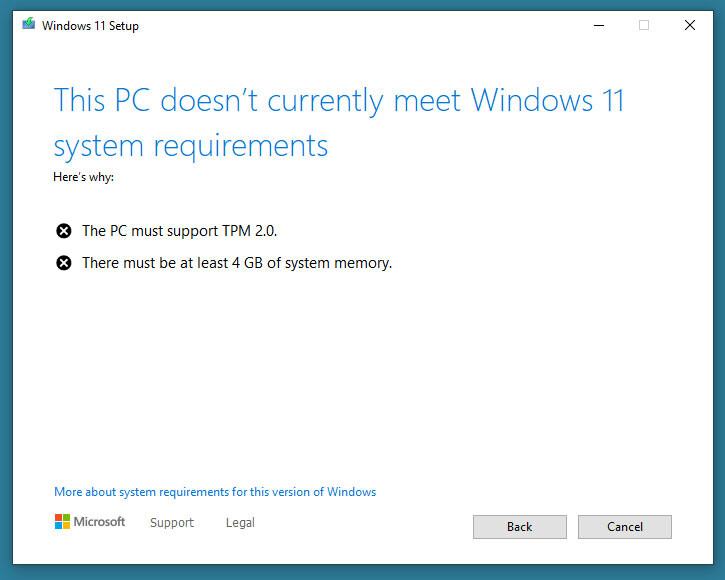
So you have a $2,000 Core i7-6950X HEDT processor, which you thought would last forever, but Windows 11 Setup stands in your way with its steep system requirements that include TPM and Secure Boot. What do you do? With Windows 11, Microsoft introduced new requirements for compatible hardware, and these are purely software-only checks—nothing really requires it. Besides the much-talked about TPM 2.0 spec compatible hardware Trusted Platform Module as a system requirement, there's also new requirements for UEFI Boot, and installation on a GPT partitioned drive (no more MBR boot for Windows 11).
While these requirements do make some sense going forward, this walls off a lot of potential users, i.e. everyone without a TPM 2.0 add-on card, or those with processors older than 7th Gen Intel Core "Kaby Lake," or AMD Ryzen 2000 "Pinnacle Ridge" series. We have discovered a quick and easy way to defeat these checks during Windows 11 Setup, including for that nagging TPM 2.0, and Secure Boot. Here's a step by step guide for fresh installations.
Update Oct 7th: At the end of this article, which is focused on "clean installation", we added a method that lets you perform the upgrade of an existing installation to Windows 11, without any TPM. For this same scenario Microsoft offers a method that downgrades the TPM requirement from 2.0 to 1.2, our method works without any TPM and also relaxes other requirements, like memory size, UEFI and MBR.
Update Oct 10th: Improved the steps for the "upgrade" installation, to mention that updates to the updater should be turned off. Step 1: Create the Registry Modification
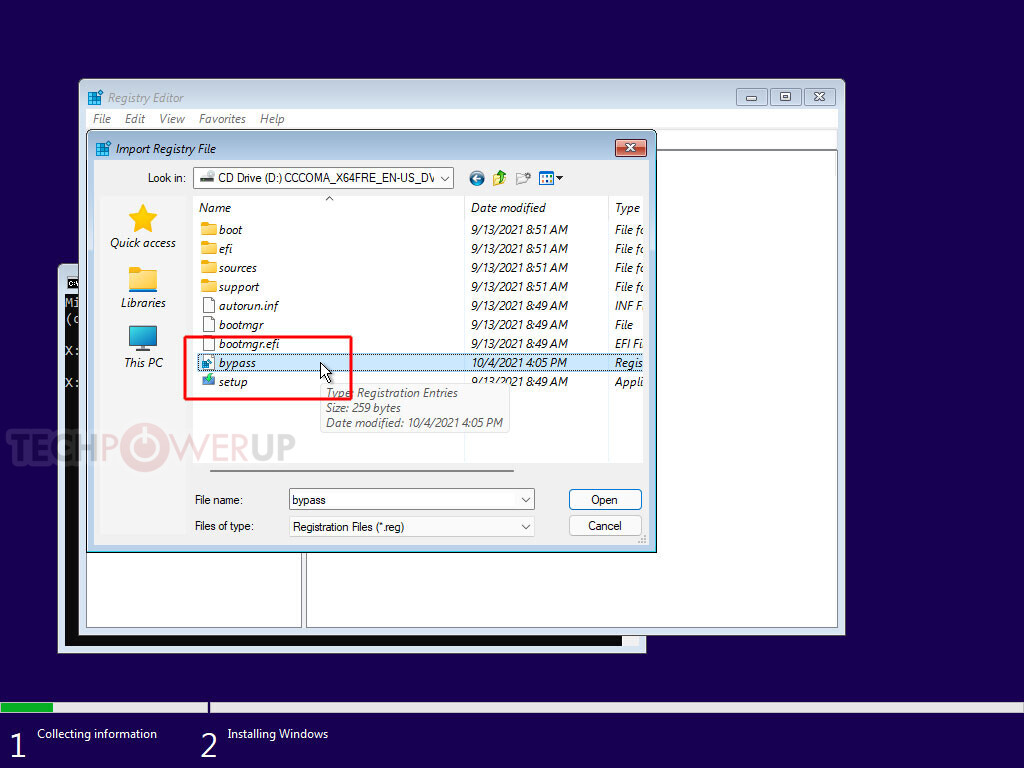
After preparing your installation media (on another PC), open Notepad, paste the text below, save this file as "bypass.reg" on the bootable USB flash drive that's serving as installation media for Windows 11. You can also put just this file alone on a separate USB stick, the Windows installation environment will show it as additional drive. Step 2 Boot from that Installation Media USB Flash Drive
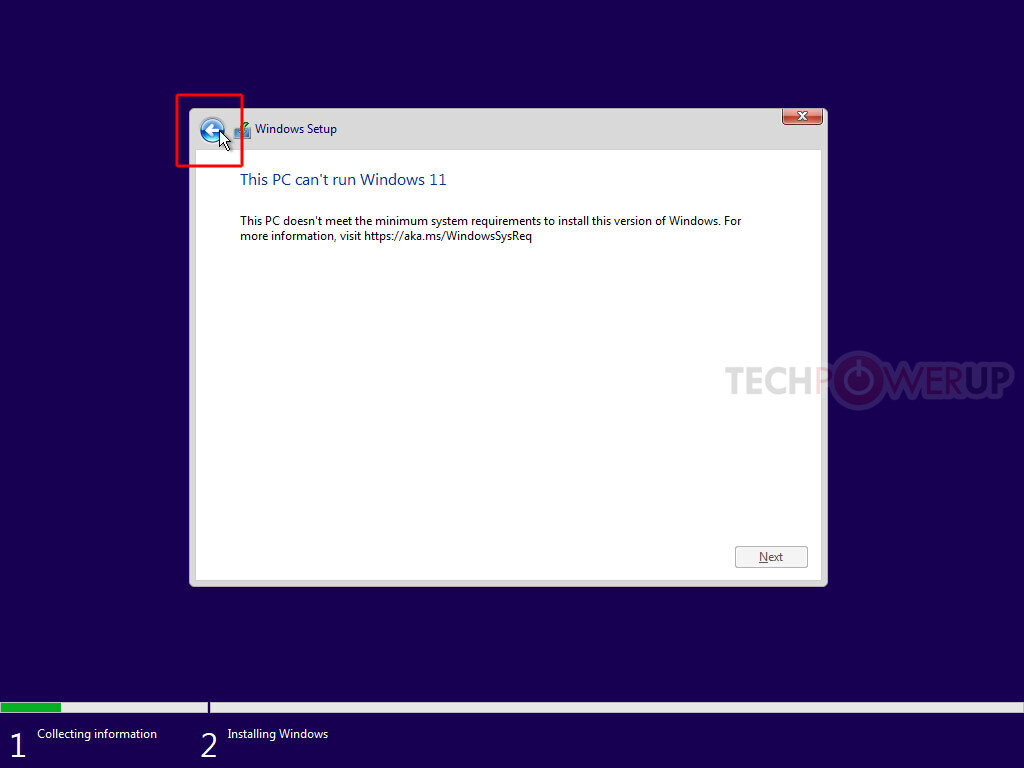
Now, simply boot from that USB flash drive, run Windows 11 Setup, and proceed until you hit the screen that says "This PC can't Run Windows 11." Here, click on the "back" button of the wizard (top left of the window), which takes you back to the previous screen.
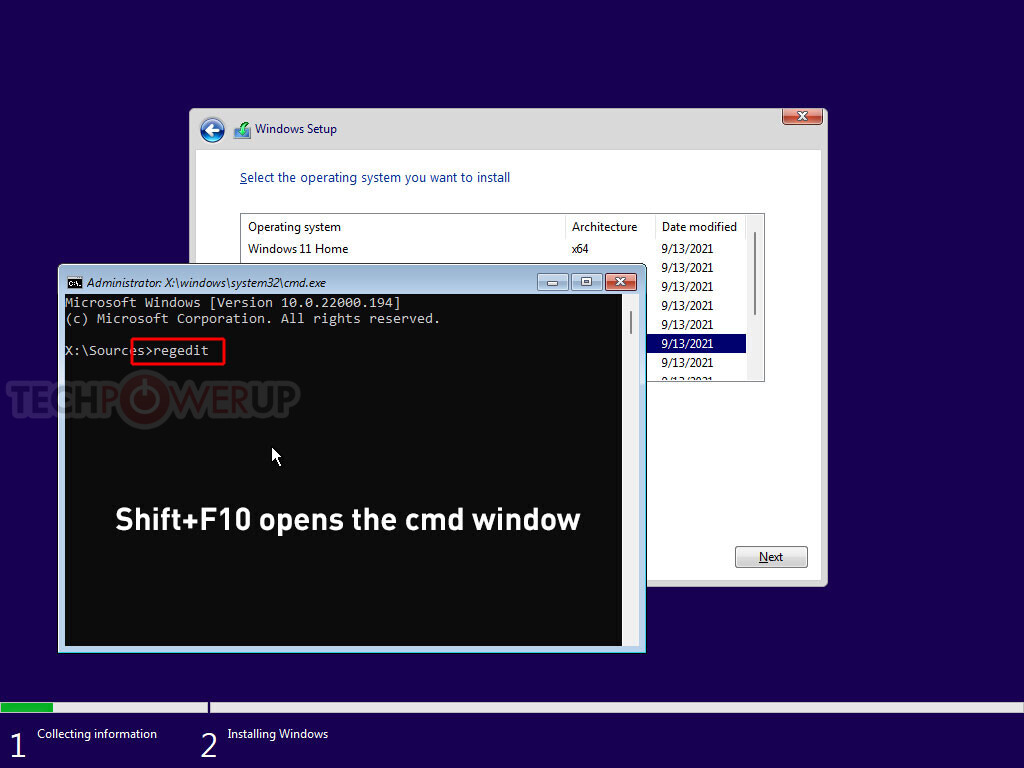
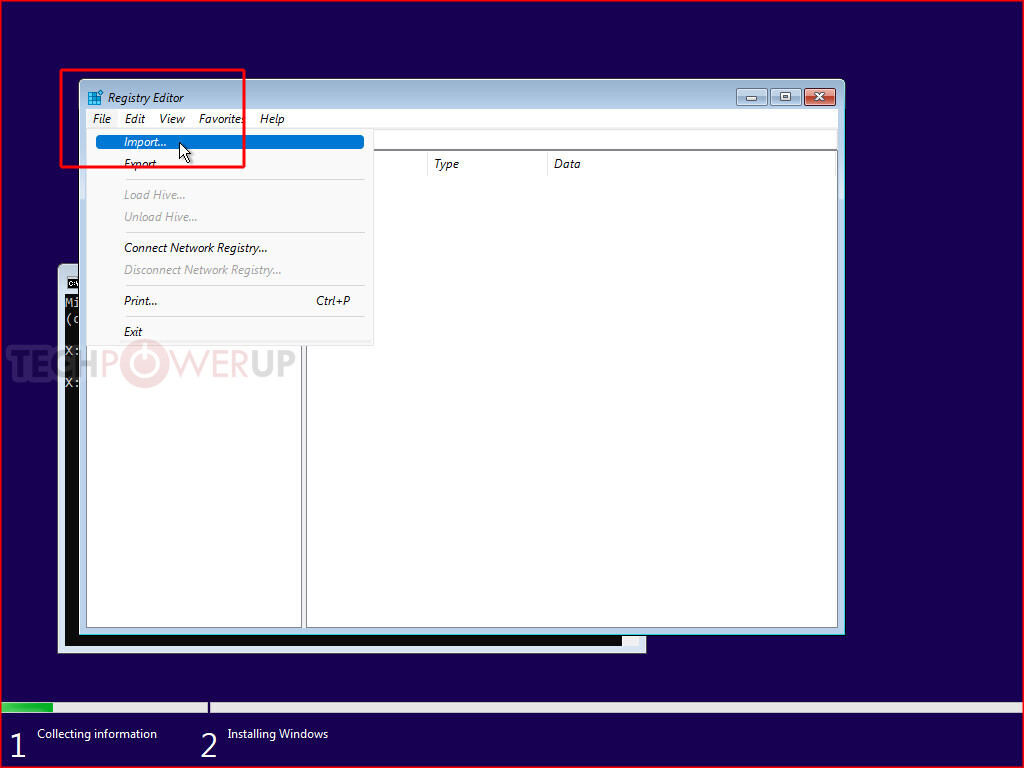
Step 3: Invoke a Command Prompt
Press "Shift+F10" on your keyboard. This opens a Command Prompt window. Type "regedit" and hit Enter. Step 4: Get Registry Editor to Pick Up that Registry File You Made
With Registry Editor open, get it to import the "bypass.reg" file that's been sitting on your USB flash drive.


Step 5: Proceed with the Installation
That's it! Close all windows, and proceed with the installation. What Happened Here
The Windows 11 installation media, much like that of Windows 10 and Windows 8 before it, is essentially a bootable "live CD" of a Windows environment, with a singular purpose of installing Windows, or attempting to Repair your Windows installation. Logically, this environment needs the tools for such repairs, including a Registry Editor and a Command Prompt. It also has its own Windows Registry, which tells it how to go about installing Windows. With this Registry mod, you're making the installer overlook multiple system requirements, meeting, including "TPM Check," which checks for a TPM 2.0 compliant module (or Firmware TPM), whether Secure Boot (and its dependency of a disabled CSM) are met.
If you need additional help, let us know in the comments,
Bypass TPM and other requirements for Update from within Windows
Start the Windows 11 update software, click "Change how setup downloads updates" and select "not right now", or disconnect from the Internet before pressing "Next". The reason is that there's now a new version of the updater that disables the "back" button on the "Unsupported Hardware" screen. Click "Next", after some checking, a screen "This PC doesn't currently meet Windows 11 system requirements" appears. Now open the folder "C:\$WINDOWS.~BT\Sources" and look for the file "appraiserres.dll", delete the file. Make sure to delete the correct file, there's several "appraiser" files in that folder.
 Return to the Windows 11 updater (no need to restart it), click "back", and "next", done.
While these requirements do make some sense going forward, this walls off a lot of potential users, i.e. everyone without a TPM 2.0 add-on card, or those with processors older than 7th Gen Intel Core "Kaby Lake," or AMD Ryzen 2000 "Pinnacle Ridge" series. We have discovered a quick and easy way to defeat these checks during Windows 11 Setup, including for that nagging TPM 2.0, and Secure Boot. Here's a step by step guide for fresh installations.
Update Oct 7th: At the end of this article, which is focused on "clean installation", we added a method that lets you perform the upgrade of an existing installation to Windows 11, without any TPM. For this same scenario Microsoft offers a method that downgrades the TPM requirement from 2.0 to 1.2, our method works without any TPM and also relaxes other requirements, like memory size, UEFI and MBR.
Update Oct 10th: Improved the steps for the "upgrade" installation, to mention that updates to the updater should be turned off.
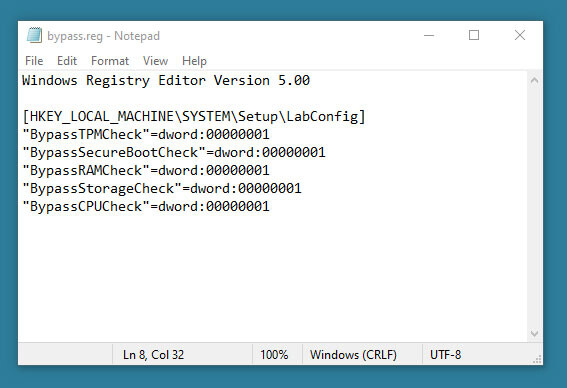
After preparing your installation media (on another PC), open Notepad, paste the text below, save this file as "bypass.reg" on the bootable USB flash drive that's serving as installation media for Windows 11. You can also put just this file alone on a separate USB stick, the Windows installation environment will show it as additional drive.
Windows Registry Editor Version 5.00Copy and paste the text, including the "Window Registry Editor Version 5.00" part, it should look like in the screenshot below. Also, make sure to save as "bypass.reg" and not "bypass.reg.txt", which can happen if you use notepad and have "Show file extensions" turned off in Explorer (the default).
[HKEY_LOCAL_MACHINE\SYSTEM\Setup\LabConfig]
"BypassTPMCheck"=dword:00000001
"BypassSecureBootCheck"=dword:00000001
"BypassRAMCheck"=dword:00000001
"BypassStorageCheck"=dword:00000001
"BypassCPUCheck"=dword:00000001
Now, simply boot from that USB flash drive, run Windows 11 Setup, and proceed until you hit the screen that says "This PC can't Run Windows 11."
Step 3: Invoke a Command Prompt
Press "Shift+F10" on your keyboard. This opens a Command Prompt window. Type "regedit" and hit Enter.
With Registry Editor open, get it to import the "bypass.reg" file that's been sitting on your USB flash drive.

That's it! Close all windows, and proceed with the installation.
The Windows 11 installation media, much like that of Windows 10 and Windows 8 before it, is essentially a bootable "live CD" of a Windows environment, with a singular purpose of installing Windows, or attempting to Repair your Windows installation. Logically, this environment needs the tools for such repairs, including a Registry Editor and a Command Prompt. It also has its own Windows Registry, which tells it how to go about installing Windows. With this Registry mod, you're making the installer overlook multiple system requirements, meeting, including "TPM Check," which checks for a TPM 2.0 compliant module (or Firmware TPM), whether Secure Boot (and its dependency of a disabled CSM) are met.
If you need additional help, let us know in the comments,
Bypass TPM and other requirements for Update from within Windows
Start the Windows 11 update software, click "Change how setup downloads updates" and select "not right now", or disconnect from the Internet before pressing "Next". The reason is that there's now a new version of the updater that disables the "back" button on the "Unsupported Hardware" screen. Click "Next", after some checking, a screen "This PC doesn't currently meet Windows 11 system requirements" appears.

261 Comments on Windows 11 TPM Requirement? Bypass it in 5 Minutes
As this PC has SecureBoot, UEFI, and TPM 2.0, I chose to install the OS using the Windows 11 Media Creation Tool. I still have not seen a nag prompt about my i7-5960X which is unexpected. The Windows 10 chipset drivers is a must to avoid seeing this:
Installing option features actually works unlike on the X58 machine. What worries me is there was only two updates queued.
Really? Is that all others with fully compatible PCs got?
Anyway, poor design decisions are apparent in this OS but it has been stable. All device drivers that worked in Windows 10 work in Windows 11. Even Asus AI Suite 3 works which is a goddamn miracle, but the Intel MEI driver must be installed first.
Got games to install...
Is there a way to edit this into an ISO or installer USB?
The W11 ESD/WIM onto the W10 USB/ISO seems ideal, but finding a free ISO editing program is the fun part.
Edit: here you go
The file can be install.wim or install.esd, certain tools compress the wim to esd
Use a windows 10 installer, with windows 11 files
1.Download a Windows 10 and Windows 11 ISO
2.Download Anyburn (It's old and ugly, but its free)
www.anyburn.com/thank-you-install-anyburn.htm
3.Open your Win 10 ISO file in Anyburn,
Browse to the sources folder, and delete the existing install.wim (or install.esd)
4 .Mount the Windows 11 ISO in windows explorer
5. Go back to Anyburn, click the Add button and browse to the new install.wim file from your Windows 11 ISO and add it to where you deleted the old file
6.Click create, save it as a new name, like Win11noTPM.iso
That's it, done.
Modify an existing bootable Win10 USB:
1. Use any method to create a W10 bootable USB, Rufus or the Microsoft media creation tool are recommended.
2. Browse to sources on the USB drive and delete the Windows 10 install.wim file
3. Copy Install.wim from your Win11 ISO to the same location
Tada, your W10 USB now installs W11 instead
(Windows has long supported the ability to "mount" an ISO and have it appear as a read only DVD drive, so you do not need third party software to open the Win 11 ISO file)
Multi-Boot with wVentoy:
(Theres an option to make this work with secure boot, but you have to wipe the disk to toggle it)
Ventoy can be installed to a USB, that makes a hidden bootable partition at the end of the drive.
To windows, this looks like a regular simple single partition, but disk manager shows the second hidden boot partition at the end (~500MB)
When booted from, Ventoy loads up a very simple screen that lets you choose an ISO file from the drive - Any ISO. 11, 10, 7, Linux, anything.
This is great for a recovery drive, as you can keep 7/8.1/10/11 and live boot linux all in here, and clean install an OS to any system - and it's super easy to update or replace the ISO's.
The only limit here is how big the drive you chose is, and you can add/remove/edit the ISO files without touching ventoy again
I even tried modifying the iso and delete appraiserres.dll altogether. Same outcome
Suggestions?
Same happened to me
Disconnect from the internet solved the dead back button issue.
Makes you wonder what was the point of it to begin with.
well until it's maybe at final beta at least :)
Folks, general rule of thumb and common sense: You should not be connected to the internet unless you are using it. If you're not using it, disconnect. It's safer and prevents a lot of nonsense.
I want just to upgrade to Win11, not a clean install.
Thank you.
If you don't understand after that explanation, you likely never will, it's all good, continue to enjoy Windows 10. Not everyone sees things the same way..
Exactly which part of 11 reminds you of win-7 lol
Can't be the start button menus
Can't be the context menus
Can't be explorer tools header
Can't be settings pages
I believe 10 has fewer changes from the default install than 11 because
At least the start button menu didn't need any alterations
Context menu wasn't totally borked
Explorer tools header/ ribbon at least didn't hide options and all were on tabs.
Settings pages are mostly the same except 10's has more.
Bottom line 10 or 11 doesn't really matter I didn't use 10 very much for anything else that oc benchmarks but saying 11 is like 7 is a stretch lol
Classic shell now open shell works on 10 also lol
And frankly I said on page 2 or 3 that I had to disconnect from the internet or the back button was dead don't believed @W1zzard believed me though lol