How do I properly lap a heatsink/ waterblock? |
|
|
Author: W1zzard
Date: 2004-05-24 07:05:46
|
|
Why lap?
If you look at this heatsink:
[PIC of heatsink + ruler with light shining through]
You can see that its surface is not completely even and looks rough.
An extreme magnification of the mating surfaces (heatsink base and CPU die or heatspreader) looks like this:

Without any thermal paste these gaps are filled by air which is an extremely poor thermal conductor (0.021 W/mK). Heat transfer will only take place between the various high points that contact each other. To improve this we use thermal interface materials (TIMs) like Arctic Silver. These compounds will not dry out or harden at temperatures well above the maximum operating temperature of your CPU and fill the the microscopic small gaps with a paste that contains thermally conductive metal oxides. The thermal conductivity of such a paste is roughly 10-100 times better than air (0.4 - 8.0 W/mK). But this is still a factor 50-100 difference to copper's thermal conductivity of 385 W/mK.
What lapping does is reduce the thickness of the TIM layer between your heatsink and your CPU.

There are several criteria that determine how good your heat transfer between two surfaces is:
- Flatness
- Smoothness
- Hardness
- Stiffness
- Interface pressure
How much can I gain by lapping my heatsink?
CPU temperatures that are 0°C to 5°C lower. You decide if that is worth your time and effort.How can I test if my heatsink is flat?
- Get a glass plate, those are usually VERY flat.
- Put a drop of water on the heatsink base
- Put the glass plate on the base

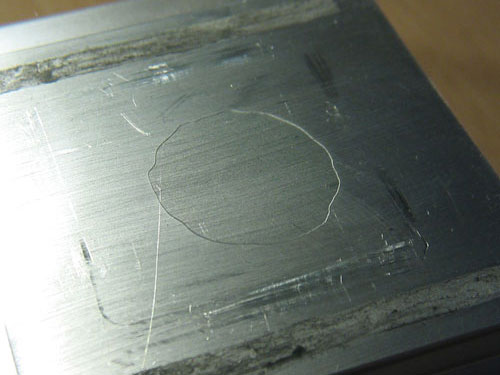
Here are pictures of a rather bad heatsink base:

These pictures are taken from a very flat hand-lapped waterblock base:

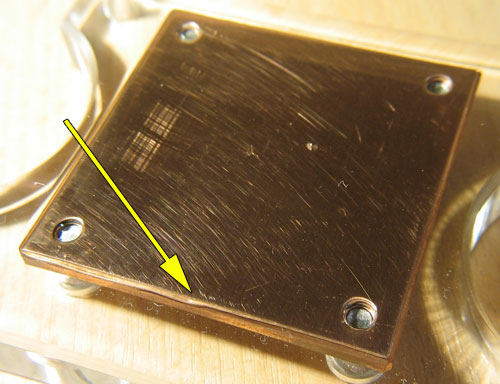
The second image really has water between glass and copper, but it is spread all over the heatsink base. Look near the arrow to see a small water droplet. The suction pressure is so big that when you raise the glass plate, the heatsink sticks to the glass and lifts off.
Do I want a mirror finish?
If you start lapping your surface beyond the 600 grit range your gaps in the heatsink will be very small. Thus you MUST apply a very very small amount of thermal paste for proper thermal transfer. In most cases where you have a mirror finish your final result will be like this: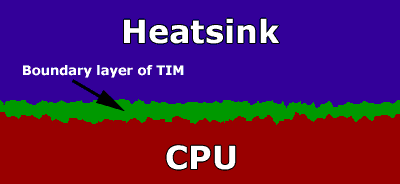
There's no contact between the two metals because of excess thermal paste. The heat transfer of this is worse than with a surface that is only 600 grit because of the boundary layer of TIM between heatsink and CPU.
Lapping instructions
Buy some wet and dry sandpaper. Good grit ranges are 120, 200, 400, 600 and maybe 800. One sheet of each is enough.Get a FLAT piece to work on. Recommended here is a slab of glass or marble.
To test whether a heat sink needs to be planed, you'll need a thin knife blade or similar device, such as a wallpaper knife.
Put the coarsest (120 grit) sandpaper on your working surface and make sure it's clean.
Start gently moving the heatsink either in an up direction and then pick it up and move it back down or in a down direction, whatever suits you best. Just dont change the direction. Do not rotate the heatsink while using the same piece of sandpaper.
Do not push too hard on it or you will round the edges. The combined weight of your hand and the heatsink is enough pressure.
Every minute clean the sandpaper and heatsink of excess metal and grit.
You switch to the next finer grit when your heatsink base has lines only in the sanding direction.
[PIC]
Between sandpaper changes rotate your workpiece by 90 degrees. This helps you see when all lines from the previous grit are gone.
Do this till you are at your final grit. Your result should look like the following picture: [PIC]
If you want a finer polish you can wet sand with a lubricant on your paper in a circular motion. This is usually not required.
Cleaning after lapping
Do not use nail polish remover that contains oil or other additives. Pure acetone is good because it evaporates without leaving anything behind. Same goes for cleaning alcohol.[/by]From Cathar:
Some further tips and tricks from someone who has lapped hundreds of blocks.I personally recommend the use of "Low Smell" kerosene as a cutting agent/lubricant. I prefer it over water or liquid detergent that some people recommend, purely because it doesn't affect the sandpaper and cause it to "curl up" as it dries.
On your flat surface (I use a marble cutting board) slosh some kerosene over the surface and place the sandpaper on top and push down. The "suction" of the liquid will hold the sandpaper flat on the surface.
The kerosene also makes work MUCH easier and faster. The heatsink/block will glide better over the paper and is far less prone to "sticking" or "catching" on the paper causing the paper to tear.
I also personally recommend cloth-backed sand-paper if you can find it. It is sturdier and holds its "grit" (the coarse particles) much better than the paper backed sand-papers. It costs more, but will typically last up to 3 times longer.
I also recommend turning the block/heatsink by 180 degrees every so often when sanding up and down. Despite one's best efforts the pressure applied by the hand is rarely even.
When looking to see if all the "lines" are going in one direction, hold the block up at a shallow angle to a bright light (like you're looking across the base). Look very carefully for patches of "discoloration". Such discoloration is an indication that the base is not flat, despite all of the prior grit's marks being removed from even a careful examination.
I highly recommend that on the final grit you will use (either 600 or 800) that once all the earlier grit's marks have been removed that the block is turned 90 degrees and keep sanding up and down until all of the 600/800 grits opposing marks are also removed. This step is important as a very slight concave bowing of the base can occur if just sanding up and down in one direction only on the same grit.
Follow up with a quick circular lap at your finest grit. Perform about 15 laps, turn 90 degrees, do another 15, and so on until you've turned it 3 times. I find it is very important to use kerosene on this last circular stage, even if you haven't used at all up until this point in time.
Apr 19th, 2024 20:38 EDT
change timezone
Latest GPU Drivers
New Forum Posts
- GTX 1060 6GB ASUS GPU Shuts Down after 5min of Gaming (3)
- Official Board Game Discussion (0)
- AMD RX 7000 series GPU Owners' Club (1068)
- I just succesfully baked DDR4 (69)
- I9 13890HX undervolting Suggestions (4)
- Undervolting Dell XPS 14 9440 is it possible? (7)
- Share your AIDA 64 cache and memory benchmark here (2884)
- Roccat Kone AIMO has developed a double left click, when I click it once. Any fix out there? (34)
- The TPU UK Clubhouse (24738)
- XFX RX580 stock Bios (7)
Popular Reviews
- Horizon Forbidden West Performance Benchmark Review - 30 GPUs Tested
- Fractal Design Terra Review
- Corsair 2000D Airflow Review
- Thermalright Phantom Spirit 120 EVO Review
- Minisforum EliteMini UM780 XTX (AMD Ryzen 7 7840HS) Review
- Creative Pebble X Plus Review
- FiiO KB3 HiFi Mechanical Keyboard Review - Integrated DAC/Amp!
- ASUS GeForce RTX 4090 STRIX OC Review
- NVIDIA GeForce RTX 4090 Founders Edition Review - Impressive Performance
- ASUS GeForce RTX 4090 Matrix Platinum Review - The RTX 4090 Ti
Controversial News Posts
- Sony PlayStation 5 Pro Specifications Confirmed, Console Arrives Before Holidays (111)
- NVIDIA Points Intel Raptor Lake CPU Users to Get Help from Intel Amid System Instability Issues (102)
- US Government Wants Nuclear Plants to Offload AI Data Center Expansion (98)
- AMD "Strix Halo" Zen 5 Mobile Processor Pictured: Chiplet-based, Uses 256-bit LPDDR5X (84)
- Windows 10 Security Updates to Cost $61 After 2025, $427 by 2028 (82)
- Developers of Outpost Infinity Siege Recommend Underclocking i9-13900K and i9-14900K for Stability on Machines with RTX 4090 (82)
- TechPowerUp Hiring: Reviewers Wanted for Motherboards, Laptops, Gaming Handhelds and Prebuilt Desktops (72)
- Intel Realizes the Only Way to Save x86 is to Democratize it, Reopens x86 IP Licensing (70)