Mithiral67
New Member
- Joined
- Jan 25, 2019
- Messages
- 6 (0.00/day)
To view this case mod, go here.
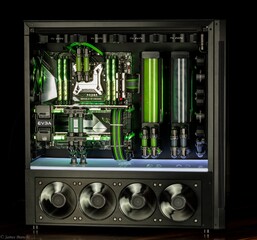
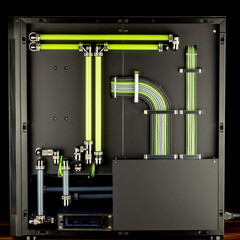
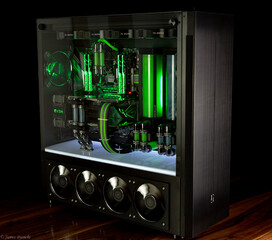
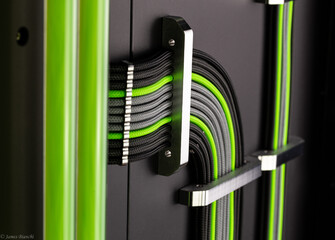
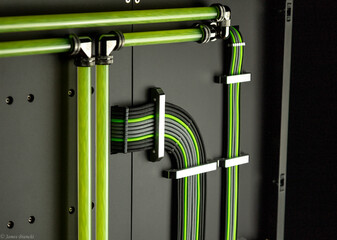
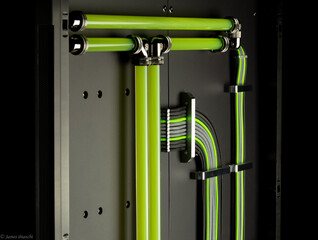
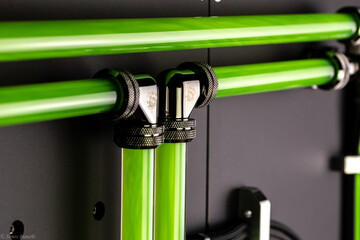
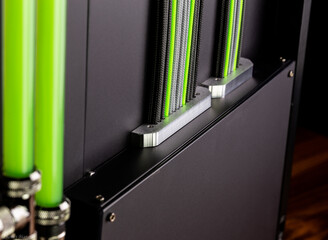
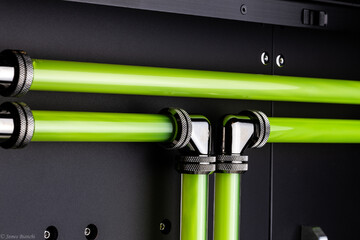
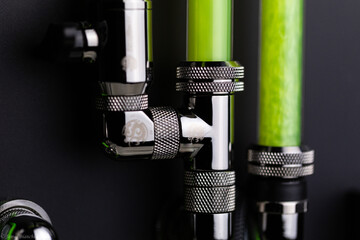

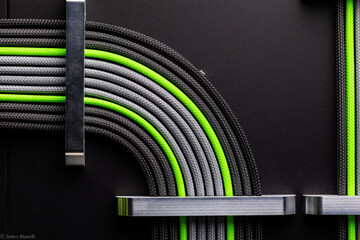
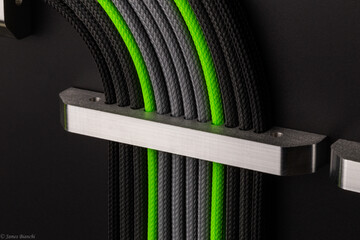


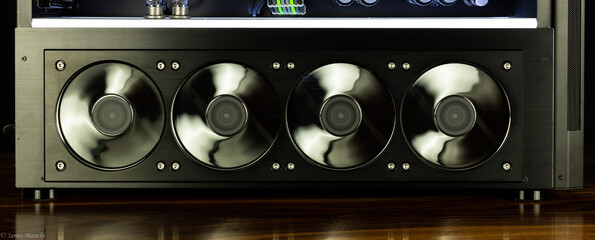
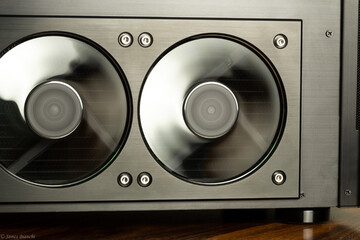

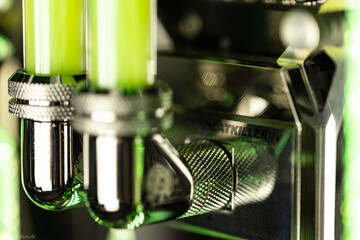

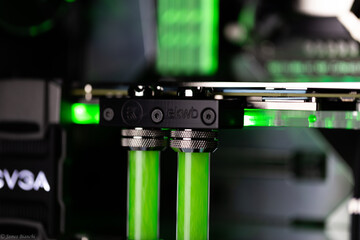
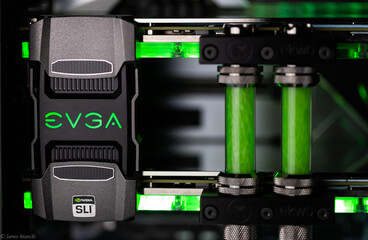
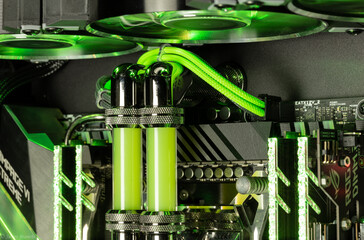


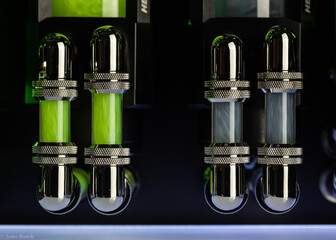
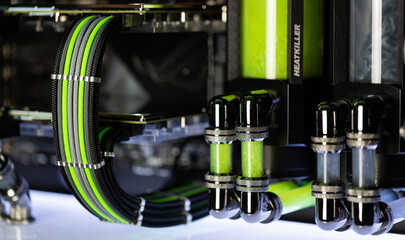


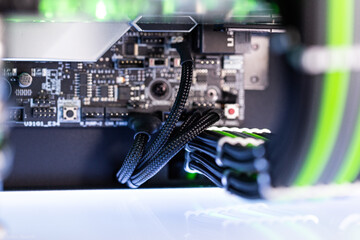
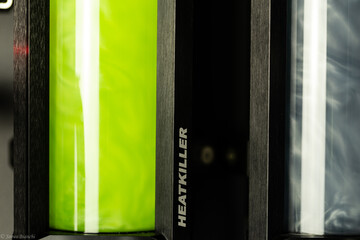


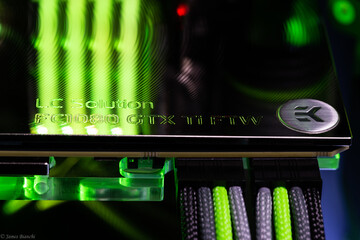

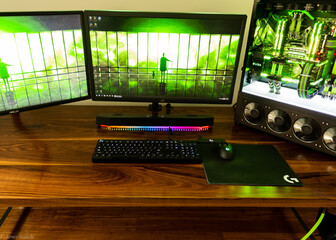
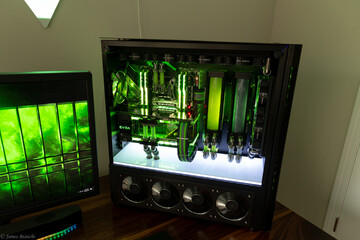
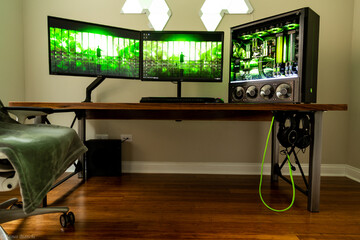
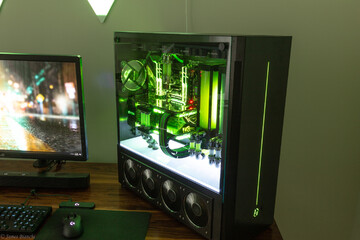
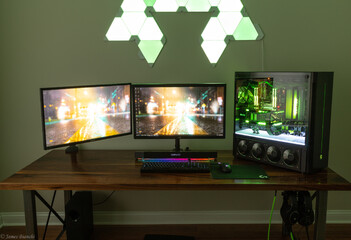

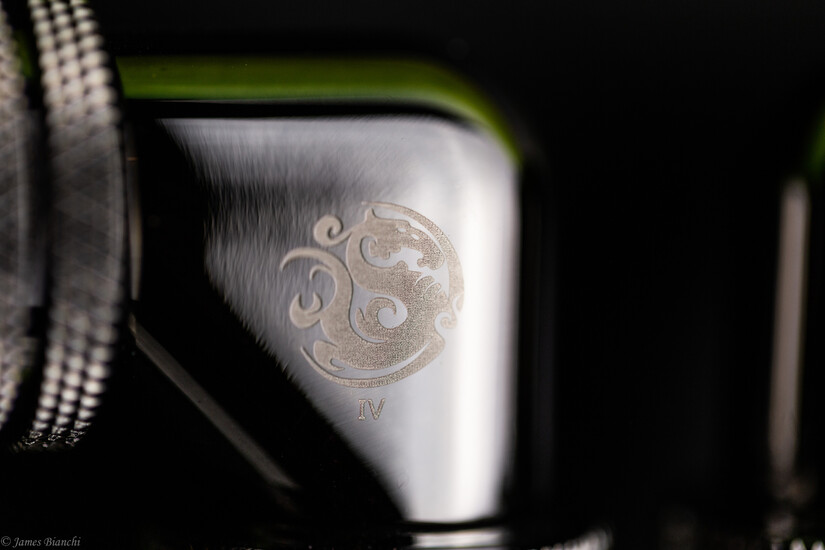
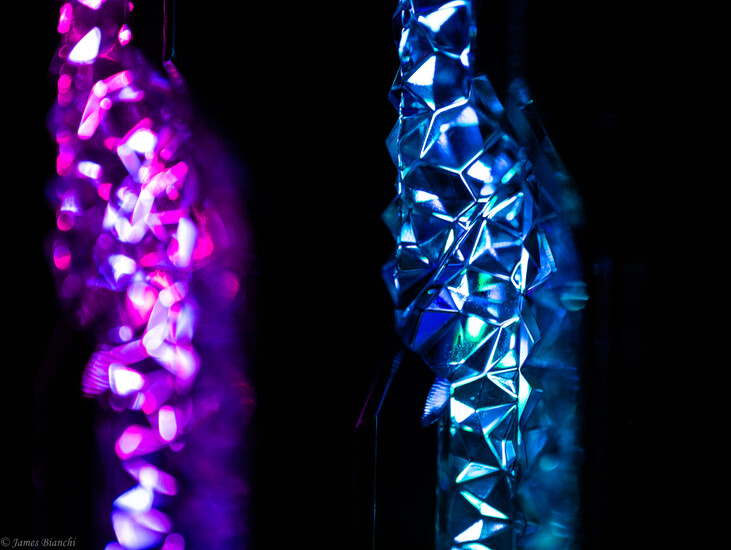
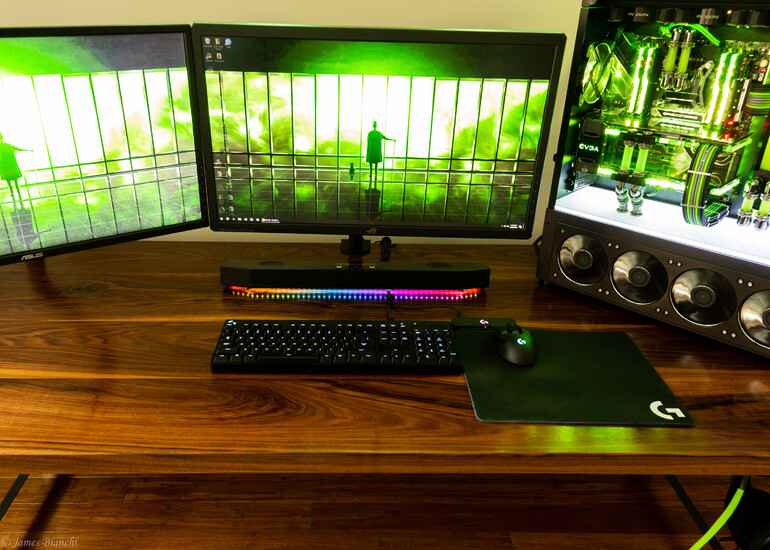
It's finally Done!!! My first custom PC is behind me") After 10 months of thinking, building, thinking and rebuilding!! Here is a quick overview of the build, look below for much more details. This build was a lot of new things for me. This is my first time with custom watercooling, making my own psu cables, customizing a case, working with acrylic and attempting record the process with video. Hence the greenhorn name. I have always focus on “bang for your buck” builds and aesthetics was always limited to my case choice. The only way to justify the costs of a custom waterloop of this nature was to view it as an art piece for my office. As such, for this build my goal was a 2160p, 100+fps gaming/photo editing rig that was beautiful before you even turn it on and then let the lighting take it to the next level. I tried to get everything perfect from the parts, to parts I made, to taking photos (photography is a hobby of mine). Forgive some inconsistencies between shoots as it took 3 shoots before I happy enough. My inspirations were caselab cases and the murderbox case and 100 amazing cases I saw on youtube and facebook. I hope you enjoy.Video of final product Video of final product. https://youtu.be/UY9WMm8exaQPics are attached but here is a link to the high rez photos.Oh, and the case was so big, I had to build a bigger desk to make it look right, lols.https://imageshack.com/a/dEOo/1The long story.Parts Highlights (I get the most questions on)Case: Lian Li V3000 heavily worked over by a Dremel and drill.PSU Cables – Made by me MDPC-X sleevingCable combs, both the back panel and front cables - https://www.clockwerkindustries.com/Front Radiator cover - https://mnpctech.com/7920x at 5.0 for benchmarks but 4.9 for daily use.CB15 - 3374 and 224 https://valid.x86.fr/8671mdEVGA FTW3 1080TI SLI ; As of this post number one for Extreme Time Spy 9677https://www.3dmark.com/search#/?mode=advanced&url=/proxycon/ajax/search2/cpugpu/spy/X/2266/1127/11115?minScore=0&cpuName=Intel%20Core%20i9-7920X%20Processor&gpuName=NVIDIA%20GeForce%20GTX%201080%20Ti&gpuCount=2Asus PG27UQ; 4k, 144hz, HDR, IPS MonitorBitspower Fittings and In Win fans for a chrome and shiny look.Alphacool 16mm Glass TubesWeight; 87lbsAbout Me and My ModificationI have been building PCs for about 20 years now. My builds have always been “best bang for your buck” builds with zero thought for looks other than trying to get a cool looking case. Last year, I was up for a new machine and decided to go big and treat myself and went with a 1080ti but only jumped into AIO cooling. See here (https://pcpartpicker.com/b/3NxG3C)But that build open my eye to all the amazing custom loops and computers out there and it motivated me to want to build something unique and special to me.I want to build a beautiful monster gaming PC and I want to document my process to share with others to give back for all the great builds others have made. As such, I created this youtube channel to document a noob building a custom PC. I have enjoyed photography for a few years and this is my first adventure into recording and making videos. https://www.youtube.com/channel/UCjM4Cqk4BEauNsv9dLDk5ugYou will notice that the earlier videos mentioned the Singularity Spectre case. I had started this build process in February when I ordered the Spectre case. I then proceeded to buy all the parts in Feb and March with the promised delivery time of April. That didnt occur and the case didn;t arrive until late September. I had planned for a latest and greatest overkill build, but this is still a great machine even with the latest gen cpu and gpus out being better.While I was waiting for the Spectre, it did give me time to think about what I really wanted in a case. After even more time looking at other builds, I realized I wanted to do more customization of the case vs the single acrylic dragon I had designed for the Spectre build.This research left me wanting to build a caselabs looking case. I loved the idea of a case with an open and balanced main chamber with the PSU hidden away.The BuildFor cases, the Lian Li V3000 was perfect. Its checks so many boxes.- Beautiful brushed aluminum on every panel - Subtle but well implemented front lighting - Sturdy, I cut a lot out and its still holding strong.- To make for a clean front, I needed space in the back to run the watercooling and wires so I wouldnt have tubes and wires cutting back and forth. The back of the case is great and allows for enough space for me to run a nice loop back there and it still allows me to have the back panel on.- The bottom allows me to hide away the PSU and allows me to include radiator that shows off the beautiful InWin Polaris fans forward. - Lastly, I installed a light floor I made from two white acrylic sheets and a clear sheet with RGB lights running along the back.- To cover up the motherboard panel on both sides, the front panel for the 240 rad, and the back compartments, I used matte black acrylic.- Making these parts gave me great appreciation for both making parts that look good and fit, but also that can actually be taken in and out of the case. Its surprising how important the order I put things into the case is for it all to work.- Lastly, I have a MNPCTech.com 480 Fan cover on the bottom, looks amazing, really well made, did a great job of allowing me to show off all of the fans vs the stock bottom piece that blocks a lot of them. https://mnpctech.com/For CPU, MB, GPU, RAM and HD.- My last build was the 7700k and a week later the 8700k came out. I thought, not again intel and went with the 7820x. Little did I know they would release the 9900k, so I upgraded to a 7920x. I seriously have to stop playing intels game. Oh well, with direct die, liquid metal, and water cooling, I am hoping to push 4.9. Its happy as can be at 4.8 but need to swap back to water before pushing it. - I went with the rampage vi because I wanted an eatx for the Spectre case to fill up the case as it looked empty with an atx. Being I didn’t use the Spectre, its actually making this case crowded. If I could have done over again, would have stuck with another asus board. Either way, its amazing in looks and OC abilities are awesome. Seeing an error message read out when I have problems is beyond helpful. The safe boot and memory okay buttons had to be pushed at least 100 times in the last few months when OC. Very happy with the board. - The EVGA 1080ti FTW3 1080tis are actually from my last build, they work great and OC to 2050hz on water. Not much else left in them. - For memory, I originally had Gskill 3000 rgb ram pushed to 3200. When they announced the Royal kits I was rather curious for their looks as well as wanting to go fast ram. Doing research, I found that faster than 3200 ram doesnt help gaming average fps and only a small bump in synthetics. However, I did notice that for some games, faster ram did improve the bottom 1% of fps. As such, I pulled the trigger on a 4266 kit and did some comparison testing. I could only get 4000 stable for now, I guess x299 isnt a fan of much faster. I did a rough comparison for gta 5 and noticed what the reviewers did, the average fps was exactly the same between 3200 and 4000 (109.04 vs 108.52), however, I noticed a considerable increase in the 99th percentile fps (47.33 bs 66.02). Per Gamers nexus, a difference of 8ms frame time between frames is where drops become noticeable. On the 3200 ram the difference in frame times from the 50th percentile and the 99th was 12.2ms whereas the 4000 ram was only 6.5ms. So, yes, the ram was a lot more to upgrade, but butter smooth gaming is the goal of this pc and I could justify the upgrade costs because of these results. - Hard Drives are Samsung 970 500g, 970 1tb, and 960 500g.Watercooling - I went with glass tubing as I wanted a challenge. I was warned against it for my first watercooling loop, but I love how great it looks and how clear it looks with water. Alphacool was decent to work with and I made a couple videos on it.- Fittings are bitspower, black chrome. They look great, and have been holding strong, so no complaints.- GPU blocks and back plates are EKWB as they were the only ones available on the FTW3s at the time. Love the shiny backplate to go with the build theme. CPU block is heatkiller pro IV. Looks great and known for solid performance.- Reservoirs are heatkiller, love that they are glass and brushed metal to match my glass tubing and my brushed metal case.- Radiators are Hardware Labs GTS. Reviews said they perform amazing with low air flow, and being I didn't have high pressure fans, they made a lot of sense. Their one flaw is that they are very restrictive compared to other rads. But 2 aquacomputer D5s do a great job to overcome that.- InWin Fans: look amazing, have the brushed metal look and awesome shiny rim. All fitting the build.Wiring - MDPC-x sleeving and 16awp cables.- Cable combs, both the back panel and front cables - https://www.clockwerkindustries.com/
After 10 months of thinking, building, thinking and rebuilding!! Here is a quick overview of the build, look below for much more details. This build was a lot of new things for me. This is my first time with custom watercooling, making my own psu cables, customizing a case, working with acrylic and attempting record the process with video. Hence the greenhorn name. I have always focus on “bang for your buck” builds and aesthetics was always limited to my case choice. The only way to justify the costs of a custom waterloop of this nature was to view it as an art piece for my office. As such, for this build my goal was a 2160p, 100+fps gaming/photo editing rig that was beautiful before you even turn it on and then let the lighting take it to the next level. I tried to get everything perfect from the parts, to parts I made, to taking photos (photography is a hobby of mine). Forgive some inconsistencies between shoots as it took 3 shoots before I happy enough. My inspirations were caselab cases and the murderbox case and 100 amazing cases I saw on youtube and facebook. I hope you enjoy.Video of final product Video of final product. https://youtu.be/UY9WMm8exaQPics are attached but here is a link to the high rez photos.Oh, and the case was so big, I had to build a bigger desk to make it look right, lols.https://imageshack.com/a/dEOo/1The long story.Parts Highlights (I get the most questions on)Case: Lian Li V3000 heavily worked over by a Dremel and drill.PSU Cables – Made by me MDPC-X sleevingCable combs, both the back panel and front cables - https://www.clockwerkindustries.com/Front Radiator cover - https://mnpctech.com/7920x at 5.0 for benchmarks but 4.9 for daily use.CB15 - 3374 and 224 https://valid.x86.fr/8671mdEVGA FTW3 1080TI SLI ; As of this post number one for Extreme Time Spy 9677https://www.3dmark.com/search#/?mode=advanced&url=/proxycon/ajax/search2/cpugpu/spy/X/2266/1127/11115?minScore=0&cpuName=Intel%20Core%20i9-7920X%20Processor&gpuName=NVIDIA%20GeForce%20GTX%201080%20Ti&gpuCount=2Asus PG27UQ; 4k, 144hz, HDR, IPS MonitorBitspower Fittings and In Win fans for a chrome and shiny look.Alphacool 16mm Glass TubesWeight; 87lbsAbout Me and My ModificationI have been building PCs for about 20 years now. My builds have always been “best bang for your buck” builds with zero thought for looks other than trying to get a cool looking case. Last year, I was up for a new machine and decided to go big and treat myself and went with a 1080ti but only jumped into AIO cooling. See here (https://pcpartpicker.com/b/3NxG3C)But that build open my eye to all the amazing custom loops and computers out there and it motivated me to want to build something unique and special to me.I want to build a beautiful monster gaming PC and I want to document my process to share with others to give back for all the great builds others have made. As such, I created this youtube channel to document a noob building a custom PC. I have enjoyed photography for a few years and this is my first adventure into recording and making videos. https://www.youtube.com/channel/UCjM4Cqk4BEauNsv9dLDk5ugYou will notice that the earlier videos mentioned the Singularity Spectre case. I had started this build process in February when I ordered the Spectre case. I then proceeded to buy all the parts in Feb and March with the promised delivery time of April. That didnt occur and the case didn;t arrive until late September. I had planned for a latest and greatest overkill build, but this is still a great machine even with the latest gen cpu and gpus out being better.While I was waiting for the Spectre, it did give me time to think about what I really wanted in a case. After even more time looking at other builds, I realized I wanted to do more customization of the case vs the single acrylic dragon I had designed for the Spectre build.This research left me wanting to build a caselabs looking case. I loved the idea of a case with an open and balanced main chamber with the PSU hidden away.The BuildFor cases, the Lian Li V3000 was perfect. Its checks so many boxes.- Beautiful brushed aluminum on every panel - Subtle but well implemented front lighting - Sturdy, I cut a lot out and its still holding strong.- To make for a clean front, I needed space in the back to run the watercooling and wires so I wouldnt have tubes and wires cutting back and forth. The back of the case is great and allows for enough space for me to run a nice loop back there and it still allows me to have the back panel on.- The bottom allows me to hide away the PSU and allows me to include radiator that shows off the beautiful InWin Polaris fans forward. - Lastly, I installed a light floor I made from two white acrylic sheets and a clear sheet with RGB lights running along the back.- To cover up the motherboard panel on both sides, the front panel for the 240 rad, and the back compartments, I used matte black acrylic.- Making these parts gave me great appreciation for both making parts that look good and fit, but also that can actually be taken in and out of the case. Its surprising how important the order I put things into the case is for it all to work.- Lastly, I have a MNPCTech.com 480 Fan cover on the bottom, looks amazing, really well made, did a great job of allowing me to show off all of the fans vs the stock bottom piece that blocks a lot of them. https://mnpctech.com/For CPU, MB, GPU, RAM and HD.- My last build was the 7700k and a week later the 8700k came out. I thought, not again intel and went with the 7820x. Little did I know they would release the 9900k, so I upgraded to a 7920x. I seriously have to stop playing intels game. Oh well, with direct die, liquid metal, and water cooling, I am hoping to push 4.9. Its happy as can be at 4.8 but need to swap back to water before pushing it. - I went with the rampage vi because I wanted an eatx for the Spectre case to fill up the case as it looked empty with an atx. Being I didn’t use the Spectre, its actually making this case crowded. If I could have done over again, would have stuck with another asus board. Either way, its amazing in looks and OC abilities are awesome. Seeing an error message read out when I have problems is beyond helpful. The safe boot and memory okay buttons had to be pushed at least 100 times in the last few months when OC. Very happy with the board. - The EVGA 1080ti FTW3 1080tis are actually from my last build, they work great and OC to 2050hz on water. Not much else left in them. - For memory, I originally had Gskill 3000 rgb ram pushed to 3200. When they announced the Royal kits I was rather curious for their looks as well as wanting to go fast ram. Doing research, I found that faster than 3200 ram doesnt help gaming average fps and only a small bump in synthetics. However, I did notice that for some games, faster ram did improve the bottom 1% of fps. As such, I pulled the trigger on a 4266 kit and did some comparison testing. I could only get 4000 stable for now, I guess x299 isnt a fan of much faster. I did a rough comparison for gta 5 and noticed what the reviewers did, the average fps was exactly the same between 3200 and 4000 (109.04 vs 108.52), however, I noticed a considerable increase in the 99th percentile fps (47.33 bs 66.02). Per Gamers nexus, a difference of 8ms frame time between frames is where drops become noticeable. On the 3200 ram the difference in frame times from the 50th percentile and the 99th was 12.2ms whereas the 4000 ram was only 6.5ms. So, yes, the ram was a lot more to upgrade, but butter smooth gaming is the goal of this pc and I could justify the upgrade costs because of these results. - Hard Drives are Samsung 970 500g, 970 1tb, and 960 500g.Watercooling - I went with glass tubing as I wanted a challenge. I was warned against it for my first watercooling loop, but I love how great it looks and how clear it looks with water. Alphacool was decent to work with and I made a couple videos on it.- Fittings are bitspower, black chrome. They look great, and have been holding strong, so no complaints.- GPU blocks and back plates are EKWB as they were the only ones available on the FTW3s at the time. Love the shiny backplate to go with the build theme. CPU block is heatkiller pro IV. Looks great and known for solid performance.- Reservoirs are heatkiller, love that they are glass and brushed metal to match my glass tubing and my brushed metal case.- Radiators are Hardware Labs GTS. Reviews said they perform amazing with low air flow, and being I didn't have high pressure fans, they made a lot of sense. Their one flaw is that they are very restrictive compared to other rads. But 2 aquacomputer D5s do a great job to overcome that.- InWin Fans: look amazing, have the brushed metal look and awesome shiny rim. All fitting the build.Wiring - MDPC-x sleeving and 16awp cables.- Cable combs, both the back panel and front cables - https://www.clockwerkindustries.com/


It's finally Done!!! My first custom PC is behind me
After 10 months of thinking, building, thinking and rebuilding!! Here is a quick overview of the build, look below for much more details. This build was a lot of new things for me. This is my first time with custom watercooling, making my own psu cables, customizing a case, working with acrylic and attempting record the process with video. Hence the greenhorn name. I have always focus on “bang for your buck” builds and aesthetics was always limited to my case choice. The only way to justify the costs of a custom waterloop of this nature was to view it as an art piece for my office. As such, for this build my goal was a 2160p, 100+fps gaming/photo editing rig that was beautiful before you even turn it on and then let the lighting take it to the next level. I tried to get everything perfect from the parts, to parts I made, to taking photos (photography is a hobby of mine). Forgive some inconsistencies between shoots as it took 3 shoots before I happy enough. My inspirations were caselab cases and the murderbox case and 100 amazing cases I saw on youtube and facebook. I hope you enjoy.Video of final product Video of final product. https://youtu.be/UY9WMm8exaQPics are attached but here is a link to the high rez photos.Oh, and the case was so big, I had to build a bigger desk to make it look right, lols.https://imageshack.com/a/dEOo/1The long story.Parts Highlights (I get the most questions on)Case: Lian Li V3000 heavily worked over by a Dremel and drill.PSU Cables – Made by me MDPC-X sleevingCable combs, both the back panel and front cables - https://www.clockwerkindustries.com/Front Radiator cover - https://mnpctech.com/7920x at 5.0 for benchmarks but 4.9 for daily use.CB15 - 3374 and 224 https://valid.x86.fr/8671mdEVGA FTW3 1080TI SLI ; As of this post number one for Extreme Time Spy 9677https://www.3dmark.com/search#/?mode=advanced&url=/proxycon/ajax/search2/cpugpu/spy/X/2266/1127/11115?minScore=0&cpuName=Intel%20Core%20i9-7920X%20Processor&gpuName=NVIDIA%20GeForce%20GTX%201080%20Ti&gpuCount=2Asus PG27UQ; 4k, 144hz, HDR, IPS MonitorBitspower Fittings and In Win fans for a chrome and shiny look.Alphacool 16mm Glass TubesWeight; 87lbsAbout Me and My ModificationI have been building PCs for about 20 years now. My builds have always been “best bang for your buck” builds with zero thought for looks other than trying to get a cool looking case. Last year, I was up for a new machine and decided to go big and treat myself and went with a 1080ti but only jumped into AIO cooling. See here (https://pcpartpicker.com/b/3NxG3C)But that build open my eye to all the amazing custom loops and computers out there and it motivated me to want to build something unique and special to me.I want to build a beautiful monster gaming PC and I want to document my process to share with others to give back for all the great builds others have made. As such, I created this youtube channel to document a noob building a custom PC. I have enjoyed photography for a few years and this is my first adventure into recording and making videos. https://www.youtube.com/channel/UCjM4Cqk4BEauNsv9dLDk5ugYou will notice that the earlier videos mentioned the Singularity Spectre case. I had started this build process in February when I ordered the Spectre case. I then proceeded to buy all the parts in Feb and March with the promised delivery time of April. That didnt occur and the case didn;t arrive until late September. I had planned for a latest and greatest overkill build, but this is still a great machine even with the latest gen cpu and gpus out being better.While I was waiting for the Spectre, it did give me time to think about what I really wanted in a case. After even more time looking at other builds, I realized I wanted to do more customization of the case vs the single acrylic dragon I had designed for the Spectre build.This research left me wanting to build a caselabs looking case. I loved the idea of a case with an open and balanced main chamber with the PSU hidden away.The BuildFor cases, the Lian Li V3000 was perfect. Its checks so many boxes.- Beautiful brushed aluminum on every panel - Subtle but well implemented front lighting - Sturdy, I cut a lot out and its still holding strong.- To make for a clean front, I needed space in the back to run the watercooling and wires so I wouldnt have tubes and wires cutting back and forth. The back of the case is great and allows for enough space for me to run a nice loop back there and it still allows me to have the back panel on.- The bottom allows me to hide away the PSU and allows me to include radiator that shows off the beautiful InWin Polaris fans forward. - Lastly, I installed a light floor I made from two white acrylic sheets and a clear sheet with RGB lights running along the back.- To cover up the motherboard panel on both sides, the front panel for the 240 rad, and the back compartments, I used matte black acrylic.- Making these parts gave me great appreciation for both making parts that look good and fit, but also that can actually be taken in and out of the case. Its surprising how important the order I put things into the case is for it all to work.- Lastly, I have a MNPCTech.com 480 Fan cover on the bottom, looks amazing, really well made, did a great job of allowing me to show off all of the fans vs the stock bottom piece that blocks a lot of them. https://mnpctech.com/For CPU, MB, GPU, RAM and HD.- My last build was the 7700k and a week later the 8700k came out. I thought, not again intel and went with the 7820x. Little did I know they would release the 9900k, so I upgraded to a 7920x. I seriously have to stop playing intels game. Oh well, with direct die, liquid metal, and water cooling, I am hoping to push 4.9. Its happy as can be at 4.8 but need to swap back to water before pushing it. - I went with the rampage vi because I wanted an eatx for the Spectre case to fill up the case as it looked empty with an atx. Being I didn’t use the Spectre, its actually making this case crowded. If I could have done over again, would have stuck with another asus board. Either way, its amazing in looks and OC abilities are awesome. Seeing an error message read out when I have problems is beyond helpful. The safe boot and memory okay buttons had to be pushed at least 100 times in the last few months when OC. Very happy with the board. - The EVGA 1080ti FTW3 1080tis are actually from my last build, they work great and OC to 2050hz on water. Not much else left in them. - For memory, I originally had Gskill 3000 rgb ram pushed to 3200. When they announced the Royal kits I was rather curious for their looks as well as wanting to go fast ram. Doing research, I found that faster than 3200 ram doesnt help gaming average fps and only a small bump in synthetics. However, I did notice that for some games, faster ram did improve the bottom 1% of fps. As such, I pulled the trigger on a 4266 kit and did some comparison testing. I could only get 4000 stable for now, I guess x299 isnt a fan of much faster. I did a rough comparison for gta 5 and noticed what the reviewers did, the average fps was exactly the same between 3200 and 4000 (109.04 vs 108.52), however, I noticed a considerable increase in the 99th percentile fps (47.33 bs 66.02). Per Gamers nexus, a difference of 8ms frame time between frames is where drops become noticeable. On the 3200 ram the difference in frame times from the 50th percentile and the 99th was 12.2ms whereas the 4000 ram was only 6.5ms. So, yes, the ram was a lot more to upgrade, but butter smooth gaming is the goal of this pc and I could justify the upgrade costs because of these results. - Hard Drives are Samsung 970 500g, 970 1tb, and 960 500g.Watercooling - I went with glass tubing as I wanted a challenge. I was warned against it for my first watercooling loop, but I love how great it looks and how clear it looks with water. Alphacool was decent to work with and I made a couple videos on it.- Fittings are bitspower, black chrome. They look great, and have been holding strong, so no complaints.- GPU blocks and back plates are EKWB as they were the only ones available on the FTW3s at the time. Love the shiny backplate to go with the build theme. CPU block is heatkiller pro IV. Looks great and known for solid performance.- Reservoirs are heatkiller, love that they are glass and brushed metal to match my glass tubing and my brushed metal case.- Radiators are Hardware Labs GTS. Reviews said they perform amazing with low air flow, and being I didn't have high pressure fans, they made a lot of sense. Their one flaw is that they are very restrictive compared to other rads. But 2 aquacomputer D5s do a great job to overcome that.- InWin Fans: look amazing, have the brushed metal look and awesome shiny rim. All fitting the build.Wiring - MDPC-x sleeving and 16awp cables.- Cable combs, both the back panel and front cables - https://www.clockwerkindustries.com/


") .
.