Harmony
It's been two years since my last Mod ( http://3rddawnmods.com/sample-page/) The Little Black Box and I'm ready to step in the ring and build another custom rig.

I wanted to step it up a notch with this portable LAN rig while still not compromising on performance, innovation, or appearance.
Sneak Peak of what is to come.


Main Colors
- Vanilla Sands
- Copper Brown
Accent Colors
- Dark Reds
Main Rig Features
- Interchangeable components
- Peak Performance Parts
Exploded Views, Color Template and descriptions of each


This will be the back of the case, the back plate design will allow for a use of an I/O Shield. This will allow for future upgrades of motherboards and processors. The back plate also has 7 PCIe slots allowing for upgrades to GFX's and also making it possible to put cards in SLI ( Which is planned )

This is revealing the bottom of the case, The mesh grill adds character to the cooling tunnel for the PSU intake. This will allow my PSU to get fresh cool air from below and blow it out the back of the case.
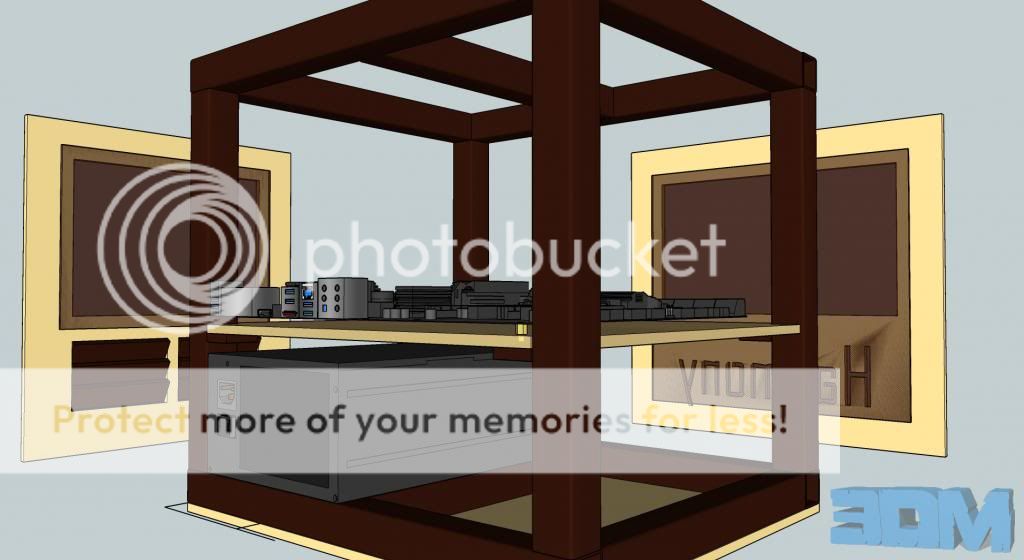
The mobo tray will be made of a vanilla semi-translucent plexi and will be grounded. It will also have the a cutout below the cpu to allow for easier access to mount necessary coolers. It will also feature multiple atx and micro-atx screw patterns.

This view show the top of the case which will allow a carrying handle to be mounted to the frame for worry free transportation. There will be 4 120mm fans that will be available to be connected also.

Another exploded view showing the design
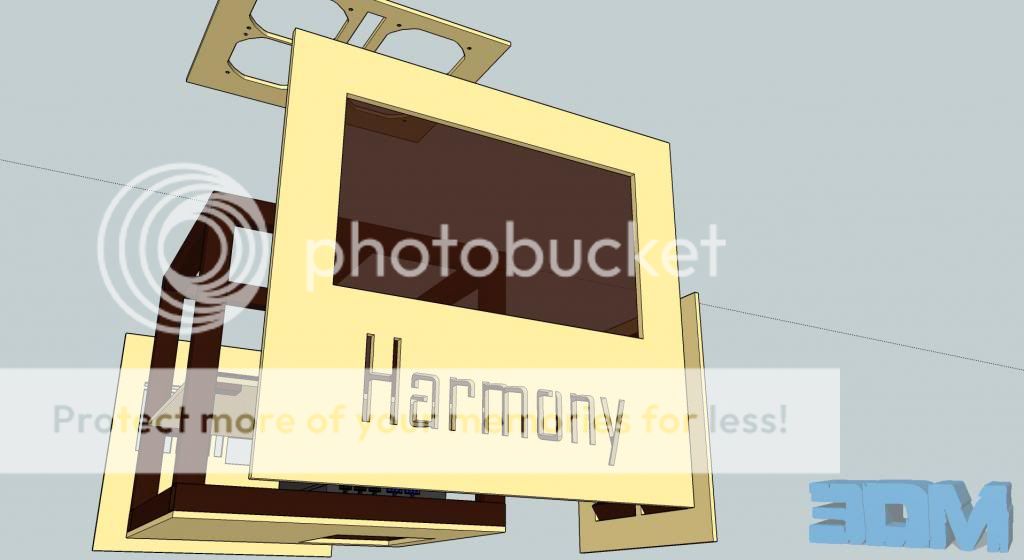
The front of the case will have the name laser cut out and will allow light to shine through allowing illumination.

The side plates will have angled grills allowing for air to be sucked through to keep the case and a reasonable temperature. Semi tinted brown plexi will allow the viewing of the interior components and wiring management.
-----------------------------------------------------------------------------------------------------
Small update. I have gotten all the aluminum for this case build and will have time this coming Tuesday to begin building the frame.
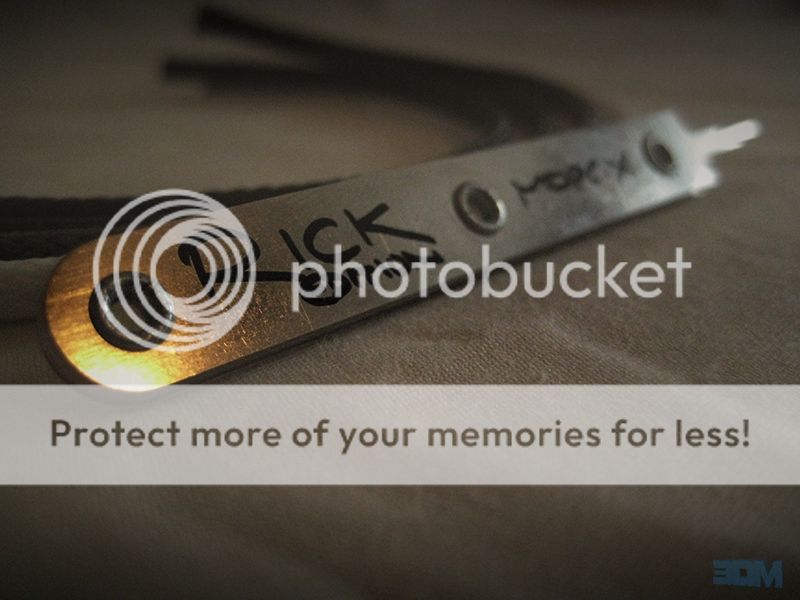
I also received my sleeving from the notorious, MDPC-X!
Custom Pin Remover.
Sata Cable Sleeve.

Single Wire Sleeve.

and some samples I received, great color scheme.

-----------------------------------------------------------------------------------------------------
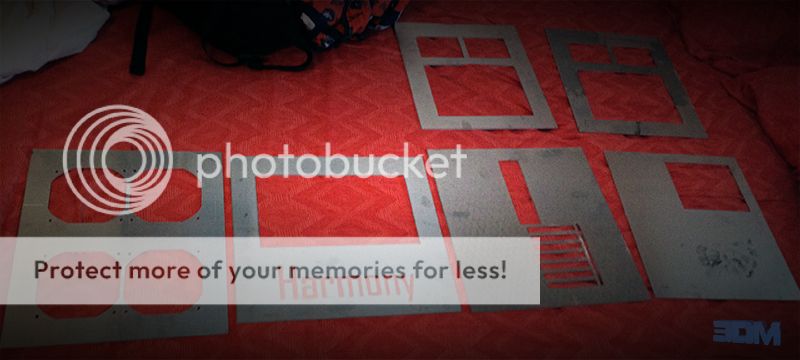
The case has finally begun the building phase.
My buddy has a home made plasma cutting machine and I was able to get all the panels of the case cut out. I used 1/8" Aluminum for all the side panels. The plasma cutter left a lot of rough edges but I knew this was going to happen. Luckily I have all of Christmas vacation to smooth them out. I will also sandblast them and get them ready for powder coating.
Here are the pictures, I can't wait to get the frame built and start getting some of the components for the build.
Enjoy.
Here is the home made plasma table.

The back panel in the process of being cut.

The completed back panel

No big updates yet, but I just got some rendering software that really takes the concept to a new level. Thought you'd enjoy them.
Front

Back

The front panel turned out great, just gotta smooth the edges!


...and I leave you with a picture of all the pieces cut out.
STAGE 2: PARTS AND BUILDING : ASRock
Yesterday I received this all the way from Thailand and I can't be more excited! This thing is awesome!
Thanks again to ASRock!
Plans for the MOBO:
- Paint heatsinks to match color scheme
- Remove all stickers (Have too)
- Get creative on ways to paint the other pieces of the MOBO.
Now onto some awesome photos!


------------------------------------------------------------------------------------------------------------------------------
Big update for today and another one coming tomorrow!
ADATA has entered the building!
Plans for SSD:
- Build a custom case to hold the SSD
- Sleeve SATA cables to match color scheme
Pictures!

The contents:


Bonus shots I really liked:


------------------------------------------------------------------------------------------------------------------------------
Today I also got started working on the frame of the case. I grabbed my two 12ft pieces of square aluminum tubing and began measuring and cutting out the individual pieces for the frame.
My initial thought was to weld the frame pieces together, but I got to thinking and remembered some super nifty tubing connectors I had found on the web from previous years. These were the key to putting the frame pieces together. I have had a lot of experience in wire feed welding steel, but have had no experience in TIG welding aluminum, and I wanted this case to look perfect. These tubing connectors will give me the strength I need and the overall look I was going for.

EZTUBE Connector, images thanks to http://eztube.com/
I have ordered these and are awaiting there arrival.
Here are the pictures from today!


Here are all the pieces cut out and the burs removed, the picture is showing how the tubing was suppose to go. I will need to cut 2inches off of the 14inch pieces to allow for the connectors to be in place.

I will start on the motherboard tray this week and hope to have another update very soon for you!
------------------------------------------------------------------------------------------------------------------------------
Today I got a little more done on the frame. I got the newest dimensions cut for where the connectors are going to be and got all the pieces un-burred again. I also have begun working on the rendering of the water cooling setup, below are a couple of pictures of where I am right now.
This picture shows the rigid acrylic tubing bent to the correct angles, the tubing will go through the motherboard tray and so will the top 1/4 of the reservoir to give it a pretty distinct look.
Here's a broader view of the tubing setup.The tubing will be clear with a color liquid that is closely matched to the overall cream color.

Here is the latest cuts on the frame. The gaps are where the connectors will be placed.

Another view, including the sides of the frame sitting in place.

This picture shows how the sides of the frame will be sitting, the connectors will go in all the corners and are 1" x 1" so a perfect fit.

Just a picture of me screwing around working on the frame.

This is the final shot of the frame pieces before they get powder coated. Can't wait to get them back a copper brown color!
Off to Minnesota!

Tomorrow I will begin working on the PSU that should be arriving today. Plans for that include, a custom acrylic case and also completely wiring sleeving it all!
------------------------------------------------------------------------------------------------------------------------------
This past week I've been finding time to build the Motherboard tray and finish sleeving the 24pin power cable. I got the 24pin fully sleeved, now I'm debating how I want to paint the connectors as there are no cream or copper brown 24 pins.
The Motherboard tray is almost completed. The next project is building a custom housing for the PSU, and SSD's. They should look pretty sweet when completely finished. I also plan on laser etching some of the pieces.
TO THE PICS!
Here is the latest design of the motherboard tray, it's made of cream colored plexi. I leave the protective layer on till I know I'm completely done with the piece.

This angle shows the two slits for the 24pin cables to go through. The sleeving will be split by the top row and bottom row, pictures further down.

A closeup of the cutout to allow easy access for back plate mountings.

Another angle of the entire mobo tray.

This is the top row of cables going into the first slit in the tray. This slit holds cables 13-24. Man I love those colors together.

A couple glamour shots.
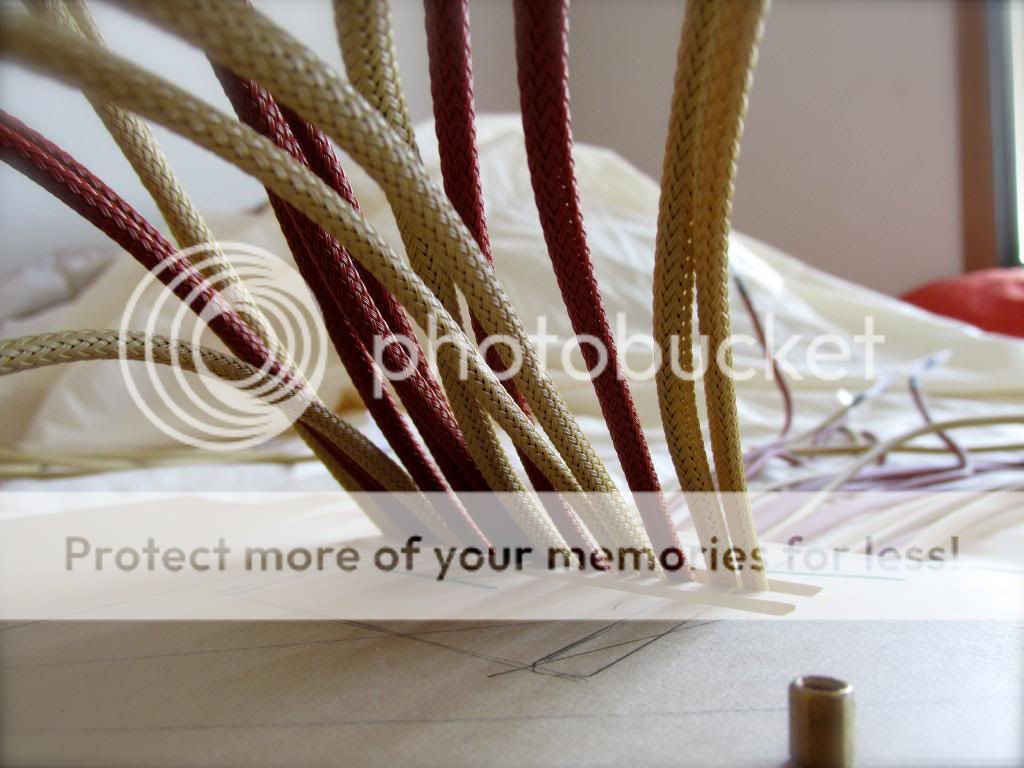

I taped the cables to a scrap piece to help keep them where they are suppose to be in terms of order. Cables 13-24.

Here are the second group of cables (1-12) through the bottom slit and taped in the same fashion as above.

Glamour Shots


My Favorite of them all.

Thanks as always for reading! More to come in the upcoming week.
------------------------------------------------------------------------------------------------------------------------------
2nd post in one day, I'm on a roll!
Today I got a lot more done then what I thought I would.
I'm currently working on a custom housing for the Adata SSD. I've got a lot more shaving to be done on the pieces but I have gotten the basic body built.
Once the body is completed, I will figure out what screws/method I will use to hold it all together. I really want to be able to exchange out the SSD with ease.
Like everything with this build, I want to ability to constantly upgrade the computer unlike my previous build which was built around a certain component.
TO THE PICS!
Here are the basic pieces cut out and ready for sanding to even all the edges.

All the edges are sanded smooth.

Another shot of all the edges sanded smooth and matching.

...and another one

The edges are rounded to add a more appealing effect.

READY FOR POLISHING!

All outer edges fully polished, man this looks good.

The workings of the cage.


Test fitting the SSD board in the housing.

Needs a final trimming and holes drilled to put it together, but coming along very nicely.

LAST SHOT

More coming this week!
Sorry about the HUGE initial post, had to play catch up from my other work logs. Hope you enjoy!
It's been two years since my last Mod ( http://3rddawnmods.com/sample-page/) The Little Black Box and I'm ready to step in the ring and build another custom rig.

I wanted to step it up a notch with this portable LAN rig while still not compromising on performance, innovation, or appearance.
Sneak Peak of what is to come.


Main Colors
- Vanilla Sands
- Copper Brown
Accent Colors
- Dark Reds
Main Rig Features
- Interchangeable components
- Peak Performance Parts
Exploded Views, Color Template and descriptions of each


This will be the back of the case, the back plate design will allow for a use of an I/O Shield. This will allow for future upgrades of motherboards and processors. The back plate also has 7 PCIe slots allowing for upgrades to GFX's and also making it possible to put cards in SLI ( Which is planned )

This is revealing the bottom of the case, The mesh grill adds character to the cooling tunnel for the PSU intake. This will allow my PSU to get fresh cool air from below and blow it out the back of the case.

The mobo tray will be made of a vanilla semi-translucent plexi and will be grounded. It will also have the a cutout below the cpu to allow for easier access to mount necessary coolers. It will also feature multiple atx and micro-atx screw patterns.

This view show the top of the case which will allow a carrying handle to be mounted to the frame for worry free transportation. There will be 4 120mm fans that will be available to be connected also.

Another exploded view showing the design

The front of the case will have the name laser cut out and will allow light to shine through allowing illumination.

The side plates will have angled grills allowing for air to be sucked through to keep the case and a reasonable temperature. Semi tinted brown plexi will allow the viewing of the interior components and wiring management.
-----------------------------------------------------------------------------------------------------
Small update. I have gotten all the aluminum for this case build and will have time this coming Tuesday to begin building the frame.
I also received my sleeving from the notorious, MDPC-X!
Custom Pin Remover.
Sata Cable Sleeve.
Single Wire Sleeve.
and some samples I received, great color scheme.
-----------------------------------------------------------------------------------------------------
The case has finally begun the building phase.
My buddy has a home made plasma cutting machine and I was able to get all the panels of the case cut out. I used 1/8" Aluminum for all the side panels. The plasma cutter left a lot of rough edges but I knew this was going to happen. Luckily I have all of Christmas vacation to smooth them out. I will also sandblast them and get them ready for powder coating.
Here are the pictures, I can't wait to get the frame built and start getting some of the components for the build.
Enjoy.
Here is the home made plasma table.
The back panel in the process of being cut.
The completed back panel
No big updates yet, but I just got some rendering software that really takes the concept to a new level. Thought you'd enjoy them.
Front
Back
The front panel turned out great, just gotta smooth the edges!
...and I leave you with a picture of all the pieces cut out.
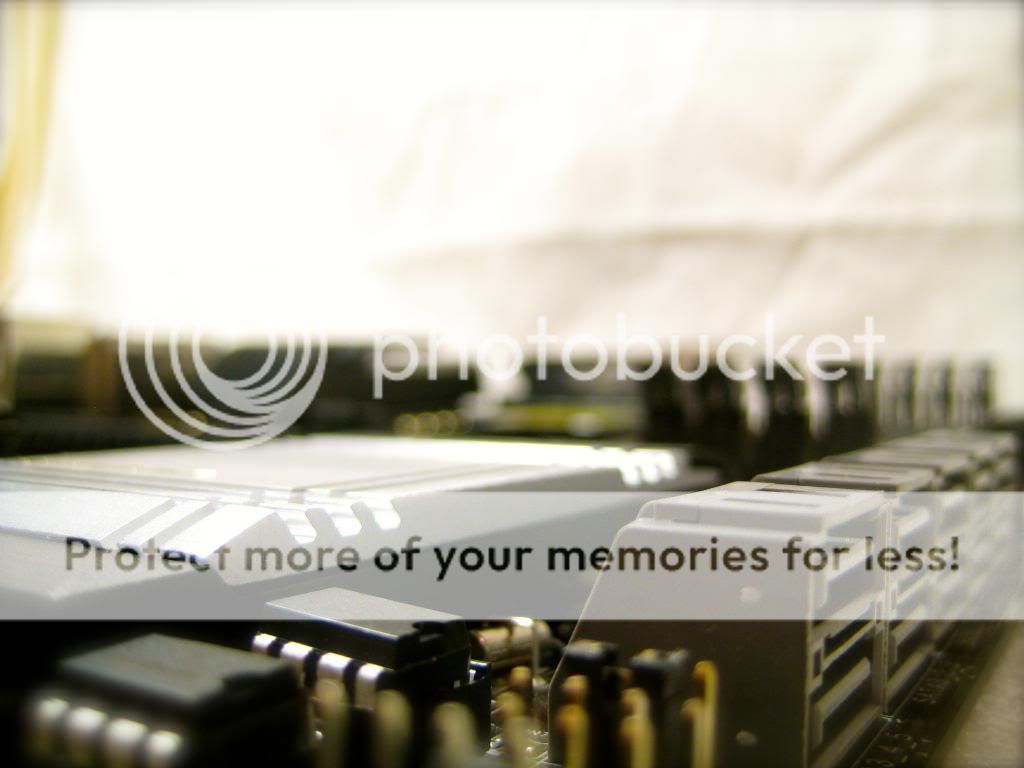
STAGE 2: PARTS AND BUILDING : ASRock
Yesterday I received this all the way from Thailand and I can't be more excited! This thing is awesome!
Thanks again to ASRock!
Plans for the MOBO:
- Paint heatsinks to match color scheme
- Remove all stickers (Have too)
- Get creative on ways to paint the other pieces of the MOBO.
Now onto some awesome photos!
------------------------------------------------------------------------------------------------------------------------------
Big update for today and another one coming tomorrow!
ADATA has entered the building!
Plans for SSD:
- Build a custom case to hold the SSD
- Sleeve SATA cables to match color scheme
Pictures!
The contents:
Bonus shots I really liked:
------------------------------------------------------------------------------------------------------------------------------
Today I also got started working on the frame of the case. I grabbed my two 12ft pieces of square aluminum tubing and began measuring and cutting out the individual pieces for the frame.
My initial thought was to weld the frame pieces together, but I got to thinking and remembered some super nifty tubing connectors I had found on the web from previous years. These were the key to putting the frame pieces together. I have had a lot of experience in wire feed welding steel, but have had no experience in TIG welding aluminum, and I wanted this case to look perfect. These tubing connectors will give me the strength I need and the overall look I was going for.
EZTUBE Connector, images thanks to http://eztube.com/
I have ordered these and are awaiting there arrival.
Here are the pictures from today!
Here are all the pieces cut out and the burs removed, the picture is showing how the tubing was suppose to go. I will need to cut 2inches off of the 14inch pieces to allow for the connectors to be in place.
I will start on the motherboard tray this week and hope to have another update very soon for you!
------------------------------------------------------------------------------------------------------------------------------
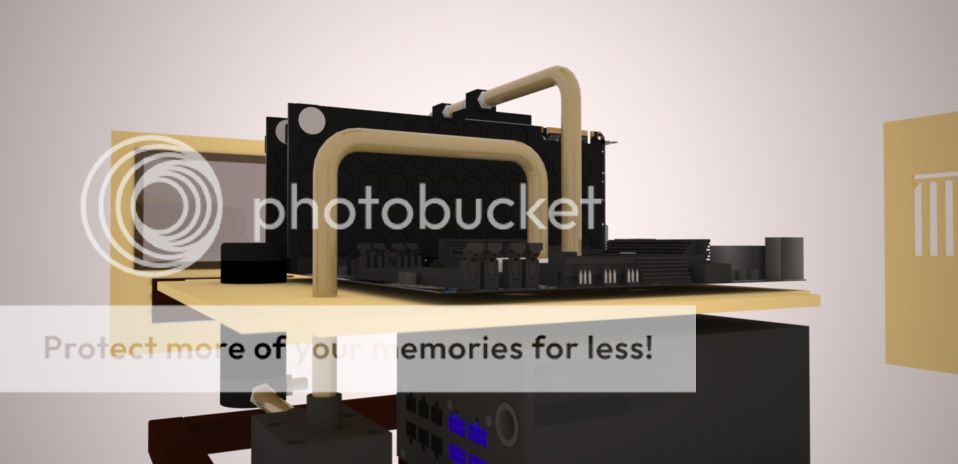
Today I got a little more done on the frame. I got the newest dimensions cut for where the connectors are going to be and got all the pieces un-burred again. I also have begun working on the rendering of the water cooling setup, below are a couple of pictures of where I am right now.
This picture shows the rigid acrylic tubing bent to the correct angles, the tubing will go through the motherboard tray and so will the top 1/4 of the reservoir to give it a pretty distinct look.
Here's a broader view of the tubing setup.The tubing will be clear with a color liquid that is closely matched to the overall cream color.
Here is the latest cuts on the frame. The gaps are where the connectors will be placed.
Another view, including the sides of the frame sitting in place.
This picture shows how the sides of the frame will be sitting, the connectors will go in all the corners and are 1" x 1" so a perfect fit.
Just a picture of me screwing around working on the frame.
This is the final shot of the frame pieces before they get powder coated. Can't wait to get them back a copper brown color!
Off to Minnesota!
Tomorrow I will begin working on the PSU that should be arriving today. Plans for that include, a custom acrylic case and also completely wiring sleeving it all!
------------------------------------------------------------------------------------------------------------------------------
This past week I've been finding time to build the Motherboard tray and finish sleeving the 24pin power cable. I got the 24pin fully sleeved, now I'm debating how I want to paint the connectors as there are no cream or copper brown 24 pins.
The Motherboard tray is almost completed. The next project is building a custom housing for the PSU, and SSD's. They should look pretty sweet when completely finished. I also plan on laser etching some of the pieces.
TO THE PICS!
Here is the latest design of the motherboard tray, it's made of cream colored plexi. I leave the protective layer on till I know I'm completely done with the piece.
This angle shows the two slits for the 24pin cables to go through. The sleeving will be split by the top row and bottom row, pictures further down.
A closeup of the cutout to allow easy access for back plate mountings.
Another angle of the entire mobo tray.
This is the top row of cables going into the first slit in the tray. This slit holds cables 13-24. Man I love those colors together.
A couple glamour shots.
I taped the cables to a scrap piece to help keep them where they are suppose to be in terms of order. Cables 13-24.
Here are the second group of cables (1-12) through the bottom slit and taped in the same fashion as above.
Glamour Shots
My Favorite of them all.
Thanks as always for reading! More to come in the upcoming week.
------------------------------------------------------------------------------------------------------------------------------
2nd post in one day, I'm on a roll!
Today I got a lot more done then what I thought I would.
I'm currently working on a custom housing for the Adata SSD. I've got a lot more shaving to be done on the pieces but I have gotten the basic body built.
Once the body is completed, I will figure out what screws/method I will use to hold it all together. I really want to be able to exchange out the SSD with ease.
Like everything with this build, I want to ability to constantly upgrade the computer unlike my previous build which was built around a certain component.
TO THE PICS!
Here are the basic pieces cut out and ready for sanding to even all the edges.
All the edges are sanded smooth.
Another shot of all the edges sanded smooth and matching.
...and another one
The edges are rounded to add a more appealing effect.
READY FOR POLISHING!
All outer edges fully polished, man this looks good.
The workings of the cage.
Test fitting the SSD board in the housing.
Needs a final trimming and holes drilled to put it together, but coming along very nicely.
LAST SHOT
More coming this week!
Sorry about the HUGE initial post, had to play catch up from my other work logs. Hope you enjoy!


