KMBN - Der Panther (Tänzer)
A bunch of coolers! You need them! You love them! Some may hate them but there is no way around them!
The humble or not so humble cooler. A cooler has a vital role inside any PC be it older or the latest tech. Often, the importance of a cooler is overlooked and only when something doesn't work as it is supposed to, people realize that from time to time, you have to clean that spinning fan and heatsink inside your computer.
As I mainly deal with stuff from the flea market, I found coolers that were in a state that ranges from perfect to one that is quite ridiculous. Fans and heatsinks caked with animal hairs, paint and all sorts of deposits of an unknown nature. Smelly and looking nasty. I'm not fazed by this fact as I know that it comes with the territory.
In regard to restoring old coolers I apply the same principles I always do. Nothing is unimportant. Surviving parts that once were destined to the crusher but had the opportunity to come into my possession deserve my absolute attention.
Over the time, when I restored old parts you also got to read how I gave a new lease of life to old lumps of aluminum and/or copper. There is a certain charm to building a system with era period correct components. This is why I try when possible, to save old fans, old stickers and everything in between.
The stars of today's episode aren't something out of this world. No exotic stuff. No water coolers. Just regular coolers that for sure will be put to good use. Some of them are more desirable than others but all of them are more than capable to fulfill their role. Keep things cool under pressure. These coolers have been acquired in the last 4-6 months with motherboards or on their own. I decided to have a small stash of coolers as the number of motherboards that I bought is growing way faster that I anticipated. In a word: I need to "reserve" more cooling capacity for the future!
 So, without further ado, let's get on with the show!
 ")
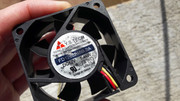
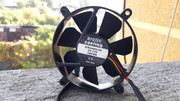
Alpha PAL6035
Spire Falcon Rock II
AVC AV-112C86FBL01 AMD Sk. A Stock Cooler - Copper insert x2
No Name Socket. A CPU Cooler x2
Arctic Cooling Cooper Silent
Arctic Cooling Super Silent PRO
Zalman VF900-Cu
Akasa, Neolec
Mighty AMD K7 700MHz with dual cooling fans
Back in the day I read about the
ALPHA coolers. I never owned such a cooler and to be honest I was on the lookout for one. Sure, I would've wanted an
Alpha P3125 or something along the lines of it, but heck, beggars can't be choosers so I'm happy with my purchase.
I found this puppy inside a big plastic 200L barrel. It flew outside when the barrel released its contents on the ground. At first I looked at it in an absent manner. A few seconds later, though, it was in my hands. To my surprise I saw that it was an
ALPHA PAL6035 CPU cooler. NICE! I liked the way it looked so I bought it asap. On the same day I also bought a
Spire Falcon Rock II. The Spire cooler, albeit being nothing spectacular, is well built and silent. I have three or four of them and they are decent performers.

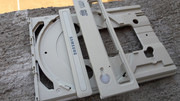
The
Alpha PAL6035 had a rough life in the dust mines and it begged to be saved. Which I did in spades.


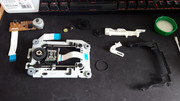
Dismantling.

The cooling fan certainly had seen better days.


I can't imagine how hard the cooling fan had to work to ensure a proper temperature of the CPU. Truth be told, the "hedgehog" design of the heatsink doesn't help either. Also, the cooling fan was mounted in a reversed position than regular, drawing air inside the heatsink instead of blowing it out. Why? I have no idea. Later on I'll put things in order from my point of view.


I removed the four round bits of foam that were present on the bottom of the heatsink as I want to use this cooler on other CPUs that aren't Sk.A. Also, the heatsink underwent an initial cleaning and detailing stage. I used water under pressure to remove all of the stuff that was inside the heatsink. It felt so good to watch it shine.


All bits have been washed with dish soap and hot tap water. Some rust that was on the long screws has been eradicated.

This was the easy part. Next came the cooling fan. Saving cooling fans isn't an exact science or a particularly sure shot procedure. Despite your efforts you might not get the expected results. Even if I am fully aware of this fact I always try to save them. There are two reasons for this:
authenticity and money.


I have cleaned quite a few fans over the course of the time and I have a few tricks up my sleeve. In this instance I decided that I need to wash the whole thing with dish soap and hot tap water before I even start to assess its state.


Out with the old bearings! In with the still old bearings!
Despite the washing with water, the bearings still worked nicely so I decided not to open and service them and just give them a grease treatment. I tried to get some grease inside by spinning them or just by using a very fine needle. If you are patient, using a fine needle you can get inside the bearings that minute quantity of grease that is required.
Servicing bearings doesn't always get you the expected results. Sometimes they are so far gone that no grease will help. Also, using a thinner or a thicker oil instead of grease usually it is not recommended as it will push the grease out and make the bearing run way louder. In any case, the original grease can became contaminated or even dry out so all in all this is not an exact science. YMMV.


Looking good!

The scratches that were present on the heatsink have been covered with black paint that is resistant to temperature. This wasn't exactly needed but I had a can laying around so I said: why not?


The cooling fan received its final stage of cleaning.


After a day inside the grease bath, I removed the bearings and massaged them until they ran like butter. I think that I got lucky this time or maybe the bearing were of a better quality.


The hedgehog heatsink in all its glory.


The sticker from the cooling fan received a backing of aluminum tape to make it a little stiffer, then it was mounted with o.2mm double sided tape. Also, the frame of the cooling fan was damaged and it was glued back with super glue. Before the final assembly I removed the protective film that was on the aluminum shroud of the cooler. It felt so good!


Saved to fight another day. I put some high strength clear tape to prevent the scratching of the heatsink and I also mounted the fan in the position that I wanted.
This cooler is @100! The cooling fan is running great. I have yet to test it in a a system but it sure looks the part, ready to give an old runner that original look!


The
Spire Falcon Rock II was in bad shape. I bought it for 1 EURO as I really didn't want to spend anything more.


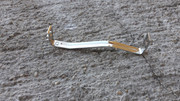
Always take pictures of the way the metal clamp is positioned.

I rolled up my sleeves and got to work.


The cooling fan has an aluminum frame and by the looks of it, had contact with moisture so it lost some of its original appearance. Regardless, I took it apart and gave it what it so desperately needed.


During the time I was occupied with the Spire cooler I also had an
AVC AV-112C86FBL01 AMD Sk. A Stock Cooler that underwent the same procedure.


The heatsink from the
AVC cooler had some very hard specs of some gray stuff on the cooper insert so I lightly sanded it down and polished it by hand. I wasn't looking for perfection just for functionality.


The cooling fan on the AVC cooler was running well. Also the fan from the Spire cooler made a full recovery.


As good as it gets.


The AVC cooler isn't the best or one of the most silent coolers but it gets the job done. Tossing it out to be recycled wasn't an option so I was stuck with it. It can be upgraded with a better fan and be put to good use. The Spire on the other hand is everything that the AVC cooler isn't. A better option overall.
Three coolers got to fight another day. Three restored coolers that wait patiently to be jump back into action.


These two coolers, another AVC AV-112C86FBL01 and a No name Sk. A cooler, were fished from two Sk. A ASUS motherboards. They were also cleaned and made a full recovery.


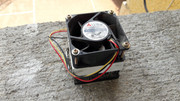
The next three coolers were found on a few more Sk.A motherboards that I acquired recently. The most interesting ones are the Arctic coolers. They are well built. Silent and in my book, they look the part.
No Name Socket. A CPU Cooler ***
Arctic Cooling Cooper Silent ***
Arctic Cooling Super Silent PRO


Initial state.


The
Arctic Super Silent PRO, that's a mouthful, is well built. I never saw or had one back in the day. When I took it apart I found out what it made it tick. I appreciated the nice addition of that plastic ring that ensures a concentrated stream of air inside the heatsink. An out of the ordinary detail that many coolers didn't have. Both of the Arctic coolers have this method of construction.
The Arctic Cooling Cooper Silent was full of everything you do not want inside a CPU cooler.


The No Name cooler was pretty clean. Go figure.

I washed the heatsinks with hot tap water and dish soap. The heatsink from the Arctic Cooling Cooper Silent was put inside a container to remove some of the more adherent stuff that was inside. I used an old long brush to stir the water inside. The heatsink have been dried with an air compressor after they were washed.


In regard to the Arctic coolers one thing was quite clear. I needed to restore both of the fans and any other replacement would throw a spanner into the way they looked and worked. I had no intention to modify new fans to fit inside the nicely made funnel rings. Also, given the track record of Arctic I knew that these fans should be quiet straight out of the door. They had a sleeve bearing type of construction that was still very, very quiet. Go figure.


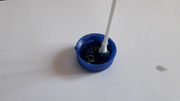
The No Name cooler had a ball bearing and sleeve bearing combo. I opened up the tiny ball bearing. I used a fine needle to remove the dust cap only to find out that it had a security ring that would've made things way easier. I put it back with minimal tampering evidence. Fresh grease and stuff.


The cooling fan had signs of water damage. The copper sleeve bearing had some corrosion that was removed with vinegar. This damned cooling fan required so much work that once I was deep in, there was no turning back. I had to carry on and hope for the best.
I plugged the hole with a bamboo stick and made a small pool of vinegar and it was left like that for a few hours.


After washing, detailing and polishing I could see that in the end, all my efforts will pay off.


Clean screws.
The fight with the verdigris was intense.


Some rust is still present but it doesn't interfere with the functioning of the fan.

I used some aluminum tape to restore the old sticker. 0.2mm double sided tape was used to fix it well.


This cooling fan was an affair that I want to forget. Despite my efforts it didn't respond well to treatment. Valuable information was gathered and experience has been gained, though. A Noctua fan is a perfect replacement both in the color department and also from a performance point of view.


After I put back the cooling fan on the Arctic Cooling Cooper Silent, I saw that once the cooler was flat on a surface, it would make a grindy noise that was gone once the cooler was flipped over. After a few minutes of investigation I found a solution.
I call it fan tuning! I made a small lever from a piece of metal and I tuned the round magnet that sits inside the propeller. How I found this solution? At first I experimented with small rubber o rings but that was a tedious affair and it didn't get me the expected outcome. Then, while I fiddled with the fan the solution hit me! From what I found, the whole grinding sound problem was due to the distance between the propeller and the sleeve bearing and/or motor so the solution was resting in that area.
A minute change in the position of the round magnet inside the propeller made all the change! The fan ran like a dream. YEAH!!!


Perfect VICTORY!
Arctic Cooling Copper Silent.


The
Arctic Cooling Super Silent PRO also made a full recovery. The fan was running well from the get go. I had to use some tape to ensure a proper grip of the screws that hold the fan.


Three coolers got another lease of life. NICE!


A close up with the funnel ring.


During the time I was restoring these coolers I also made some progress with smaller fans that have 0.5cm bearing inside. While trying to service these bearing is in most cases problematic, as they usually do not respond too well to this treatment, I still do it.
I even started experimenting with other magnets to try and restore other fans in the future. I do this from the perspective that if I get another ATI Rage Fury MAXX or another V5 5500 or even a V5 6k I want the original fans on, no matter what. Instead of replacing something it is sometimes better to try at least to save those parts. IMO. There is too much garbage and waste as it is.


 HUH! This is a long episode!
 We are not done yet though! No rest for the wicked!
Next is the
Zalman VF900-Cu VGA cooler.
I found the Zalman cooler on a regular trip to the flea market. It was mounted on a beat up 7600GT PCI-E. It looked worse for wear but nothing too serious. Some elbow grease and it will be golden ahem, copper(y) like. I said to myself.

It had some rust on some parts. Nothing that the rust remover solution can't handle.


The copper heatsink took a nice 15 minutes bath inside vinegar mixed with some table salt.

The copper base will forever be engraved with the nVIDIA logo. I wonder what will an ATI card say if I manage to mount this cooler on one. I'm pretty sure that it will puke it out! Fixing nuts and all.


The rust was stubborn and it needed to be flushed out.

Clean as a whistle.


The seal of approval.

LED action. NICE!

Tiny coolers that also got what they so desperately needed. The AKASA fan was still good the Neolec not so much. Crappy balls inside the ball bearing. For sure they used square balls inside!


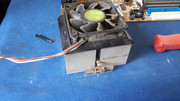
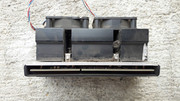
After quite a few stand alone coolers we have arrived to one that was still firmly attached to a CPU.
Meet a very dusty double headed monster. A two PAPST beast that I really like! It was mounted on a Slot A AMD 700MHz CPU that in turn was mounted on a very dead Gigabyte GA-7IXE motherboard. When I mean dead I mean riddled with holes. Precious metal hunting + small brains = lot's of dead components. Not all that glitters is GOLD!


Holy dust bunnies Batman!


Dirty bits. In case you are wondering, I powered up the CPU to see if it works. It worked well but I also got a dust storm effect. Like when old plane engine fire up for the first time.
I used a breathing mask of course. The CPU said NOT DEAD YET! AWESOME STUFF! The fans coughed up and got back to life.


Exemplary TIM placement that marginally touches the area of the CPU. NICE! GREAT! AWESOME!


Bubble bath.

I wanted to service the cooling fans but I found out that they have an enclosed design. I could've tried to try and pull on the propellers and try to remove them as for sure this is the way they were built, with a tiny plastic washer that holds the shaft, but I decided to try something that it is let's say a little more lazy.
Also they were so dirty that there was no way to clean them without extreme measures.


I washed them inside and outside!

Even after a good scrub they were still nasty. In what conditions has been poor thing used? In a mine or something?

After I was done with the cleaning of the fans I used a thick oil to lube the bearings inside. Not ideal but they were in bad shape to begin with. Three tiny holes inside the propeller made things nice and easy. In the end the tiny fans got from a very bad working state to a more than decent one. Still not perfect but perfectly usable if you know what I mean. A small grumble is still present but otherwise they spin freely.


Nice and clean.

I decided not to open the CPU cartridge as I do not plan to use this CPU in a build any time soon. I gave it a good clean and some air compressor treatment.

Some assembly required.


I did some tests with Arctic MX-4 to determine the best quantity of TIM needed. Also I put the blob of TIM on the center of the die of the CPU.


Done and Done!


 RIP GA-7IXE
 ...


There you have it! A huge episode dedicated to the silent (or sometimes not so silent) heroes inside our machines. They toil in scorching heat, keeping things in check so that we can enjoy our purpose driven PCs. Do not overlook them and give them the attention they seldom need. A little bit goes a long way.
More later.
gallery:
https://postimg.cc/gallery/dyNHsHx ***
https://postimg.cc/gallery/gwDvvNF ***
https://postimg.cc/gallery/D4CV88T ***
https://postimg.cc/gallery/0vC4cRp ***
https://postimg.cc/gallery/Gyqjrzm ***
https://postimg.cc/gallery/wvT4XBw ***
https://postimg.cc/gallery/np27L0K