• Welcome to TechPowerUp Forums, Guest! Please check out our forum guidelines for info related to our community.

Hello, World! :D - Robert B's PC builds - oogle away freely :) - OLD Hardware Emporium

Mussels

Freshwater Moderator
Staff member
Joined
Oct 6, 2004
Messages
58,413 (8.19/day)
Location
Oystralia
System Name Rainbow Sparkles (Power efficient, <350W gaming load)
Processor Ryzen R7 5800x3D (Undervolted, 4.45GHz all core)
Motherboard Asus x570-F (BIOS Modded)
Cooling Alphacool Apex UV - Alphacool Eisblock XPX Aurora + EK Quantum ARGB 3090 w/ active backplate
Memory 2x32GB DDR4 3600 Corsair Vengeance RGB @3866 C18-22-22-22-42 TRFC704 (1.4V Hynix MJR - SoC 1.15V)
Video Card(s) Galax RTX 3090 SG 24GB: Underclocked to 1700Mhz 0.750v (375W down to 250W))
Storage 2TB WD SN850 NVME + 1TB Sasmsung 970 Pro NVME + 1TB Intel 6000P NVME USB 3.2
Display(s) Phillips 32 32M1N5800A (4k144), LG 32" (4K60) | Gigabyte G32QC (2k165) | Phillips 328m6fjrmb (2K144)
Case Fractal Design R6
Audio Device(s) Logitech G560 | Corsair Void pro RGB |Blue Yeti mic
Power Supply Fractal Ion+ 2 860W (Platinum) (This thing is God-tier. Silent and TINY)
Mouse Logitech G Pro wireless + Steelseries Prisma XL
Keyboard Razer Huntsman TE ( Sexy white keycaps)
VR HMD Oculus Rift S + Quest 2
Software Windows 11 pro x64 (Yes, it's genuinely a good OS) OpenRGB - ditch the branded bloatware!
Benchmark Scores Nyooom.
It is beyond criminal you can only get one like per user for that post

Make a guide for your fan repair/restoration techniques in its own thread and you'll have people commenting and asking advice for decades.
 
Joined
Jul 3, 2016
Messages
758 (0.27/day)
Queen - A Kind of Magic

It's easier than you might think! It's a kind of magic! :D

Full details here when I'm done with testing and restoring. :D

More later.
 

Attachments

  • PRW-2021-421.jpg
    PRW-2021-421.jpg
    1.8 MB · Views: 104
  • PRW-2021-422.jpg
    PRW-2021-422.jpg
    1.1 MB · Views: 107
Last edited:

Mussels

Freshwater Moderator
Staff member
Joined
Oct 6, 2004
Messages
58,413 (8.19/day)
Location
Oystralia
System Name Rainbow Sparkles (Power efficient, <350W gaming load)
Processor Ryzen R7 5800x3D (Undervolted, 4.45GHz all core)
Motherboard Asus x570-F (BIOS Modded)
Cooling Alphacool Apex UV - Alphacool Eisblock XPX Aurora + EK Quantum ARGB 3090 w/ active backplate
Memory 2x32GB DDR4 3600 Corsair Vengeance RGB @3866 C18-22-22-22-42 TRFC704 (1.4V Hynix MJR - SoC 1.15V)
Video Card(s) Galax RTX 3090 SG 24GB: Underclocked to 1700Mhz 0.750v (375W down to 250W))
Storage 2TB WD SN850 NVME + 1TB Sasmsung 970 Pro NVME + 1TB Intel 6000P NVME USB 3.2
Display(s) Phillips 32 32M1N5800A (4k144), LG 32" (4K60) | Gigabyte G32QC (2k165) | Phillips 328m6fjrmb (2K144)
Case Fractal Design R6
Audio Device(s) Logitech G560 | Corsair Void pro RGB |Blue Yeti mic
Power Supply Fractal Ion+ 2 860W (Platinum) (This thing is God-tier. Silent and TINY)
Mouse Logitech G Pro wireless + Steelseries Prisma XL
Keyboard Razer Huntsman TE ( Sexy white keycaps)
VR HMD Oculus Rift S + Quest 2
Software Windows 11 pro x64 (Yes, it's genuinely a good OS) OpenRGB - ditch the branded bloatware!
Benchmark Scores Nyooom.
Did.... DID YOU REPLACE THE ENTIRE GODDAMN SOCKET?
 

Mussels

Freshwater Moderator
Staff member
Joined
Oct 6, 2004
Messages
58,413 (8.19/day)
Location
Oystralia
System Name Rainbow Sparkles (Power efficient, <350W gaming load)
Processor Ryzen R7 5800x3D (Undervolted, 4.45GHz all core)
Motherboard Asus x570-F (BIOS Modded)
Cooling Alphacool Apex UV - Alphacool Eisblock XPX Aurora + EK Quantum ARGB 3090 w/ active backplate
Memory 2x32GB DDR4 3600 Corsair Vengeance RGB @3866 C18-22-22-22-42 TRFC704 (1.4V Hynix MJR - SoC 1.15V)
Video Card(s) Galax RTX 3090 SG 24GB: Underclocked to 1700Mhz 0.750v (375W down to 250W))
Storage 2TB WD SN850 NVME + 1TB Sasmsung 970 Pro NVME + 1TB Intel 6000P NVME USB 3.2
Display(s) Phillips 32 32M1N5800A (4k144), LG 32" (4K60) | Gigabyte G32QC (2k165) | Phillips 328m6fjrmb (2K144)
Case Fractal Design R6
Audio Device(s) Logitech G560 | Corsair Void pro RGB |Blue Yeti mic
Power Supply Fractal Ion+ 2 860W (Platinum) (This thing is God-tier. Silent and TINY)
Mouse Logitech G Pro wireless + Steelseries Prisma XL
Keyboard Razer Huntsman TE ( Sexy white keycaps)
VR HMD Oculus Rift S + Quest 2
Software Windows 11 pro x64 (Yes, it's genuinely a good OS) OpenRGB - ditch the branded bloatware!
Benchmark Scores Nyooom.
man i just bend all the pins straight because i like suffering

This one had 6 or 7 damaged ones, straightened them all, slapped in a 2500K and called it a day...

1638765614090.png


Why do you think i love this thread, i just aim for "it works" and leave it at that :p
 
Joined
Jul 3, 2016
Messages
758 (0.27/day)
Guys, thanks for the inputs! :) I had to think outside the box a little and then it hit me! I am not talking about the box of course. :D

The method that I am going to present, somewhere around Christmas, even common folk can do it. I think that I might call it, CPU Socket Replacement without special tools. :D Even if the title is like click bait, in this instance it is something as the title suggests. :) It can even used on many other compatible sockets.

It's magic! :D

I can't spill the beans just yet. What I can tell you though is that the MSI board is working well, and the Asus also works well.

A sure shot method. No risks. Etc. Yada. Yada. :D

More later.
 
Joined
Jul 3, 2016
Messages
758 (0.27/day)
Hi! Hi! Ho Ho! He! He! Basshunter DotA

Dual CPU stuff is AWESOME!!!


I still need a few Opteron 200 series CPUs, Coolers and brackets for the H8DAE. The Supermicro H8DAE motherboard was a complete basket case. Repairs are done. 38+ missing parts, cut traces, missing various plastic bits, mangled caps and everything in between! As expected an FX51 was a no go in the finicky H8DAE. She's a needy mother of all boards! :) I had to try even if I knew that it was a long shot!

More later.
 

Attachments

  • PRW-2021-418.jpg
    PRW-2021-418.jpg
    668.9 KB · Views: 97
  • PRW-2021-426.jpg
    PRW-2021-426.jpg
    1.8 MB · Views: 93
  • PRW-2021-427.jpg
    PRW-2021-427.jpg
    1.5 MB · Views: 81
  • PRW-2021-416.jpg
    PRW-2021-416.jpg
    1.2 MB · Views: 92
  • PRW-2021-417.jpg
    PRW-2021-417.jpg
    2 MB · Views: 82
  • PRW-2021-428.jpg
    PRW-2021-428.jpg
    1.8 MB · Views: 85
Last edited:
Joined
Jul 5, 2013
Messages
25,559 (6.49/day)
Christmas Special in the works. Paradis - Toi Et Moi (Official Video)

CPU Socket "replacement" without special tools aka MSI K7D Master-L

Yes! No special tools required! This is no clickbait posting!

If I did it YOU CAN DO IT TOO! :)

More later.
It'll be fun what we can see that picture. W1zzard is still fixing things..

EDIT:
Seems things are working again. @Robert B, Try uploading your attachment again.
 
Last edited:
Joined
Jul 3, 2016
Messages
758 (0.27/day)
Convextion - Convextion (AA)

CPU Socket "replacement" without special tools aka MSI K7D Master-L MS-6501

Before we get to the matter at hand, we must first read the following lines:

Socket A mechanical load limits

AMD recommends that the mass of a Socket A CPU cooler to not exceed 300 grams (10.6 ounces). Heavier coolers may result in damage to the die when the system is not properly handled.

All socket A processors (Athlon, Sempron, Duron and Geode NX) have the following mechanical maximum load limits which should not be exceeded during heatsink assembly, shipping conditions, or standard use. Load above those limits may crack the processor die and make it unusable.

Location Dynamic Static
Die Surface 445 N(100 lbf) 133 N(30 lbf)
Die Edge 44 N(10 lbf) 44 N(10 lbf)


What does the text above tells us? Well, for what I am going to present today, the most important aspect is the one related to the 300g weight limit regarding the socket A CPU coolers. This is not about chipped CPU dies or coolers installed incorrectly. I never had this problem and I did my share of stupid things.

Ever since I read about that 300g weight limit, the first question that popped in my mind was: WHY? You see, back in the day I never had problems related with the weight of the CPU coolers, but also, I never had to mount a heavy CPU cooler on my CPUs.

So what's the stuff with the weight restriction regarding the socket A CPU coolers?

As the story will unfold you will get an insight that now is a well known fact to me. Back in the day this might've never been an issue but as it happens, many times we take for granted things that aren't meant to be taken for granted.

So without any further ado, let's get on with the show! :)

It all started, on a wet, cold, rainy day at the local flea market. There wasn't much to be seen and I wasn't holding much hope that things would change on that faithful day.

Like many times in the past, I was proven wrong and fate made that I found this huge red beauty lying on a wet and dirty bed sheet, begging to be saved.


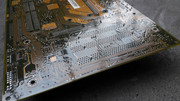
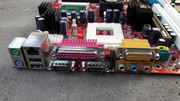
I looked at it and I quickly assessed the situation. What was to be assessed? One look and all you could see was that the board was disfigured. A once mighty piece of tech now a decayed and deprecated mess. The second CPU socket also had a partially torn middle hook but the rest were okay.

I really hate when this happens. I might be too sensible or too involved as I felt the pain of this red mother of all boards. DAMN IT!


Should I zoom in?!


Yep. There seems to be a slight problem with this motherboard. IT IS MISSING AN ENTIRE CPU SOCKET!!!

Other than the minor fact pointed above there was little wrong with the MSI K7D Master-L. This was a fresh kill as I could still pick up the scent of the perpetrator. A recycler-predator or a Cro-Magnon human had its way with this RED HOT board. Damn! If only the dice would've rolled a higher chance for a saving throw! $#&*$*(#&*($(#*&##!!!!


I bought the board without blinking an eye. You see, with experience comes confidence and with confidence you can achieve almost anything. If you believe in something then there is nothing to stop you from trying something.

For many years I roamed the flea market and I have seen my share of socket A motherboards missing their heart and soul, namely the all important CPU socket. Without it there is no coming back from the brink. Many times I thought that those boards were a write off as the damage seemed to be terminal or close to that. Now I have a solution even for this. The mind is a beautiful thing!

The thought that gave birth to the idea that I put in practice in this episode, came to fruition after I found these CPUs, many moons ago. The fact that they came with the plastic shell of the CPU socket was out of the ordinary.


The pictures above tell something that it is blatantly obvious. It is very easy to remove the plastic shell from a socket A CPU socket and also from a socket 7 CPU socket. Ever since I saw this, I saved a sector in my mind and I stored that information for future use. The mind has a curious way of putting things together.

Now comes into play the weight limit restriction for CPU coolers that I mentioned at the start of this thread. You see, as the CPUs got faster so the cooling requirements got tighter. Bigger more performant coolers were required to cool the beasts running faster and faster. This wasn't an issue at first but it got pretty serious later and it goes on to this day. Better coolers had a bolt through mounting mechanism but at the age of the socket A stuff, this was, should we say exotic? Even if motherboards had mounting holes for coolers, I never saw one in the flesh or remember reading about one that made use of those holes. Even if I knew about them, pfft, who needs that stuff when we have clip on CPU coolers that do the same job?!?! This doesn't mean that they didn't exist, it is simply that I considered this information as unimportant. This also means that I have some catching up on that info. Good Ol' Internets to the rescue.

But I digress ...


As I really wanted to save this motherboard, my mind searched relentlessly for a solution. One was a complete CPU socket replacement which was a daunting task for someone who lacks the required tools. Even with the best tools there is no guarantee that things will go according to plan. To this day I still rely on ancient soldering irons, 15W, 40W, 80W, with unregulated temperature and a 100W soldering gun. :D I might have a couple of screws loose but I tight them up on a regular basis! :D

There has to be an easier solution! All the pieces of the puzzle were in the correct place. Then it hit me!

Guinea pig? CHECK! Replacement CPU socket? CHECK! Able and willing? CCCCCCCHHHHHHHHHHEEEEEEEEEEECCCCCCCCCCCCCKKKKKKKKKKKKKKKK!!!


By sheer luck, all of the pins from the CPU socket were in a perfect position. What were the odds?!?!? So what are you waiting for?!?!?

Slap that plastic shell on that puppy and POWER IT UP!!!


The matter of putting back the plastic shell on a socket A CPU socket is as fiddly as a mistress but it is also very easy to be done.

You have to:

1. Start from one side, preferably from the side with which forms the back side of the CPU pins. The part that normally has the Socket 462 string written on it. Starting from the front of the CPU pins means dealing with the tiny hooks of the pins and that is asking for trouble.
2. Work your way through, slowly and gently. Feel each pin through the tips of your fingers.
3. Check to see that row after row of pins, get into their corresponding hole.
4. Row after row, at some point, you will feel that the plastic shell slides in by itself.
5. You are home free.

Easy as that. I am not kidding.

Who knew that CPU socket "replacement" was so easy! You even don't need special tools!
It doesn't come easier than that folks!!!

Little did I know, that on my first try, as it is ALWAYS the case, you make all the mistakes and then some! Phewwww!!! I was in for a ride and it was awesome!

I always thought that CPU sockets were as sturdy as they come. That nothing could move them. They are there to stay.

WRONG!

At the moment in time when I was performing the surgery described above, I was thinking that the plastic shell from the CPU socket had to have some kind of retention mechanism so I took things further and I used a .... HAMMER! Yep! I still laugh when I remember that moment.

Don't worry, the hammer wasn't used to hammer stuff down, it was just used to gently tap on the plastic shell while I used thick pieces of cardboard as cushion on the plastic shell and under the motherboard. I may be mad but not that MAD!


I must confess that while I "hammered" away, I heard an echo in my mind: "All parts should go together without forcing. Therefore, if you can't get them back together again, there must be a reason. By all means, do not use a hammer. IBM maintenance manual 1975".

What was that? Must've been the WIND! :D


To be sure that things are how they are supposed to be, I also used a pair of fine tweezers to gently bend the pins into a position that I thought was correct. This step wasn't necessary but I found out this only later. When you go into uncharted territory there is bound that STUFF will happen! DUDE!


I was ecstatic. Dunk with success. A feeling that cannot be put into words.

When I got home I checked the pictures to see what I have accomplished. I even opened a cold refreshing one to celebrate.

My victory was short lived though, as upon a close inspection of the pictures I got some bad news. My flawless victory wasn't so flawless after all ...


YEP! A God Damned &*#&*(#%(&#(&)(*!!!!!!! bent PIN!!!! F....................................K!!!!!!!!!!!!!!!!!!!!!!!!!!!!!

I took all of the precautions. I checked and double checked. I even triple checked but I still screwed up. BIG TIME!

I took a deep breath and I evaluated my options. There weren't too many. Without finishing my beer I went to where I keep my stuff, (the other part of the town) and I checked to see if what I saw in the pictures was true. And boy was it TRUE.

^$#^&*^$#^$&#^&*$^#&*@#$(*!!!!!!! NOOOOOOOOOOOOOOOOOOOOOOOO!!!!!

To really understand what I felt is hard to put into words. To some, what I do might seem trivial but to me it is a matter of life and death. When I do some damage, even unintentional, it is something that I feel organically. Don't worry though as I recover quickly. :) I have a thick skin and each such experience is treated as a learning experience. Ever since I know myself I have always been a perfectionist but only when it come to me or to what I do as I take people as they are. I learned way back that people do not change or change very little. We should take everyone as they are. But I digress again ...

So, I Fed UP BIG TIME! Bent pin and all ...

I took the rest of the day off.

The next day, a Sunday I was back at the flea market. This time I bought a donor board to see if that 300g weight limit was true. You see, there was something fishy about that plastic shell and I just couldn't put my finger on it. This required more investigation.

Enter an MS-6777 K7N2GM-L. Ignore all of the extra plastic connectors for CD-IN and such, as I took the liberty to "steal" many of them from other damaged boards to be used to complete other boards in my collection. This was just a means to transport them. :D The MS-6777 was trashed and one corner was almost missing. Poor thing. Nevertheless you will get to live in many other motherboards so I thank You for that! I said to it.

Go figure. A RED HOT mobo rescuing another RED HOT mobo. How quaint ...


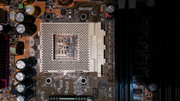
There I was with a socket A CPU socket in front of me. The top plastic cover and steel lever removed. The pins inside were a carbon copy of the ones on the MS-6501.


Let's test the 300g limit!


Shock and awe! Too easy to remove for comfort!

Using a flat head screwdriver with the required width plus some pieces of an old credit card as cushion, I removed the plastic shell in a matter of seconds. WOW! This is too easy! And to think that to that date I handled so many socket A boards by holding the CPU cooler. This was equal to asking for trouble. Damn. Once you overcome the initial threshold required to remove the shell and lift it a little, you just have to use your fingers and it comes off! What the actual ...

Sure, when the CPU is in, friction is multiplied by all of the tiny CPU socket pins, clinging to the CPU pins, but still, this was a shock. Removing the plastic shell without the CPU mounted is easier as the cooler weight limit refers to a mounted cooler but I wasnt prepared for this.


After all the "hammering" I thought that the plastic shell was sitting tight on the K7D Master-L.

WRONG! It came out easier than it went in! What the F......K ?!?!?!!?!?


Now was the time to inspect the damage that I inflicted on my precious MSI K7D Master-L.

Things were looking grim.

One pin collapsed on itself and it broke off when I tried to straighten it up. HOW COULD I not feel it?! If I had a hammer ... all day ...

&*#&$#$%^#&*$%*@^#)!%#$^!(#&!%^%!!!!!!


So there I was with a board that looked worse than it came in, wondering where it all went so wrong. The road to HELL is paved with GOOD intentions!!!

I took a deep breath and I shook off all of the negative thoughts.

Square ONE. Let's start again. This time FTW!!!

I had another socket A motherboard that had a damaged plastic shell on the CPU socket. An ASUS A7A266. Some may say that it is an unremarkable board but as it is the only socket A motherboard with an ALi chipset that I own, it is quite special to me. Not to mention that it is looking quite snazzy. After all it is an Asus (pronounced correctly like on the YT clips) board. It doesn't come more A S U S than that folks!!! :D

So what did I stand to lose? A damaged ASUS board and a donor MSI MS-6777 board? Pfftt, I LIKE THE ODDS!!!

LET'S DO IT!

I performed on the A7A266 the same surgery I did on the MS-6501.

Needless to say that it was a complete SUCCESS!!!


There is still HOPE for the MS-6501!

With renewed forces I was ready to solve the issues of the dual headed monster! FTW!!! FTW!!! FTW!!!

Let's END THIS!!!

The first thing that popped in my mind was to desolder the damaged pin. I took the MS-6777 and with the help of the 15W (unregulated) soldering iron I removed 4 pins quite easily.

Oh YEAH!!! I GOT THIS!!!

Hold your horses! When it came the time for the real deal, removing the VCC_CORE M8 pin from the MS-6501, I hit a brick wall. I tried many things, even a 40W soldering iron, I tried to heat the board with a hair dryer, all the tricks I could think of given the tools at my disposal.

Nothing worked. *#(&%&#^(&^$#_%@&*^!!~~~~~~!!!!!!

After several futile attempts I took a moment to assess the situation. In case you are wondering nothing got damaged. I must say that I did things that I won't speak of, while I tried to remove the damaged pin. All for nothing. If there was a moment that told me that I need better tools it was that moment. Needless to say that I took note but I didn't give up. I needed to sort this motherboard not later but NOW! I was relentless.


When I saw that I wasn't able to safely remove the pin from the MS-6501 even if I was able to safely remove the same pin from the MS-6777, I came up with a bodge, ahem alternative solution.


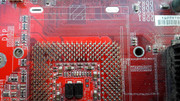
I removed the top part from one pin from the MS-6777 and I soldered it on the MS-6501.

The whole deal was quite tricky. Aligning and soldering the pin required all the hands of the Shiva Goddess but I managed to do it with just two. All in all, it took about four tries to get it right. After soldering the missing part of the pin I ended up with a THICC pin so I had to enlarge the hole in the plastic shell to accommodate the THICC shortstack (gf) pin. Well, take the good with the bad. This isn't pretty but it works. I might desolder the pin when I get the required tools but if it works why mess with it?!


Putting back the plastic shell was a trivial task. Muscle memory and experience were there to guide me. Slowly, gently, this is how a socket is made whole again. RISE my precious. RISE AND SHINE!!! (nondescript incantations in the background).


Did it fly? Ahem, work?!

Well, ...


After I powered up the board, even if I knew that there was no reason that this wouldn't work, albeit the board being literally dead, I was filled with an energy that it is hard to describe. Mental orgasm might cover half of it. I felt that I could do anything, even bend space and time continuum ... ( just kidding).

After the good news, I started experimenting with various BIOS versions to see what makes this board tick. https://www.voodooalert.de/board/fo...23481-almost-abandoned-a-home-for-bios-files/


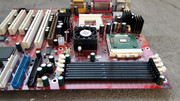
As I only had an AMD Athlon MP 2600+ AMSN2600DKT3C that came with the board and I wanted to test the dual CPU function, I looked for alternatives. On the internet I found that some Duron CPUs with Morgan cores are MP capable so I decided to try it out. I went for broke and I mounted a pair of AMD Duron 1.3GHz with Morgan cores. This didn't go according to plan but at least the two CPUs have been recognized sign that the board was @100%! NICE! I must confess that a few years back I could've bought 10 AMSN2600DKT3C for a trivial sum but I didn't. I mean who needs Athlon MP CPUs? Right?

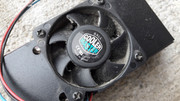
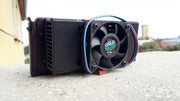
The stock AMD Socket A CPU coolers from the previous episode have been put to good use. I LIKE THEM!!!


So there you have it. CPU socket "replacement" for the dummies. All you need is basic tools and common sense. Lack of any of those means that you should not attempt to perform the operation described above.

I did all the mistakes and then some, so that you won't have to do them. So please take notes.

After the "mechanical" part has been solved I had to do what I do best. Restoring this mother (f) of all boards. Yeah! Get restored ... (non descript words included) !

The board was dirty with thick deposits and mud on some parts, like the PS/2 connectors and the cooler on the NB.


DURON POWA!!!


Don't worry. Where does it hurt? Let me take care of that!


Vintage TIM! YUMMY!


The mighty AMD-762.


The package of the AMD-762 reminded me of the CPU package of the Slot A CPUs. Interesting.


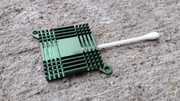
I forgot to mention that the board came with the optional MS-9516 VER:100 4-port PCI Adapter Card. This was included in the package with the MS-6501 because at launch there was a problem with the onboard USB ports so this was a solution to this shortcoming. Neat! Funny fact. On Saturday I didn't buy the MS-9516 but after I read on internet that is came with the MS-6501, the next day, on Sunday I went back and bought it. Lucky me that the seller was still there. :D

The MS-9516 cleaned up nicely. I mean look at it! It is green and shiny!


Things were looking up and I had little reasons to worry. Little did I know. When I thought that I was out of the woods, I was faced with the following issue.

While the CPU was in the socket and the cooler mounted I didn't notice that the plastic shell of the socket would lift from the board. It flexed a little while the cooler was clamped but it was tight and I could handle the board just by holding the cooler. (Don't do this though, 300g and all ...).

So I was faced with this.


I was shocked at how easy was to remove the plastic shell from the CPU socket. What the ... 101 dalmatians is this now?!?! I mean I just lift it with my fingers and it moves?!?!


With this happening I got a definitive answer, to the normal question: How is the plastic shell fixed onto the pins when there are no physical means that keep it in place? Before this development no matter how hard I searched for an answer I couldn't came up with a conclusive one. I had a hunch but it was, you know, just a hunch.

Now the answer was staring me in the eyes.

Yep. Good Ol' friction as I said earlier. Nothing more. 300g. Shuffle the info and spit out the answer. All those many tiny pins are held into tiny slim grooves in the plastic shell. Nothing more. I was shocked to say the least. I was expecting more. Like lets say a few pins with odd shapes that would hold tight on the plastic shell but there were no such exotic measures in place. Man ... 300g ... Now I understand, even if in practice I still feel that the socket is stronger than that. Well, we'd better use those mounting holes around the CPU socket when we need beefy coolers or we move our vintage systems around, or else.

Sure, maybe the fact that the MS-6501 CPU socket has been handled with brute force might explain why the plastic shell came out so easy but is this all that there is to it? It seems so.

I even went so far to try another plastic shell. Nothing changed. For sure, something happened with the shape of the pins or maybe the plastic shell being a recovered one had its grooves enlarged in the process ... the plot thickens ... this is madness ...

I checked the ASUS A7A266 and to my relief the plastic shell held on tightly as it should. So what gives?

When I tweaked the pins on the MS-6501 I meant that I put them in a position that I thought was correct and I didn't use too much force. They weren't deformed or bent as they were already in their tiny holes and there was no room to manoeuvre.

Well, I think that there is a huge difference in the way the plastic shell is removed. Forcefully or purposely.

So what did I do with the MS-6501? Nothing. I just mounted a CPU that will be there at all times. Friction to the rescue. I was able to hold the whole motherboard by the replaced socket and it didn't move at all.

This was a roller coaster ride of the most extreme type. In the end I got more than I hoped for. I was thankful for this. I still wanted more but there was nothing more to be gained from this so I stopped thinking about it.

This board is awesome. A true survivor. Nothing more to be said.


The restoration procedure carried on without a hitch.

As the board already had an encounter with water I did the right thing and I added MORE water and some dish soap for good measure. Did I mention that the water was HOT? NO? My bad! :D


Uhhh! Look! A RAINBOW!!! (not a real one of course, any resemblance with the real thing is purely coincidental unless stated otherwise...)


The NB cooler has been washed entirely with hot water and dish soap. Fan and heatsink. As the fan had a tendency to become stuck even after I cleaned it and lubed it, I polished the sleeve bearing with a bamboo stick and some polishing compound. I also use IPA 99% to clean certain parts. In the end, the cooler was as good as new.


Waiting for some AC MX-4 TIM.


Also ready for some AC MX-4 TIM.


After I did my magic all of the problems and nagging things have been washed away and I was left with the most gorgeous piece of tech this side of the continent. :D


I took my sweet time and it showed. RED! IN YOUR EYES RED! SEE MEE RED! Good thing that the Fire Department folks weren't around as I am pretty sure that they would've hosed down my precious. :D


I want to see MORE!


Totally worth it! Is all I could come up with when I took a hard long look at what I had accomplished. To some, this motherboard might not be a huge deal but to me it was a personal affair. It could've been another board but it happened to be this one. The rest is history.

What did we learn? You can perform a CPU socket "replacement" with basic tools and the all important common sense like I said earlier. Easy as pie. This goes to show that even if something seems stupid or pointless it doesn't necessarily mean that it is stupid or pointless.

I searched for something like the I described above in regard to the CPU socket replacement but I found nothing on the Internet so this means that it is a World Premiere?!?!? Maybe? I am a modest guy and I let my "work" do the speaking for me.

I still haven't gotten over how easy is to remove the plastic shell from the CPU socket. It is mind boggling. Also I never intended to replace the second CPU shell even if one hook is damaged. The rest are in great shape.

My data shows that this method can be applied to socket 7 CPU sockets and maybe other types but until I get to do it on other sockets, take this with a bucket of salt.

Think of how many board that have this exact type of damage, can be saved. I am a little sad of the many boards that I saw and I didn't buy due to this problem when the solution was so easy.

Now you know! Get out there and save some boards!

Merry Christmas everyone!


More later.

gallery: https://postimg.cc/gallery/LhdZtdC
 
Joined
Jul 24, 2021
Messages
450 (0.45/day)
Location
Tornado Alley
System Name Main W10
Processor i7 2700K
Motherboard Gig Z77 HD4
Cooling Xigmatech Tower Cooler
Memory 16 GB G-Skill 1600Mhz
Video Card(s) ASUS GTX 1080ti 11GB
Storage WD Gold 2 TB HD
Display(s) Acer 27" 1440P
Case Phanteks Enthoo Pro
Audio Device(s) JDS Labs Element DAC/AMP
Power Supply Rosewill Hive 650 watt
Mouse MX 518
Keyboard Cherry 3000 with Blues
I'm too old and with fuzzy eyesight and industrial hands to do such work. I'd rather read your stories of HOW to do it correctly. Nice work!
Merry Christmas! :)
 
Joined
Jul 3, 2016
Messages
758 (0.27/day)
Thanks Audioave10! :) No need to worry. This isn't rocket science by any means but I understand your point of view. :)

I hope that the next year I will be able to post many awesome stories as I have plenty of unfinished projects and not to mention that my Spidey-Sense has picked some vibes, sign that I will be finding many more relics of times gone over the course of the following months. :D

Lately I have started to look for storage options and I came up with a few variants. This is still WIP.

More later.
 

Attachments

  • PRW-2021-451.jpg
    PRW-2021-451.jpg
    945.8 KB · Views: 81
  • PRW-2021-452.jpg
    PRW-2021-452.jpg
    1.1 MB · Views: 72
  • PRW-2021-453.jpg
    PRW-2021-453.jpg
    216.6 KB · Views: 76

phill

Moderator
Staff member
Joined
Jun 8, 2011
Messages
15,947 (3.40/day)
Location
Somerset, UK
System Name Not so complete or overkill - There are others!! Just no room to put! :D
Processor Ryzen Threadripper 3970X
Motherboard Asus Zenith 2 Extreme Alpha
Cooling Lots!! Dual GTX 560 rads with D5 pumps for each rad. One rad for each component
Memory Viper Steel 4 x 16GB DDR4 3600MHz not sure on the timings... Probably still at 2667!! :(
Video Card(s) Asus Strix 3090 with front and rear active full cover water blocks
Storage I'm bound to forget something here - 250GB OS, 2 x 1TB NVME, 2 x 1TB SSD, 4TB SSD, 2 x 8TB HD etc...
Display(s) 3 x Dell 27" S2721DGFA @ 7680 x 1440P @ 144Hz or 165Hz - working on it!!
Case The big Thermaltake that looks like a Case Mods
Audio Device(s) Onboard
Power Supply EVGA 1600W T2
Mouse Corsair thingy
Keyboard Razer something or other....
VR HMD No headset yet
Software Windows 11 OS... Not a fan!!
Benchmark Scores I've actually never benched it!! Too busy with WCG and FAH and not gaming! :( :( Not OC'd it!! :(

Mussels

Freshwater Moderator
Staff member
Joined
Oct 6, 2004
Messages
58,413 (8.19/day)
Location
Oystralia
System Name Rainbow Sparkles (Power efficient, <350W gaming load)
Processor Ryzen R7 5800x3D (Undervolted, 4.45GHz all core)
Motherboard Asus x570-F (BIOS Modded)
Cooling Alphacool Apex UV - Alphacool Eisblock XPX Aurora + EK Quantum ARGB 3090 w/ active backplate
Memory 2x32GB DDR4 3600 Corsair Vengeance RGB @3866 C18-22-22-22-42 TRFC704 (1.4V Hynix MJR - SoC 1.15V)
Video Card(s) Galax RTX 3090 SG 24GB: Underclocked to 1700Mhz 0.750v (375W down to 250W))
Storage 2TB WD SN850 NVME + 1TB Sasmsung 970 Pro NVME + 1TB Intel 6000P NVME USB 3.2
Display(s) Phillips 32 32M1N5800A (4k144), LG 32" (4K60) | Gigabyte G32QC (2k165) | Phillips 328m6fjrmb (2K144)
Case Fractal Design R6
Audio Device(s) Logitech G560 | Corsair Void pro RGB |Blue Yeti mic
Power Supply Fractal Ion+ 2 860W (Platinum) (This thing is God-tier. Silent and TINY)
Mouse Logitech G Pro wireless + Steelseries Prisma XL
Keyboard Razer Huntsman TE ( Sexy white keycaps)
VR HMD Oculus Rift S + Quest 2
Software Windows 11 pro x64 (Yes, it's genuinely a good OS) OpenRGB - ditch the branded bloatware!
Benchmark Scores Nyooom.

phill

Moderator
Staff member
Joined
Jun 8, 2011
Messages
15,947 (3.40/day)
Location
Somerset, UK
System Name Not so complete or overkill - There are others!! Just no room to put! :D
Processor Ryzen Threadripper 3970X
Motherboard Asus Zenith 2 Extreme Alpha
Cooling Lots!! Dual GTX 560 rads with D5 pumps for each rad. One rad for each component
Memory Viper Steel 4 x 16GB DDR4 3600MHz not sure on the timings... Probably still at 2667!! :(
Video Card(s) Asus Strix 3090 with front and rear active full cover water blocks
Storage I'm bound to forget something here - 250GB OS, 2 x 1TB NVME, 2 x 1TB SSD, 4TB SSD, 2 x 8TB HD etc...
Display(s) 3 x Dell 27" S2721DGFA @ 7680 x 1440P @ 144Hz or 165Hz - working on it!!
Case The big Thermaltake that looks like a Case Mods
Audio Device(s) Onboard
Power Supply EVGA 1600W T2
Mouse Corsair thingy
Keyboard Razer something or other....
VR HMD No headset yet
Software Windows 11 OS... Not a fan!!
Benchmark Scores I've actually never benched it!! Too busy with WCG and FAH and not gaming! :( :( Not OC'd it!! :(
He doesn't get enough love and attention for what he posts here
You sir, are 1001% correct... @Robert B's level of detail is second to none... I don't think even manufactures are putting that much effort into a product.....
 
Joined
Jul 3, 2016
Messages
758 (0.27/day)
@Robert B

:respect: :respect: :respect: :respect: :respect: :respect: :respect: :respect: :respect: :respect: :respect: :respect: :respect: :respect: :respect: :respect: :respect: :respect: :respect: :respect: :respect: :respect: :respect: :respect: :respect: :respect: :respect: :respect: :respect: :respect: :respect: :respect: :respect: :respect: :respect: :respect: :respect: :respect: :respect: :respect: :respect: :respect: :respect:


That is all.
Man I love this thread!! :cool:

Thanks @phill - I'm just doing my thing, nothing special in my opinion, putting to rest my demons one by one. Nothing too fancy. :D I'm glad that you still love my thread. Looking back, at the 6 years since I post on TPU and 7 years since all this madness has started, I can say without any doubt that I have no regrets. No matter the hours put in, no matter the hundreds of days spent at the flea market, no matter the sleepless nights, I can say that all I do it is totally worth it. I am very grateful that I can present my adventures here on TPU. LONG LIVE TPU! :)

He doesn't get enough love and attention for what he posts here

You might be right but as I said in my earlier posts, what I do comes naturally and this thread is a way of giving back all the knowledge I have gathered from many other people on the internet while adding my personal touch. I'm glad that my thread is watched and from time to time I get some feedback. :)

Guys I appreciate your kind words and also the fact that this thread is read by many other people and this can only make me carry on and continue what I do with added strength and determination. :)

Yesterday I managed to finish a project which was started waaaaay back the previous year. Slot A in the HOUSE. I think that it came out pretty slick in my not so humble opinion, if I may. :D

Also a MIGHTY ABIT BE6 motherboard underwent extensive plastic surgery and registered a complete recovery. One thing is still missing though, a Winbond W83783S chip, which I hope to find at (where else) the flea market. :D

An AOpen AK73(A) had a few caps replaced and it is still alive and kicking.

A QDI KinteiZ 7E also had many caps replaced and it is still alive and kicking.

Also last weekend I got some fresh loot from the flea market and I had some fun with it. :D

More later.
 

Attachments

  • PRW-2022-018.jpg
    PRW-2022-018.jpg
    1.6 MB · Views: 106
  • PRW-2022-017.jpg
    PRW-2022-017.jpg
    262.7 KB · Views: 51
  • PRW-2021-455.jpg
    PRW-2021-455.jpg
    1.8 MB · Views: 63
  • PRW-2021-456.jpg
    PRW-2021-456.jpg
    2.5 MB · Views: 72
  • PRW-2021-458.jpg
    PRW-2021-458.jpg
    1.7 MB · Views: 77
  • PRW-2022-010.jpg
    PRW-2022-010.jpg
    1.2 MB · Views: 67
  • PRW-2022-011.jpg
    PRW-2022-011.jpg
    1.9 MB · Views: 70
  • PRW-2022-012.jpg
    PRW-2022-012.jpg
    1.6 MB · Views: 67
  • PRW-2022-013.jpg
    PRW-2022-013.jpg
    741 KB · Views: 64
  • PRW-2022-014.jpg
    PRW-2022-014.jpg
    3.2 MB · Views: 66
  • PRW-2022-005.jpg
    PRW-2022-005.jpg
    1.6 MB · Views: 78
  • PRW-2022-006.jpg
    PRW-2022-006.jpg
    424.1 KB · Views: 67
  • PRW-2022-007.jpg
    PRW-2022-007.jpg
    1.5 MB · Views: 50
Last edited:
Joined
Jul 5, 2013
Messages
25,559 (6.49/day)
I'm just doing my thing, nothing special in my opinion, putting to rest my demons one by one. Nothing too fancy. :D I'm glad that you still love my thread.
You clearly love doing what you do. That's why we keep coming back! It's a joy to watch you do your thing and we appreciate it!

EDIT:
Nice cap job on the Slot1 board! It's too bad QDI is gone, you might have been able to update the BIOS to support that AthlonXP properly.

EDIT2:
I spoke too soon;
The above BIOS is dated 2004, where as yours is dated 2001(from the screenshot).

Also found this from the Wayback machine;
I've looked at both files and they look legit. Might do you a fair treat!
 
Last edited:
Joined
Jul 3, 2016
Messages
758 (0.27/day)
I had a Duron 1.4GHz for testing that is why it said unsupported CPU. I'll update the BIOS on both boards. :) Those are KT133 and KT133A boards. Real early Sk. A stuff. A Thunderbird is all they (will ever) need :D

Thanks for the links lex. :) I also did a full backup of the UH Ultimate Hardware site before it went on the Wayback Machine.
 
Joined
Jul 3, 2016
Messages
758 (0.27/day)
A delve into the world of cosmetic surgery aka MSI MS-6191

As we all know, flea market stuff is bound to have a few problems that can range from just a few scuffs and scratches to total carnage.

"Back in the day", I mean a few years ago :D, I used to discard the thought of buying basket cases and I chose the safe route of buying nothing but the best examples of old tech that I could find.

This approach quickly changed when my skills regarding the restoration of electronic relics (and more) have increased. Today I feel confident to tackle even the most difficult cases. As I said in the past, where people see stuff beyond rescue I see opportunity.

The star of today's episode is a Slot A motherboard that had a few cosmetic issues but luckily was still in one piece.

I have a huge soft spot for slot A stuff and when I find such beauties I snatch them in a heartbeat. After 7 years of collecting I have 10 motherboards and 25 CPUs. It took a while to get here but I am not complaining. The only nagging thing is that all of the CPUs are in the range 500-800MHz and nothing in the 800-1000MHz range. No matter, I am patient and one day I'll find the rest of them. :)

But I digress ... Slot A motherboard. Flea market.

The Slot A setup I found was composed of an MSI MS-6191 VER:1 Micro ATX AMD-750 Irongate motherboard and an AMD Athlon 800MHz CPU - K7800MPR52B A.


Apart from the fact that the kit was very dirty, the most obvious problems were:

* a damaged AGP slot which was missing a piece of the plastic,
* a few minor scratches on the back,
* the FDD connector had a torn piece of plastic
* one IDE connector was missing a piece of plastic
* the CPU cartridge was heavily scratched.

The problems above are nothing terminal and a very good example of the flea market being gentle for once. :D

The AGP slot was like a sore eye and I had to deal with it ASAP as it made me hurt internally just by looking at it. The good news was that the pins inside the slot were in perfect condition so the damage was just cosmetic.

I looked for solutions and the first thing that came into my mind was the use of a two part epoxy. The stuff I used is called POXIPOL but any two part epoxy might work just as good.

I cut some pieces from an old credit card and I made a formwork to try and mimic the shape of a regular AGP slot.


Next I prepared the two part epoxy and I put the correct amount to fill the gaps. After I put the epoxy, I used small bits of credit card to squeeze out the excess and also stabilize the adhesive.


The operation was a complete success from the get go.

A few hours later I removed the formwork and I was greeted by a lovely sight.


I was so captured by the problem of the AGP slot that I didn't even bother to clean the motherboard before I got to work.


While the epoxy was left to dry a few hours more, I tackled the CPU which was destined to receive the full treatment that I am capable at this date.

Like the motherboard, the CPU was also very dirty. The combo was a match made in heaven. Equally dirty but dirty in a different way. The motherboard was covered by a fine dust and the CPU was clogged with dust and some type of hair.


A dust cake of perfect shape.


The poor cooling fan. Not a Cooler Master anymore. An asthmatic cooler at best.


While I looked at this kit, I hoped that it will still be alive and kicking as I never powered it up before I started working on it.

The NB was still covered in TIM. A sign that maybe the motherboard has survived this ordeal as the moment of pressing the POWER button was still far away.


I rolled up my sleeves and I got to work. Nothing was left to chance. Broken bits of plastic have been glued back. Missing bits have been scavenged from donor parts and made to fit. The results have been decent in my opinion.


A sign of things to come.


Tests have been made to ensure that the fix was viable. In regard to the broken side tabs on IDE and FDD ports due to the pulling of the cables when the PC has been taken apart, I have a couple of solution besides gluing back the missing bits. One is a complete change of the plastic socket with a new one after the old one was heated up a little with a hot air station set on a low temperature and removed. Steps to protect the surrounding area must the taken. The second solution is the trimming of the sides with a fine blade so that they look the same.


I am sure that you have observed that the AGP port is brown and the epoxy is grey. To cover the grey epoxy I used a combination of red, black and light brown markers. While I wasn't able to match the color exactly, one thing was obvious: this fix was just what was needed in this case.

Before I used the markers to cover the grey epoxy I took my sweet time to trim the excess epoxy and give the repaired area the best look it could possibly have, without compromising the strength of the repair.

In the pictures we can see why the edge of the AGP slot tore off. Some motherboards of that era, had, on some slots, be it ISA, PCI or AGP, a small bit of metal in the shape of the letter "U" that acted as a protection against damaging the slot while the card was taken out. This measure was just plain old stupid in my opinion as it did more bad than good. That metal "clip" also had a couple of hooks that dug into the plastic, the double scars on the slot indicate this. So when the card was taken out by force this translated in the damage that we can see.


I was lucky when I judged the thickness of the epoxy as there is a very small gap between the video card and the edge of the slot. Ideally the gap would've had to be a smidgen bigger but I left it as is. More strength.


This is what I meant by decent results. Gluing broken stuff is not an exact science.


Minor scratches. To check if there are cut traces I use a magnifying glass. If I have doubts, I use some IPA 99% on the scratches and I check again. The liquid fills the gaps and gives a better look at the damage. Think of when you polish a scratch in the paint of a car. By polishing, you change the way light falls on the scratch.


Dull looking ports.


Let's return to the matter of the CPU which was destined to receive THE TREATMENT!


The cooling fan was taken apart. The ball bearing was cleaned and greased. Servicing ball bearings is a hit and miss situation but I do it regardless. Opening them means damaging the dust cover a little but I flip them when I put them back so that no dirt will get inside.


Looking good!


To make the plastic case of the CPU look better, I applied some aluminum tape for protection and I used a lighter to soften the edges of the scratches. I took great precautions regarding the time the flame spent on the plastic. The results have been very good. The marks will remain but they look better than before.


Nothing was left to chance.


To open up the CPU cartridge I used a tried and true method that I presented many years ago.


As it is always the case, one edge of the CPU heat plate is harder to remove. In some instances this results with a broken bit of plastic on the plastic case. This happened here too. The fix is to use some superglue.

I used a screw to hold the broken bit in place while the glue hardened.


I used a small drill and by twisting it using my hand, I enlarged the hole so that the plastic case will be easier to remove in the future. Alternatively you can use a fine round file.


Naked.


The "glue" job.


The CPU PCB, plastic case, heat plate and heatsink have been thoroughly cleaned.


The sloppy applied TIM on the cache chips has been replaced with Arctic thermal pad that was custom fitted. I used a small metal cylinder to flatten and create the perfect custom width of thermal pad. Each PCB is different. I started doing this a while back. After each pass with the metal cylinder I check the gaps between the heat plate and the cache chips and not mention the all important CPU die. I repeat this until I get perfect results. Also I keep an eye out for PCB warping by checking the alignment of the edge connector of the CPU. The excess thermal pad is trimmed with a small blade.


After some work, the results speak for themselves.


All this work and no test can make a man loose his temper. So, after restoring the CPU, a motherboard test was also necessary to establish if the combo was still among the living.

Would you look at that!


To my joy both the motherboard and the CPU were still alive and kicking!

The original push-pins from the NB have been replaced with identical ones that were better in the sense that they stayed in the PCB holes not like the original ones that would just pop out unexpected. You really do not wan this to happen.


About the same time I was having fun with the MSI MS-6191 and the 800MHz beast,I also acquired a 500MHz slot A CPU. So as these were fit to each other like peas in a pod, I also decided to include it in this episode.

More "skull cracking" ensued. The CPU model was AMD-K7500MTR51B C. It sported a dual FAN setup and underwent the same treatment like the 800MHz CPU got.

The plastic case was damaged as the ape that removed it from the slot used a screwdriver. Thankfully the PCB wasn't affected.

The job of separating the plastic case from the CPU was as easy as it can be as the stubborn bit was already torn. More gluing was in order. Like glue BOSS!!!


Removing the broken piece was hard. Initially I tried a flat screwdriver and a credit card piece to try an separate them. This didn't work, so I resorted to a pair of fine pliers.


The PCB was a few millimeters away from disaster.


500! BABY! The OG AMD Athlon!


The heatsink was washed and some rust was eliminated.


IPA 99%!


Done!


The Neolec fans were restored.

While I was cleaning them, I dropped one of the propellers and one blade broke off. Bummer! No matter as I managed to glue it back and it was as good as new. Even at full rpms there was no vibration. Nice! This stuff usually doesn't work but hey I am not complaining!


Just a regular day at the office.


The sleeve bearings were polished using a bamboo stick and some polishing paste. They were cleaned with IPA 99% after.


Ready to rumble in the jungle!


Black paint was used to cover the scars in the metal.


As expected, the CPU ran fine. No stress here. From all of the slot A CPUs that I have, only one is not working. A 750MHz model that looks like a tank has driven over it. These classic Athlon CPUs are hardcore and they can take some abuse without blinking and eye.


After I finished the 500MHz Athlon, I went on to restore the motherboard which ended looking as good if not better than it was new.

Glass!


No doubt about it. This motherboard is a looker alright!


A small touch up and she's done and done!


From lost to found and loved.


This adventure reminded me of my first slot A motherboard, a PC CHIPS/PcCHIPS/PC-CHIPS M800LMR V1.3A and the four CPU I bought with it. That was the spark that ignited my passion for Slot A.


Now at the end of this episode, I can safely say that I have saved a fine combo from the jaws of the crusher. The fixes weren't something exotic or difficult. This stands as a testimony that simple things correctly applied can solve many problems as long as you are willing to try. There is no harm in trying. Even in failure there is much to be learned.

gallery: https://postimg.cc/gallery/NytC52G

More later.
 
Joined
Jul 24, 2021
Messages
450 (0.45/day)
Location
Tornado Alley
System Name Main W10
Processor i7 2700K
Motherboard Gig Z77 HD4
Cooling Xigmatech Tower Cooler
Memory 16 GB G-Skill 1600Mhz
Video Card(s) ASUS GTX 1080ti 11GB
Storage WD Gold 2 TB HD
Display(s) Acer 27" 1440P
Case Phanteks Enthoo Pro
Audio Device(s) JDS Labs Element DAC/AMP
Power Supply Rosewill Hive 650 watt
Mouse MX 518
Keyboard Cherry 3000 with Blues
In 1983 I had a slight accident and went to the Doctor to get 10 stitches in my arm. I can promise you that you have a great deal more talent than he did.
:clap:
 

phill

Moderator
Staff member
Joined
Jun 8, 2011
Messages
15,947 (3.40/day)
Location
Somerset, UK
System Name Not so complete or overkill - There are others!! Just no room to put! :D
Processor Ryzen Threadripper 3970X
Motherboard Asus Zenith 2 Extreme Alpha
Cooling Lots!! Dual GTX 560 rads with D5 pumps for each rad. One rad for each component
Memory Viper Steel 4 x 16GB DDR4 3600MHz not sure on the timings... Probably still at 2667!! :(
Video Card(s) Asus Strix 3090 with front and rear active full cover water blocks
Storage I'm bound to forget something here - 250GB OS, 2 x 1TB NVME, 2 x 1TB SSD, 4TB SSD, 2 x 8TB HD etc...
Display(s) 3 x Dell 27" S2721DGFA @ 7680 x 1440P @ 144Hz or 165Hz - working on it!!
Case The big Thermaltake that looks like a Case Mods
Audio Device(s) Onboard
Power Supply EVGA 1600W T2
Mouse Corsair thingy
Keyboard Razer something or other....
VR HMD No headset yet
Software Windows 11 OS... Not a fan!!
Benchmark Scores I've actually never benched it!! Too busy with WCG and FAH and not gaming! :( :( Not OC'd it!! :(
This thread @Robert B is just full of pure awesomeness, amazing talent, amazing hardware and some of the most amazing attention to detail I've ever seen.

This is why this is one of my most favourite threads in TPU. The love and respect you have for the hardware and determinism is out of this world and to you sir, you have my utmost respect for everything that you do because its not just about the effort putting into it to clean it up and test it, its the effort that goes into each and every post you make which again, you have my utmost respect for.

Love the thread sir, love your love of hardware. Now all we need is a respect emoji......... :) :respect: :respect: :respect: :respect: :respect: :respect: :respect: :respect: :respect: :respect: :respect: :respect: :respect: :respect: :respect: :respect: :respect: :respect:
 
Joined
Jul 3, 2016
Messages
758 (0.27/day)
@phill - Thank You my brother! :) I appreciate your kind words as I know that they come straight from your heart! :)

It took a while to get back on track. I was quite busy with at least 40 ongoing projects in the sense that each new arrival had to be tested and eventually repaired so I didn't have enough time to post and finish restoring too many parts.

The next episode will be called: From left 4 dead to standing tall!

If in the previous episode we had to deal with the letter "A" in this episode we will have to deal with the number "1".

The whole story is peppered with twists and turns, small problems and big problems.

The only thing that matters, though, is that a great motherboard deemed to be too expensive to fix was eventually fixed
. :D

More later.
 

Attachments

  • PRW-2022-001.jpg
    PRW-2022-001.jpg
    385.6 KB · Views: 43
Last edited:

phill

Moderator
Staff member
Joined
Jun 8, 2011
Messages
15,947 (3.40/day)
Location
Somerset, UK
System Name Not so complete or overkill - There are others!! Just no room to put! :D
Processor Ryzen Threadripper 3970X
Motherboard Asus Zenith 2 Extreme Alpha
Cooling Lots!! Dual GTX 560 rads with D5 pumps for each rad. One rad for each component
Memory Viper Steel 4 x 16GB DDR4 3600MHz not sure on the timings... Probably still at 2667!! :(
Video Card(s) Asus Strix 3090 with front and rear active full cover water blocks
Storage I'm bound to forget something here - 250GB OS, 2 x 1TB NVME, 2 x 1TB SSD, 4TB SSD, 2 x 8TB HD etc...
Display(s) 3 x Dell 27" S2721DGFA @ 7680 x 1440P @ 144Hz or 165Hz - working on it!!
Case The big Thermaltake that looks like a Case Mods
Audio Device(s) Onboard
Power Supply EVGA 1600W T2
Mouse Corsair thingy
Keyboard Razer something or other....
VR HMD No headset yet
Software Windows 11 OS... Not a fan!!
Benchmark Scores I've actually never benched it!! Too busy with WCG and FAH and not gaming! :( :( Not OC'd it!! :(
@phill - Thank You my brother! :) I appreciate your kind words as I know that they come straight from your heart! :)

It took a while to get back on track. I was quite busy with at least 40 ongoing projects in the sense that each new arrival had to be tested and eventually repaired so I didn't have enough time to post and finish restoring too many parts.

The next episode will be called: From left 4 dead to standing tall!

If in the previous episode we had to deal with the letter "A" in this episode we will have to deal with the number "1".

The whole story is peppered with twists and turns, small problems and big problems.

The only thing that matters, though, is that a great motherboard deemed to be too expensive to fix was eventually fixed
. :D

More later.
As always sir @Robert B I look forward to the next adventure when you post it!! :) I'm a kind of blunt person, but I never see a reason to lie about anything, so definitely, from the heart :) Please do keep up the most excellent work :)
 
Top