
- Joined
- Jan 24, 2009
- Messages
- 435 (0.08/day)
- Location
- New York
| System Name | Unobtainium |
|---|---|
| Processor | 3600X |
| Motherboard | Gigabyte X570S Aorus Elite AX |
| Cooling | DH15 Chromax Black |
| Memory | 32GB Ripjaws 3200MHz |
| Video Card(s) | EVGA 3080 Ti FTW Ultra w/ Alphacool Eiswolf |
| Storage | 500GB SN750 | 3.84TB Micron 7450| 4TB SP XS70 |
| Display(s) | Asus 144Hz display + LG Ultrafine 4k |
| Case | Evolv X |
| Audio Device(s) | Schiit Hel + AKG Q701s |
| Power Supply | Seasonic FOCUS PX-750 |
| Mouse | Logitech G502 Hero |
| Keyboard | Filco Majestouch II |
| Software | Windows 11 |
OmegaAI's Newbie Guide to Intel Overclocking (C2D/C2Q or below)
This guide is liable to change at any time. If you see any problems with it, please contact me or post what you thing should be changed. Thank you!
FEEL FREE TO TELL ME IF I NEED TO ADD OR FIX SOMETHING!
Newbie Guide to Overclocking
Intel Processors Only (c2D/C2Q or below!)
MAKE SURE YOU KEEP YOUR MOBO'S FRAKING MANUAL! READ IT SO YOU KNOW WHAT EACH MAIN OPTION IS FOR!
Please note, this guide can be modified to help with overclocking of an AMD based processor.
What is overclocking?
Overclocking is a process of making various components in a computer to go faster than their stock speeds. So if you buy a processor (lets say an e7300 2.5GHz) and make it go faster (lets say 3.6GHz), that can be deemed as an overclocking.
HALT! Do not proceed any further until you have read this:
Dell, Gateway, eMachine, etc... do not overclock very well, so proceed at your own risk. You break, it is your fault.
A little bit more of some explanation:
This guide is intended to explain how to overclock and its uses. It was made for those who have computers (moreover, motherboards and other components) that support overclocking. If you bought a brand of computer like Dell, Sony, Gateway, HP, eMachine, or any other crappy PC (not saying all of them are) that comes for a store like Walmart, Best Buy, or Circuit City, then this guide does not pertains to you. Even though it is possible to overclock these systems with software, it is not recommended nor advised. This guide is meant for anyone who has a motherboard made by ASUS, GIGABYTE, Abit, DFI, (sometimes Intel), or any other well known brand know for their boards and overclocking abilities. But be forewarned, not all boards made by these companies are made to overclock. Check and see if yours does for going any farther than this final line.
Note: There are ways to bypass hardware overclocking via software, but it is not recommended and can make your PC unstable, even rending it unable to stay stable to till the system is returned to normal. Overclocking software is made for boards that supports overclocking so that changes can be made without having to restart.
Further notes:
-Motherboards not designed for overclocking will not go as far in overclocking, become unstable sooner, and heat far quicker.
-Computers with boards that do not support overclocking do not have adequate cooling.
-If your computer uses a Celeron, Sempron, or equivalent processor, then no matter how much you overclock, there is no way around the sheer junky design. They are great for learning how to overclock, but there is not much of a yield in performance that you may be looking for in gaming or benchmark (or measuring how well your computer performs).
Why would you want to overclock if it could be damaging?
Simple, to get more out of what you payed for. Overclocking is similar to going and upgrade a car's engine by boring out its piston chambers and adding better fuel injection, air intake, transmission, etc..., but there is always a risk in doing so. But it all boils down to one thing: performance. It is hard to fry your system if you are careful and know what you are getting yourself into. If you are careful about what you do, then it is rather hard to do any kind of permanent damage to your system by pushing it to its sheer limits.
As with any kind of performance enhancement, there is a level of risk involved. The first and foremost danger is heat. Heat will degrade and damage your components beyond repair if left unchecked and will most definitely lower your system's life span. When you overclock, you are making your computer do more work than it is used to, thus it is going to generate more heat, so having a good cooling system is essential. If you do not have sufficient cooling, then your system could and will overheat. Overheat by itself cannot kill your computer though, the only way for that to happen is to repeatedly overheat it time and time again past the recommended temperatures. YOU SHOULD ALWAYS TRY TO STAY AT OR BELOW YOU CPU's MAX RATED TEMPERATURE! If you go above this, you can risk harming your CPU. Do so at your own risk. I have overclocked an e7300 to 3.8 (which has a max temp of 74.1C) but had temps of 71C! So running it like that for long term was out of the question. Run your CPU at 5-10C above its max temp for short periods only and ONLY for benchmarking purposes only. DO NOT DO IT FOR LONG TERM!
And as luck would have it, you do not have to be overly worried about your system overheat as there will be signs before you system becomes a fried potato. Random crashes are probably the most common sign. Overheat is easily prevented by the use of thermal sensors which can tell you how hot your system is getting. If you see temperatures that you think is too high, then either run at a lower speed, or get better cooling, which I will cover later on.
The other danger of overclocking is voltage. Too much, and you can significantly shorten your components' lifespan. A small boost will not do much, but if you plan on a rather hefty overclock, you may want to be aware that it will decrease the lifespan of your computer's components. But this is usually not an issue since most people who will overclock do not use their components for more than 4-5 years and there is a good chance your components will not fail before 4-5 years regardless of the voltages running through it. Most processors are designed to last in upwards of ten years. So most of of the time, loosing a few of those years is worth the performance gained for overclocking.
Disclaimer for my own protection:
WARNING!!! READ THIS DAMN WARNING!!! I DO NOT WANT TO HERE YOU WHINE YOU BROKE YOUR COMPUTER SO READ THIS WARNING!!!!!!
Overclocking can really mess things up, and it wares down your hardware and its life-expectancy. In other words, the more you overclock, the shorter your computer will live (like how an F1 car's engine must be replaced after each race). If you attempt to overclock, then I, Lord Xeb, of this forum and its inhabitants are not responsible for any damage or destroyed hardware when using this guide. Follow at your own risk.
Please note, much of this first part of this guide is based off (but not plagiarized) of this other guide, thus credit should go to it:
http://forums.extremeoverclocking.co...ad.php?t=79266
NOTE: Before you begin to overclock, you MUST have good cooling. PLEASE go to the cooling section for more information.
Now onto the basics:
Like all other tech out there, you must understand how things work before you can fix them. The processor is the most common component to overclock, so we will start there.
Any time you buy a processor (a.k.a., CPU or Central Processing Unit), not matter what brand it is, or where it came from, you will see and speed on it (now-a-days in GHz), this speed is its operating speed. To give you better understand of what this measurement means, I must first tell you what its speed stands for. The speed of a processor is how many clock cycles, in a certain alloted period time, in which it can carry out a given amount of instructions. So, as one can think, the more clock cycles the better. The same would go for a car, the more horsepower, the more power it has to do its job. One MHz (megahertz) is 1 million clock cycles per second. 1 GHz (gigahertz) is 1 billion clock cycles per second. So if a processor is rated at 2.66GHz, then it can go through 2,660,000,000, or 2 billion, six-hundred sixty-six clock cycles in EVERY SECOND! Mind boggling eh? The latest processor (AKA Core i7), can do more work than a Pentium 4 ever could. So speed means more than just muscle, It means bragging rights and the ability to get things down faster!
The primary goal of an overclocking is to raise this said speed of a processor so that I can do more clock cycles per second, this more instructions, and ultimately, more data. This is how your processor's speed is calculated:
FSB (Front Side Bus, in MHz) x Multiplier = speed in MHz
The FSB (AKA Front Side Bus), is the channel through which your system communicates with the your CPU, Common sense would tell you that if you make this faster, they entire system would run faster as well (which of course it will).
Since you will be dealing with the real FSB, not the actually CPU speed, it is important to keep this is in mind for both the FSB and the CPU.
The multiplier is just like it sounds. It is used to multiply the FSB to give you your processor speed. So if you have a processor running at 400Mhz FSB with a multiplier of 9, then you will have a processor speed of 3600MHz, or 3.6GHz.
So the equation is like so:
400MHz (FSB) x 9 (multiplier) = 3600MHz CPU speed, or 3.6GHz (note, most processors do not run at this speed even when at stock).
Now for a little info on the FSB:
When you set your FSB for you CPU, you are also increasing the FSB of the board as well. To find this out, multiply the FSB speed you set your CPU by 4 and that will give you your FSB speed (this is Intel only).
From here on, this guide will be about overclocking Intel processors only.
How to Overclock:
If you understand how a processor gets its speed rating, then you may proceed. If not, ask a few questions and I, or someone else will try and help you.
Where do I begin?
Hmm, that is a toughy. Lets just start by going into the most common way of overclocking, which is through your motherboard's BIOS (or Basic Input/Output System). In order to reach your BIOS, you need to push delete, F1, F2m or any other F button when your system first boots (you will see a splash screen at right as soon as you turn your PC on). Most of the time there is a screen that that will tell you what button to push to access the BIOS (sometimes also referred to as Setup).
This is what it will look like for a Gigabyte board. The MIT is for OC

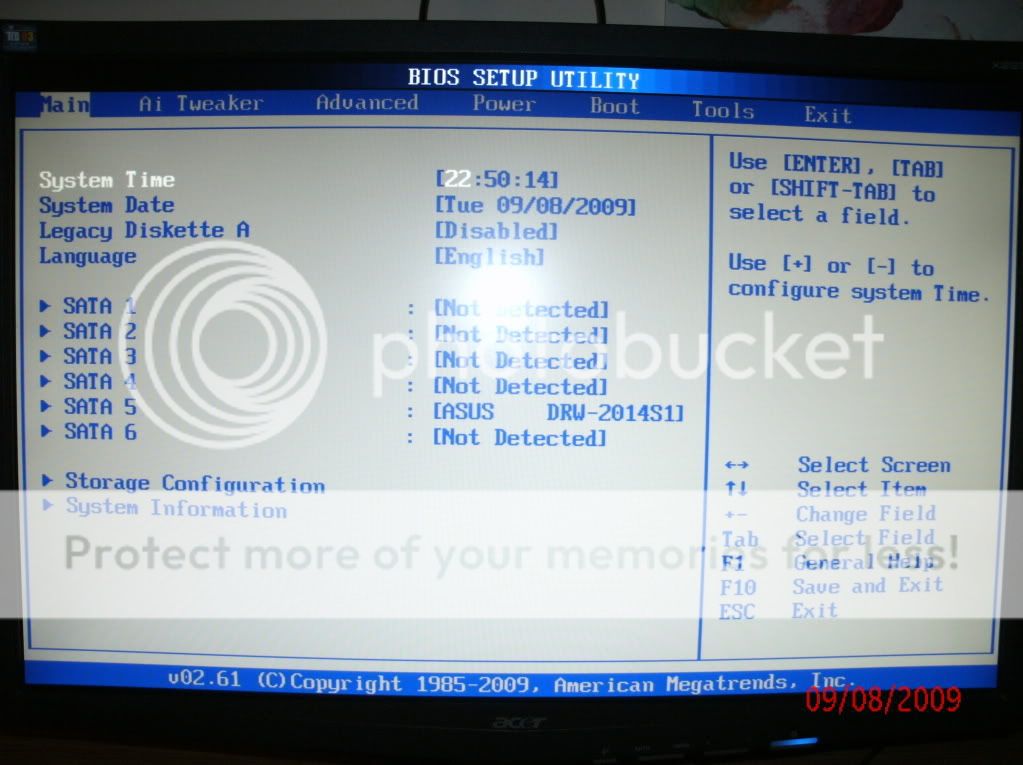
Here is an ASUS P5Q-E (Intel P45 chipset) . The AI Tweaker is for OC:
Gigabyte X48 chipset board. MIT is for overclocking:

- Thank you pm1109
This is an XFX 650i bios. The 650i is a nVidia chipset. Advanced Chipset Features is for OC:

- Thank you micah_jones
This is an MSI X48 chipset. Advanced BIOS features is for OC:

- Thank you olio
Once you are in the BIOS (you will know because it will be a blue screen with white text options for you to choose and no, it will not look like the BSOD), assuming you BIOS do support overclocking, you should access to the necessary settings to overclock you system (refer to your mobo's manual). They most common settings that you will be able to adjust are as follows:
Multiplier, FSB, RAM Timings, RAM speed, and RAM Ratio.
Basically, you are trying to get the highest FSB x Multiplier formula that you can possibly achieve (within reason). By far the easiest way is the raise the multiplier (which I have stated before), but this will not work on most processors unless they are an EE (Extreme Edition, released by Intel), or a BE (Black Edition, released by AMD). It is pretty self explanatory, but there is one issue you may encounter: RAM issues. I will cover this in a bit, so be patient.
This one is for those of balls of steel (not really) and requires a little bit more tinkering sometimes. You can try to lower the Multi. and raise the FSB even higher. Just to give you an Idea. Lets say that you are OC (overclocking) your computer and you have hit a wall at 360FSB with a Multi of 10 (or 3.6GHz), you can drop your multiplier from 10 to 9 and increase your FSB to 400 (400 x 9 = 3.6GHz). Both of these combinations will give you the same result. Now you are thinking to yourself, “So, both combinations give me the same speed, so that would mean I have the same performance?” I am sorry to bust your bubble and ruin your cloud of glee, but WRONG!
Since the FSB is the channel at which your entire system communicates with your CPU, then you would want it as high as possible. So, if you your FSB is running at 360 instread of 400, then your CPU is running at a higher speed, but your system is running slower.
Now, ideally you would want to lower the multiplier and increase the FSB to as high of a speed that you can get, but this can cause problems in the chain of command (or so to speak) since your system depends on the FSB (and most notibly, the RAM). This concluses my lecture on this tidbit and leads me to the next, the RAM (or Random Access Memory, but don't worry, you do no need to know what every acronym means).
If you do not understand what I am talking about, read the rest of this guide and look at the Simple Guide.
*Please note: Retail computers use motherboards with rather crappy BIOS which contain no overclocking support at all. The only way to overclock these system is to softclock (use software to overclock) like http://www13.plala.or.jp/setfsb/ (SetFSB). Since I have never used this before to OC, I do not recommend using (unless you can find someone on OCN that can help overclock with software).
What does RAM have to do with Overclocking?
Before I go any further, I would like to give you a like to the RAM Information Link of AWESOMENESS! http://forums.pcper.com/showthread.php?t=320351
Now let me repeat what I have said before (sorry for beating a dead horse): The FSB is the way your system talks to your CPU (and the way it talks back and screams information to your data hungry processor). So increasing the FSB will overclock the rest of your system (most notably your RAM).
Here is a little list to give you an idea of your RAM speeds (in MHz).
DDR2 533 – Max FSB: 266.5
DDR2 667 – Max FSB: 333.5
DDR2 800 – Max FSB: 400
DDR2 900 – Max FSB: 450
DDR2 1000 – Max FSB: 500
DDR2 1066 – Max FSB: 533
DDR2 1200 – Max FSB: 600
These are the most common DDR2 RAM speeds on the market and the maximum FSB you can go to before you top out the max speed your ram likes the FSB to go. Any higher than the MFSB (my version of Max FSB), then you could encounter some stability issues (and in some cases your system will just cycle on and off or you will get the dreaded BSOD (Blue Screen Of Death). If you get the BSOD, just reduce your FSB till you are at your ram's maximum (or below maximum) FSB. If it cycles on and off, you and reset your CMOS (either by putting moving using a jumper [Consult your motherboard's manual for this] or by removing the button cell battery on your motherboard) and start over. It will take you a few tries before you get things right, but hey, practice max perfect, so why not?
Now then, to understand this, you must know roughly how your RAM works. RAM, or Random Access Memory, serves as temporary storage of files that the CPU needs to access quickly. For instance, when you load a level in a game, your CPU will load the level into RAM so that it can access the information quickly whenever it needs to, instead of loading the information from the relatively slow hard drive.
If you still do not understand, think of the RAM as the work bench that has all of your tools and necessities to complete a job. The bigger the table, the more work space your have to work with and the more space you can put stuff out that you may need for your project. Also, the faster your RAM is, the faster you able to access the stuff on that table. Now think of your hard drive as a garage that has all of your stuff packed away in boxes and on shelves. It is relatively slow to go and look through the hard drive to find stuff (as it would be look though all those boxes), so you lay your stuff on a table. Making any sense yet? If not, then sorry, but this is not for you. If yes, then you may now proceed.
Most DDR2 RAM runs at a speed between 533MHz and 1066MHz (sometimes higher). Since this considerably slower than your FSB (well, unless your FSB is 1066 or 800).
I will not go into any detail as to why this is so, or the history of the RAM. Just know that your ram runs a half the speed of what is rated at (because it runs on a multiplier of 2x). Thus you need to look at things in this perspect.
So what does all this have to do with Overclocking?
Good question. As I have said before (sorry), when you raise the FSB, you effectively overclock everything else on your system. This applies to RAM as well, RAM that is rated at 800, is rated to speeds up to 400MHz. For a non-overclock, this doesn't mean much. But for those of use that are, it means a world of difference.
Now in lamen terms, if you raise the FSB above the Maximum FSB, then you will have some problems. And the biggest problem you will have is that your system will crash. There are ways around this though. And of which, you have 3 options:
Buying faster RAM (which means $$$ for higher speeds), using a FSB : RAM ration (also know as FSB : RAM), or overclocking your RAM.
FSB : DRAM Ratio: If you are running a higher FSB than what your RAM supports, you can run your at a slower speed. This can be done by use the FSB : DRAM ratio. For the most part, the ratio allows you to select a ratio of numbers, lets say 5:4, that sets the ratio at which your FSB and RAM run at. Lets say that you are running a FSB of 1000 and the RAM can only run up to 800, and you run a 5:4 FSB : DRAM ratio, then for every 5MHz that the FSB goes up, your RAM goes up 4MHz. So if you are running a FSB of 1000MHz and you have a 5:4 ratio, then your RAM will be running at 800MHz, which makes everything happy. Simple enough, eh? But there is an issue with this method.
Running at a FSB : DRAM ratio causes gaps between the time the FSB and RAM communicate with each other. This slows down your system and that wouldn't be there if the FSB and RAM were running at the same speed. Getting the most speed out of your system will mean that the FSB : DRAM ratio will not be the best of solutions.
Buying Faster RAM:
This can be a solution to your problem if your are running your FSB faster than your RAM, but the issue is that you will have to spend money to do so which is unnecessary. The faster the RAM, the more you are going to be paying. Since overclocking your slower RAM is cheaper, it seems like the more logical choice.
Overclocking Your RAM:
Overclocking RAM is very similar to overclocking a CPU. The principle behind it is similar as well: to get the RAM to run at a higher speed that it was supposed (or rated at) to run. And thank god the similarities end there because then RAM overclocking RAM would be a little more complicated and more of a pain to write about >.>
On high-end boards, you can adjust the RAM speed rather easily and get it to run at the speed you want because they offer more FSB : DRAM ratios or they offer unlinking of the FSB and DRAM. This lets you set your speeds to your liking . So if you want to take your 800MHz RAM and get it to run at 900MHz, your system could crash (if it is crappy RAM). To solve this, just increase your voltages to your RAM by a notch or two and try again. DO NOT GO OVER 2.3v FOR DDR2 RAM!!!!!!! You may have to run your RAM at a low overclock than what you want, but that is what happens with RAM, you cannot pick the speed you want, you got to ease it to it. On lower-end boards, you only have the FSB : DRAM ratio. This is a pain and requires tinkering. You may have to mess your RAM timings, which is fun (not), ut I will get into that here further on. But you can try and run you RAM at a higher voltages, and/or just change the FSB : DRAM ratio till your system is stable and your RAM is happy. You may have to have the RAM run at a lower speed but you then you can run “tighter” timings then (well sometimes). For some good info on RAM, go to the HOLY GRAIL OF RAM!
Now for timings:
There are 5 main timings in for RAM and they are the following:
tCL (CAS Latency)
tRCD
rRP
rRAS
Command Per Clock (CMD)
The best way I can describe each of these is to use the examples used in a MaximumPC magazine I got, which describes things as if they were a librarian going for row to row of books in a library >.>
“tRCD setting, for example, describes how much time the librarian has to get to a certain row on a shelving column. Set it too low, and she can't get to the row where your desired book is.
Say she reaches the row, tRAS determines the amount of time the librarian can linger there find your book.. tRP is how much time the librarian has to get from the row she was at to the bottom of the ladder.
TCL is how much time the librarian has to move from one shelf of books to a different one. Setting this too low is like asking her to move a 30-foot ladder 100 yrds in 2 seconds. TRAS is basically how much time overall the operation takes to climb the ladder, get your book and get off. CMD is the amount of time between one request and the next.”
Now there are 2 approaches to this:
A) Set the timings to your timings on your RAM (that is if it they were provided). Now if you got fancy, high-end RAM. The ram is good looking with the heat spreaders for no reason. They have also been test and binned to run at optimal speeds. Commonly, the RAM timings for DDR2 is 5-5-5-15-2T or 5-5-5-18-2T, or 6-6-6-18-2T. In BIOS talk, that is for the first one would be:
tCL – 5
tRCD – 5
tRP – 5
tRAS – 15
CMD – 2T
B) Now the other method is to let your chipset choose the timings for you, but this can through your RAM out of whack and make it run slower than what it should be. That is why you want to have your RAM running at or lower than your RAM's stated timings since they are designed to run at those timings, at a set speed and voltage. But that does really mean much if you can make it run at faster speeds with the same timings because it just comes to the RAM being faster
Now for a little bit of a explanation with the terms “tighter” and “looser”.
Tighter would refer to the RAM timings being set lower than they are stated to run at. For example:
If your RAM is rated to run at 800MHz with timings of 5-5-5-18-2t and you tune your ram to run at 800MHz and timings of 4-4-4-12-2T, the you have just made your RAM “tighter”.
“Looser” would be the opposite. If the RAM is rated for 5-5-5-18-2T at 800MHz and you run it at 6-6-6-18-2T, you made the RAM run at “looser” timings.
BEFORE YOU PROCEED, YOU MUST HAVE AT LEAST ONE OF THE FOLLOW PROGRAMS FROM EACH CATAGORY:
Stability testing:
OCCT (run LinPack for at least 2 hours. If you get an error before 1 hour, you are not stable enough, after 1 hour, your pretty good. If you get no errors even after 2 hours of testing, then try for a 24/7 test. Set the time to infinite and let it run at 90% RAM for 12-24 hours. If you get no errors, then you are rated as 24/7 stable!)
Orthos – Run for at least 2 hours with small FFT. You can use this for 24/7 stress testing
IntelBurnTest (really intense program) – If you can pass 50 runs, your pretty good to go
Prime95 – Must run at least 2 hours of small FFT to be deemed stable. You can use the and run a 24/7 test if you like. If you pass, your 24/7 stable. After you past 2 hours, run for 2 hours on blend to be extra sure
Thermal Monitoring:
NOTE: Temp monitors are not extremely accurate down to the tooth and can vary in temp 5-10C +/-.
Core Temp – Rather effective and really reliable. Leave the max TJ at 100 (note: Not all processors have a TjMax of 100, just experiment or look on google. The Q6600 G0 has a TjMax of 90C while the e7300 is 100C).
Real Temp – Another rather accurate program (but note, still can vary +/- 5C). Leave TJ max at 100 (note: Not all processors have a TJ of 100, just experiment or look on google).
Speed fan – Junk for monitoring CPU, but feel free to use it if you like. It has been known to be off by as much as 10C!
Everest – Really nice but you have to pay for and it monitors EVERYTHING on your computer!
Riva Tuner w/ RealTemp plug in – I use this and it works great
Voltages and their effects:
As you increase the frequencies and speed of your machine, it is going to eventually encounter a point were it will not post at all (mean nothing will happen, you just get a beep from your mobo and then it just sits there or turns itself off or cycles on and off). When this happens you have two choices:
1)Downclock to a lower speed on your processor, memory, and/or FSB
2)Increase the voltage to parts of you motherboard, memory or CPU to see if you can get it to work at those speeds.
If you choose option 2, then you are on the track to more speed, but also more heat. Heat is one of the BIGGEST reasons why people cannot overclock to uber high speeds. But, there is also another problem, too much voltage. Although you can increase the voltage on a 45nm chip (Codename: Yorksfield (Core 2 Quad 45nm) and Wolfdale (Core 2 Duo 45nm) CPU) to 1.6v (Yes, you can do this, Intel just says you cannot go above 1.3625v since the chips were not designed for it and/or they do not want you to overclock anymore than that), but the heat produced is crazy at anything above 1.45v on a 45nm chip.
I only have experience with 45nm chips so I will try to add my 2 cent for 65nm chips. Feel free to correct me and I will fix it.
Now, lets get back onto task. If your system does not post or you get BSOD of death or freezing, your system is unstable and needs some more tweaking, which usually is just a little bit more voltage. You need to do so in steps as to find out what needs to be done.
1.Start by increasing the voltage to your CPU by one notch, then save and reboot your machine and if that solves anything. If not, go and increase the voltage by one notch and try again. Do this until you reach 1.3625v on your (or maybe 1.4v on a 65nm chip?). If that still doesn't solve anything then you need to go to step 2.
2.If step one doesn't work, then go and increase your North Bridge voltage (check with your motherboard's manual for what it would be called) by one notch, save then reboot and check again. If not, repeat like in step one till you hit about 1.3v (again I only have experience with the P45 chipset so feel free to correct me or give me info on the other chipsets like the P35 and whatnot). If there is still a problem, then go to step 3.
3.Next try and increase the voltage to your RAM if your RAM is above its rated speed. Do this till you get to about 0.1v above your RAM's rated voltage. If not, go to step 4.
4.Try to increase the FSB Termination (again, check your motherboard's manual if you do not know what it is called on your motherboard) by a notch till you get to about 1.3v. DO NOT GO ABOVE 1.34v (at least on a P45 chipset and the 45nm chips, not sure what the others are like).
5.If the others have not worked yet or you still having some stability issues, increase your PLL by one notch and ONLY one notch. Just raising it on notch took my e7300 from 65C at 3.8 to 71C! Use at your own risk.
6.[/B]Now, if you are still having issues (and lets hop not), increase your CPU's voltage by a singe notch till you get to 1.45v. DO NOT GO ABOVE THIS ON AIR COOLING EVER! Heat will just be insane, so be careful.
7.Finally, if you are still having issues, then I have bad news for you. You are going to have to reduce your overclock because it is too dangerous to proceed unless you have balls of steel or have the experience to do so.
If you managed to get your CPU stable after all of that, then start trying to decrease on of the voltages by one notch until you become unstable or you hit your stock (default) voltages. Do this all the way down the line till you are right on the edge of your voltages. This will increase the life span of you parts and also decrease the heat produced.
COOLING!
When you overclock, the components produce more heat. The more heat that is produced, the shorter lifespan your components will have. Furthermore, the hotter a CPU gets, the slower it will go and you are pushing it to its engineering limits! There are 4 types of cool:
Air Cooling – This is the most common method of cooling and also the least expensive. When searching for a heat sink (which most if not all of them are air cooled), you want to look for one with really good bottom (either HDT (Heatpipe Direct Touch) or a copper bottom that is flat). You also want something that has at least 3 or more heat pipes that are copper as well as good fins that are made out of aluminum or copper. The 3 best heat sinks you can get are Xigatek HDT-s1283 and Xigatek HDT-s1283 Dark Night, or the TRUE. The Xigateks ave HDT and the TRUE has copper bottom. The way to increase the effiency of these heat sinks you must have good air flow and a good fan to move air through them. For some good cooling, putting an Ultra Kaze 3000RPM fan onto the Xigatek or TRUE offers the best air flow, but also creates a lot of noise. You just got use a fan that has good airflow and if you prefer, not very loud.
Water Cooling – Water cooling is the second most popular cooling out there. It utilizes waterblocks (or special blocks that attach to different components and have water going through them), a series of hoses, pump and radiators to keep your system cool. The radiators also use fans to move air through them, so having good air flow through them will give you the best results. Please note, I have no experience with water cooling.
DICE or Liquid Nitrogen – This method is the most extreme and is only used to get the highest clocks possible. It utilizes a pot that is put onto the CPU and liquid nitrogen or dry ice (DICE) is added into it to cool things down below zero (in some cases, -100C or below). This keeps things cool and a strange effect takes place as well. The cooler the CPU gets, the clocks continue to go up. This method allows for EXTREME overclocks to take place, but can only be used for short periods of time since the DICE and NL2 actually evaporates.
For long term cooling, use water cooling or heat sinks. This is recommended for the newbies to overclocking seeing they do not take much skill to setup correctly and are the easiest to do.
Case – Having a good computer case that has good air flow can knock your temps down by +10C. It also keeps your other components cool. The more air you can move through your case, the more heat that can be removed. I have (or have had) an Antec 300 case that moves 208CFM (cubic feet per minute) into the case and 288CFM out of the case. The negative pressure that my setup creates allows for the hot air and keeps the dust moving, which causes the dust and hot air to be “sucked” out of the case, thus keeping the machine cooler and cleaner. Furthermore having good cable management inside the case to keep the turbulence down inside the case. This also increases air flow and decreases the number of hot spots (or areas of stale air) as well.
TEH SIMPLE GUIDE!
Now that you have read the entire guide and now have some knowledge under your belt, let me explain to you the correct fashion of overclocking your processor.
There are two ways you can OC
1. Balls to the Walls - This is where you pic a CPU, termination, NB (North Bridge) voltages, FSB : DRAM ratio, and FSB x Multi, and just stick with it. That is what I did on my first OC ever and got 3.6 right off the bat stable (but used higher voltages than needed). I will explain this some more he in a bit.
2. Grandpa Style[/B] - This is where you go and put your multi as high as it will go (except on the extreme editions) and slow increase your FSB by about 5-10MHz till your proc becomes unstable to the point where you cannot boot into windows anymore. Then increase your voltages by 1-2 notches and repeat..... I hate this because it takes too long.
Alright now on to further explaination.
BttW (Balls to the Walls)
1. The first thing you should do before you do this is to download CPU-z and look at the specs of your processor. It should say what model it is and tell you its Stepping (AKA revision). Some stepping revisions perform better than others (Like the G0 stepping for the Q6600 is famous becaue it OC better than the B3 stepping).
2. Google your processor and read up what other people have achieved with your processor (and if your lucking, what stepping their proc was). See if you can find out what kind of voltages they used.
3. Pick something about 1/4 of the highest OC (that did not need Dry Ice or LN2) that you found and figure out the multi and FSB that you need for that (get it close). If it is any higher than about 5-10% overclock, increase your CPU voltage by about 1-2 notches and see what you get.
To get your the OC Percentage (OCP), you use the following equation:
BE SURE TO USE MHz! To figure that out, take your OC (like 3.8) and multiply it by 1000 (because there are 1000MHz in a GHz so 3.8GHz would be 3800MHz).
(C-S)/S
C = Current OC
S = Stock Speed of Proc
Current overclock minus stock speed of processor divided by the stock speed of processor.
EX.
Current OC - 3.6GHz (3600MHz)
Stock speed - 2.66GHz (2667MHz)
3600 - 2667 = 933
933/2667 = ~34.98% OC (this is good OC for an e7300 E0 stepping )
Be sure to set the following voltages like this:
PLL - leave alone
CPU (or FSB) termination - increase by about 2-3 notches
DRAM voltage - set to specification of RAM
FSB : DRAM ratio - Set this so that your RAM is at or below its rated speed
NB voltage - increase by 2-3 notches
After setting everything, go and see if you can boot into windows. If not, go and increase your CPU voltage by 1-2 notches again till you can boot into windows. Then use one of the stress testing programs above and stress for NO LESS THAN 2 HOURS! If you pass, your stable
If not increase your NB voltage by another 1-2 notches and try again.
If that fails, increase your CPU termination by 1-2 notches (for 45nm CPUs DO NOT go above 1.34v for 24/7 use. Your proc will die a quick and miserable death).
If that fails, increase your PLL by 1 notch and 1 notch only!
If that fails, increase your CPU voltage by another 1-2 notches.
If that fails, continue increase your CPU voltages by 1 notch and making sure your CPU's temps stay below 60-65C. DO NOT INCRESE VOLTAGES ABOVE 1.5v ON AIR FOR 45nm! IT WILL DIE! 65nm processors are fine to about 1.6v (but get really really freaking hot).
If that fails, back your OC down by about 25-50MHz and test. Just keep on doing this till you get stable!
<.< See why it is called balls to the walls?
Grandpa Style - This method is like above but you take your time.
BE SURE TO KEEP YOUR DRAM AT OR BELOW ITS RATED SPEED! IF YOU KNOW YOU RAM CAN OC WELL, THEN LET IT OC
Set the following voltages like this:
PLL - leave alone
CPU (or FSB) termination - increase by about 2-3 notches
DRAM voltage - set to specification of RAM
NB voltage - increase by 2-3 notches - you can take this all the way up to 1.4-1.5v on a P45 chipset.
Slowly increase your FSB with the highest multiplier you can get by about 5-10MHz at a time. Then try and boot into windows.
Once Windows fails to boot, increase your CPUs voltage by 1-2 notches and try again.
Continue doing this you get a speed you like. Then try and do a stress test.
If the stress test fails, back down your FSB by 5-10 MHz until it passes 2 hours.
I know it is sloppy but it works and that is the best way I can explain it.
Thank you for reading!
Note: This is still in Beta and will remain in beta till further notice since it can be changed at any time.
Info on how I got my OC on my Q6600:
My Q6600 is a G0 stepping (which on these chips means awesome overclocking potential) and has a VID of 1.275. VID is the stock voltage on your chip and can determine (sometimes) if your chip will be a good overclocker since it will need less voltage.
The first thing that I did was get an idea of what I was dealing with. You got to do some research on good as to what you can get with your chip and what you need to get to there. For my chip, I need to have a higher FSB because my max multi is 9x. So if I do 9x400 I will only have 3.6 (which is not bad for a chip that has a stock clock of 2.4). Since my chip will need a higher FSB, you will have to increase the voltage on your FSB and make sure your RAM can OC. My RAM is known to OC to 1000MHz easy.
Since I am a gun-hoe type of person, I just jumped right in and shot for 3.6. I got that rather easy with 1.48125v (I could have tried to do a lower voltage, but I didn't really feel like it)). That is not bad and my temps were about 63-65C. Since this chip is known to take a beating and keep on going, I was not too worried. This is what I did to get to 3.6:
Q6600 is G0 stepping
MB Intelligent Tweaker(M.I.T.)
Robust Graphics Booster ...............: [Auto]
CPU Clock Ratio ...........................:9x
Fine CPU Clock Ratio.....................:
CPU Frequency .............................:3.6
Clock Chip Control
Standard Clock Control
CPU Host Clock Control..................: [Enabled]
CPU Host Frequency (Mhz) ............: 400
PCI Express Frequency (Mhz) .........: 100
C.I.A.2 ...........................................:[Disabled]
DRAM Performance Control
Performance Enhance...................: [Standard]
X.M.P………………………………………………..: Disabled
(G)MCH Frequency Latch...............: 400
System Memory Multiplier ..............:[2.00D]
Memory Frequency (Mhz) ...............:800 800
DRAM Timing Selectable ................: [Manual]
Standard Timing Control
CAS Latency Time........................: 5
tRCD ......................................... 5
tRP'........................................... 5
tRAS.......................................... 18
Advanced Timing Control
? Haven;t changed anything in here
Driving Strength Profiles
Same here
Motherboard Voltage Control
Load Line Calibration........................[enabled]
Voltage Type.………... [manual
CPU
CPU Vcore….……….........................: 1.48125
CPU Termination…..... ......................:1.32
CPU PLL………………….....................:1.5
CPU Reference.…………........................:0.760V [Auto]
MCH/ICH
MCH Core……………....1.4
MCH Reference….…….Auto
MCH/DRAM Ref.…...... auto
ICH I/O……………….....1.570V
ICH Core…………...……1.200V
DRAM
DRAM Voltage ……....2.2 (2.1 normal)
res is auto
REMEMBER, EACH BOARD IS DIFFERENT AND EACH CHIP IS DIFFERENT! THESE SETTINGS ARE WHAT I USED AND ARE TO BE A GUIDE AS TO WHAT YOU NEED TO DO! 45nm CHIPS DO NOT NEED NEARLY AS MUCH VOLTAGE AS WHAT I NEED!
Now since the TjMax (the max temp the chip can run at before it starts to degrade or just up and die) is 90C, I tried to make sure I kepted my max temps below 80C (I run my chips hard).
Right now I am running 3.717 with the following changed to the above settings:
FSB: 413
CPU voltage (vcore): 1.525
At these settings my chip is 24/7 stable and I have max temps during Intel Burn Test of 75C. My temps never get above 68C when I am running Prime95 or Orthos.
I manged to get 3.825 with the following changed:
FSB: 413
vcore: 1.575
My chip just wanted to go higher and higher. I could have got 3.9 out of it, but then the chip would need 1.6v and be running at almost 90C if not more....
Hope this helps out some.
This guide is liable to change at any time. If you see any problems with it, please contact me or post what you thing should be changed. Thank you!
FEEL FREE TO TELL ME IF I NEED TO ADD OR FIX SOMETHING!
Newbie Guide to Overclocking
Intel Processors Only (c2D/C2Q or below!)
MAKE SURE YOU KEEP YOUR MOBO'S FRAKING MANUAL! READ IT SO YOU KNOW WHAT EACH MAIN OPTION IS FOR!
Please note, this guide can be modified to help with overclocking of an AMD based processor.
What is overclocking?
Overclocking is a process of making various components in a computer to go faster than their stock speeds. So if you buy a processor (lets say an e7300 2.5GHz) and make it go faster (lets say 3.6GHz), that can be deemed as an overclocking.
HALT! Do not proceed any further until you have read this:
Dell, Gateway, eMachine, etc... do not overclock very well, so proceed at your own risk. You break, it is your fault.
A little bit more of some explanation:
This guide is intended to explain how to overclock and its uses. It was made for those who have computers (moreover, motherboards and other components) that support overclocking. If you bought a brand of computer like Dell, Sony, Gateway, HP, eMachine, or any other crappy PC (not saying all of them are) that comes for a store like Walmart, Best Buy, or Circuit City, then this guide does not pertains to you. Even though it is possible to overclock these systems with software, it is not recommended nor advised. This guide is meant for anyone who has a motherboard made by ASUS, GIGABYTE, Abit, DFI, (sometimes Intel), or any other well known brand know for their boards and overclocking abilities. But be forewarned, not all boards made by these companies are made to overclock. Check and see if yours does for going any farther than this final line.
Note: There are ways to bypass hardware overclocking via software, but it is not recommended and can make your PC unstable, even rending it unable to stay stable to till the system is returned to normal. Overclocking software is made for boards that supports overclocking so that changes can be made without having to restart.
Further notes:
-Motherboards not designed for overclocking will not go as far in overclocking, become unstable sooner, and heat far quicker.
-Computers with boards that do not support overclocking do not have adequate cooling.
-If your computer uses a Celeron, Sempron, or equivalent processor, then no matter how much you overclock, there is no way around the sheer junky design. They are great for learning how to overclock, but there is not much of a yield in performance that you may be looking for in gaming or benchmark (or measuring how well your computer performs).
Why would you want to overclock if it could be damaging?
Simple, to get more out of what you payed for. Overclocking is similar to going and upgrade a car's engine by boring out its piston chambers and adding better fuel injection, air intake, transmission, etc..., but there is always a risk in doing so. But it all boils down to one thing: performance. It is hard to fry your system if you are careful and know what you are getting yourself into. If you are careful about what you do, then it is rather hard to do any kind of permanent damage to your system by pushing it to its sheer limits.
As with any kind of performance enhancement, there is a level of risk involved. The first and foremost danger is heat. Heat will degrade and damage your components beyond repair if left unchecked and will most definitely lower your system's life span. When you overclock, you are making your computer do more work than it is used to, thus it is going to generate more heat, so having a good cooling system is essential. If you do not have sufficient cooling, then your system could and will overheat. Overheat by itself cannot kill your computer though, the only way for that to happen is to repeatedly overheat it time and time again past the recommended temperatures. YOU SHOULD ALWAYS TRY TO STAY AT OR BELOW YOU CPU's MAX RATED TEMPERATURE! If you go above this, you can risk harming your CPU. Do so at your own risk. I have overclocked an e7300 to 3.8 (which has a max temp of 74.1C) but had temps of 71C! So running it like that for long term was out of the question. Run your CPU at 5-10C above its max temp for short periods only and ONLY for benchmarking purposes only. DO NOT DO IT FOR LONG TERM!
And as luck would have it, you do not have to be overly worried about your system overheat as there will be signs before you system becomes a fried potato. Random crashes are probably the most common sign. Overheat is easily prevented by the use of thermal sensors which can tell you how hot your system is getting. If you see temperatures that you think is too high, then either run at a lower speed, or get better cooling, which I will cover later on.
The other danger of overclocking is voltage. Too much, and you can significantly shorten your components' lifespan. A small boost will not do much, but if you plan on a rather hefty overclock, you may want to be aware that it will decrease the lifespan of your computer's components. But this is usually not an issue since most people who will overclock do not use their components for more than 4-5 years and there is a good chance your components will not fail before 4-5 years regardless of the voltages running through it. Most processors are designed to last in upwards of ten years. So most of of the time, loosing a few of those years is worth the performance gained for overclocking.
Disclaimer for my own protection:
WARNING!!! READ THIS DAMN WARNING!!! I DO NOT WANT TO HERE YOU WHINE YOU BROKE YOUR COMPUTER SO READ THIS WARNING!!!!!!
Overclocking can really mess things up, and it wares down your hardware and its life-expectancy. In other words, the more you overclock, the shorter your computer will live (like how an F1 car's engine must be replaced after each race). If you attempt to overclock, then I, Lord Xeb, of this forum and its inhabitants are not responsible for any damage or destroyed hardware when using this guide. Follow at your own risk.
Please note, much of this first part of this guide is based off (but not plagiarized) of this other guide, thus credit should go to it:
http://forums.extremeoverclocking.co...ad.php?t=79266
NOTE: Before you begin to overclock, you MUST have good cooling. PLEASE go to the cooling section for more information.
Now onto the basics:
Like all other tech out there, you must understand how things work before you can fix them. The processor is the most common component to overclock, so we will start there.
Any time you buy a processor (a.k.a., CPU or Central Processing Unit), not matter what brand it is, or where it came from, you will see and speed on it (now-a-days in GHz), this speed is its operating speed. To give you better understand of what this measurement means, I must first tell you what its speed stands for. The speed of a processor is how many clock cycles, in a certain alloted period time, in which it can carry out a given amount of instructions. So, as one can think, the more clock cycles the better. The same would go for a car, the more horsepower, the more power it has to do its job. One MHz (megahertz) is 1 million clock cycles per second. 1 GHz (gigahertz) is 1 billion clock cycles per second. So if a processor is rated at 2.66GHz, then it can go through 2,660,000,000, or 2 billion, six-hundred sixty-six clock cycles in EVERY SECOND! Mind boggling eh? The latest processor (AKA Core i7), can do more work than a Pentium 4 ever could. So speed means more than just muscle, It means bragging rights and the ability to get things down faster!
The primary goal of an overclocking is to raise this said speed of a processor so that I can do more clock cycles per second, this more instructions, and ultimately, more data. This is how your processor's speed is calculated:
FSB (Front Side Bus, in MHz) x Multiplier = speed in MHz
The FSB (AKA Front Side Bus), is the channel through which your system communicates with the your CPU, Common sense would tell you that if you make this faster, they entire system would run faster as well (which of course it will).
Since you will be dealing with the real FSB, not the actually CPU speed, it is important to keep this is in mind for both the FSB and the CPU.
The multiplier is just like it sounds. It is used to multiply the FSB to give you your processor speed. So if you have a processor running at 400Mhz FSB with a multiplier of 9, then you will have a processor speed of 3600MHz, or 3.6GHz.
So the equation is like so:
400MHz (FSB) x 9 (multiplier) = 3600MHz CPU speed, or 3.6GHz (note, most processors do not run at this speed even when at stock).
Now for a little info on the FSB:
When you set your FSB for you CPU, you are also increasing the FSB of the board as well. To find this out, multiply the FSB speed you set your CPU by 4 and that will give you your FSB speed (this is Intel only).
From here on, this guide will be about overclocking Intel processors only.
How to Overclock:
If you understand how a processor gets its speed rating, then you may proceed. If not, ask a few questions and I, or someone else will try and help you.
Where do I begin?
Hmm, that is a toughy. Lets just start by going into the most common way of overclocking, which is through your motherboard's BIOS (or Basic Input/Output System). In order to reach your BIOS, you need to push delete, F1, F2m or any other F button when your system first boots (you will see a splash screen at right as soon as you turn your PC on). Most of the time there is a screen that that will tell you what button to push to access the BIOS (sometimes also referred to as Setup).
This is what it will look like for a Gigabyte board. The MIT is for OC
Here is an ASUS P5Q-E (Intel P45 chipset) . The AI Tweaker is for OC:
Gigabyte X48 chipset board. MIT is for overclocking:
- Thank you pm1109
This is an XFX 650i bios. The 650i is a nVidia chipset. Advanced Chipset Features is for OC:
- Thank you micah_jones
This is an MSI X48 chipset. Advanced BIOS features is for OC:
- Thank you olio
Once you are in the BIOS (you will know because it will be a blue screen with white text options for you to choose and no, it will not look like the BSOD), assuming you BIOS do support overclocking, you should access to the necessary settings to overclock you system (refer to your mobo's manual). They most common settings that you will be able to adjust are as follows:
Multiplier, FSB, RAM Timings, RAM speed, and RAM Ratio.
Basically, you are trying to get the highest FSB x Multiplier formula that you can possibly achieve (within reason). By far the easiest way is the raise the multiplier (which I have stated before), but this will not work on most processors unless they are an EE (Extreme Edition, released by Intel), or a BE (Black Edition, released by AMD). It is pretty self explanatory, but there is one issue you may encounter: RAM issues. I will cover this in a bit, so be patient.
This one is for those of balls of steel (not really) and requires a little bit more tinkering sometimes. You can try to lower the Multi. and raise the FSB even higher. Just to give you an Idea. Lets say that you are OC (overclocking) your computer and you have hit a wall at 360FSB with a Multi of 10 (or 3.6GHz), you can drop your multiplier from 10 to 9 and increase your FSB to 400 (400 x 9 = 3.6GHz). Both of these combinations will give you the same result. Now you are thinking to yourself, “So, both combinations give me the same speed, so that would mean I have the same performance?” I am sorry to bust your bubble and ruin your cloud of glee, but WRONG!
Since the FSB is the channel at which your entire system communicates with your CPU, then you would want it as high as possible. So, if you your FSB is running at 360 instread of 400, then your CPU is running at a higher speed, but your system is running slower.
Now, ideally you would want to lower the multiplier and increase the FSB to as high of a speed that you can get, but this can cause problems in the chain of command (or so to speak) since your system depends on the FSB (and most notibly, the RAM). This concluses my lecture on this tidbit and leads me to the next, the RAM (or Random Access Memory, but don't worry, you do no need to know what every acronym means).
If you do not understand what I am talking about, read the rest of this guide and look at the Simple Guide.
*Please note: Retail computers use motherboards with rather crappy BIOS which contain no overclocking support at all. The only way to overclock these system is to softclock (use software to overclock) like http://www13.plala.or.jp/setfsb/ (SetFSB). Since I have never used this before to OC, I do not recommend using (unless you can find someone on OCN that can help overclock with software).
What does RAM have to do with Overclocking?
Before I go any further, I would like to give you a like to the RAM Information Link of AWESOMENESS! http://forums.pcper.com/showthread.php?t=320351
Now let me repeat what I have said before (sorry for beating a dead horse): The FSB is the way your system talks to your CPU (and the way it talks back and screams information to your data hungry processor). So increasing the FSB will overclock the rest of your system (most notably your RAM).
Here is a little list to give you an idea of your RAM speeds (in MHz).
DDR2 533 – Max FSB: 266.5
DDR2 667 – Max FSB: 333.5
DDR2 800 – Max FSB: 400
DDR2 900 – Max FSB: 450
DDR2 1000 – Max FSB: 500
DDR2 1066 – Max FSB: 533
DDR2 1200 – Max FSB: 600
These are the most common DDR2 RAM speeds on the market and the maximum FSB you can go to before you top out the max speed your ram likes the FSB to go. Any higher than the MFSB (my version of Max FSB), then you could encounter some stability issues (and in some cases your system will just cycle on and off or you will get the dreaded BSOD (Blue Screen Of Death). If you get the BSOD, just reduce your FSB till you are at your ram's maximum (or below maximum) FSB. If it cycles on and off, you and reset your CMOS (either by putting moving using a jumper [Consult your motherboard's manual for this] or by removing the button cell battery on your motherboard) and start over. It will take you a few tries before you get things right, but hey, practice max perfect, so why not?
Now then, to understand this, you must know roughly how your RAM works. RAM, or Random Access Memory, serves as temporary storage of files that the CPU needs to access quickly. For instance, when you load a level in a game, your CPU will load the level into RAM so that it can access the information quickly whenever it needs to, instead of loading the information from the relatively slow hard drive.
If you still do not understand, think of the RAM as the work bench that has all of your tools and necessities to complete a job. The bigger the table, the more work space your have to work with and the more space you can put stuff out that you may need for your project. Also, the faster your RAM is, the faster you able to access the stuff on that table. Now think of your hard drive as a garage that has all of your stuff packed away in boxes and on shelves. It is relatively slow to go and look through the hard drive to find stuff (as it would be look though all those boxes), so you lay your stuff on a table. Making any sense yet? If not, then sorry, but this is not for you. If yes, then you may now proceed.
Most DDR2 RAM runs at a speed between 533MHz and 1066MHz (sometimes higher). Since this considerably slower than your FSB (well, unless your FSB is 1066 or 800).
I will not go into any detail as to why this is so, or the history of the RAM. Just know that your ram runs a half the speed of what is rated at (because it runs on a multiplier of 2x). Thus you need to look at things in this perspect.
So what does all this have to do with Overclocking?
Good question. As I have said before (sorry), when you raise the FSB, you effectively overclock everything else on your system. This applies to RAM as well, RAM that is rated at 800, is rated to speeds up to 400MHz. For a non-overclock, this doesn't mean much. But for those of use that are, it means a world of difference.
Now in lamen terms, if you raise the FSB above the Maximum FSB, then you will have some problems. And the biggest problem you will have is that your system will crash. There are ways around this though. And of which, you have 3 options:
Buying faster RAM (which means $$$ for higher speeds), using a FSB : RAM ration (also know as FSB : RAM), or overclocking your RAM.
FSB : DRAM Ratio: If you are running a higher FSB than what your RAM supports, you can run your at a slower speed. This can be done by use the FSB : DRAM ratio. For the most part, the ratio allows you to select a ratio of numbers, lets say 5:4, that sets the ratio at which your FSB and RAM run at. Lets say that you are running a FSB of 1000 and the RAM can only run up to 800, and you run a 5:4 FSB : DRAM ratio, then for every 5MHz that the FSB goes up, your RAM goes up 4MHz. So if you are running a FSB of 1000MHz and you have a 5:4 ratio, then your RAM will be running at 800MHz, which makes everything happy. Simple enough, eh? But there is an issue with this method.
Running at a FSB : DRAM ratio causes gaps between the time the FSB and RAM communicate with each other. This slows down your system and that wouldn't be there if the FSB and RAM were running at the same speed. Getting the most speed out of your system will mean that the FSB : DRAM ratio will not be the best of solutions.
Buying Faster RAM:
This can be a solution to your problem if your are running your FSB faster than your RAM, but the issue is that you will have to spend money to do so which is unnecessary. The faster the RAM, the more you are going to be paying. Since overclocking your slower RAM is cheaper, it seems like the more logical choice.
Overclocking Your RAM:
Overclocking RAM is very similar to overclocking a CPU. The principle behind it is similar as well: to get the RAM to run at a higher speed that it was supposed (or rated at) to run. And thank god the similarities end there because then RAM overclocking RAM would be a little more complicated and more of a pain to write about >.>
On high-end boards, you can adjust the RAM speed rather easily and get it to run at the speed you want because they offer more FSB : DRAM ratios or they offer unlinking of the FSB and DRAM. This lets you set your speeds to your liking . So if you want to take your 800MHz RAM and get it to run at 900MHz, your system could crash (if it is crappy RAM). To solve this, just increase your voltages to your RAM by a notch or two and try again. DO NOT GO OVER 2.3v FOR DDR2 RAM!!!!!!! You may have to run your RAM at a low overclock than what you want, but that is what happens with RAM, you cannot pick the speed you want, you got to ease it to it. On lower-end boards, you only have the FSB : DRAM ratio. This is a pain and requires tinkering. You may have to mess your RAM timings, which is fun (not), ut I will get into that here further on. But you can try and run you RAM at a higher voltages, and/or just change the FSB : DRAM ratio till your system is stable and your RAM is happy. You may have to have the RAM run at a lower speed but you then you can run “tighter” timings then (well sometimes). For some good info on RAM, go to the HOLY GRAIL OF RAM!
Now for timings:
There are 5 main timings in for RAM and they are the following:
tCL (CAS Latency)
tRCD
rRP
rRAS
Command Per Clock (CMD)
The best way I can describe each of these is to use the examples used in a MaximumPC magazine I got, which describes things as if they were a librarian going for row to row of books in a library >.>
“tRCD setting, for example, describes how much time the librarian has to get to a certain row on a shelving column. Set it too low, and she can't get to the row where your desired book is.
Say she reaches the row, tRAS determines the amount of time the librarian can linger there find your book.. tRP is how much time the librarian has to get from the row she was at to the bottom of the ladder.
TCL is how much time the librarian has to move from one shelf of books to a different one. Setting this too low is like asking her to move a 30-foot ladder 100 yrds in 2 seconds. TRAS is basically how much time overall the operation takes to climb the ladder, get your book and get off. CMD is the amount of time between one request and the next.”
Now there are 2 approaches to this:
A) Set the timings to your timings on your RAM (that is if it they were provided). Now if you got fancy, high-end RAM. The ram is good looking with the heat spreaders for no reason. They have also been test and binned to run at optimal speeds. Commonly, the RAM timings for DDR2 is 5-5-5-15-2T or 5-5-5-18-2T, or 6-6-6-18-2T. In BIOS talk, that is for the first one would be:
tCL – 5
tRCD – 5
tRP – 5
tRAS – 15
CMD – 2T
B) Now the other method is to let your chipset choose the timings for you, but this can through your RAM out of whack and make it run slower than what it should be. That is why you want to have your RAM running at or lower than your RAM's stated timings since they are designed to run at those timings, at a set speed and voltage. But that does really mean much if you can make it run at faster speeds with the same timings because it just comes to the RAM being faster
Now for a little bit of a explanation with the terms “tighter” and “looser”.
Tighter would refer to the RAM timings being set lower than they are stated to run at. For example:
If your RAM is rated to run at 800MHz with timings of 5-5-5-18-2t and you tune your ram to run at 800MHz and timings of 4-4-4-12-2T, the you have just made your RAM “tighter”.
“Looser” would be the opposite. If the RAM is rated for 5-5-5-18-2T at 800MHz and you run it at 6-6-6-18-2T, you made the RAM run at “looser” timings.
BEFORE YOU PROCEED, YOU MUST HAVE AT LEAST ONE OF THE FOLLOW PROGRAMS FROM EACH CATAGORY:
Stability testing:
OCCT (run LinPack for at least 2 hours. If you get an error before 1 hour, you are not stable enough, after 1 hour, your pretty good. If you get no errors even after 2 hours of testing, then try for a 24/7 test. Set the time to infinite and let it run at 90% RAM for 12-24 hours. If you get no errors, then you are rated as 24/7 stable!)
Orthos – Run for at least 2 hours with small FFT. You can use this for 24/7 stress testing
IntelBurnTest (really intense program) – If you can pass 50 runs, your pretty good to go
Prime95 – Must run at least 2 hours of small FFT to be deemed stable. You can use the and run a 24/7 test if you like. If you pass, your 24/7 stable. After you past 2 hours, run for 2 hours on blend to be extra sure
Thermal Monitoring:
NOTE: Temp monitors are not extremely accurate down to the tooth and can vary in temp 5-10C +/-.
Core Temp – Rather effective and really reliable. Leave the max TJ at 100 (note: Not all processors have a TjMax of 100, just experiment or look on google. The Q6600 G0 has a TjMax of 90C while the e7300 is 100C).
Real Temp – Another rather accurate program (but note, still can vary +/- 5C). Leave TJ max at 100 (note: Not all processors have a TJ of 100, just experiment or look on google).
Speed fan – Junk for monitoring CPU, but feel free to use it if you like. It has been known to be off by as much as 10C!
Everest – Really nice but you have to pay for and it monitors EVERYTHING on your computer!
Riva Tuner w/ RealTemp plug in – I use this and it works great
Voltages and their effects:
As you increase the frequencies and speed of your machine, it is going to eventually encounter a point were it will not post at all (mean nothing will happen, you just get a beep from your mobo and then it just sits there or turns itself off or cycles on and off). When this happens you have two choices:
1)Downclock to a lower speed on your processor, memory, and/or FSB
2)Increase the voltage to parts of you motherboard, memory or CPU to see if you can get it to work at those speeds.
If you choose option 2, then you are on the track to more speed, but also more heat. Heat is one of the BIGGEST reasons why people cannot overclock to uber high speeds. But, there is also another problem, too much voltage. Although you can increase the voltage on a 45nm chip (Codename: Yorksfield (Core 2 Quad 45nm) and Wolfdale (Core 2 Duo 45nm) CPU) to 1.6v (Yes, you can do this, Intel just says you cannot go above 1.3625v since the chips were not designed for it and/or they do not want you to overclock anymore than that), but the heat produced is crazy at anything above 1.45v on a 45nm chip.
I only have experience with 45nm chips so I will try to add my 2 cent for 65nm chips. Feel free to correct me and I will fix it.
Now, lets get back onto task. If your system does not post or you get BSOD of death or freezing, your system is unstable and needs some more tweaking, which usually is just a little bit more voltage. You need to do so in steps as to find out what needs to be done.
1.Start by increasing the voltage to your CPU by one notch, then save and reboot your machine and if that solves anything. If not, go and increase the voltage by one notch and try again. Do this until you reach 1.3625v on your (or maybe 1.4v on a 65nm chip?). If that still doesn't solve anything then you need to go to step 2.
2.If step one doesn't work, then go and increase your North Bridge voltage (check with your motherboard's manual for what it would be called) by one notch, save then reboot and check again. If not, repeat like in step one till you hit about 1.3v (again I only have experience with the P45 chipset so feel free to correct me or give me info on the other chipsets like the P35 and whatnot). If there is still a problem, then go to step 3.
3.Next try and increase the voltage to your RAM if your RAM is above its rated speed. Do this till you get to about 0.1v above your RAM's rated voltage. If not, go to step 4.
4.Try to increase the FSB Termination (again, check your motherboard's manual if you do not know what it is called on your motherboard) by a notch till you get to about 1.3v. DO NOT GO ABOVE 1.34v (at least on a P45 chipset and the 45nm chips, not sure what the others are like).
5.If the others have not worked yet or you still having some stability issues, increase your PLL by one notch and ONLY one notch. Just raising it on notch took my e7300 from 65C at 3.8 to 71C! Use at your own risk.
6.[/B]Now, if you are still having issues (and lets hop not), increase your CPU's voltage by a singe notch till you get to 1.45v. DO NOT GO ABOVE THIS ON AIR COOLING EVER! Heat will just be insane, so be careful.
7.Finally, if you are still having issues, then I have bad news for you. You are going to have to reduce your overclock because it is too dangerous to proceed unless you have balls of steel or have the experience to do so.
If you managed to get your CPU stable after all of that, then start trying to decrease on of the voltages by one notch until you become unstable or you hit your stock (default) voltages. Do this all the way down the line till you are right on the edge of your voltages. This will increase the life span of you parts and also decrease the heat produced.
COOLING!
When you overclock, the components produce more heat. The more heat that is produced, the shorter lifespan your components will have. Furthermore, the hotter a CPU gets, the slower it will go and you are pushing it to its engineering limits! There are 4 types of cool:
Air Cooling – This is the most common method of cooling and also the least expensive. When searching for a heat sink (which most if not all of them are air cooled), you want to look for one with really good bottom (either HDT (Heatpipe Direct Touch) or a copper bottom that is flat). You also want something that has at least 3 or more heat pipes that are copper as well as good fins that are made out of aluminum or copper. The 3 best heat sinks you can get are Xigatek HDT-s1283 and Xigatek HDT-s1283 Dark Night, or the TRUE. The Xigateks ave HDT and the TRUE has copper bottom. The way to increase the effiency of these heat sinks you must have good air flow and a good fan to move air through them. For some good cooling, putting an Ultra Kaze 3000RPM fan onto the Xigatek or TRUE offers the best air flow, but also creates a lot of noise. You just got use a fan that has good airflow and if you prefer, not very loud.
Water Cooling – Water cooling is the second most popular cooling out there. It utilizes waterblocks (or special blocks that attach to different components and have water going through them), a series of hoses, pump and radiators to keep your system cool. The radiators also use fans to move air through them, so having good air flow through them will give you the best results. Please note, I have no experience with water cooling.
DICE or Liquid Nitrogen – This method is the most extreme and is only used to get the highest clocks possible. It utilizes a pot that is put onto the CPU and liquid nitrogen or dry ice (DICE) is added into it to cool things down below zero (in some cases, -100C or below). This keeps things cool and a strange effect takes place as well. The cooler the CPU gets, the clocks continue to go up. This method allows for EXTREME overclocks to take place, but can only be used for short periods of time since the DICE and NL2 actually evaporates.
For long term cooling, use water cooling or heat sinks. This is recommended for the newbies to overclocking seeing they do not take much skill to setup correctly and are the easiest to do.
Case – Having a good computer case that has good air flow can knock your temps down by +10C. It also keeps your other components cool. The more air you can move through your case, the more heat that can be removed. I have (or have had) an Antec 300 case that moves 208CFM (cubic feet per minute) into the case and 288CFM out of the case. The negative pressure that my setup creates allows for the hot air and keeps the dust moving, which causes the dust and hot air to be “sucked” out of the case, thus keeping the machine cooler and cleaner. Furthermore having good cable management inside the case to keep the turbulence down inside the case. This also increases air flow and decreases the number of hot spots (or areas of stale air) as well.
TEH SIMPLE GUIDE!
Now that you have read the entire guide and now have some knowledge under your belt, let me explain to you the correct fashion of overclocking your processor.
There are two ways you can OC
1. Balls to the Walls - This is where you pic a CPU, termination, NB (North Bridge) voltages, FSB : DRAM ratio, and FSB x Multi, and just stick with it. That is what I did on my first OC ever and got 3.6 right off the bat stable (but used higher voltages than needed). I will explain this some more he in a bit.
2. Grandpa Style[/B] - This is where you go and put your multi as high as it will go (except on the extreme editions) and slow increase your FSB by about 5-10MHz till your proc becomes unstable to the point where you cannot boot into windows anymore. Then increase your voltages by 1-2 notches and repeat..... I hate this because it takes too long.
Alright now on to further explaination.
BttW (Balls to the Walls)
1. The first thing you should do before you do this is to download CPU-z and look at the specs of your processor. It should say what model it is and tell you its Stepping (AKA revision). Some stepping revisions perform better than others (Like the G0 stepping for the Q6600 is famous becaue it OC better than the B3 stepping).
2. Google your processor and read up what other people have achieved with your processor (and if your lucking, what stepping their proc was). See if you can find out what kind of voltages they used.
3. Pick something about 1/4 of the highest OC (that did not need Dry Ice or LN2) that you found and figure out the multi and FSB that you need for that (get it close). If it is any higher than about 5-10% overclock, increase your CPU voltage by about 1-2 notches and see what you get.
To get your the OC Percentage (OCP), you use the following equation:
BE SURE TO USE MHz! To figure that out, take your OC (like 3.8) and multiply it by 1000 (because there are 1000MHz in a GHz so 3.8GHz would be 3800MHz).
(C-S)/S
C = Current OC
S = Stock Speed of Proc
Current overclock minus stock speed of processor divided by the stock speed of processor.
EX.
Current OC - 3.6GHz (3600MHz)
Stock speed - 2.66GHz (2667MHz)
3600 - 2667 = 933
933/2667 = ~34.98% OC (this is good OC for an e7300 E0 stepping )
Be sure to set the following voltages like this:
PLL - leave alone
CPU (or FSB) termination - increase by about 2-3 notches
DRAM voltage - set to specification of RAM
FSB : DRAM ratio - Set this so that your RAM is at or below its rated speed
NB voltage - increase by 2-3 notches
After setting everything, go and see if you can boot into windows. If not, go and increase your CPU voltage by 1-2 notches again till you can boot into windows. Then use one of the stress testing programs above and stress for NO LESS THAN 2 HOURS! If you pass, your stable
If not increase your NB voltage by another 1-2 notches and try again.
If that fails, increase your CPU termination by 1-2 notches (for 45nm CPUs DO NOT go above 1.34v for 24/7 use. Your proc will die a quick and miserable death).
If that fails, increase your PLL by 1 notch and 1 notch only!
If that fails, increase your CPU voltage by another 1-2 notches.
If that fails, continue increase your CPU voltages by 1 notch and making sure your CPU's temps stay below 60-65C. DO NOT INCRESE VOLTAGES ABOVE 1.5v ON AIR FOR 45nm! IT WILL DIE! 65nm processors are fine to about 1.6v (but get really really freaking hot).
If that fails, back your OC down by about 25-50MHz and test. Just keep on doing this till you get stable!
<.< See why it is called balls to the walls?
Grandpa Style - This method is like above but you take your time.
BE SURE TO KEEP YOUR DRAM AT OR BELOW ITS RATED SPEED! IF YOU KNOW YOU RAM CAN OC WELL, THEN LET IT OC
Set the following voltages like this:
PLL - leave alone
CPU (or FSB) termination - increase by about 2-3 notches
DRAM voltage - set to specification of RAM
NB voltage - increase by 2-3 notches - you can take this all the way up to 1.4-1.5v on a P45 chipset.
Slowly increase your FSB with the highest multiplier you can get by about 5-10MHz at a time. Then try and boot into windows.
Once Windows fails to boot, increase your CPUs voltage by 1-2 notches and try again.
Continue doing this you get a speed you like. Then try and do a stress test.
If the stress test fails, back down your FSB by 5-10 MHz until it passes 2 hours.
I know it is sloppy but it works and that is the best way I can explain it.
Thank you for reading!
Note: This is still in Beta and will remain in beta till further notice since it can be changed at any time.
Info on how I got my OC on my Q6600:
My Q6600 is a G0 stepping (which on these chips means awesome overclocking potential) and has a VID of 1.275. VID is the stock voltage on your chip and can determine (sometimes) if your chip will be a good overclocker since it will need less voltage.
The first thing that I did was get an idea of what I was dealing with. You got to do some research on good as to what you can get with your chip and what you need to get to there. For my chip, I need to have a higher FSB because my max multi is 9x. So if I do 9x400 I will only have 3.6 (which is not bad for a chip that has a stock clock of 2.4). Since my chip will need a higher FSB, you will have to increase the voltage on your FSB and make sure your RAM can OC. My RAM is known to OC to 1000MHz easy.
Since I am a gun-hoe type of person, I just jumped right in and shot for 3.6. I got that rather easy with 1.48125v (I could have tried to do a lower voltage, but I didn't really feel like it)). That is not bad and my temps were about 63-65C. Since this chip is known to take a beating and keep on going, I was not too worried. This is what I did to get to 3.6:
Q6600 is G0 stepping
MB Intelligent Tweaker(M.I.T.)
Robust Graphics Booster ...............: [Auto]
CPU Clock Ratio ...........................:9x
Fine CPU Clock Ratio.....................:
CPU Frequency .............................:3.6
Clock Chip Control
Standard Clock Control
CPU Host Clock Control..................: [Enabled]
CPU Host Frequency (Mhz) ............: 400
PCI Express Frequency (Mhz) .........: 100
C.I.A.2 ...........................................:[Disabled]
DRAM Performance Control
Performance Enhance...................: [Standard]
X.M.P………………………………………………..: Disabled
(G)MCH Frequency Latch...............: 400
System Memory Multiplier ..............:[2.00D]
Memory Frequency (Mhz) ...............:800 800
DRAM Timing Selectable ................: [Manual]
Standard Timing Control
CAS Latency Time........................: 5
tRCD ......................................... 5
tRP'........................................... 5
tRAS.......................................... 18
Advanced Timing Control
? Haven;t changed anything in here
Driving Strength Profiles
Same here
Motherboard Voltage Control
Load Line Calibration........................[enabled]
Voltage Type.………... [manual
CPU
CPU Vcore….……….........................: 1.48125
CPU Termination…..... ......................:1.32
CPU PLL………………….....................:1.5
CPU Reference.…………........................:0.760V [Auto]
MCH/ICH
MCH Core……………....1.4
MCH Reference….…….Auto
MCH/DRAM Ref.…...... auto
ICH I/O……………….....1.570V
ICH Core…………...……1.200V
DRAM
DRAM Voltage ……....2.2 (2.1 normal)
res is auto
REMEMBER, EACH BOARD IS DIFFERENT AND EACH CHIP IS DIFFERENT! THESE SETTINGS ARE WHAT I USED AND ARE TO BE A GUIDE AS TO WHAT YOU NEED TO DO! 45nm CHIPS DO NOT NEED NEARLY AS MUCH VOLTAGE AS WHAT I NEED!
Now since the TjMax (the max temp the chip can run at before it starts to degrade or just up and die) is 90C, I tried to make sure I kepted my max temps below 80C (I run my chips hard).
Right now I am running 3.717 with the following changed to the above settings:
FSB: 413
CPU voltage (vcore): 1.525
At these settings my chip is 24/7 stable and I have max temps during Intel Burn Test of 75C. My temps never get above 68C when I am running Prime95 or Orthos.
I manged to get 3.825 with the following changed:
FSB: 413
vcore: 1.575
My chip just wanted to go higher and higher. I could have got 3.9 out of it, but then the chip would need 1.6v and be running at almost 90C if not more....
Hope this helps out some.
Last edited by a moderator:


")