• Welcome to TechPowerUp Forums, Guest! Please check out our forum guidelines for info related to our community.

Phosphor Generic Case Mod 2010 from Mexico

PBR

New Member
Joined
Mar 28, 2010
Messages
3 (0.00/day)
Location
Cancun, Mexico
System Name Compak II
Processor AMD Phenom X3 8450
Motherboard Asus M3A78-EM microAtx
Cooling Cooler Master Hyper N620
Memory 4 GB Skill DDR2-800
Video Card(s) ATI HD 4850 1GB
Storage 2 X 500 GB SATA3 Seagates
Display(s) 2 X 17" Lcds LG/cer
Case Modded XQPack I
Audio Device(s) Creative Xi-Fi ExtremeMusic
Power Supply Cooler Master 600w
Software Win7 Ult x64
Benchmark Scores None to brag about.
Howdy Folks! I'm here posting in English (practicing it before I forget, hehe) by suggestion of a forum mate, Masbuskado, who steered me to this great site! I use GPUz and the other utilities but I had not imagined that there is a thriving mod section here, great! I started working on this case for two reasons: to serve as a home forum tutorial on modding on the cheap (yup, we are in pretty bad shape) and something to enter into an affiliate forum of ours, New Mod City for their 1st Anniversary commemoration. The key here was to keep expenses under $99.00usd. My home forum too is young not having reached our own first anniversary yet. Now, onto the project itself and its worklog. Please bear with my with my wonky writing style but I am still working on it, hehe:


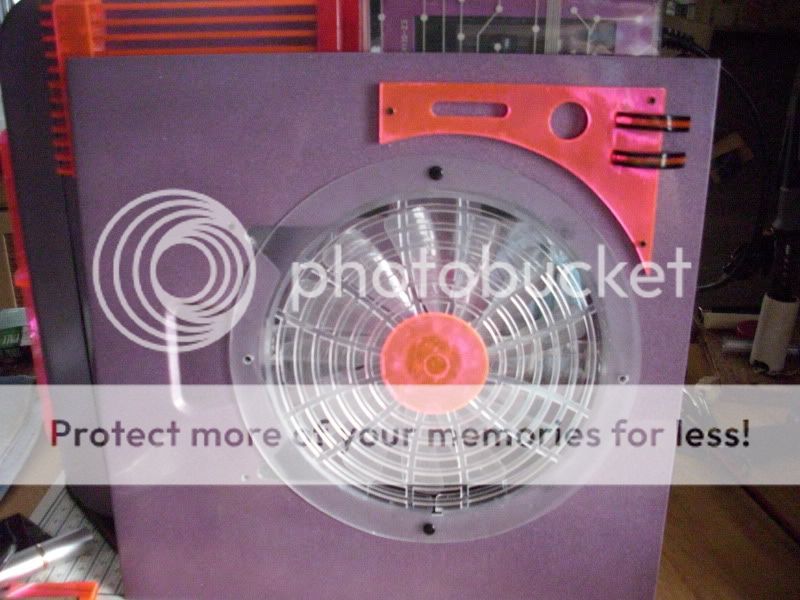
I finally got hold of a case last month, that a computer tech friend of mine (Gino R.) here in Cancun was frankly going to throw into the trash bin. He told me that the owner had gotten fed up with changing the psu which is of the mico-Atx variety and that are really hard to find here in Mexico vs Atxs which you can get anywhere. The hardware was junk by now (Athlon XP) so that too went out. So, as someone said "one guys junk is another guy's treasure". I toted it back home, dusted it and this is it:


I placed my recently arrived mini-Itx mobo inside to see what it looked like and this was the appreciation, either the mini-Itx is really small or the case if really big! The mobo is a Zotac 9300i-e which is a socket 775 and takes DDR2 ram, but the distinguishing factor is that it also includes a pc-express 2.0 16 bit slot for an external video card, good enough to be a capable HTPC-Gaming machine. It has all else buit-in: wi-fi, 7.1 sound, lan, etc.


Of course it was all scratched and dented (the previous owner would hit it with a broomstick when it would lock up, probably from excess heat). It will however be the prime-material for a hot mod, hehe!

Saludos and Cheers
 
Last edited:

PBR

New Member
Joined
Mar 28, 2010
Messages
3 (0.00/day)
Location
Cancun, Mexico
System Name Compak II
Processor AMD Phenom X3 8450
Motherboard Asus M3A78-EM microAtx
Cooling Cooler Master Hyper N620
Memory 4 GB Skill DDR2-800
Video Card(s) ATI HD 4850 1GB
Storage 2 X 500 GB SATA3 Seagates
Display(s) 2 X 17" Lcds LG/cer
Case Modded XQPack I
Audio Device(s) Creative Xi-Fi ExtremeMusic
Power Supply Cooler Master 600w
Software Win7 Ult x64
Benchmark Scores None to brag about.
Checking around the net, this happens to be an Actek Kendal and costs around $720mn or $55.38 usd, including a pretty sorry 500w micro-Atx psu.


The highlight of the this case is a strip of acrylic that lit up with a couple of blue leds on each end of it.


When I got it, one of the leds was knocked off its base and just hanging inside the case, leaving only half of the acrylic strip lit, probably from on of the multiple interventions the case (burnt psus, overheating, etc.).


To begin, I would change the fixed lights in favor of something with movement (I like a lot), be it something sequential or flashing.

http://www.steren.com.mx/catalogo/images_productos/normal/K-320.JPG

Analyzing the case front, now I see why it would overheat. The front has no fans at all and the front cover is practically solid with no entrance of fresh air. The only way the case could breath from the front is if the access door to the dvd burner/usb ports were left open, something that most people would not normally do. There is even nothing in the floor (solid plate) so if the door were shut, the only air it could suck was the tiny slit left by the door and the frame, duhhh!!! A clear case of form (looks) over function (breathing).

To remedy this I will take of the door (one of the plastic pins that held it in place was broken anyways) and turn it into a grill. I was thinking of using a piece of orange phosphorescent acrylic I got not too long ago for around $1.15 usd.


I think I will lean on a lot of acrylic like Chozen did on his Dragon and who competed in CM and NMC mod contests.


Why you say? Because it it is relatively cheap, of high visual impact and you don't need a lot of expensive tools to work it.

Cheers and Saludos
 

PBR

New Member
Joined
Mar 28, 2010
Messages
3 (0.00/day)
Location
Cancun, Mexico
System Name Compak II
Processor AMD Phenom X3 8450
Motherboard Asus M3A78-EM microAtx
Cooling Cooler Master Hyper N620
Memory 4 GB Skill DDR2-800
Video Card(s) ATI HD 4850 1GB
Storage 2 X 500 GB SATA3 Seagates
Display(s) 2 X 17" Lcds LG/cer
Case Modded XQPack I
Audio Device(s) Creative Xi-Fi ExtremeMusic
Power Supply Cooler Master 600w
Software Win7 Ult x64
Benchmark Scores None to brag about.
Well this is a pain, sanding the edges and then polishing them. First with a grit 80, then a 280 and finally 600. After this a automotive rubbing compound with a rag till it shines.


Just to fix 10 slats took me almost 4 hours and my fingers were aching. There has to be an easier way! When are they going to come with home lazer or water cutters!


I place a piece of masking tape on each end to cut the desired curve through it. The masking serves as a guide to know how far to cut and does not leave a stain like a Sharpie does. I do not cut through the tape but around it.

The rough shape is cut with a Dremel and the rest is sanding and polishing like above.


The first one took me 20 min, but the rest should be easier (I hope).

Saludos and Cheers.
 

papang

New Member
Joined
Jan 25, 2008
Messages
27 (0.00/day)
Location
Cancun, Mexico
Almost a whole week gone by without any major advances, redoing a bunch of things, blehh!. Lets go by parts.

POWER SOURCE/SUPPLY)

Although the psu has 3 internal ub leds due to the pcb being placed in backwards, a lot of the light was obstructed by stuff like the capacitors (large). To improve the reflectance, I put a metallic finish Contac to the inside of the psu case and I figure I doubled the light emitance.


I decorated the psu acrylic cover with a printed acrylic sheet from an old keyboard which was later thrown out.


LIGHTING ON THE FRONT CASE COVER)

I lost a lot of time here seeing the lighting effects from various sources and alternatives: with an 80mm uv led fan, a bar with red leds down the middle of the grills, white leds on the bar, etc. I finally decided to drill and hot glue the grill bases and put orange leds which gave off the best effect.


BLINKING LED KIT)

This cruddy light kit DOES NOT WORK OFF OF 12V! (TIP) . It is made for a 9v. And works best at this voltage. However on the Steren forum site, I was advised to just change the resistors for the leds in order to use 12v. but the leds would not twinkle just staying permanently on. I experimented with several resistors first 180 ohms, then 270 and I ended up going back to the original 10 ohms resistors that came with the kit, but this time connected to 7.5 v. You know how, do you not? The ground black wire goes to the red 5v connector on the molex and the other to the yellow one, thus getting 7.5 v. in the process. Fortunately it worked albeit a little dimmer than when using the recommended 9v. So forget about using 12v! (TIP)
I spent the better part of the week figuring this out, bah! :smils4:


I made a small box for the kit pcb from styrene, bent it with a 1220w hair dryer and glued with pvc glue.


I will owe you a vid of the kit working when I finish, hehe.

SIDE GRILL)

Since the psu acrylic shield looked sort of lonely, I decided to put something in front of it. It was the same as the other grills except with another set of spacers between the fins. It was threaded and screwed to the side of the case.


LIGHTING THE TOP WINDOW)

In order to more or less follow the lighting theme from the front center acrylic, I made a similar bar from scratch.


OTHER STUFF)

I did not take the pics, but I made an acrylic sandwich of smoke-orange-smoked acrylic and made a 45° cut along one edge. I am not too sure how I am going to use it, hehe.


And I found a plastic toy egg I found at the mall. Some kid took out the toy it had and threw the egg away. I am pretty sure I can use it somewhere, haha.


.
Made a mock up/test of the lights that the case had except for the blinking leds.


Saludos and Cheers


Man Hours Used: 21 hours
$ Invested: -0-
-------------
Acc. Hours: 139 hours
Acc. $: $996mn=$76.06usd
 

papang

New Member
Joined
Jan 25, 2008
Messages
27 (0.00/day)
Location
Cancun, Mexico
THE PSU)


I thought that I was over this but I noticed something weird. The glue I used had etched the plastic to the point of it being noticeable. Darn, another frikkin cover-the third!
Anyways, I had to take apart the mess again so I added another window to the psu case so that I could get a bit more light out of it on the “gull wing” part of the shell.


Of course, with a lot of care because it was painted and this how the shell came out:


CHERUB OR COMET?)

Remember the plastic egg? I made a tail for it...


If my wife lets me, I will put 3 flashing leds to light up the dome which is transluscent (the case is for her).


She wants this (ugghh):


Well, the customer is always right....

MENU HOLDER)

I double side taped the menu holder onto the case and turned the house upside down to find something to put inside it. It measures 30 X 24 cms and the only thing I could find was my sons Tae Kwan Do black belt certificate.


I was going to use pop rivets but double sided tape did the job. I will be messing around with spray paint art in order to fill the holder. Wish me luck, it will be my first, hehe.


It will have on it “NMC 1st Anniversary” in a strategic place.

LIGHT STRIP ON CASE TOP)

I dressed up the strip with bits and pieces of acrylic and did this:


Gluing with chloroform (I FINALLY layed my hands on some)


Shaping with a file and sandpaper, I fit it flush with the acrylic underneath.


CASE FEET)

Taking the previously made sandwich strip:


I decided on a less conventional shape and lay out.


.
What I did not like is that the orange lost all of its phosphorescence once glued and an inordinate amount of light was necessary to just barely light it.


I fixed it with another layer of acrylic, transparent this time.


I assembled a 5 led holder from an old 3 led holder that burned out.


All assembled.


This is what it would look with the minimal-always on lights. All others are switched off.


SWITCHES)

To turn off and on the extra lights.


And finally to make the center of the fan look better.


The medallion will have a sticker like this one:


it will say “Phosphor”. Some pics of general view of what I have up to now.


Saludos and Cheers

19/Mzo/10:

Man Hours: 24 h.
$ Inv.: $50mn for 100m.l of chloroform=$3.85 usd
------------------
Acc. Man Hours: 163 h.
Acc. $: $1,040mn=$79.90usd
 

papang

New Member
Joined
Jan 25, 2008
Messages
27 (0.00/day)
Location
Cancun, Mexico
On the way to the end, there are only a few details left. Yes, I still have visits so I am still pinching time from where and whenever I can.

FINAL TOUCHES TO SIDE PANEL)

Considere que la tapa lateral con el ventilador grande era medio "medio sencillo", asi que me propuse hacerle una "pestaña" de acrílico:
I felt that the fan side panel was a little "plain" so I proceeded to make a "brow" out of acrylic:


En la ultima foto, pegue el naranja a una base de acrílico ahumado. El resultado es que al pegar el fosforescente al ahumado MATA totalmente la emanación de luz por las orillas. Me lleva el tren! Rápido separe los dos y deje secar el cloroformo de ambas superficies. Lije y pulí las superficies para dejarlos como estaban. Solución: atornillarlos junto y así funciona la fosforescencia! (TIP).
In the last pic, I glued the orange to a smoked base. What resulted was the phosphorescence of the the orange part was TOTALLY KILLED. Oh crap! I separated the two parts as fast as I could and sanded and polished them back to more or less as they were. Solution: SCREW the orange to the smoked and that way the phosphorescence works! (TIP)


Ahora a darle algo mas de "vista" a la pieza.
Now to dress up the part .


Una capa de pintura tipo cromo al acrĂ­lico humo para que refleje el naranja mejor.
A layer of chrome paint over the smoked layer so that it will reflect light through the orange better.


En la parte inferior va un sticker PBR, tan pronto me reparen mi impresora, jeje.
The lower space below the brow is reserved for the PBR sticker as soon as they repair my printer which has been screwed up since the Coolermaster contest, hehe.


LIGHTING UP THE FACTORY HS FAN)

Por no tener algun ventilador con leds que le quede al disipador de bajo perfil que pide el espacio interior, decidĂ­ ponerle un "led puck" (Puk de leds) encima del venti de fabrica del disipador de fabrica con que vino el procesador (Celeron E3300 dual core). Luego pinte el ventilador un color claro gris (era negro) y un poco de funda verde a los alambres.
Since I do not have an adequate led fan for the stock hs which is round (cool and functional but not very modable) nor do I have a low profile hs with led fan, I decided on a "led puck" placed on top of the factory fan. Then painted the fan a light gray and sleeved the wires with green sleeving.


INSTALLING WIN7 ULTIMATE)

Un defecto (?) de la placa es que no tiene un conector IDE y mi quemador de DVD es de IDE :smils06:
A defect (?) of the mobo is that it does not have a connector for IDEs and my DVD burner is still IDE. :blink:

Me acorde que la vez pasada que vino mi hijo, pedí un adaptador IDE a SATA que me costo como $15usd. Aunque intente un par de días, no pude hacer que booteara de un flash drive usb porque las opciones para arranque son: usb fdd, usb cd rom y usb hdd. En ningún de los casos pude hacerlo bootear! Alguien lo ha conseguido? Pero gracias al adaptador, pude usar un DVD con el SO para instalar a la manera clásica.
However, I did remember that the last time my son came down, he brought me an IDE to SATA adapter/converter I had ordered and that cost me $15usd. Although I gave it my best for a couple of days, I could not boot of a flash drive because the boot options for the mobo are: usb fdd, usb cdrom and usb hdd. In all cases the install would not boot in! Has anyone had any luck? Anyways, thanks to the adapter/converter, I used a DVD to make a classical OS install.


Hora de cerra la tapa lateral finalmente, después de acomodar los cables un poco. Si tuviera mas tiempo, haría una caja central para todo el cablerio y así eliminar la maraña de conectores molex. También, hora de meter la tarjeta de vídeo. Cupo como Dios mando--perfectamente! El inconveniente: NO CIERRA LA TAPA LATERAL POR EL VENTILADOR!!!! :smils9: :smils3: :smils02 :smils05: :smils04: :smils00:
After cleaning up the wiring as much as I could (crap load of molexs), it was time to close the fan side panel (I thought) after inserting the video card which fit thank goodness! The only bummer: THE SIDE PANEL FAN WOULD SCRAPE AGAINST THE VIDEO CARD! :glare: :this: :rolleyes: :cry: :blush:


Faltantes: Pintura de arte de lata y sticker con logo NMC para el venti grande. Por lo visto, voy a tener que quitar el GPU externo y usar el interno, blehhhh!!!!
Missing yet: spray can art for the other side (menu holder), the NMC logo sticker for the side fan and print my PBR sticker. Also from what I can see, I will have to remove the external gpu and use the internal gpu, blehhh!!!


Saludos

M de O Usada: 17 h.
$ Inv.: -0-
--------------------
Acc M de O: 180 h
Acc. $: $996mn=$76.06usd
 

papang

New Member
Joined
Jan 25, 2008
Messages
27 (0.00/day)
Location
Cancun, Mexico
ell, I sort of got forced to tinker with the insides again. This is to clean up the molex mess I had. I had not thought that it was that bad since I did a little cable management and stuck most of them into a corner. Why? Because this guy gave me an example of a clean inside,and yes it is Dillusional’s idea:


So… I pulled out a terminal I had from a previous project that I did not get to use. I got this at Steren, a local electronics shop for a measly $8.00mn or $0.77usd.


However, when I tested it with my volt-amp meter, it was not what I thought it was and Steren did not have anything else. It is basically a pass-through terminal with each terminal independent of each other so I had to mod where I did not want to! Anyways nothing out of this world but it did suck up time.


What took a while was to cut of the molex’s without messing with the detour lines to the switches. Once cut off, man did it take time to stick them into the tiny terminals and screwing them in place-the wires are so thin and the cramped space inside the case did not help.

Before:


and later:


A lot better, no? No not really but I did manage to get rid of all the molexes except for the 3 coming form the front cover so that it will be faster to take it off in the future. Now the problem is the cables coming out of the psu which were not used anymore. There is no empty bay to stuff them into so I did as best as I could to tuck them away.

Time to move on to printing the PBR logo sticker now that my printer is “fixed”. I duly printed in adhesive backed paper so next is to see how to protect it. The previous sample was painted with clear acrylic to see if that did the trick, but no. The paints gets sucked into the paper and dulls and darkens the inkjet colors so out it went. I ran off to Office Depot and got a clear adhesive plastic that although cost $10.00mn ($0,77 usd) was a bunch. Putting it over my new sticker did the trick and is now safe from wear and tear.


Below the plastic coated sticker and below the darker painted sticker:


Unless anything pops up, I am down to the spray can art, hehe.

M Hours Used: 6 h.
$ Invested: $10.00mn=$0.77usd
--------------------------------------
Acc. M Hrs.: 186 h.
Acc $: $1,006mn=$76.83usd

Saludos and Cheers and Mod on!
 

papang

New Member
Joined
Jan 25, 2008
Messages
27 (0.00/day)
Location
Cancun, Mexico
Well some of the guys pointed out to me that the cherub or ball of "fire" was ok for personal reasons but no quite adequate for the anniversary. Hades suggested more sandwhiches so I came out first with this:


I stopped this as not good enough and started doing another one which tried to ape what I finally ended up buying a local supermarket called Chedraui and it only cost me $54mn or $4.15usd, pheww! Still within budget. The problem with the assembly I was trying to make was that the piece was so small, I could not hold it to sand and file. One more to experience.


It's ok but it can be better, off to mod it! first I carefully removed the double sided tape to be reused:


Hehe, lucky it is hollow inside and workable from the inside:


Next up an acrylic sandwich base to be lit.


I will take a while to work on this so I will get back to you but the idea is: a base lit sandwhich with red or orange leds, one or two flashing leds and repainting to match, do you follow me?

Cheers and Saludos
 

papang

New Member
Joined
Jan 25, 2008
Messages
27 (0.00/day)
Location
Cancun, Mexico
Got a little bit done with the new "wi-fi" antenna. I made an acrylic sandwich with the phosphorescent orange and this time, transparent. This time I screwed them together to not affect the phosphorescent glow of the orange acrylic.


I repainted the chrome finish which looked pretty good but does not match the rest of the case, so I sanded it off. this is a contest after all.


Here it is pre-assembled with a 5mm orange led. I wanted to use a 3mm led but since I ran out of them, I did my best to adapt this one. It came out more or less well inspite all, hehe.

Placing the antenna on top the case, the orange glows even without light. I got this from placing the transparent layer on the bottom so that light could reach the orange layer and thus give it the appearance that it has a low light. Another more complicated acrylic with a blinking led is pending but I will post it as soon as it is done.


I had a bunch of .2mm styrene left over from the Ovni so I cut a piece off and tacked it to a base.


I gathered my paints, magazine sheets and other doodads.


I will review a few more tutorials on Youtube but I found an excellent one-spraycasso here:

[video]http://www.youtube.com/watch?v=LIsIkUJiSi4[/video]


M H Used : 4 h.
$ Invested: $54mn=$4.15usd (the antenna)

Acc. M H: 190 h.
Acc. $ : $1060mn=$80.98 usd

Saludos and Cheers
 

papang

New Member
Joined
Jan 25, 2008
Messages
27 (0.00/day)
Location
Cancun, Mexico
The final steps:

NMC ART SIDE PANEL:

Today I gathered my willies and began my spray paint art. Yesterday I pre-painted the styrene with primer to help paint adhesion as it doesn't hold paint well.


I sat down again for the last time, to view my video tutorials because I realized that there was no point writing down a plan and that its was best to memorize the steps. I thought about making a video but it would have been over half an hour which even I would have had a hard time seeing, hehe.

The planet done. I used yellow, green, purple and black layed down in stripes first, then a coat of white over all this-NMC colors except for the yellow. With a small, folded over piece of paper, I zig-zagged down the area which would uncover the underlying colors. The truth is that the white would settle down again mixing with the colors on the bottom and turn into something else. I should have let the background colors dry more so that they would not mix so easily with the white or give it a pass with the hairdryer.


The moon now. I re-cover my planet to protect it, uncover the moon and apply my background colors: light gray and purple with black sprayed over that. This time I use paper to blot some of the paint for texture.


I re-cover the moon and lightly spray swaths of blue, yellow, green and purple to make cosmic dust. Taking off the valve of the white spray can, I depress the stem and sputter white over the area-stars. I then remove both caps and....


I shadowed both with black (cutting off the tops of the caps and spraying black down one side), the setting needed a "sun". Pulling out one of the test badges which was printed on a light colored adhesive paper, I layed down a yellow aurea with a touch of purple for shading (used a small tube from a roll of toilet paper and sprayed purple down a side) and then white "rays" or light swaths(place the can of white upside down on the painting and tap and revolve the can). Placing the badge in the middle of this aureole, it looks like so..


Cutting off the edges, I stuck it inside of the menu holder on the side of the case, which is now its home, until I improve on it and make something not so noobish.


Presto and ready! My first spray paint art! Hmmm, the side looks a little over the top and "busy" but this houses my contribution to the "Spray Off". Note that this the only surface where I could add/fit this mod as the other side panel is used by the large fan.

THE ANTENNA)

The last thing added to this is a surface to bounce off light on top. I inserted a piece of orange acrylic for this by first carefully cutting a slit on the flat part of the fin. I then opened the slit using a milling attachment on my rototool. A blinking led with its appropriate resistor, was then hot melted underneath the middle of the acrylic strip. It is switched for when you get a head-ache seeing the flashes, hehe.


As can be seen, the current lines run out the back and are exterior, the only way to connect something here. The exposed part will be sleeved with green.


Pending yet: How to do a decent cable management job with a gigantic 20 to 24 pin adapter and other cables. Damn this case is so bare and with little to hide cables and the smallness of the miniItx mobo doen't help. Hmmm...


Last but no least, the fan badge printed on translucent tracing paper (papel albanene). With an ink jet printer, you have to use a paper product as plastics do not hold the ink and smear. I covered it with transparent adhesive plastic and used Pritt, a paper glue in a lip stick like container and shape/form until I find something better. Now light glows behind it-another sought after light effect.


M H : 8 h.
$ Invested: $33.50mn=$2.58usd for a can of white spray paint
-----------------------------------
Acc. M H: 198 h.
Acc $ Inv.: $1,093.50mn=$83.56usd

Saludos and Cheers
 

papang

New Member
Joined
Jan 25, 2008
Messages
27 (0.00/day)
Location
Cancun, Mexico
The missing link. As per a suggestion from a member of Hardmodding (Aqui(1)les), one of the sites I posted this worklog and one of my home members, Neo360, I took a a final punch at the inside wiring. I finally decided on the original grill that cover the side panel now used by the side fan. As it has a weird shape, and had little probability of using it elsewhere, I took a second look at it.


Placing it inside, it appears to hide most of the wires.


So I flipped it over and put into a "ship bay" to access it from the top. I dressed up the grill putting a piece of clear acrylic and putting Chrome Contac paper over it (reflectance), made another NMC sticker and this is what I ended up with:


The "shield" covers most of the wires and the fan flow is only interrupted by about a third. Underneath the shield is basically empty space so the components to be cooled are not compromised. As a matter of fact, temps are the same as indicated by Everest Ult., so looks did not affect performance, good!

So, in sum, it went from this:


To this:


Can't be seen but we know it is there and will look decent even open, hehe.

That is all folks! With this the project is officially finished and I will shortly upload the rest of the requirements as final photos and vid.

M H Used: 3 h.
$ Inv.: -0-
-----------------
Acc. M. H. Used: 200 h.
Acc. $ Inv.: $1,093.50mn=$83.56usd

Cheers and Saludos
 

papang

New Member
Joined
Jan 25, 2008
Messages
27 (0.00/day)
Location
Cancun, Mexico
Final pics semi-studio/kitchen:


Cheers and Saludos
 

papang

New Member
Joined
Jan 25, 2008
Messages
27 (0.00/day)
Location
Cancun, Mexico
Outside shots:


The obligatory first stop, the stair landing.


Just outside of the outer gate with a nosy visitor with no tail.


Hi from afar!


Hmm, looks like a car, well on top of one now.


Finished, time to celebrate !

Cheers and Saludos
 

papang

New Member
Joined
Jan 25, 2008
Messages
27 (0.00/day)
Location
Cancun, Mexico
Improved video (with software update), pls. see:


Background music: Baby V.O.X. - "Devotion"


Cheers and Saludos
 
Joined
Jul 3, 2007
Messages
1,317 (0.21/day)
Location
New Zealand
Processor AMD Phenom II 555BE unlocked X4 @3.8GHz
Motherboard GA-78LMT-S2P
Cooling Thermaltake Blue Orb + open case in cold room = low temps lol
Memory 8Gb DDR3 1600
Video Card(s) GTX580
Storage 64GB SSD Super Talent
Display(s) 22" Chimei, 17" Philips
Case POS!
Power Supply Cooler Master Silent Pro Gold 800W
Joined
Oct 8, 2009
Messages
2,047 (0.39/day)
Location
Republic of Texas
Processor R9 5950x
Motherboard Asus x570 Crosshair VIII Formula
Cooling EK 360mm AIO D-RGB
Memory G.Skill Trident Z Neo 2x16gb (CL16@3800MHz)
Video Card(s) PNY GeForce RTX 3090 24GB
Storage Samsung 970 EVO Plus 1TB NVMe | Intel 660p 2TB NVMe
Display(s) Acer Predator XB323QK 4K 144Hz
Case Corsair 5000D Airflow
Audio Device(s) Objective2 Amp/DAC | GoXLR | AKG K612PRO | Beyerdynamic DT880| Rode Pod Mic
Power Supply Corsair AX 850w
Mouse Razer DeathAdder Elite V2
Keyboard Corsair K95 Platinum RGB "Cherry MX Brown"
VR HMD Oculus Rift
Software Window 11 Pro
wow nice mod bud :rockout:
 
Joined
Jul 28, 2008
Messages
1,018 (0.18/day)
Location
New York
System Name Filtration tower
Processor i9 7900@4.4ghz
Motherboard ASRock X299 Taichi
Cooling Air
Memory 64g 3200 quad channel
Video Card(s) ASUS GTX 1080Ti
Storage 500gb Nvme, 200gb SSD, 1700gb HDD
Display(s) 34" Acer Predator 3440x1440
Case Thermaltake v71
Power Supply EVGA supernova 850 T2
Joined
Mar 5, 2007
Messages
1,372 (0.22/day)
Location
Chicago, IL
System Name Stealth 2 Duo Turbine
Processor Intel e6850 @ 3.8ghz
Motherboard Asus Striker Extreme
Cooling CoolerMaster V8 Modded With 2 white LED's & 100CFM fan
Memory OCZ DDR2 1066_ SLI Black-4GB
Video Card(s) 2xMSI 8800GT"s SLI
Storage <<HDD For OS>> 2x150GB_Western Digital Raptor_Raid 0. <<HDD For Storage>> 3 x 1TB
Display(s) ACER B273HU 27" LCD 2048x1152
Case Apex SuperCase_Custom 7 month Build
Audio Device(s) Striker Extreme Add-In Card HD-Audio
Power Supply EnerMax INFINITI 720watt
Software SE7VEN ULTIMATE 64bit
Benchmark Scores 3DMark01=NTTA, 3Dmark06=NTTA 3Dmark_Vantage=NTTA, Core Temp v0.99.5=28C
Very creative from Mexico,, nice job
 
Joined
May 30, 2007
Messages
9,019 (1.46/day)
System Name Black Panther
Processor i9 9900k
Motherboard Gigabyte Z390 AORUS PRO Wifi 1.0
Cooling NZXT Kraken X72 360mm
Memory 2 x 8GB Corsair Vengeance RGB Pro DDR4 3600Mhz
Video Card(s) Palit RTX2080 Ti Dual 11GB DDR6
Storage Samsung EVO 970 500GB SSD M.2 & 2TB Seagate Barracuda 7200rpm
Display(s) 32'' Gigabyte G32QC 2560x1440 165Hz
Case NZXT H710i Black
Audio Device(s) Razer Electra V2 & Z5500 Speakers
Power Supply Seasonic Focus GX-850 Gold 80+
Mouse Some Corsair lost the box forgot the model
Keyboard Motospeed
Software Windows 10
I must say the work you did on that case, and the result, is awesome!

:rockout:

:toast:
 

Solaris17

Super Dainty Moderator
Staff member
Joined
Aug 16, 2005
Messages
25,844 (3.79/day)
Location
Alabama
System Name Rocinante
Processor I9 14900KS
Motherboard EVGA z690 Dark KINGPIN (modded BIOS)
Cooling EK-AIO Elite 360 D-RGB
Memory 64GB Gskill Trident Z5 DDR5 6000 @6400
Video Card(s) MSI SUPRIM Liquid X 4090
Storage 1x 500GB 980 Pro | 1x 1TB 980 Pro | 1x 8TB Corsair MP400
Display(s) Odyssey OLED G9 G95SC
Case Lian Li o11 Evo Dynamic White
Audio Device(s) Moondrop S8's on Schiit Hel 2e
Power Supply Bequiet! Power Pro 12 1500w
Mouse Lamzu Atlantis mini (White)
Keyboard Monsgeek M3 Lavender, Akko Crystal Blues
VR HMD Quest 3
Software Windows 11
Benchmark Scores I dont have time for that.
this is so sweet.
 
Joined
May 27, 2009
Messages
3,405 (0.63/day)
Location
Brunswick, GA
System Name Haz0
Processor i7-2700K
Motherboard Gigabyte Z68X-UD3H-B3
Cooling Chicken Stock
Memory 16GB G.Skill Ripshits X 1600MHz
Video Card(s) Sapphire 5850
Storage Kingston 128GB SSD + WD Black 640GB + 2x 1.5TB
Display(s) 24" Acer G245HQ + 19" Lenovo L194
Case Antec NSK-4482 Orangified
Audio Device(s) X-Fi XtremeGamer
Power Supply Corsair TX750W
Software Windows 7: Electric Boogaloo
Talk about trash to treasure, you did a great job. Quite trippy :toast:
 

papang

New Member
Joined
Jan 25, 2008
Messages
27 (0.00/day)
Location
Cancun, Mexico
LMAO, great pose in the background! Case looks crazy, good work man.

Thanks and much appreciated Cuzza from a fellow socket a user (XP 2800+ and Gigabyte GA-7VRX-yes it still works and good for daily chores), yay!

Well, it is sort of heavy mod but the trick was to cram as much as you could to the case with only $99usd which is NOT a lot of money, hehe. What was the recipe for me? A lot of acrylic in fancy grills, a lot of leds and a simple light kit (moving sequential). Also since it had to be functional, a tricky adaptation to use regular ATX psus versus the micro-Atx psu it uses, the reason to mod the rear to fit the bigger psu case. And a 19" fan to cool this hot little case which pushes air OUT of the grills rather than the other way around. Now I have cool temps and a quite cooling scheme.

I surprised myself for finishing so fast and it was a fun mod using a bunch of new techniques that I used for the first time. It seems that finally I am getting the hang of modding after so many years (been modding since 1987) but this time around, not tossing the budget out of the window, haha.

Thanks again!

Cheers and Saludos
 

papang

New Member
Joined
Jan 25, 2008
Messages
27 (0.00/day)
Location
Cancun, Mexico
wow nice mod bud :rockout:

Thanks Erazer, great to see someone from the great state of Texas, where I got my BBA (Texas A and M University-College Station/Kingsville) and got my English down pat.

A modding Aggie/Jav? We have been called worst things, haha!

Cheers and Saludos
 

papang

New Member
Joined
Jan 25, 2008
Messages
27 (0.00/day)
Location
Cancun, Mexico

Thanks a bunch Brave! It just looks big but it is a regular ATX psu only. I made the adaptation inorder to not use a micro-Atx psu which is what is regularly used. I can find regular ATXs just about everywhere but micro-Atxs are scarcer than hen's teeth and so expensive!

No Neweggs over here! And the Egg doesn't ship to Mexico:(

Appreciate your visit and comment!

Cheers and Saludos
 
Joined
Jan 14, 2010
Messages
970 (0.19/day)
Location
Granby, Qc. Canada
System Name Loose nuts & bolts
Processor FX-8350 - EK Supreme HF full nickel
Motherboard ASUS Sabertooth 990FX R2.0
Cooling Water EK goodness all around 2xBlack Ice X-280
Memory 2 x8G HyperX Fury 1600 @ 9-9-9-24-1T
Video Card(s) 2 x XFX RX 480 w/EK-FC RX 480 nickel+Acetal
Storage Samsung 850 Evo + 2xWD Black 500GB in RAID0
Display(s) Crossover 27" 2560x1440 110Hz OC
Case Cooler Master HAF XB EVO
Audio Device(s) on board
Power Supply Corsair HX850
Software Win 10 Enterprise x64
Amazing mod. A creative imagination and lots of skill. :toast:
 
Top