• Welcome to TechPowerUp Forums, Guest! Please check out our forum guidelines for info related to our community.

Project: APASF ("A Post-Apocalyptic Steampunk Future")

Joined
May 25, 2011
Messages
281 (0.06/day)
Location
Málaga, Spain
Todays Update.

I´ve started with the paint. Basically everything that´s not wood, is copper, but adding the post-apocalyptic flavour in there. This technique I´ve been developing for a while and it´s the first time I implement it in to a mod.

By the end of this update you will not see the final product, you will see what it looks like before the ageing process, i.e. the copper goes in most places a lot darker, like real copper, the reason for the extra light copper color is to be able to have highlights once it´s ben aged. The turquoise is the opposite, it is very pale here, and it will have aged highlights once finished. The reason I can´t do this today is due to the fact that to get to this point requires quite a few coats and it needs a lot more time to dry, which it needs to be completely for me to aply the ageing process to this.

Without further wait, the process pictures.

First, the primer.


To continue, a solid coat of the orange-y copper and before it dries, a light coat of turquoise. Once aplied, using absorbant paper I go all over the fresh paint creating a non solid surface or color which will be the base.


Once dried, I aply a almost solid coat of the copper orange from further away than the usual, as you can see the dried paint uneven surface is doing it´s job by not allowing the fresh coat to reach every corner. I also further the paper usage to create a more uneven surface for the next coats.


This goes on for 2 more coats alternating both colours.

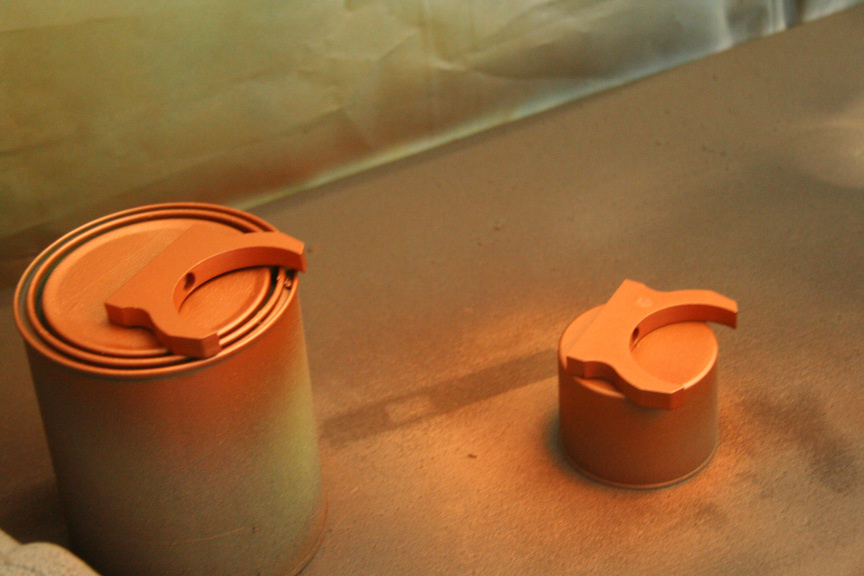
To finish off, I give a completely solid coat of turquoise and very quickly another of the copper. The wet coats and the surface react with eachother giving me the final look before the ageing process.

Here´s a variety of pictures of it with and without flash.


The final rusted copper look coming tomorrow.
 
Joined
May 25, 2011
Messages
281 (0.06/day)
Location
Málaga, Spain
Update,

Had some internet issues last night so you couldn´t upload the pictures.

Aniway, the rust effect is finished, I aplied the ageing technique and several tones of copper to give it a more realistic look. The turquoise is very mild and I can´t quite catch it on camera, I took some pictures outside in the sun, hopefully that helps.

You´ll also notice I decided to add some extra effects and I´ve made it look as if the case had been partially submerged from the bottom left corner upwards.

This has without a doubt been the hardest and most time consuming effect I´ve ever done, the whole copper rust thing.

Hope you like it.


Joined
Aug 11, 2011
Messages
4,355 (0.94/day)
Location
Mexico
System Name Dell-y Driver
Processor Core i5-10400
Motherboard Asrock H410M-HVS
Cooling Intel 95w stock cooler
Memory 2x8 A-DATA 2999Mhz DDR4
Video Card(s) UHD 630
Storage 1TB WD Green M.2 - 4TB Seagate Barracuda
Display(s) Asus PA248 1920x1200 IPS
Case Dell Vostro 270S case
Audio Device(s) Onboard
Power Supply Dell 220w
Software Windows 10 64bit
Joined
May 25, 2011
Messages
281 (0.06/day)
Location
Málaga, Spain
hahahaha awesome, I take it mine wasnt in the list since it aint finished? :p
 
Joined
May 25, 2011
Messages
281 (0.06/day)
Location
Málaga, Spain
Update:

Today I haven´t done much progress in the sense of progress I can show you with pictures. The 3 hours I had today to work on the project I pretty much spent measuring up and deciding mounting of the liquid cooling components (yes, they arrived today).

But, for the sake of posting a picture, here´s a teaser on where the rads will be.


Initially I had planned to mount them with spaces, however, I´ve decided against it for two reasons. First, the weight of the rads would provably unbalance the tower if separated. Secondly the metal sheeting, while thick, isn´t thick enough to keep the rads firmly straight and I don´t like them being able to move at all if touched as it can weaken the sheet metal.

So due to these 2 reasons I will be mounting them straight on the metal plate.

Hopefully, a rather big update tomorrow in prepation for the final update (I´ve taken tomorrow morning and friday morning off work in order to have enough time to finish this by friday midnight, the deadline for the competition, wish me luck!
 
Joined
Feb 26, 2008
Messages
1,037 (0.18/day)
Location
London, England
System Name Le Don
Processor Core i 5 2500K Unlocked 3.3GHz HD Graphics 3000
Motherboard Asus P8P67 Pro B3 Revision Rev 3.1
Cooling Arctic Freezer Pro 7 Rev.2
Memory 8Gb Corsair DDR3 (CMZ8GX3M2B1600C9), 1600MHz, 1.5V, 9-9-9-24
Video Card(s) EVGA Signature 2 Super Clocked GTX680 2GB
Storage Total 6 TB storage
Display(s) LG 23" D2342P and LG 42" 42LF65 LCD (Wall mounted)
Case Antec P180 Silver
Audio Device(s) Audigy 2 ZS Platinum Pro
Power Supply Corsair 850HX
Software Windows 7 Ultimate 64-bit,
Joined
May 25, 2011
Messages
281 (0.06/day)
Location
Málaga, Spain
First update of D-Day -1.

I am plausibly going slightly crazy...


...yes

Started drilling based on measurements taken yesterday and test mounted both radiators.


Matt black painted the chasis, even though in the picture it doesn´t look matt, that´s because paint wasn´t dry yet.


Painted one side of both radiators (mainly the middle as the the non-radiator-y-bits will receive the wood treatment later today. Before anyone goes crazy about loosing performance and all that. I´ll say what I´ve said every other time I´ve painted a rad or heatsink and noticed no loss of performance. If you do it with acrylic paint, it´s fine. It´s not fine when you do it with synthetic or plastic paints. You can argue all you want, but I wouldn´t be doing it if I hadn´t tested it countless times : )

I´m hoping I can run the system without fans on the radiator to acceptable temps, since there´s 2 rads and all they are cooling is the cpu, if not, will add fans at a later point, but for the "final" look they won´t have fans on them.


Painted the plastic parts of the reservoir...


...and it´s mounts.


And finished all the wood effect trimmings.


Piping won´t be done today as all the parts need to be mounted and while that will happen today, it won´t before the plumbing supplies shop closes for the day.

So will be going hopefully first thing tomorrow morning and getting all the piping done, leave the loop running for as many hours as I can allow it to and still have time to mount the hardware and psu in and finish by midning tomorrow.

...I can´t believe I haven´t aplied the matt clear coat finish yet...

Now I have to go to my actual job and pretend like I´m not freaking out about not finishing this in time :S
 
Joined
May 25, 2011
Messages
281 (0.06/day)
Location
Málaga, Spain
Right, I´m at then end of D-Day -1, tomorrow is the last day.

Now, a lot of stuff has been finished but because some where still drying I didnt want to risk mounting what I need to measure for the piping till tomorrow morning, then as I mentioned in the previous post, piping time.

Anyhow...

Rads finished.


Reservoir unmasked...


...and aged with a touch of "filth".


If all goes well, tomorrow 1 to 2 updates + final update... after that, beer and a nervous breakdown :D
 
Joined
May 25, 2011
Messages
281 (0.06/day)
Location
Málaga, Spain
Right guys, we´re at that point, this is the update before the final update (in theory aniway).

So, this morning I assembled all that needed to be in or on the case in order to do the piping.

So, rads, motherboard and other assorted pieces.


And this is what the case looked like pre-piping.


So went down to my local friendly plumbing supplies shop and with some help from the shop attendant (my mate) and later on the owner of the shop (he was intrigued on what we were doing), I put it all togueter, it was incredibly hard to measure everything up correctly, tighten all the fittings being very carefull with the fragile ones (like the plexy ones on the cpu cooler or the plastic ones on the pump and reservoir). And after almost 4 hours, got it ready.

So here is the bare essentials case (nothing is screwed in, details wise, only the liquid cooling related stuff.


I now of course have to aply all the ageing effects to the fittings and pipes.

After that I went to my actual job (as I mentioned in previous posts I took both yesterday morning and today morning off to work on the project but still had to work 4 hours in the evening.

I´ve taken the motherboard out and left the loop running to be sure there´s no leaks before I put everything togueter.

And yeah if there´s no leaks I feel optimistic about meeting the deadline but words cannot express how tired and generally exhausted I feel.

Again, thanks for reading and following the project.
 
Joined
May 25, 2011
Messages
281 (0.06/day)
Location
Málaga, Spain
Hi Guys,

I tried my best, I´m sure you all know from my hectic updates these last almost 3 weeks that I´ve been working every second I get free on the project. Unfortunately it was not enough. The reason for starting so late was waiting for parts to arrive and basically financially being able to buy all the materials, paints, etc I needed to make this truelly unique.

The fact is I´m about 1-3 days short worth of work on detailing, fixing some last minute issues (that always pop up) and so on to be happy with the final result.

That said, I have made it as presentable as posible to be able to participate in the competition I started this for.

As you can see some parts are missing like the wood trimmings (that´s what those holes in the metal are for), some modifications to make everything fit better, and a few other things, also theres 2 very small leaks on 2 different fittings on the radiator side of the case which I need to fix.

And a long list of "small things to do".

Goes without saying I am finishing the project, but since the hectic deadline is now over I will be taking my sweet time, and making sure everything is as perfect as my skills allow it to be.

Aniway, here are the pictures of how it looks right now.


Joined
May 25, 2011
Messages
281 (0.06/day)
Location
Málaga, Spain
Update:

I´ve been fighting for the last two weeks with the tubing, I´m still trying to fix the leak on one of the outputs on the reservoir, the other two leaks have been fixed (I took apart those sections and reinforced the joints with teflon which seals it quite nicely, for whatever reason that doesn´t seem to be working with the reservoir.

I have a couple of options I will be trying on monday, hopefully one of them will work. Worst comes to worst I can permanently fit the joint which will fix the issue but will not allow for it to ever be taken apart again (not that its an issue as I never planned to but its nice to know I can if for whatever reason I need to).

Updates to come following that.

On another subject, I´ve been nominated for MOTM over at bit-tech, and the voting has been going on from the 6th of July. The voting ends on the 6th of Aug, i.e. tomorrow monday at 8 am. I´m currently fighting for the first place so if you feel like helping out, pop by and vote. But I´d like to stress that, only do it if you believe APASF is the best out of the 6 mods shown there. I´d greatly appreciate it : )

http://forums.bit-tech.net/showthread.php?t=233580
 
Joined
Jun 4, 2011
Messages
3,051 (0.65/day)
System Name The SwagMachine / The Sister
Processor Core i5 3570K @5.2ghz 1.3V/ 1100T
Motherboard ASUS P8Z77-V / ASUS M5A99X EVO
Cooling Phanteks PH TC14PE / Corsair H40
Memory M379B5273DH0-YK0 2X4GB + PVI316G213C1QK 2X4GB / 2x4GB Patriot 2133
Video Card(s) PNY 780Ti /Windforce 7950
Storage 2xSamsung 840 EVO 250gb+WD10EZEX + WD30EZRX/ 1x WD1500 Black
Display(s) AOC Q2963PM+Acer S200HL / Acer S200L+ LG 22LD350
Case Fractal Define R4 / NZXT Trinity
Audio Device(s) Asus Xonar DG / Asus Xonar DG
Power Supply Seasonic 750X / ROSEWILL RG630-S12 630W R
Mouse Razer Deathadder Chroma / Roccat Kone+
Keyboard Razer Blackwidow 2013 Stealth / Roccat Isku
Software Windows 8.1 Pro / Windows 7 Ultimate
Benchmark Scores one time I scored a 3 on 3dmark 11
Update.

Today I´ve started to cut and test mount the side covers. While they look like wood, they are plastic and they are not the final look, they simply come like that from the store, I will be using vinyl and ageing process so they match the PSU. The same treatment will be done on both sides of the case.

Originally I was going to use rubber covers for the cuts so they don´t look sharp, however in order to add more "wood" to the design, I will be using the same parts cut in half as on the side, this should increase the wood/copper ratio of the final look.

I´ve also ordered all the liquid cooling stuff I need, and it will hopefully arrive on Friday so I have the weekend to mount everything and start and finish the front of the case so on Monday I can go to the plumbing suplies shop and cut, test mount and buy all remaining fittings and copper tubing to complete the loop.

If the parts don´t come by friday I´ll have to delay the plumbing details till tuesday or wednesday which will only give me a 2 day painting window to finish the project, so it´d definately cutting it short, but I feel confident at this point.

Aniway, photos!

http://www.neonit.net/images/apasf/66.JPG

http://www.neonit.net/images/apasf/67.JPG

http://www.neonit.net/images/apasf/68.JPG

http://www.neonit.net/images/apasf/69.JPG

http://www.neonit.net/images/apasf/70.JPG

http://www.neonit.net/images/apasf/71.JPG

http://www.neonit.net/images/apasf/72.JPG

Hopefully more tomorrow.
Now that just looks silly
 
Joined
May 25, 2011
Messages
281 (0.06/day)
Location
Málaga, Spain
Thank you everyone who voted for me on the Bit-Tech.net Mod of the Month June Edition Competition. I´m over the moon for winning! ^^
 
Joined
May 25, 2011
Messages
281 (0.06/day)
Location
Málaga, Spain
Hi Everyone,

After almost a year since I started the project, it is now Finished.

Since October I´ve been adding paint effects, ink effects, done some detail changes, added missing details and essentially obsessed over there damned thing. Following the original idea I did 2 casings, one for the psu and one for the gpus, unfortunately I just wasn´t happy with them, I felt they changed the overall look to much. I never wanted it to look clean as it simply doesn´t fit the post-apocalyptic style so in the end I opted for a rough way around it. The last 4 PSU connectors are bare and inked cabling for the GPUs. I´m sure quite a few of you would´ve proffered casings but I feel this way is what suits the style of the project best.

I also pretty much "coated" the whole thing with a mix of inks that took me a month to get right for a more old-n-gritty feel as while I was very happy with how the faux wood effect turned out, I felt it didn´t much the rest of the oxidized copper effects, this slight effect ink helps blend these two together and really make it look like it´s been around for a hundred years. If you compare these final pictures to the previous update pictures you´ll find you can´t exactly point why, but you´ll understand what I mean (or at least I hope you will :) )

I also realise there´s no SLI bridge, this is simply because I´ve misplaced mine and didn´t want to wait till I ordered a new one to make the final pictures as I didn´t feel it was that important and... I really needed to end this stage of my life.

APASF is the project I´ve always wanted to do ever since I started painting and modding and while there are somethings that NOW I may have done differently, I´m extremely happy with the final outcome, I´m also relieved it´s over, it's taken a huge toll on me and in the end, it was more of an obligation and obsession rather than something I enjoyed doing as sad as that may sound.

I´d like to thank my sponsors for being so patient with it as it´s taken 6 months more than I originally thought it would and of course for being there with me all the way.

Right, without further wait, here is the final shoot of APASF "A Post-Apocalyptic Steampunk Future".


Thank you all for reading through this long worklog during what for me has been the hardest project I´ve ever done!

Until next time,
Luciel
 

de.das.dude

Pro Indian Modder
Joined
Jun 13, 2010
Messages
8,785 (1.73/day)
Location
Stuck in a PC. halp.
System Name Monke | Work Thinkpad| Old Monke
Processor Ryzen 5600X | Ryzen 5500U | FX8320
Motherboard ASRock B550 Extreme4 | ? | Asrock 990FX Extreme 4
Cooling 240mm Rad | Not needed | hyper 212 EVO
Memory 2x16GB DDR4 3600 Corsair RGB | 16 GB DDR4 3600 | 16GB DDR3 1600
Video Card(s) Sapphire Pulse RX6700XT 12GB | Vega 8 | Sapphire Pulse RX580 8GB
Storage Samsung 980 nvme (Primary) | some samsung SSD
Display(s) Dell 2723DS | Some 14" 1080p 98%sRGB IPS | Dell 2240L
Case Ant Esports Tempered case | Thinkpad | Antec
Audio Device(s) Logitech Z333 | Jabra corpo stuff
Power Supply Corsair RM750e | not needed | Corsair GS 600
Mouse Logitech G400 | nipple
Keyboard Logitech G213 | stock kb is awesome | Logitech K230
VR HMD ;_;
Software Windows 10 Professional x3
Benchmark Scores There are no marks on my bench
long time no see
 

HammerON

The Watchful Moderator
Staff member
Joined
Mar 2, 2009
Messages
8,397 (1.52/day)
Location
Up North
System Name Threadripper
Processor 3960X
Motherboard ASUS ROG Strix TRX40-XE
Cooling XSPC Raystorm Neo (sTR4) Water Block
Memory G. Skill Trident Z Neo 64 GB 3600
Video Card(s) PNY RTX 4090
Storage Samsung 960 Pro 512 GB + WD Black SN850 1TB
Display(s) Dell 32" Curved Gaming Monitor (S3220DGF)
Case Corsair 5000D Airflow
Audio Device(s) On-board
Power Supply EVGA SuperNOVA 1000 G5
Mouse Roccat Kone Pure
Keyboard Corsair K70
Software Win 10 Pro
Benchmark Scores Always changing~
Very cool mod:toast:
One of a kind!!!
 
Joined
Jan 19, 2013
Messages
88 (0.02/day)
Location
Beer-Sheva@Israel
System Name RyZEN Build + XBOX One
Processor AMD Ryzen 1600 3.2Ghz
Motherboard ASUS Prime B350-Plus
Cooling Stock cooling
Memory Kingston HyperX FURY Black 24GB DDR4 2400Mhz
Video Card(s) Sapphire Radeon HD 7950 OC
Storage Samsung 860Evo 250GB SSD M.2 + Corsair Force GT 60GB SSD + WD Blue 500GB Sata
Case Antec Three Hundred TWO
Power Supply Seasonic M12II 620Watt
Software Win 10 Pro
Great mod just WOW :eek::nutkick:
 
Joined
Apr 19, 2012
Messages
12,062 (2.75/day)
Location
Gypsyland, UK
System Name HP Omen 17
Processor i7 7700HQ
Memory 16GB 2400Mhz DDR4
Video Card(s) GTX 1060
Storage Samsung SM961 256GB + HGST 1TB
Display(s) 1080p IPS G-SYNC 75Hz
Audio Device(s) Bang & Olufsen
Power Supply 230W
Mouse Roccat Kone XTD+
Software Win 10 Pro
Why not WC those GPU's with two 360mm radiators???
 

rtwjunkie

PC Gaming Enthusiast
Supporter
Joined
Jul 25, 2008
Messages
13,909 (2.42/day)
Location
Louisiana -Laissez les bons temps rouler!
System Name Bayou Phantom
Processor Core i7-8700k 4.4Ghz @ 1.18v
Motherboard ASRock Z390 Phantom Gaming 6
Cooling All air: 2x140mm Fractal exhaust; 3x 140mm Cougar Intake; Enermax T40F Black CPU cooler
Memory 2x 16GB Mushkin Redline DDR-4 3200
Video Card(s) EVGA RTX 2080 Ti Xc
Storage 1x 500 MX500 SSD; 2x 6TB WD Black; 1x 4TB WD Black; 1x400GB VelRptr; 1x 4TB WD Blue storage (eSATA)
Display(s) HP 27q 27" IPS @ 2560 x 1440
Case Fractal Design Define R4 Black w/Titanium front -windowed
Audio Device(s) Soundblaster Z
Power Supply Seasonic X-850
Mouse Coolermaster Sentinel III (large palm grip!)
Keyboard Logitech G610 Orion mechanical (Cherry Brown switches)
Software Windows 10 Pro 64-bit (Start10 & Fences 3.0 installed)
That has turned out to be the coolest case mod I have ever seen! I cannot imagine the total number of hours. "Great Job" just isn't enough!
 
Joined
Oct 26, 2011
Messages
430 (0.09/day)
Processor Intel i9-9900k @ 5GHz
Motherboard Gigabyte Z390 Aorus Pro Wifi
Cooling ThermalTake Riing 240
Memory 2x8GB G-Skill 3600 CL19 @ 16-19-19-20
Video Card(s) Zotac RTX 2060 Amp!
Storage 2x Samsung 860 Evo 512GB, 4x Seagate 8TB
Display(s) 2x Dell U2713H
Case CoolerMaster M500P
Power Supply ThermalTake Toughpower 730W
Software Windows 10 Pro
Given thought to wiring the GPU power connectors to the exposed side of the PSU instead of routing inside the case? Could add even more steampunkness to the build with proper cable treatment.
 
Top