• Welcome to TechPowerUp Forums, Guest! Please check out our forum guidelines for info related to our community.

Project Thief - CaseLabs TX10-D Dual Workstation/Gaming Build - Gulftown and SB-E

Joined
Jan 16, 2012
Messages
211 (0.05/day)
Haha, lemme know what you want for those old drives!

Will do - it's going to be a month or so before I post any F/S threads though :banghead:

Coming soon:


Oh and just to prove I'm still working on this project:


Meanwhile I've also been busy working on this:

 
Joined
Oct 26, 2011
Messages
3,145 (0.69/day)
Processor 8700k Intel
Motherboard z370 MSI Godlike Gaming
Cooling Triple Aquacomputer AMS Copper 840 with D5
Memory TridentZ RGB G.Skill C16 3600MHz
Video Card(s) GTX 1080 Ti
Storage Crucial MX SSDs
Display(s) Dell U3011 2560x1600 + Dell 2408WFP 1200x1920 (Portrait)
Case Core P5 Thermaltake
Audio Device(s) Essence STX
Power Supply AX 1500i
Mouse Logitech
Keyboard Corsair
Software Win10
I've seen the thread on XS, thanks for your effort mate.
 
Joined
Jan 16, 2012
Messages
211 (0.05/day)
I've seen the thread on XS, thanks for your effort mate.

:)


So when the inlaws came I moved the water cooling test rig off of the floor. The TX10 makes a convenient stand and also protected it from my niece.


The whole thing makes the 30" monitor look small

Now that the august weather is here though I may have to move it to a different room - the extra heat is making it intolerable in here!
 
Joined
Oct 26, 2011
Messages
3,145 (0.69/day)
Processor 8700k Intel
Motherboard z370 MSI Godlike Gaming
Cooling Triple Aquacomputer AMS Copper 840 with D5
Memory TridentZ RGB G.Skill C16 3600MHz
Video Card(s) GTX 1080 Ti
Storage Crucial MX SSDs
Display(s) Dell U3011 2560x1600 + Dell 2408WFP 1200x1920 (Portrait)
Case Core P5 Thermaltake
Audio Device(s) Essence STX
Power Supply AX 1500i
Mouse Logitech
Keyboard Corsair
Software Win10
Does it radiate lots of heat? My MO-RA3 does and it is annoying sometimes lol

The build quality on Caselabs is awesome, too bad there is no way to get one of them in Europe, I would buy the ST10 or something like that, I even tried e-mailing Caselabs but they never answered back.
 
Joined
Jan 16, 2012
Messages
211 (0.05/day)
Does it radiate lots of heat? My MO-RA3 does and it is annoying sometimes lol

The build quality on Caselabs is awesome, too bad there is no way to get one of them in Europe, I would buy the ST10 or something like that, I even tried e-mailing Caselabs but they never answered back.

The mora doesn't seem to give off much heat, but it's only cooling a 3930K that's idle a lot :cool: The majority of heat comes from the other 3930K which is constantly priming for the CPU block test rig. Plus there's no AC so the office gets up to 90F during the day :(

Try CL again- that's not like them to not reply. If no luck with email, PM Jim or Keven over at overclock.net or just make a thread in the pre-sales forum.

But yes shipping to europe is expensive on these cases - they're not small though that might change with the new Merlin line up :banghead:
 
Joined
Oct 26, 2011
Messages
3,145 (0.69/day)
Processor 8700k Intel
Motherboard z370 MSI Godlike Gaming
Cooling Triple Aquacomputer AMS Copper 840 with D5
Memory TridentZ RGB G.Skill C16 3600MHz
Video Card(s) GTX 1080 Ti
Storage Crucial MX SSDs
Display(s) Dell U3011 2560x1600 + Dell 2408WFP 1200x1920 (Portrait)
Case Core P5 Thermaltake
Audio Device(s) Essence STX
Power Supply AX 1500i
Mouse Logitech
Keyboard Corsair
Software Win10
Well I assume you are blessing the Koolance QDC's (I do) on the test rig especially because you are sampling soooooo many waterblocks :D
Really thanks again for your effort :toast:

I will try sometimes again to email Caselabs, I'd love to make a build on a white powder coated case.
 
Joined
Jan 16, 2012
Messages
211 (0.05/day)
Well I assume you are blessing the Koolance QDC's (I do) on the test rig especially because you are sampling soooooo many waterblocks :D
Really thanks again for your effort :toast:

I will try sometimes again to email Caselabs, I'd love to make a build on a white powder coated case.

You should they are awesome cases. Yes the QDC's make life so much easier!

Another update:

Finished up the gtx 560 - here are some pics. Getting ready to start:


Chopping some heatshrink:


2 fans done - ignore the yellow wire - I'm not actually hooking up the tach wire to the 12V, I just reused the yellow wire for the 12V line:


One thing I learned is that you don't have to join the wires all in the same place, in fact it's easier and less bulky if you join the 12V wires at one point, the 0V wires at another point and do the sleeving join at another point. This way you don't get one big lump. So don't do it like this is what I'm saying:


One side done - you can see the difference between the lumpy connection on the 3rd and 4th fan from the left, and the cleaner one on the 2nd/3rd:


Now we have to move those fans on to the other (push) side of the radiator. So we have to add the 140mm adapters to the other side of the fan, and remove the adapters from the original side:


All done with that side, now let's go do the same thing again for the pull side:


Attaching the fans for the pull side:


Nearly done - but the last piece of sleeve pulled out of the heatshrink:


Replaced that section and all done:


Installed - as you might be able to see, the section above with the low speed yates/HDDs still needs to be done:


As you can see there's still a ton to do in the bottom compartment:


This side that's open right now will house the ex560 that's currently being used for testing waterblocks, and the gtx 360 that I'm going to go wire up and sleeve right now :)

I have some ideas for lighting too that I'm going to test out also :)
 
Joined
Oct 26, 2011
Messages
3,145 (0.69/day)
Processor 8700k Intel
Motherboard z370 MSI Godlike Gaming
Cooling Triple Aquacomputer AMS Copper 840 with D5
Memory TridentZ RGB G.Skill C16 3600MHz
Video Card(s) GTX 1080 Ti
Storage Crucial MX SSDs
Display(s) Dell U3011 2560x1600 + Dell 2408WFP 1200x1920 (Portrait)
Case Core P5 Thermaltake
Audio Device(s) Essence STX
Power Supply AX 1500i
Mouse Logitech
Keyboard Corsair
Software Win10
Are those bitspower fan adapters? :)

It's nice to see your progress :toast:
 
Joined
Jan 16, 2012
Messages
211 (0.05/day)
Some of the pics from the last week's adventures:

Fitted the sniper to the 990x and installed some of the samsung superOC ram. Corsair promised to sponsor me some ram, but it never showed up and after 3 months of my emails being ignored I've officially given up on them :rolleyes:


I want to make a custom waterblock for the RAM anyway, but that's still a gleam in my eye right now :thumb: Time to get to leak testing on the motherboard loop:


After leak testing got done, I swapped the painted fan for one that worked and installed the motherboard tray into the *empty* chamber.


I need to swap out the circuit board from the broken GT fan for a good one and then swap back in the painted one. Now it's time to start hooking everything back up:


Plugged in the PSU cables, but the PSU is not yet there:


The sleeving is the stuff that came with the evga psu, that will be replaced with mdpc-x later:


Finally with a PSU:


Those extra 6 pin headers are annoying but the nice thing is that most of the PSU cables can be flipped so you can hide some of the extra unwarted parts by plugging them in the other way round :)


Tidying up a bit:


There's still so much to be done, and so much of this is still temporary e.g. fittings/sleeve/loop layout etc etc. But for now I'm just glad to be finally getting this rig up and working after 8 months!
 
Joined
Jun 12, 2007
Messages
4,815 (0.78/day)
Location
Wangas, New Zealand
System Name Darth Obsidious
Processor Intel i5 2500K
Motherboard ASUS P8Z68-V/Gen3
Cooling Cooler Master Hyper 212+ in Push Pull
Memory 2X4GB Corsair Vengeance DDR3 1600
Video Card(s) ASUS R9 270x TOP
Storage 128GB Samsung 830 SSD, 1TB WD Black, 2TB WD Green
Display(s) LG IPS234V-PN
Case Corsair Obsidian 650D
Audio Device(s) Infrasonic Quartet
Power Supply Corsair HX650w
Software Windows 7 64bit and Windows XP Home
Benchmark Scores 2cm mark on bench with a razor blade.
Monster looking rig will be keeping an eye on this.

Wonder if there will be any room left to cool some beers as well.
 

de.das.dude

Pro Indian Modder
Joined
Jun 13, 2010
Messages
8,782 (1.74/day)
Location
Stuck in a PC. halp.
System Name Monke | Work Thinkpad| Old Monke
Processor Ryzen 5600X | Ryzen 5500U | FX8320
Motherboard ASRock B550 Extreme4 | ? | Asrock 990FX Extreme 4
Cooling 240mm Rad | Not needed | hyper 212 EVO
Memory 2x16GB DDR4 3600 Corsair RGB | 16 GB DDR4 3600 | 16GB DDR3 1600
Video Card(s) Sapphire Pulse RX6700XT 12GB | Vega 8 | Sapphire Pulse RX580 8GB
Storage Samsung 980 nvme (Primary) | some samsung SSD
Display(s) Dell 2723DS | Some 14" 1080p 98%sRGB IPS | Dell 2240L
Case Ant Esports Tempered case | Thinkpad | Antec
Audio Device(s) Logitech Z333 | Jabra corpo stuff
Power Supply Corsair RM750e | not needed | Corsair GS 600
Mouse Logitech G400 | nipple
Keyboard Logitech G213 | stock kb is awesome | Logitech K230
VR HMD ;_;
Software Windows 10 Professional x3
Benchmark Scores There are no marks on my bench
http://i.imgur.com/Q1uGth.jpg

i do this too :D i figured this out the last time i was sleeving and putting on LEDs in my case :D
plus this way there is no need to insulate the joint :D
 

popswala

New Member
Joined
May 29, 2009
Messages
2,257 (0.41/day)
Location
Conway, AR
System Name Deep Space // Black Mystery
Processor AMD Phen II X4 945 oc'd 3.4GHz // I7 870 oc'd 4.0GHz
Motherboard Gigabyte 990FXA-UD7 AM3+ // MSI P55-GD80
Cooling Corsair H50 w/ x2 gelid wing blue 120mm // Tt Frio OCK
Memory G. Skill Snipers DDR3 1600 2x4GB // G.Skill Tridents DDR3 2000 2x2GB
Video Card(s) eVGA GTX 275 // eVGA GTX 460 SC 768mb oc'd (830/1620/2000
Storage Seagate 1TBx2 7200.12 /1.5TB/500GB/750GB // Mushkin Collistro 60GB
Display(s) LG 23" 2353v-pf 1920x1080p // None
Case Tt Chazer MK-1 // NZXT Phantom black modded
Audio Device(s) Logitech G51 5.1 // None
Power Supply Cooler Master Silent Pro Hybrid 850w // Corsair HX1000W
Software Win 7 Ult X64 // Win 7 Ult X64
Benchmark Scores Crunching & Folding 24/7 Help Save Lives!!!
This thing is coming along nicely. Any updates coming?
 
Joined
Jan 16, 2012
Messages
211 (0.05/day)
Monster looking rig will be keeping an eye on this.

Wonder if there will be any room left to cool some beers as well.

Haha I'll need a few when I'm done, or maybe before.... like now?

http://i.imgur.com/Q1uGth.jpg

i do this too :D i figured this out the last time i was sleeving and putting on LEDs in my case :D
plus this way there is no need to insulate the joint :D

Yes!

This thing is coming along nicely. Any updates coming?

Actually right now :)


Another update - big one too!

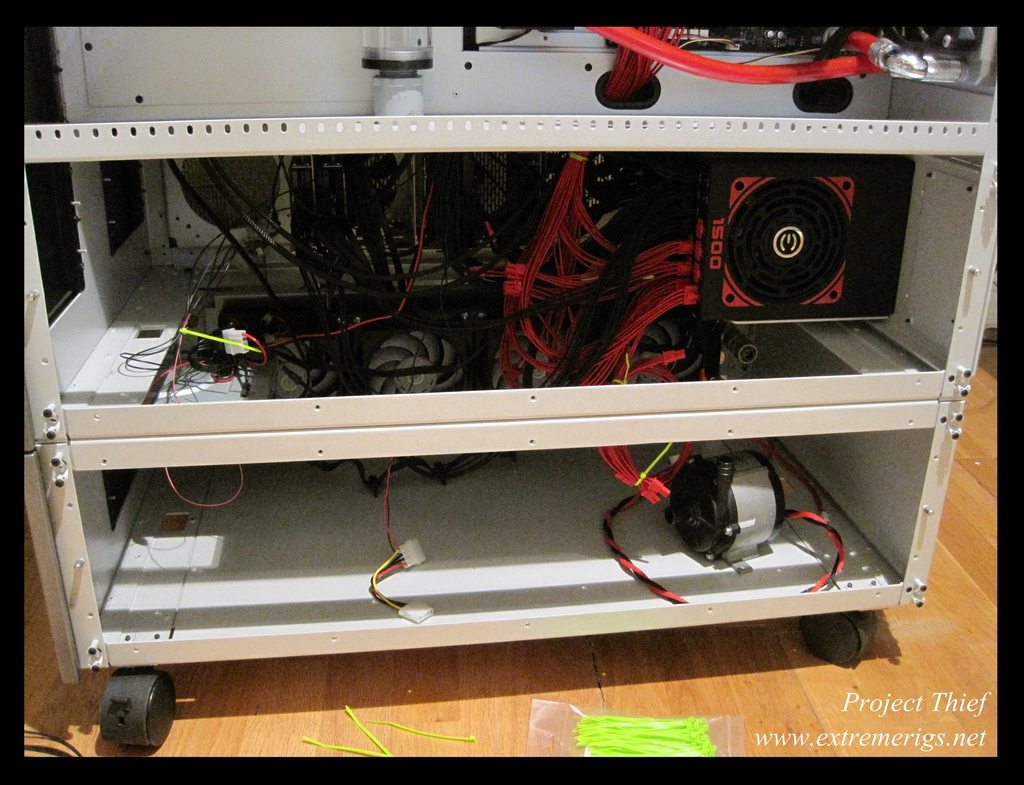
So this is where we were last time - gaming rig trying to get up and working in a temporary state. Main loop not yet connected:


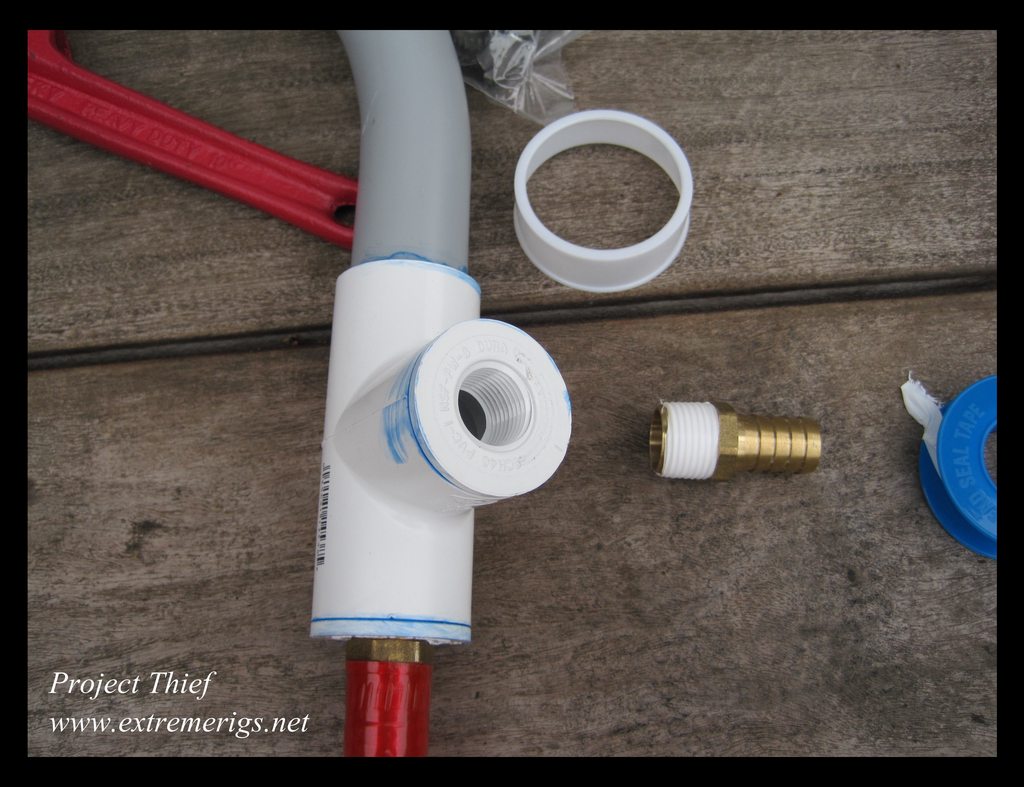
To finish the main loop we needed to connect the EK400 reservoir with the custom 1" NPT tap to the Iwaki RD-30 pump. First we need to build a T section for the drain port:


These are standard schedule 40 pieces of PVC that I'm gluing together. I took a T junction and two 1/2" NPT reducers as well as a piece of 1" grey electrical conduit for making the 90 degree turn:


This is all based on amuseme's idea except that I'm using 1" pipe instead of 0.75" and I connect to the pump slightly differently. So now we have to connect to the pump:


So we take a 5/8" brass barb from your local hardware store and tape it up with teflon tape:


1/2" tube can be warmed up and stretched over the barb. The idea is that the barb lines up right next to the 5/8" input to the Iwaki giving less restriction to the input feed of the RD30 unlike regular 1/2" tube would. I also added a 2nd barb for the drain tube. This reservoir coupled with the 1" pipe means there is a lot of water that needs draining easily:


Both barbs in:


Now let's hook up the pump:


Add some worm clamps so that nothing flies free when you turn the pump up to 29V:


Now let's add the drain tube, the tube color is temporary for now:


Add the drain port:


Add a worm clamp and we're done for now:


Now it's time to put it in the case. As the reservoir was temporarily mounted we need to fix it first. There's a convenient metal plate in the case that you can unscrew and drill holes in:


Now let's reinstall that in the case:


And done:


The reservoir is fed by two drain ports. When feeding a larger amount of water it's useful to have one for water coming in and another for air coming out:


Now here's the Iwaki Plus feed tube situated in the base. The cardboard box will be replaced with anti-vibration gel soon enough:


Here you see the gap between the Iwaki feeding tube and the tapped base of the EK reservoir:


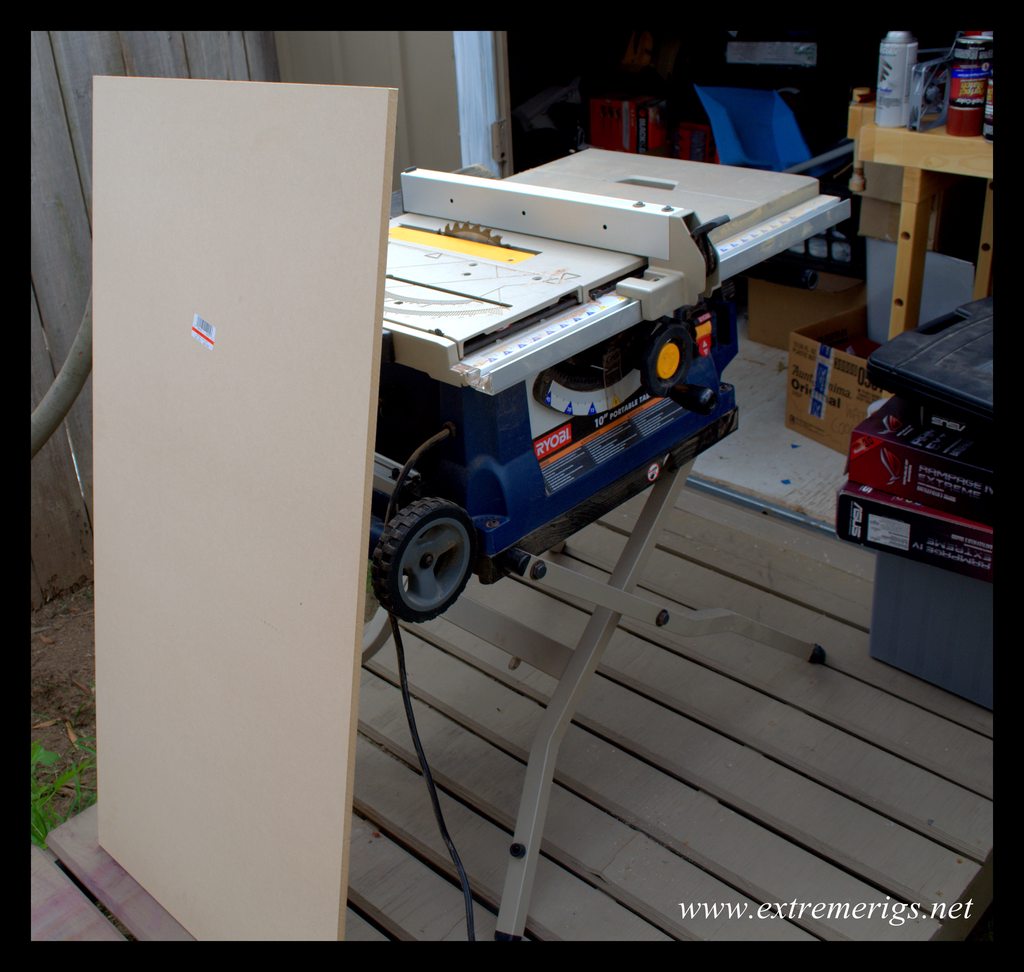
I cut a piece of schedule 40 tube to size to glue in here:


Later I will paint all of the tubes so it doesn't look so bad :p The cardboard box doesn't quite raise the Iwaki high enough so we'll need to swap that out:


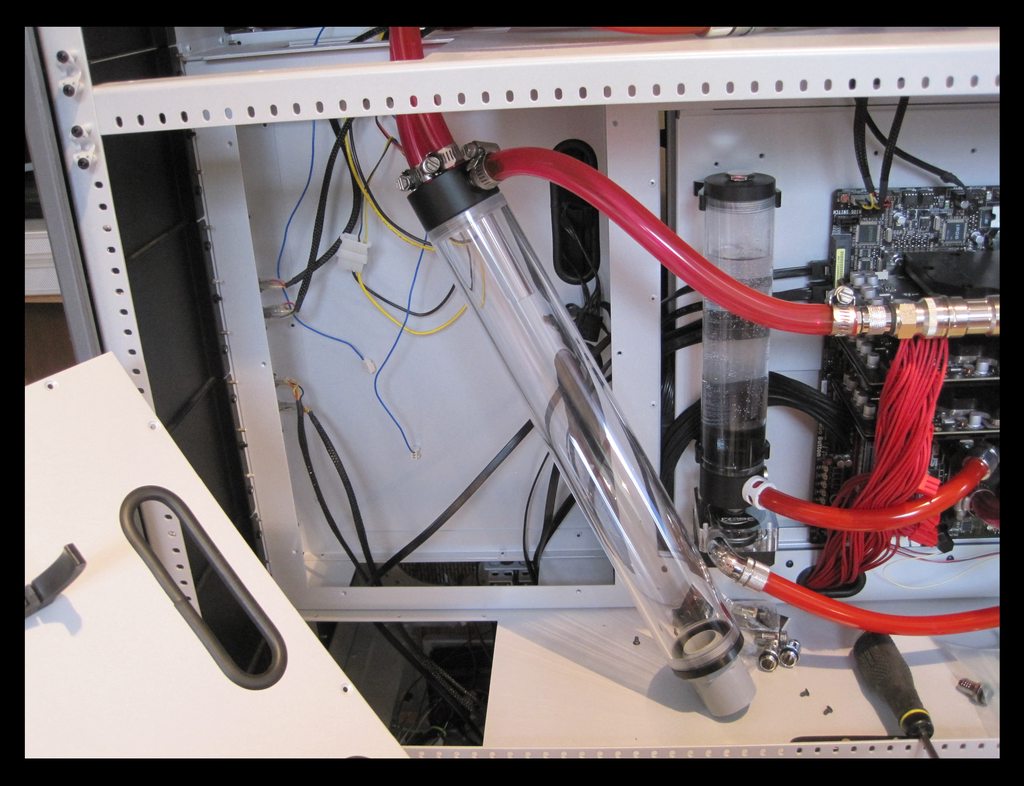
But here it is fully connected:


And here's the whole side of the gaming case in it's temporary state:


Now we can add the 360 radiator back in quickly (30 seconds) due to the Koolance quick disconnect fittings and the CaseLabs side mount design:


I can't fit a 480 in because of the placement of the radiator and the feed tube. I may move it later, but for now this works. So it's time to fill up with water:

 
Joined
Nov 13, 2009
Messages
5,614 (1.07/day)
Location
San Diego, CA
System Name White Boy
Processor Core i7 3770k @4.6 Ghz
Motherboard ASUS P8Z77-I Deluxe
Cooling CORSAIR H100
Memory CORSAIR Vengeance 16GB @ 2177
Video Card(s) EVGA GTX 680 CLASSIEFIED @ 1250 Core
Storage 2 Samsung 830 256 GB (Raid 0) 1 Hitachi 4 TB
Display(s) 1 Dell 30U11 30"
Case BIT FENIX Prodigy
Audio Device(s) none
Power Supply SeaSonic X750 Gold 750W Modular
Software Windows Pro 7 64 bit || Ubuntu 64 Bit
Benchmark Scores 2017 Unigine Heaven :: P37239 3D Mark Vantage
Very cool keep up the great work!
 
Joined
Jan 16, 2012
Messages
211 (0.05/day)
Very cool keep up the great work!

Thanks :):)

Well time for a bit of an update! A big thanks to Corsair for sponsoring the build :)


My original dominators (same part number) came in a much more boring box than this one:


And if you're wondering just how small those overclockable low profile sammy dimms are:


Joined
Oct 26, 2011
Messages
3,145 (0.69/day)
Processor 8700k Intel
Motherboard z370 MSI Godlike Gaming
Cooling Triple Aquacomputer AMS Copper 840 with D5
Memory TridentZ RGB G.Skill C16 3600MHz
Video Card(s) GTX 1080 Ti
Storage Crucial MX SSDs
Display(s) Dell U3011 2560x1600 + Dell 2408WFP 1200x1920 (Portrait)
Case Core P5 Thermaltake
Audio Device(s) Essence STX
Power Supply AX 1500i
Mouse Logitech
Keyboard Corsair
Software Win10
Stren, this is a bit offtopic but if you don't mind may I ask your subjective noise rating on the Iwaki pump?

Thank you.
 
Joined
Jan 16, 2012
Messages
211 (0.05/day)
Stren, this is a bit offtopic but if you don't mind may I ask your subjective noise rating on the Iwaki pump?

Thank you.

With the right damping you won't hear it above a gentle typhoon AP15. However it's significantly noisier than well damped D5s at max. The tone is a bit annoying (buzzing) if you can hear it though. An MCP35X2 at max is still a bit quieter, but a better tone still. If you dial it back to 18V it's not so bad though it's still plenty audible if you turn off your fans. It's not for silent setups but it's not ridiculous, i.e. quieter than my "quiet" aquarium gear.
 
Joined
Oct 26, 2011
Messages
3,145 (0.69/day)
Processor 8700k Intel
Motherboard z370 MSI Godlike Gaming
Cooling Triple Aquacomputer AMS Copper 840 with D5
Memory TridentZ RGB G.Skill C16 3600MHz
Video Card(s) GTX 1080 Ti
Storage Crucial MX SSDs
Display(s) Dell U3011 2560x1600 + Dell 2408WFP 1200x1920 (Portrait)
Case Core P5 Thermaltake
Audio Device(s) Essence STX
Power Supply AX 1500i
Mouse Logitech
Keyboard Corsair
Software Win10
You are what I call a "watercooling resource" thanks man, for everything you do for our community (watercoolers). :toast:
 
Joined
Nov 13, 2009
Messages
5,614 (1.07/day)
Location
San Diego, CA
System Name White Boy
Processor Core i7 3770k @4.6 Ghz
Motherboard ASUS P8Z77-I Deluxe
Cooling CORSAIR H100
Memory CORSAIR Vengeance 16GB @ 2177
Video Card(s) EVGA GTX 680 CLASSIEFIED @ 1250 Core
Storage 2 Samsung 830 256 GB (Raid 0) 1 Hitachi 4 TB
Display(s) 1 Dell 30U11 30"
Case BIT FENIX Prodigy
Audio Device(s) none
Power Supply SeaSonic X750 Gold 750W Modular
Software Windows Pro 7 64 bit || Ubuntu 64 Bit
Benchmark Scores 2017 Unigine Heaven :: P37239 3D Mark Vantage
amazing work!
 
Joined
Jan 16, 2012
Messages
211 (0.05/day)
amazing work!

Thanks :)


Morpheus from OCN stopped by and gave me some fan splitters which come in very useful for the quick disconnect of the radiators. Each radiator has two 3 pin headers that come from each side. This little PCB is then attached to the backplate of the pedestal:


One for each side of the case. The distance between the two is conveniently sized to feed from a single molex


I also got done painting the 24V Power supply for the Iwaki pump. I don't think I showed a pic of it before, but it looked like a very beat up version of this:


Except that the mesh part was painted black on mine and had been worn off over time.

So I thought I'd paint the whole thing red and then mod a PSU support from the bottom heat chamber so that it can be mounted next to a fan from the HDD rack. I also need to hook up a relay so that it only turns on when the computer is on. Here are the pieces after painting and clear coating:


With the PSU back in and the heatsinks retimmed:


All sealed up:


That's it for now. Now that I have my windows PC up and running I can finally get sketch-up back and running and start playing with ideas for custom blocks and reservoirs!

Don't forget to like my facebook (www.facebook.com/extremerigs) if you want previews of updates, giveaways and also my watercooling reviews (17 cpu block roundup in progress)!
 
Joined
Nov 13, 2009
Messages
5,614 (1.07/day)
Location
San Diego, CA
System Name White Boy
Processor Core i7 3770k @4.6 Ghz
Motherboard ASUS P8Z77-I Deluxe
Cooling CORSAIR H100
Memory CORSAIR Vengeance 16GB @ 2177
Video Card(s) EVGA GTX 680 CLASSIEFIED @ 1250 Core
Storage 2 Samsung 830 256 GB (Raid 0) 1 Hitachi 4 TB
Display(s) 1 Dell 30U11 30"
Case BIT FENIX Prodigy
Audio Device(s) none
Power Supply SeaSonic X750 Gold 750W Modular
Software Windows Pro 7 64 bit || Ubuntu 64 Bit
Benchmark Scores 2017 Unigine Heaven :: P37239 3D Mark Vantage
Coming along nicely!
 
Joined
Jan 16, 2012
Messages
211 (0.05/day)
Coming along nicely!

:D

11/20/2012

Well it's been a while - I was busy working on my new website, the CaseLabs Merlin Preview, Spotswood Tech Station Review, the EK X3 Reservoir Preview, figuring out my new Nikon D5100 as well as finishing off the CPU Water Block roundup. I need a break but I'm almost done with all of that! Anyway - to celebrate not being fired yet I thought I'd work (finally) on the waterfall reservoir. This was originally inspired by Cyberdruid, however as he's retired I figured I'd have to make my own, and I suppose that's more fun anyway. I knew I would need a few attempts at this to get it right so I figured I'd make the prototypes out of MDF as it's cheap and easy to work with. So I went to the hardware and picked up a small board of MDF:


Dragged out my lonely tablesaw from the shed and got to work. I cut some 3x 3" strips of the 4ft side of the board:


I then measured the height of the 18 bays in the case and made the cut on one strip:


Then I test fitted in the case which meant undressing the drive bays!


Alright let's take that cover off:


Well that was fast, ok, drive bays next:


Resting the wood on the bottom of the drive bay gives me this much clearance which is about perfect:


So I cut the other side to the same size. Then measured and cut the top piece:


It's ok for both these pieces to be flush because they'll be some kind of joinery action going down. For now I'm thinking a finger joint. Maintaining strength while being able to knock it out on the table saw. I then cut a matching piece for the base so that all the frame pieces were cut:


I then started cutting the pieces that would form the waterfall itself:


Seven down:


Tablesaws make this quick. All done, sitting on the uncut acrylic sheet that will make up the front and back:


That's it for now!
 
Joined
Jan 16, 2012
Messages
211 (0.05/day)
It was raining a good bit this week so I didn't work on that, instead I put some painted parts back together. I reassembled the rotors into the housing:


The paint was standard automotive stuff and came out quite nicely the red is metallic:


So it was time to sleeve:


I started with the push fans and mounted them on the pull side of the radiator so that the spacing would be correct. Most of the time sleeving these is really spent soldering wire extensions on:


Slow progress:


Done with the first set of 3:


Mounted the push fans on the push side:


Now it's time to work on the pull fans:


Ran out of red wire so I used yellow:


Done with the pull side:


Now it's time to join both sets of three into one. This is the 360 that will be replaced with the painted one:


All put together on the push side:


And the pull side - which will need some custom stickers to pretty it up:


I also sleeved a matching fan to go on the motherboard tray:


And there it is running:


:thumb:
 
Top