• Welcome to TechPowerUp Forums, Guest! Please check out our forum guidelines for info related to our community.

Project XFCN (military style)

Joined
Feb 16, 2012
Messages
158 (0.04/day)
Project XFCN​
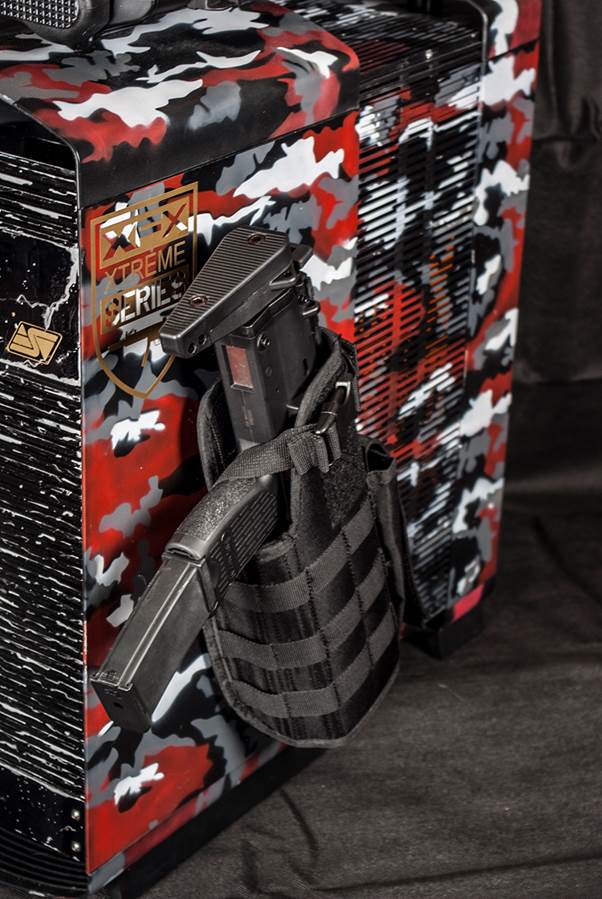
It’s been a while since I have built a Mod, but it seems I cannot get enough of the Military route, having sat there and looked at BF3.3 project (that became my misses PC). I have to say I wanted to build another.

This time I wanted to go down the same route of having a weapon, but now I wanted it mounted to the case permanently so that I could rewire the internals so the trigger became the PC’s power switch. I also wanted to make sure the safety on the replica also worked, so that with the safety on the trigger would not do a thing and so it began and hence the name XFCN which is military speak for Exterior Function.


Web / Facebook / Youtube

First off let me start off with a big thanks to the sponsors that jumped on board.
XFX really stepped up for me on this build and offered me a superb choice of full support with hardware and would supply the Case, PSU and Graphics for the project, and as most of us modders know that is a huge chunk of change out of the money we spend out, there was a condition that it goes to some shows, but hey I am up for my work being on display.


Another Big thank you goes out to UMAREX, who will be supplying a couple of Airsoft Realistic Imitation firearms for the build. The main choice for the roof mount was a MP5 and UMAREX hold the worldwide exclusive trademark and exterior design copy of Heckler and Koch products, which means the replica will be a 1/1 scale and looks as close to the real version of the MP5.


Swiftech will be supplying the main components of the watercooling with 2x 140mm radiators, the Apogee XL and the Maelstrom V2 Dual Bay Reservoir/pump combo.


A big thank you to the Kingston team for supply a 8gb kit of Red and 8gb black hyper X memory kits to match the builds theme.


Thanks to Dremel who seem to step up on every build, I got a couple of pieces of to help move the build along quicker.


Thanks again to PrimoChill for supplying their hardline kit with a bender and tubing with the connectors, they also supplied some modsmart pieces too, so watch this space.


Also a shout out to Bitfenix who are always there to supply me on my builds with lighting and fans, every bit does help.


More thanks goes out to Startech for supplying me with the HDD brackets and the cables I needed to fit 4 SSD’s into 3 slots.

Where to start the log off, well I think i have to go to straight to the case...


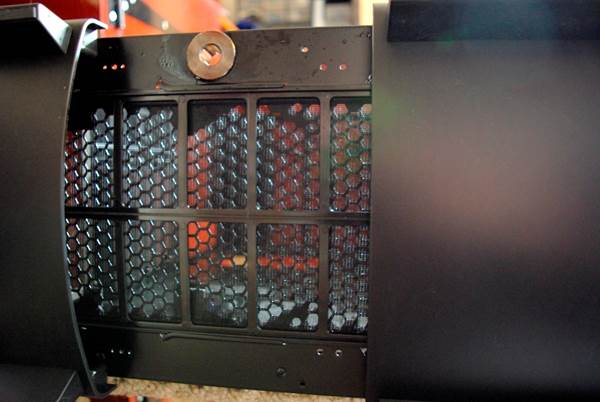
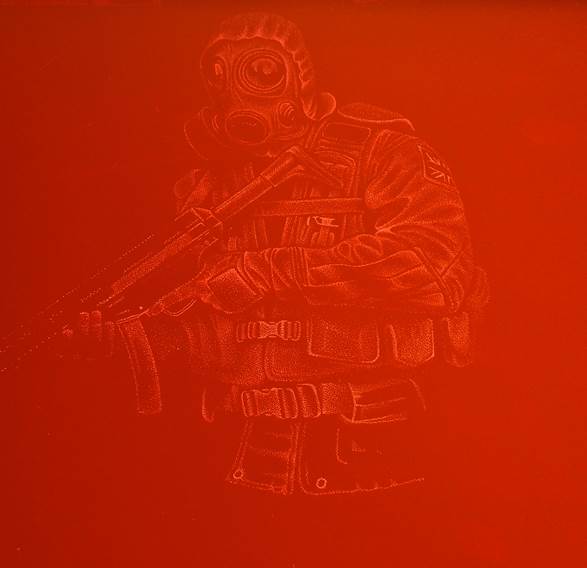
The case in question is the XFX type 01 bravo and it has a nice smooth appearance with some inner bulk (if that makes any sense to you guys). So of course most of you probably know my mods will be going to feature a window with a hand etched window, with that said, let us move on to the beginning and get this build started, as always criticism is always welcome and never taken personally. So lets begin.
 
Last edited:
Joined
Feb 16, 2012
Messages
158 (0.04/day)
One of the first things I noticed when taking the side panels off is that were double skinned, this meant for the widowed side I was going to have to cut two windows out for the same side one from the outer plastic side of the side panel and one from the inner steel one.


Masking up the panel was pretty straight forward once I had decided on window size, for the best way to cut out a window with a dremel, I highly recommend watching MNPCTECH’s video here

it’s simple and its spot on and a method I have been using since I first got a Dremel.


Oh dear XFX are you sure you used standard SECC here, the inner skin of the case went through 4 of my reinforced cutting disks! Talk about man of steel (or should I say Case of steel :p), a lot more than I am used to going through on a SECC based case. Cutting the plastic parts was easy, (just remember to stop from time to time, to pull off the excess plastic). You don’t have too, but I personally advise this as its much easier to pull off any excess plastic from both sides.


Moving on to the rear side panel, I wanted to just get the inner steel grill cut-out, so time to shed some more reinforced cutting disks., the reason behind this is I wanted to pull the red anodised logo off the back panel and put a UV red XFX logo behind the grill. Once this was done this is what I was left with (not final position), just a mock up to give you a rough idea.


I have to pull off the type 01 logo strip as I will the other side too, I have something that I’ll show you in the next post that will be attached to the windowed side panel on the outside that will have the type 01 written onto it.
 
Joined
Feb 16, 2012
Messages
158 (0.04/day)
Back again as promised with a little update, removed the red sign from rear side panel, but then grabbed my 3m tack remover to find it had evaporated, so I’ll have to wait for more to turn up to remove the rest of the bonding tape.


This should give you an idea of what I want the rear panel to look, like, so when powered up just the XFX glows up on this panel. Onto main side which will of course include an etching, but also after removing the XFX type 01 logo from the bottom of the panel, I wanted something else to say XFX type 01. Here is what I came up with.


This was done using vinyl stencil, Salt water and a tattoo powersupply, I need to polish up a bit more to get rid of fine marks. I should have really done a guide. So to make up for that I will make sure something else needs some of this treatment so that there is a guide in this log.
 
Joined
Feb 16, 2012
Messages
158 (0.04/day)
So having decided on urban camo (red, black, grey and white) I decided to keep the red and black theme going on through the case, so first point of call is the front panel.


I wanted to redo the front XFX to tie in more with the MP5, so time to cut out the XFX on the front.


After I cut this, I had to make a small bit of red acrylic to fit inside to be able to use some vinyl to ensure the logo pops out.


Simple so far, so a quick visit to my plotter and for the custom logo cut out left me with this.


Now to test the placement and fitting with the vinyl as it was pretty tight without it.


Next I had to mask up the dark smoke acrylic for the cover, so that it would be only visible with light from behind.


I had to do this as I did not want any light to pass through anything but were I had placed the logo piece. Here are a few pictures to give you an idea of what I am aiming for.


He he before any of you point it out, the XFCN is still visible, it’s just the angle I had to take the photos off to capture the light behind the panel, I actually love the way it came out to be honest, but I am still in a debate on if I should set the front panel up so that the MP5 silhouettes are only lit by HDD activity, not sure yet. I’ll have to wait to see how it looks when I get to that stage.
 
Joined
Feb 2, 2011
Messages
561 (0.12/day)
System Name Salamander
Processor Ryzen 5 3600 @ 4.325ghz 1.206v
Motherboard Asrock X370 Taichi
Cooling EK Supremacy Evo | Black Ice Nemesis 360GTS XFlow | Noiseblocker BlackSilent Pro 120mm x 3
Memory Team T-Force Xtreem 2x8GB DDR4 3733 @ 3733mhz c16 1.4v | IF @ 1866mhz
Video Card(s) XFX RX-470 RS Single Fan flashed to RX-570 @ stock water-cooled
Storage Samsung 850 Evo 256gb M.2 | Crucial M4 128GB | WD Blue 1TB | WD Blue 500GB 2.5" | Toshiba 2TB 2.5"
Display(s) LG 27MP68VQ 27" 1920x1080 75hz IPS Freesync monitor
Case Fractal Design Define C
Audio Device(s) onboard
Power Supply Seasonic Prime Gold 650w
Mouse Steelseries Kana White
Keyboard Steelseries 6GV2 Cherry MX Black
Software Windows 10 Pro N
looks interesting :) sub'd
 
Joined
Feb 16, 2012
Messages
158 (0.04/day)
So here is what turned up on here


Yes that is 2 Heckler & Koch boxes from Umarex, time to open these puppies up.


Although I only need the MP5 for now to mock up on the roof, here is a couple of images of them out of the packaging.


The MP5 replica we have is quite amazing to be honest and I supposed it should be as Umarex own the licence to produce one to one copies of Heckler and Koch products, the detail on this is superb and the build quality just as good too.


The MP7, just like the MP5 is really detailed, this is also a one to one clone and very well made, this is mostly made from a composite though, but I do have to say I think this has a nice feel to it and my personal fav out of the two I received. I will add some more detailed pictures later so you guys can see how nice they are close up, but for now, I am going to use the mp5 to mock up the roof mount for it.


So first up was placing the gun into position and then marking up a few mount holes to cut. I also had to think that I still wanted access to the audio sockets on the front of the case as well as 1 or 2 of the USB ports, so a slight angle was chosen to ensure this was possible.


Of course, being double skinned I had to remove the top and make the drill holes through the metal too. (Hoping my measurements are correct :p).


Phew, with the bolts in place I had done it just right, as you can see I now have the access to one USB port and both the audio ones, I had to also mock up some supports so that it was not resting on the roof, I also had to make sure these would be sturdy and have enough clearance to allow a motherboard cable to run through them so I could wire the trigger. This is what I came up with.


I decided to use a steel inner, with an acrylic outer tube, just to give the arch more stability, I still have to sand more of the acrylic tube down though as it is putting a bit of pressure on the top panel and causing a light curve as you can see.


As you can see the MP5 is now sitting above the roof, so far so good, let me move onto the motherboard power wire.


Eureka, now I have the wire able to route up into part of the MP5 I am beginning to see the light, I do have to say that was the hardest part of wiring up the trigger to be the powers witch as wiring the gearbox of a AEG has the wires hanging out of it already, I only have to connect the two going to the motor and wire this cable to the connectors on the front of the gearbox, I thought that was me done for the day though until I spent and age looking at the front panel, and thinking..


Well I was not happy with it, so I am going to have to redo it again, what I am going to do is cut the slats down as I don’t like the fact the tint panel is sticking out and from the side you can see the grooves, It is just not right at all!. More on that to come later.
 
Joined
Feb 16, 2012
Messages
158 (0.04/day)
Small update, misses started the etching for the window, I thought I would take a shot just at the start so you guys can appreciate the work going into it.


As you can see it is mainly all dotting which is a long process, but the best way to get shading and detail.
 
Joined
Feb 16, 2012
Messages
158 (0.04/day)
Back again with another small update to show you guys how the etching is coming along


I think it is coming along nicely, I did have some other ideas for the image, but this one seems to be the best choice for the rig as the mp5 was a feature in it.


The dotting work on this is amazing and I get amazed every time, here is a closer image


Click here for a full size version of this image to give you an idea of how much time is put into these engravings, with the 1000s of dots involved.

That’s all for today… p.s don't let the boss catch you reading this at lunch ;)
 
Joined
Feb 16, 2012
Messages
158 (0.04/day)
Well I can see that, (one of the reasons i have to change some things, as i said not totally happy with front), but it is just a start really, there is plenty more to come, the case has to be finished mocking up (changing side panel as I do not like the way the window is framed), also once mocked up the whole case, will be painted in red, grey, white urban cammo... I will change your mind by the end ;)
 
Joined
Feb 16, 2012
Messages
158 (0.04/day)
So before I start on about salt water etching here are a few things that turned up.


One Dremel Moto-saw and one tool stand (the tool stand I had already and despite turning my place upside down I could for the life of me not find it) so thankfully Dremel stepped in to replace it. As for the moto-saw, I needed this as I was unhappy with the look of the side panel with the slits in the side (see previous posts).

So using the Moto-saw I created a new side panel out of a fresh piece of acrylic, although this still bugged me out and I was not happy as it did not have any ruggedness about it at all.


Ha ha yes to me this was an epic fail and it still felt pretty flimsy, not happy with it at all, what to do next was quite simple, get some 6mm aluminium sheet.


This is where the moto-saw came into its own, although it took twice as long as using a jigsaw I wanted the cutline to be as thin as possible and with some WD40 and some perseverance I finally ended up with a proper side panel.


Now that was done it was time to add a small etching to the panel, I will describe this process as best to my knowledge and accept no responsibility for you getting small electric shocks, or any fumes numbing your mouth lol… (more on this later).

So the first thing we want to do is set up a stencil, luckily I have a silhouette cameo vinyl cutter so I cut my design out and applied it to the panel.


It’s important to get the stencil made from outdoor sign vinyl as it is more durable than normal vinyl, I should also point out here, that once I apply a stencil I leave the item alone for 24 hours, just to ensure it is stuck down well, one thing you don’t want to happen is the vinyl to start lifting during the etching process as that will just ruin it.


On the next day I add some vinyl around the edges just to ensure no seeping salt water gets onto the metal any other place than were I want it, I think this is something that is important too as you don’t want to ruin the thing.


Yes guys this is a tattoo power supply, the reason I am including this in the guide, is this is what I use regularly to do any saltwater etchings. Its small does the job and works how it is supposed to. Although I it to a charger for the panel, I had already took pics of this for the guide.


Salt water etching this way is a messy process and as you can see via the towel under the white one, make sure you put something under the towel (I have a large glass chopping block) to ensure you don’t damage the side in your kitchen (Just don’t tell my misses I do this in the kitchen ;P). Before we get started I should also mention ensure the area is well ventilated, why the gas coming off salt water is not very harmful, in this sort of dose it would be if you let it build up.

So onto the etching, first attach the positive lead to the piece you are doing.


Then place your cotton wool bud into your salt water mix (the mix is a hit a miss affair really, too much and your create way to much heat. This will then lifts up your stencil and mess everything up.


Then attach it to the negative cable (I know it has red, but this is way I made this cable, and once done I could not be bothered to change it). I thought I would have an issue with this though and I was right, the tattoo power supply could not give enough oomph due to the size of the panel. Although it was more than enough for the knifes I have done, it was time to swap over to a Car battery charger.


Due to the size of the connecters on the battery charger you want to get some of your misses or sisters (depending who’s stuff is nearer) face pads or cotton pads, wrap them round the cotton wool bud and clamp them with the connector. Once done dip into the salt water and then push down on the towel to get rid of any excess water off the pad.


Then start going over your stencil, check every few seconds that the cotton pad is not becoming too hot, if it is water down your salt water mix. You will hear it sizzling when it is working, also do not breathe in any of the fumes that come off the panel,. The fumes will not kill you but having made the mistake once you will know why you should not breathe them in. (can you say numb and tingling mouth? I did once, but never again so you have been warned.


This was after 30 minutes of going over the stencil, it was not as deep as I would have liked, but it was my first time using this method with aluminium rather than steel and it’s quite funny that the steel is easier to work with, but his could also be down to the size of the panel, although 30 minutes was good enough to get a 1mm depth on the stencil.


After a little polish you can see roughly what all that work was for, this is now embossed into the side panel and will still be there once painted. Until the next time.
 
Joined
Feb 16, 2012
Messages
158 (0.04/day)
Hi all back for an update, first point of call now I had done the etch on the custom side panel, it was time to mount it, I decided to use some smaller Allen bolts for these to give an almost pot riveted look.


I had to do this anyway to ensure the 6mm aluminium piece would stay mounted to the 1mm steel panel behind it, it is almost a shame to paint it really, but as the themes is military (with red, grey white and black) it has to be painted too.

Moving on now I have done this it is time to make some holes to accommodate the fill and drain ports in the case.


The drain port hole is placed near the PSU, with just enough room for the fitting and the pipe to squeeze in, also it seems the most logical place due to the fact the curvature of the case outer panels (in this case the feet support) would be in the way if it was placed any other place.


The top fill port hole was placed in the exact opposite location leaving only enough room for the fan, I done this as mentioned due to the curvature of the case.


Top mounted Primochill fill port in place on the roof of the case.


The bottom Primochill drain port mounted in place to check fitment, now both of them locations are fixed, before I strip the case down to plan the watercooling I want to do a little mock-up of the gun placements, just to get a rough idea.


Top mounted MP5 in place with room to spare for one of the USB ports and headphone and mic jack so they are useable.


MP7 mounted to the side panel via leg holster, might not be every ones cup of tea, but as they say in blighty horses for courses. Another update will be coming this weekend stay tuned.
 
Joined
Feb 16, 2012
Messages
158 (0.04/day)
So as my last image posted was of the guns mounted, let’s take a look at the Umarex replicas themselves, we will start off with the Umarex HECKLER & KOCH MP5 A5 an electric based Airsoft replica that can be found here.


As you can see the detailing is amazing on this one to one replica and makes a great choice for the external function (XFCN) part of this mod, the trigger is the power switch and also the safety works so no one can just go up to the pc and pull the trigger resulting in a power down.


Moving on to the next Umarex replica, this is a gas blow back airsoft rifle and is a another great one to one replica of the real HECKLER & KOCH MP7 NAVY , this is my favourite of the two and actually has some good kick back when fired. More info on this can be found here


My favourite of the two of these simply to its accuracy to the real one and although the build quality on both is superb I have to say I prefer the size of this one. Here a couple of hdr shots of it loaded out with scope, folding foregrip and side sights.


That’s all for today, I will be venturing into the build part soon as panels have been sent off for painting, stay tuned for more.
 
Joined
Feb 16, 2012
Messages
158 (0.04/day)
Back again with another small update, this time some photos of the rest of the stuff going inside the mod.


Many thanks to Swiftech for stepping in to supply the res/pump combo, the excellent Apogee XL which as you will see matches the build well, first up we have the radiators.


Due to the limitations put on me by the case I decided to go for 2x 140mm radiators, the Swiftech MCR140-QP were the perfect choice, I am not 100% sure I will need both as this is only going to be a CPU loop. But I thought I better cover my bases on this one, next up the res/pump combo.


I like the way Swiftech have implemented the pump on this reservoir, it is a nice touch, and built incredibly well.


Also unlike most pumps, Swiftech are moving with the times on this and instead of the old molex connector for power, we have a sata, why not a major selling point the Swiftech brand has a good reputation anyway and have been around a very long time.


Moving onto the mounting brackets, Swiftech have made a very good attempt to make sure the res is secure, I also have to applaud them for making the mounting bracket with the slot in the middle, as some of you know when using a dual bay res with a case with supports for DVD drives sticking out, most modders either bend them flat or cut them out, with this res there is no need to do either as the slots allow you to just slide it in. Nice touch indeed.


They even have covered you on the fill port side by adding another mount point on the res, as you can see above, these two fitting holes are there as well as the one on the end of the pump. I have to say the Swiftech Maelstrom V2 Dual Bay Reservoir is one of my favourite dual bay reservoirs for practicality and ease and if I had the choice I would use this in all of my builds. Onto the cooler


Getting the apogee out of the box It was a pleasing sight to see the block comes with not only the included blue colouring but also white, red and green. It’s nice to have colour options and of course red is going to be placed in this build.


I suppose could go on about how well engineered this is, but in reality those of you that have used Swiftech products now they have been on top of their game for a while now and you should expect quality when you buy one of their products.


To change the colour over is as easy as pulling these pins (I used a craft knife to get under them), then you are faced with this.


Then it’s just a case of flipping that out and replacing with the colour of your choice, quick, simple and very easy. Why we are on the subject of water cooling, let us take a look at the Primochill products.


A massive thank you for Primochill for stepping up to the plate on this build, not only did they provide me with the tubing and revolver fittings for this hardline kit, they also supplied me with a bender, some heat proof gloves, the dye and some fan grills for the project, as well as loads of little mod smart clips and dust covers and a flow meter.


For the flow meter I went with the PrimoChill Vortex Black POM flow indicator with the blood red to tie in with the theme.


I also went with the PETG tubing as this rig will do quite a bit of travelling between places I wanted to make sure it had some strength, why the acrylic is clearer it is not really ideal if you transport a rig around, so it’s a safe bet to use the PETG instead.


On the compression fittings for the build I have gone for the red revolver fittings, these tie in with the colour scheme well and obviously are the right choice for this. Stay tuned for more updates soon as I get closer and closer to the build being complete.
 
Joined
Feb 16, 2012
Messages
158 (0.04/day)
So Just another little update, with some of the parts being used and a little bit of vinyl work, first up is the small, but important pieces of the puzzle from BitFenix.


Some lighting, the all-important extension cables for mobo power (to run from weapon down to mobo power) and of course some sleeved extension cables.


I bet right now, you may be a bit confused, due to the black and gold choice, but the explanation is quite simple, you see the logo I done on the side panel.


Well this will be also cut out of gold vinyl and will be added to the roof and the reverse black side to break it up, plus having my own vinyl cutter means I will be adding the red, black, white and grey camo to the inside as well, so having gold breaks that up and matches the logos outside too, anyway back onto the parts.


Thanks to Kingston for sponsoring me with to different colour kits to match the motherboard memory slots on my chosen motherboard, the kits supplied are viewable here, I almost wish the motherboard had 2 extra memory slots so I could mix in a white kit too ;). Moving on to the main components we have.


The rest of the internals are made up of a Asus Crosshair V formula Z to handle the FX9590 Black edition CPU, you would be amazed with the hassle had choosing a board for the CPU, Other manufactures do offer support on their AMD motherboards, but they have to be certain revisions and a quick phone around comes up with the problem that stock is a mix of revisions and no one can ensure you get the right one… go figure. The PSU is a XFX modular and Hard drive wise I will be throwing in 4 smaller 120 GB Samsung SSD’s in raid.


The motherboard ties in with the colour scheme and as you can see the memory sticks with match the slots on the motherboard.


Both cards are the XFX R9 290, which together should provide more than enough grunt for the rig, why I am on the subject of the cards ill vinyl these before moving on with the camo effect from outside, but done a lot smaller.


That’s all for now, need to add some vinyl to inside of case and attach cpu block to the motherboard.
 
Joined
Mar 26, 2010
Messages
9,781 (1.90/day)
Location
Jakarta, Indonesia
System Name micropage7
Processor Intel Xeon X3470
Motherboard Gigabyte Technology Co. Ltd. P55A-UD3R (Socket 1156)
Cooling Enermax ETS-T40F
Memory Samsung 8.00GB Dual-Channel DDR3
Video Card(s) NVIDIA Quadro FX 1800
Storage V-GEN03AS18EU120GB, Seagate 2 x 1TB and Seagate 4TB
Display(s) Samsung 21 inch LCD Wide Screen
Case Icute Super 18
Audio Device(s) Auzentech X-Fi Forte
Power Supply Silverstone 600 Watt
Mouse Logitech G502
Keyboard Sades Excalibur + Taihao keycaps
Software Win 7 64-bit
Benchmark Scores Classified

i like that aluminum, pretty cool
 
Joined
Sep 15, 2008
Messages
1,050 (0.18/day)
Location
Pikeville NC
System Name In the works
Processor 4670k
Motherboard ASUS Z87
Cooling 5x120mm
Memory 8GB Sniper Gskill 1833
Video Card(s) MSI 970 Gaming
Storage 2x 240gb SSD's + 1TB seagate
Display(s) 27" Acer 1920x1080
Case Corsair Carbide 200R
Power Supply OCZ Power 600W Modular
Keyboard Corsait K70 with red switches
Software Win10
Joined
Feb 16, 2012
Messages
158 (0.04/day)
Back for another update, now with the panels out to be sprayed, I decided to crack on with the innards and get some work done. First up was making the cut for the front mounted radiator, this had to be done to ensure it gave the radiator some room to breathe.


Once the cut was made I decided to tidy it up with carbon fibre and some rubber edging, I like the way it came out as it made for a much cleaner look.


Placement of the radiator was actually limited quite badly in this case, with this being the only really viable spot in the case, even having 140mm fan mounts on the bottom, roof and back there was no room to put one of these in any of them spaces, it would just not fit, so as the rig was not going to have the cards water-cooled I decided to leave it at that

Next on the agenda in this instance was to lay down a bit of the cammo scheme in vinyl to match the cards.


Now that was done it was time to mock fit the motherboard, and put in in with the cards to get a feel for the flow, so time to add the Swiftech Apogee XL with the Primochill revolver fittings to the motherboard.


As you can see with the red insert in the block with the red fittings, the block matches the mobo well, it’s actually starting to come together now and look the way I am going for. Time to fit it all to see how the look is starting to come together inside the case.


Now that all the vinyl is laid down, next instalment will be the Primochill Petg bending to add to the build, not sure how that’s going to materialise at it will be my first time using it. But I am sure it wont be that hard, to be honest I am starting to love this build more and more. P.S sorry about pics this time, camera ran out of batteries so a couple are from my mobile :(
 
Joined
Feb 16, 2012
Messages
158 (0.04/day)
Back again with a quick little update, this time with the front and tubing work done, as you saw the front of the case was changed up a bit, I have also after adding a coat of gloss black, used silver to give it a scratched metal feel to it.


I decided to cover the res, with piece of acrylic too, but used a piece with 50% less ting than the lower section. (Ignore the part under the acrylic at the top, this was just weighed down to insure the CDrom bay cover didn’t raise up while the top acrylic was drying and knock it out of place) I also as with the bottom panel added some scratches to the acrylic which will be filled with silver as with bottom piece, I am happy with the front to give that worn look. Moving on to the Primochill PETG tubing, it was time to measure and cut some.


Again thanks to Dremel for this puppy, it became very useful during this build, it made cutting the pipes straight easy as pie, also the blades are really thing so you get a nice thin cut.


Now I would love to say this was easy due to the acrylic bender from Primochill, but being my first time using this tubing it was not, I wasted two and a half meters of the stuff before I sussed it out!! Then when done I changed one pipe I made, simply because I did not like the angle of it, so if your going to do this for the first time, I would say get a couple of tubes and practice loads of different bends with them, just to get the hang of it.

The plus side to all this was the acrylic bender, I imagine my waste would have been a lot more without it. Big word of advice though, is get the Primochill kit, it comes with some gloves and a tube to put inside the tube to stop it from collapsing in, it also comes with a little tube of lube to help slide it in… (no pron puns please). Anyway here is what I got up to with it.


I had made the fill port section too, but cannot fit it until the top panel gets back from paint, clear was used for the cpu tubes and black for the return from radiator tubes and drain port.


Done, now to jazz it up a little and get all the cammo vinyl segments out and start random placing each colour piece out to match the other cammo pieces in the case.


I like the result so time to add it to the other black pipes.


Very happy with the way it looks, the only change I done was the CPU to radiator pipe, now to move on and see how it looks with a bit of lighting inside.


Setup for lighting test will just involve putting the PSU and memory in, just to see how it looks.


Also you may have noticed the change of Primochill logo on the Flow meter to gold, this was to match the gold and black power cables I had chosen. (due to the fact the logos on reverse side and roof will be gold and I just wanted to put a bit of a different colour in there).

In the next update I will be moving on to the back, and also hopefully installing panels ready ti flush, fill and drain the water loop for install, I should also have some pictures of the painted panels to add.
 
Joined
Feb 16, 2012
Messages
158 (0.04/day)
Sorry for the lack of updates, I was in a mad rush to get the rig almost fully complete to be displayed at MCM London (comicon) at the weekend, so here are a few pictures, please ignore the quality as I will be doing a proper photo shoot once it gets back to me.


As you can see from the picture above, I added camo to the fill port as well, I wanted to ensure all the black pipes had it so it was a no brainer really, I know some won’t like it but I do, let’s put some power into this puppy shall we.


I am happy with the way the lighting has come out and extremely happy I somehow managed to fit a load of cabling behind the motherboard tray (no easy task really due to the fact there is only a 10mm gap behind there). Let’s put the side panels on and take a look


I love the way it came out in the end and as mentioned will get a proper photo shoot done to ensure you guys see it in its proper glory. Until then here are a few pictures from the show.


I had to wait ages, just to get these few pictures in, and I mean ages, had to leave and come back around lunch time to get these as this is how it looked like most of the day.


Gave me a good proud moment listening to the people chatting about it, although I was worried the dino would nick it as I mean who wants to fight a dino I don’t :p anyway should have the proper photos for you guys in the not too distant future.

Small video of the XFCN (external function) or trigger power switch

 
Last edited:
Joined
Feb 16, 2012
Messages
158 (0.04/day)
Ok back now having finally got round to doing some proper pics, I liked this mod in many ways especially having the trigger of the MP5 being the actual power switch and thus the name XFCN, which if I had not said it a lot already means external function in military speak.. Anyway enjoy the pictures folks.


Overall, it’s a bit overkill on something’s, but I still love the concept, the main point of this rig was to draw a crowd in and it seems to have done that effortlessly at comicon (MCM London).

 
Top