• Welcome to TechPowerUp Forums, Guest! Please check out our forum guidelines for info related to our community.

SanDisk Extreme Pro 256GB USB Flash Drive (lack of) Performance

Joined
Nov 10, 2006
Messages
4,665 (0.73/day)
Location
Washington, US
System Name Rainbow
Processor Intel Core i7 8700k
Motherboard MSI MPG Z390M GAMING EDGE AC
Cooling Corsair H115i, 2x Noctua NF-A14 industrialPPC-3000 PWM
Memory G. Skill TridentZ RGB 4x8GB (F4-3600C16Q-32GTZR)
Video Card(s) ZOTAC GeForce RTX 3090 Trinity
Storage 2x Samsung 950 Pro 256GB | 2xHGST Deskstar 4TB 7.2K
Display(s) Samsung C27HG70
Case Xigmatek Aquila
Power Supply Seasonic 760W SS-760XP
Mouse Razer Deathadder 2013
Keyboard Corsair Vengeance K95
Software Windows 10 Pro
Benchmark Scores 4 trillion points in GmailMark, over 144 FPS 2K Facebook Scrolling (Extreme Quality preset)
I've been seeing poor performance on my SanDisk Extreme Pro 256GB USB drive since its initial purchase in November 2017. I initially saw my drive easily hit the advertised speeds of 400+ MB/s reads and 300+ MB/s writes pretty continually.

After 10 months of light use, I opened a ticket with SanDisk support in September 2018 reporting diminished read speeds of 273 MB/s and heavily diminished write speeds at 53MB/s. I found that completely formatting the drive would improve both up to 340 MB/s and 310 MB/s respectively but filling up the drive even 20% would cause speeds to quickly drop way back down. At times, I was even seeing poor speeds from the drive with it completely empty. I asked support if I should expect to see TRIM working (it wasn't clear if it was), if there were any firmware updates I could perform, if there was a special way to format it, or anything I was doing incorrectly that would cause these slow speeds. Even if this was expected behavior for the drive. I received a response back saying that per my screenshots, I was getting the "optimum speed" from the drive which was good enough for them to close my ticket.

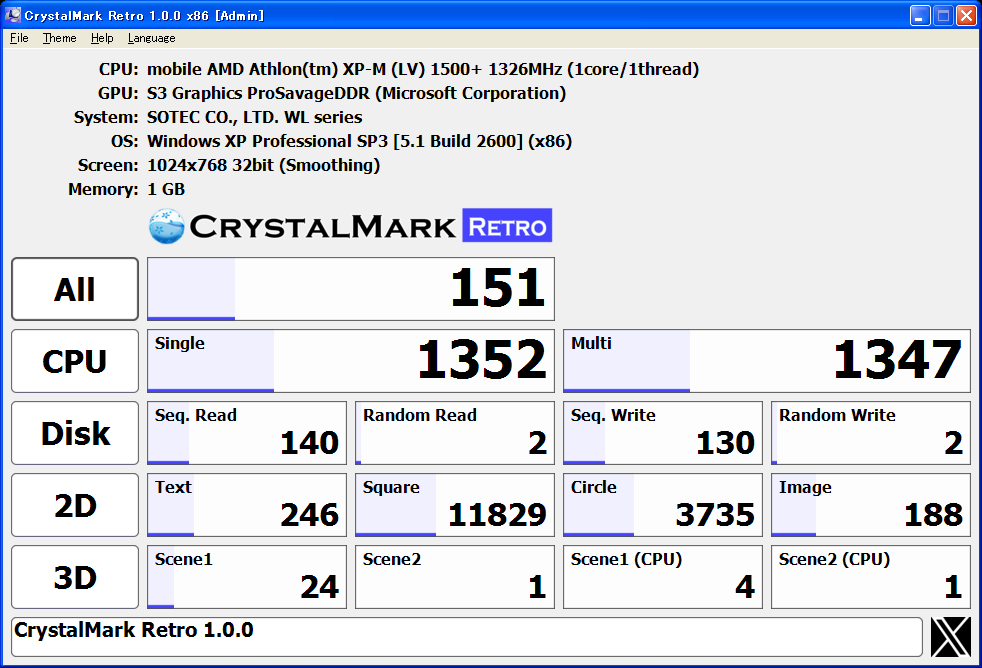
Now three years old, the drive seems to still be excessively finicky. I've attempted to look into it again recently. SanDisk's support page still doesn't even acknowledge that the Extreme Pro USB drives even exist. After running across a forum post on SanDisk's forums of a "SanDisk Guru" ranting about how it's the user's fault for formatting the drive from how it was originally formatted in the factory, I've run some quick benchmarks with the drive formatted under various file system configurations (attached below).
CrystalDiskInfo says the drive is TRIM capable and HD Sentinel says it is enabled, but running TRIM check seems to show that TRIM is not working. Some quick Googling doesn't turn up much in regard to getting TRIM working over USB with few relevant results and one mention of a "USB attached SCSI" protocol that I assume isn't supported by the controller they're using. Attempting to manually TRIM doesn't seem to help either.
Code:
PS C:\Windows\system32> Optimize-Volume -DriveLetter D -ReTrim -Verbose
VERBOSE: Invoking retrim on (D:)...
VERBOSE: Retrim:  100% complete.
Optimize-Volume : The volume optimization operation requested is not supported by the hardware backing the volume.
Activity ID: {39560822-5cc8-4601-9b74-b3ede5b119ef}
At line:1 char:1
+ Optimize-Volume -DriveLetter D -ReTrim -Verbose
+ ~~~~~~~~~~~~~~~~~~~~~~~~~~~~~~~~~~~~~~~~~~~~~~~
    + CategoryInfo          : NotSpecified: (StorageWMI:ROOT/Microsoft/...age/MSFT_Volume) [Optimize-Volume], CimException
    + FullyQualifiedErrorId : StorageWMI 43022,Optimize-Volume
I suspect a lack of TRIM is the only actual issue here and I'll be pursuing this (perhaps with better luck on Linux) however that doesn't quell my frustration with this drive and SanDisk in general.

I wanted to just note this for mostly informational and cautionary purposes but I am curious to know if anyone has thoughts on SanDisk's quality of support before and after the acquisition by Western Digital and thoughts on the performance of similar high-speed flash drives.

I'm considering replacing the drive with a USB NVMe enclosure and an inexpensive NVMe drive. While it would be bulky in comparison, it seems much more feature-rich and upgradable. Does anyone have any experience with these?
 

Attachments

  • 1578358992822.png
    1578358992822.png
    1.1 MB · Views: 748
Last edited:
Joined
Nov 10, 2006
Messages
4,665 (0.73/day)
Location
Washington, US
System Name Rainbow
Processor Intel Core i7 8700k
Motherboard MSI MPG Z390M GAMING EDGE AC
Cooling Corsair H115i, 2x Noctua NF-A14 industrialPPC-3000 PWM
Memory G. Skill TridentZ RGB 4x8GB (F4-3600C16Q-32GTZR)
Video Card(s) ZOTAC GeForce RTX 3090 Trinity
Storage 2x Samsung 950 Pro 256GB | 2xHGST Deskstar 4TB 7.2K
Display(s) Samsung C27HG70
Case Xigmatek Aquila
Power Supply Seasonic 760W SS-760XP
Mouse Razer Deathadder 2013
Keyboard Corsair Vengeance K95
Software Windows 10 Pro
Benchmark Scores 4 trillion points in GmailMark, over 144 FPS 2K Facebook Scrolling (Extreme Quality preset)
tl;dr: POTENTIAL FIX! I think I have a quick fix that suggests (but possibly doesn't require) erasing the drive. I have a step-by-step guide below.

So I ran across some articles that were talking about tricking the drive to do a TRIM via performing a hardware-based secure erase. After some research of the secure erase implementation in Linux, it seemed like Windows was far less likely to turn my drive into a very small paperweight. Hard Disk Sentinel reports the drive supports secure erase and a lot of people online seem to imply that this performs a destructive TRIM of the entire drive.

I had booted to a live Ubuntu environment where I had attempted to invoke TRIM despite it claiming it wasn't supported. I had found an article about enabling TRIM for hardware that supports it but isn't enabled by default by the OS. This procedure worked up until the point where it says to run fstrim which would error out for me citing an issue with the filesystem not supporting TRIM (I had tried NTFS and ext4 which both support it). I suspected it was the USB SATA controller on the drive that was the real culprit. I then ran across a utility blkdiscard which would skip the file system and send the command to destructively TRIM the entire drive. This also errored out. I gave up and rebooted to Windows.

Poking around further, it seemed commonly suggested that the drive be hardware encrypted then formatted which would apparently perform a secure erase. Translating that concept over to Windows, I figured I would start by encrypting the drive with BitLocker with the encryption which took a fair bit of time. I had checked to see if TRIM was running at all using a utility simply named "TRIM check" by Vladimir Panteleev. After trying to encourage the disk to TRIM, this utility eventually confirmed TRIM was not running at all.
TRIM check v0.7 - Written by Vladimir Panteleev

Loading continuation data from D:\trimcheck-cont.json...
Drive path : \\.\D:
Offset : 56131584
Random data : E2 91 03 E0 6C F6 2F E0 3D 7F D8 1B 72 28 A6 92...

Reading raw volume data...
Opening \\.\D:...
Seeking to position 56131584...
Reading 16384 bytes...
First 16 bytes: E2 91 03 E0 6C F6 2F E0 3D 7F D8 1B 72 28 A6 92...
Data unchanged.

CONCLUSION: TRIM appears to be NOT WORKING (or has not kicked in yet).

You can re-run this program to test again with the same data block,
or delete trimcheck-cont.json to create a new test file.

Press Enter to exit...
After locking the drive, TRIM check had noted that the test was overwritten and the conclusion was indeterminate.
TRIM check v0.7 - Written by Vladimir Panteleev

Loading continuation data from D:\trimcheck-cont.json...
Drive path : \\.\D:
Offset : 56131584
Random data : E2 91 03 E0 6C F6 2F E0 3D 7F D8 1B 72 28 A6 92...

Reading raw volume data...
Opening \\.\D:...
Seeking to position 56131584...
Reading 16384 bytes...
First 16 bytes: 57 57 57 57 57 57 57 57 57 57 57 57 57 57 57 57...
Data is neither unchanged nor empty.
Possible cause: another program saved data to disk,
overwriting the sector containing our test data.

CONCLUSION: INDETERMINATE.
Re-run this program and wait less before verifying / try to
minimize writes to drive D:.

Press Enter to exit...
I generated a new test with BitLocker enabled and followed my below guide including removing, creating, and formatting the volume. I copied TRIM check and its temp file back onto the drive which was also indeterminate.
I started my journey of enabling BitLocker and once encrypted, I had found vastly improved (although inconsistent) write speeds right out of the gate with slightly reduced write speeds. I'm assuming the slower read speeds are either overhead or tax for having BitLocker on. After formatting through Disk Management (diskmgmt.msc) and accepting the warning about Bitlocker being enabled, I'm getting some mixed but very much improved results in benchmarks...

1578627769649.png


..as well as real-world file transfers back to more acceptable rates.

1578627910391.png


It looks like this very well may accomplish the end goal of restoring drive performance back up closer to what the drive is rated for. I'm currently filling up the drive to see if performance remains high.
Having actual TRIM would be preferred, but I'll happily wipe the drive every now and then to keep performance up. I'm also still severely disappointed with SanDisk's support for having no answer to this.


Anyways, here are all the steps I've performed to restore performance. I've snipped them under this spoiler just to keep post length down.
Obligatory Warning! All information here is provided for documentation purposes and carries no guarantee that something bad will not happen! Please read all steps before proceeding and if you are not comfortable with the process, I suggest you do not proceed. Since this guide modifies drive partitions and monkies with some areas of the PC that the average user does not explore, it is absolutely possible that you may accidentally erase data on a different drive! Again, please do not proceed if you are not comfortable with this!

Another Warning! This will add wear to your drive since we are writing data across the entire drive! I wouldn't recommend performing this very often.

This guide assumes you only have one volume/partition on your drive. If you have more than one, I recommend removing all partitions and creating one partition that spans the entire drive. If you would like to keep multiple partitions, you will need to repeat step 2 through 7 for all partitions.

1. Open the BitLocker settings in Control Panel. This can be done by searching the start menu for "BitLocker" and clicking "Manage Bitlocker".

1578629911786.png


2. Find the volume and drive letter of your USB drive. It will likely say something about "BitLocker To Go". If you can't find it here, it may not support encryption and you may not be able to proceed with the model drive you have. Click "Turn on BitLocker"

1578629890327.png


3. Check "Use a password to unlock the drive" and pick a password. You will not need to remember this, but it may be good to pick something simple. You will need something with letters and at least one number at a minimum. Click Next.

1578630101319.png


4. Pick any method to save a recovery key, picking one is mandatory. I chose to save to a file which I then deleted. If you would like to keep BitLocker enabled, After that, click Next.

1578633565818.png


5. Very important! Click "Encrypt entire drive" since we want to do a pass over the entire drive, not just used space. Click Next.

1578633679995.png


6. Pick either encryption modes. I chose "New encryption mode" here.

1578633777413.png


7. Click "Start Encrypting". This will take quite some time as it has to do a full pass over the drive. For my SanDisk Extreme Pro USB3.1 256GB drive, it took 15 minutes and 26 seconds.

1578634423072.png


At this point, you may want to check drive performance to see if speeds have improved. I'm also wondering if running BitLocker/Security Mode will continually TRIM in the name of security which might explain why the drive has TRIM supported at all. If true, it may be worth leaving BitLocker enabled.


8. If you would like to disable BitLocker, it seemed to be recommended to delete the partition of your drive. Open Disk Management by searching for it in the Start Menu (or otherwise).
8a. You may also be able to simply disable BitLocker from the same panel from Step 2 and save all your data. I was not able to experiment with this. Please let me know below if you do!

1578635766065.png


9. Find the partition of your USB drive. Be careful to match the drive letter, total drive size, and "BitLocker Encrypted" status to ensure you have the correct drive.

1578636189067.png


10. Right click the volume that correlates to your USB drive and click "Delete Volume". You will get a warning about losing your data, which you of course will if you click yes. If you understand you will lose your data, click "Yes". You will get another prompt that the drive has been encrypted with BitLocker and you will, again, lose all your data. Click "Yes" again. You may get a third prompt about the drive being in use, asking you if you would like to force deletion. Click "Yes" again.

1578636275684.png


11. You will now see your drive with a large "Unallocated" area. Right click again and click "New Simple Volume"

1578637199734.png


12. Follow the prompts to create a new volume/partition. It is fairly safe to repeatedly click "Next" until the end. I'm creating mine with the max volume size (the default option), keeping the recommended drive letter, formatting the volume using NTFS, default. I recommend leaving "Perform a quick format" checked since we don't want to write zeros to the entire drive which I believe would negate all this work. Click Finish.

1578637386085.png

This is all pretty rough theory at the moment with little proof other than good drive speeds after the procedure. In the past, I was able to format my drives to restore drive speed. With that not working this time around, I came up with this which seemed to work. I plan to use the drive again to the point where speeds degrade and see if simply zero-filling the drive (slow format) also improves performance, although I suspect not.

If anyone tries this out, please let me know in this thread if this did or did not work for you!
 
Joined
Apr 5, 2005
Messages
6,771 (0.97/day)
Location
Republic of Asia (a.k.a Irvine), CA
System Name ---
Processor FX 8350 @ 4.00 Ghz with 1.28v
Motherboard Gigabyte 990FX-UD3 v4.0, Hacked Bios F4.x
Cooling Silenx 4 pipe Tower cooler + 2 x Cougar 120mm fan, 3 x 120mm, 1 x 200 mm Red LED fan
Memory Kingston HyperX DDR3 1866 16GB + Patriot Memory DDR3 1866 16GB
Video Card(s) Asus R9 290 OC @ GPU - 1050, MEM - 1300
Storage Inland 256GB PCIe NVMe SSD for OS, WDC Black - 2TB + 1TB Storage, Inland 480GB SSD - Games
Display(s) 3 x 1080P LCDs - Acer 25" + Acer 23" + HP 23"
Case AeroCool XPredator X3
Audio Device(s) Built-in Realtek
Power Supply Corsair HX1000 Modular
Software Windows 10 Pro 64 bit
I am issues with my older SSDs that was used for W7 OS on desktop and Laptops. Kingston HyperX 120GB SSD. I tried secure erase using Kingston's tool, did regular windows formatting but the drive doesn't seem to restore it's original write speed. From it's rated 400+ write, I barely get 100+ now. I tried Parted Magic and still the same. I will probably try this trick and see if it helps.


I have 3 or 4 such SSDs having this issue, including a Samsung Evo. If I could revive one drive, then I could start swapping out with other drives and restore all the drives to acceptable performance. Samsung Evo write speed sometimes crawls to less than 75 MB/s.
 
Joined
Apr 5, 2005
Messages
6,771 (0.97/day)
Location
Republic of Asia (a.k.a Irvine), CA
System Name ---
Processor FX 8350 @ 4.00 Ghz with 1.28v
Motherboard Gigabyte 990FX-UD3 v4.0, Hacked Bios F4.x
Cooling Silenx 4 pipe Tower cooler + 2 x Cougar 120mm fan, 3 x 120mm, 1 x 200 mm Red LED fan
Memory Kingston HyperX DDR3 1866 16GB + Patriot Memory DDR3 1866 16GB
Video Card(s) Asus R9 290 OC @ GPU - 1050, MEM - 1300
Storage Inland 256GB PCIe NVMe SSD for OS, WDC Black - 2TB + 1TB Storage, Inland 480GB SSD - Games
Display(s) 3 x 1080P LCDs - Acer 25" + Acer 23" + HP 23"
Case AeroCool XPredator X3
Audio Device(s) Built-in Realtek
Power Supply Corsair HX1000 Modular
Software Windows 10 Pro 64 bit
This trick did not work, the SSDs write performance actually went down when compared to Parted Magic route.
 
Joined
Nov 10, 2006
Messages
4,665 (0.73/day)
Location
Washington, US
System Name Rainbow
Processor Intel Core i7 8700k
Motherboard MSI MPG Z390M GAMING EDGE AC
Cooling Corsair H115i, 2x Noctua NF-A14 industrialPPC-3000 PWM
Memory G. Skill TridentZ RGB 4x8GB (F4-3600C16Q-32GTZR)
Video Card(s) ZOTAC GeForce RTX 3090 Trinity
Storage 2x Samsung 950 Pro 256GB | 2xHGST Deskstar 4TB 7.2K
Display(s) Samsung C27HG70
Case Xigmatek Aquila
Power Supply Seasonic 760W SS-760XP
Mouse Razer Deathadder 2013
Keyboard Corsair Vengeance K95
Software Windows 10 Pro
Benchmark Scores 4 trillion points in GmailMark, over 144 FPS 2K Facebook Scrolling (Extreme Quality preset)
Thanks for the info! Interesting. Parted Magic appears to be directly invoking the secure erase function built into the drive. I was having trouble finding something similar for Windows (all my search results were just for software that would zerofill the SSD).

Out of curiosity, does Trim Check show that TRIM is working at all? Also, do any of the SMART values indicate anything wrong with the drive?

If it's an actual SATA SSD, it may be worth looking into the firmware changelogs to see if that's a bug that was fixed in an update.
 
Joined
Jun 18, 2010
Messages
2,329 (0.46/day)
Processor Intel i7 970 // Intel i7 2600K
Motherboard Asus Rampage III Formula // Asus P8P67 Deluxe
Cooling Zalman CNPS9900MaxB // Zalman CNPS11X
Memory GSkill 2133 12GB // Corsair V 2400 32GB
Video Card(s) ASUS GTX1080 // MSI GTX1070
Storage Samsung 870EVO // Samsung 840P
Display(s) HP w2207h
Case CoolerMaster Stacker 830se // Lian Li PC-9F
Audio Device(s) onboard
Power Supply Seasonic X 850w Gold // EVGA 850w G2
Mouse Logitech G502SE HERO, G9
Keyboard Dell
Software W10 Pro 22H2
Don't know if your results may be different if you upgrade CDI and CDM to the latest versions (if patched)???


CDI v8.4.0

CDM v7.0.0
 
Joined
Nov 10, 2006
Messages
4,665 (0.73/day)
Location
Washington, US
System Name Rainbow
Processor Intel Core i7 8700k
Motherboard MSI MPG Z390M GAMING EDGE AC
Cooling Corsair H115i, 2x Noctua NF-A14 industrialPPC-3000 PWM
Memory G. Skill TridentZ RGB 4x8GB (F4-3600C16Q-32GTZR)
Video Card(s) ZOTAC GeForce RTX 3090 Trinity
Storage 2x Samsung 950 Pro 256GB | 2xHGST Deskstar 4TB 7.2K
Display(s) Samsung C27HG70
Case Xigmatek Aquila
Power Supply Seasonic 760W SS-760XP
Mouse Razer Deathadder 2013
Keyboard Corsair Vengeance K95
Software Windows 10 Pro
Benchmark Scores 4 trillion points in GmailMark, over 144 FPS 2K Facebook Scrolling (Extreme Quality preset)
Don't know if your results may be different if you upgrade CDI and CDM to the latest versions (if patched)???
Nothing of particular interest other than some higher speeds at 8 queue depth compared to 32 in the old version.

1580942802459.png
 
Joined
Apr 5, 2005
Messages
6,771 (0.97/day)
Location
Republic of Asia (a.k.a Irvine), CA
System Name ---
Processor FX 8350 @ 4.00 Ghz with 1.28v
Motherboard Gigabyte 990FX-UD3 v4.0, Hacked Bios F4.x
Cooling Silenx 4 pipe Tower cooler + 2 x Cougar 120mm fan, 3 x 120mm, 1 x 200 mm Red LED fan
Memory Kingston HyperX DDR3 1866 16GB + Patriot Memory DDR3 1866 16GB
Video Card(s) Asus R9 290 OC @ GPU - 1050, MEM - 1300
Storage Inland 256GB PCIe NVMe SSD for OS, WDC Black - 2TB + 1TB Storage, Inland 480GB SSD - Games
Display(s) 3 x 1080P LCDs - Acer 25" + Acer 23" + HP 23"
Case AeroCool XPredator X3
Audio Device(s) Built-in Realtek
Power Supply Corsair HX1000 Modular
Software Windows 10 Pro 64 bit
Thanks for the info! Interesting. Parted Magic appears to be directly invoking the secure erase function built into the drive. I was having trouble finding something similar for Windows (all my search results were just for software that would zerofill the SSD).

Out of curiosity, does Trim Check show that TRIM is working at all? Also, do any of the SMART values indicate anything wrong with the drive?

If it's an actual SATA SSD, it may be worth looking into the firmware changelogs to see if that's a bug that was fixed in an update.

Kingston reports all is good even when the Write performance is not that great.

I tried Kingston's secure erase which is supposed to bring back close to factory performance, but it was spinning for hours with no result back, so I stopped it. May be I should let it run all night.
 
Joined
Jun 18, 2010
Messages
2,329 (0.46/day)
Processor Intel i7 970 // Intel i7 2600K
Motherboard Asus Rampage III Formula // Asus P8P67 Deluxe
Cooling Zalman CNPS9900MaxB // Zalman CNPS11X
Memory GSkill 2133 12GB // Corsair V 2400 32GB
Video Card(s) ASUS GTX1080 // MSI GTX1070
Storage Samsung 870EVO // Samsung 840P
Display(s) HP w2207h
Case CoolerMaster Stacker 830se // Lian Li PC-9F
Audio Device(s) onboard
Power Supply Seasonic X 850w Gold // EVGA 850w G2
Mouse Logitech G502SE HERO, G9
Keyboard Dell
Software W10 Pro 22H2
Last edited:
  • Like
Reactions: xvi
Joined
Nov 4, 2005
Messages
11,687 (1.73/day)
System Name Compy 386
Processor 7800X3D
Motherboard Asus
Cooling Air for now.....
Memory 64 GB DDR5 6400Mhz
Video Card(s) 7900XTX 310 Merc
Storage Samsung 990 2TB, 2 SP 2TB SSDs and over 10TB spinning
Display(s) 56" Samsung 4K HDR
Audio Device(s) ATI HDMI
Mouse Logitech MX518
Keyboard Razer
Software A lot.
Benchmark Scores Its fast. Enough.
I am issues with my older SSDs that was used for W7 OS on desktop and Laptops. Kingston HyperX 120GB SSD. I tried secure erase using Kingston's tool, did regular windows formatting but the drive doesn't seem to restore it's original write speed. From it's rated 400+ write, I barely get 100+ now. I tried Parted Magic and still the same. I will probably try this trick and see if it helps.


I have 3 or 4 such SSDs having this issue, including a Samsung Evo. If I could revive one drive, then I could start swapping out with other drives and restore all the drives to acceptable performance. Samsung Evo write speed sometimes crawls to less than 75 MB/s.


Your Samsung Evo problems are a controller and memory issue, data written on them may "leak" voltage causing the drive to try and refresh data and multiple writes of data already written. The only true fix is a new drive, but a work around is a SSD test tool that reads the whole drive block by block and rewrites the data as it goes.

 
Joined
Aug 26, 2019
Messages
558 (0.33/day)
If zeroing the drive in search of a solution, would it truly be needful to zero the entire drive in its entirety?

For example, rather than the below or equivalent
$dd if=/dev/zero of=/dev/sdx

Would something like the below (or whatever equivalent germane to GPT/EFI) be sufficient?*
$dd if=/dev/zero of=/dev/sdx bs=512 count=1

*this example would be with regard to MBR drives i.e. bs=512 count=1 to clear out the master boot record and partition table. Not sure what the equivalent would be with a GPT/EFI drive, but iirc there's a secondary GPT header at the end of the drive. I'd probably just start with $wipefs -a /dev/sdx anway for a GPT drive.

Edit: Apparently so in some cases, reading Steevo's link, due to problematic NAND hardware.
 
Last edited:
Joined
Nov 10, 2006
Messages
4,665 (0.73/day)
Location
Washington, US
System Name Rainbow
Processor Intel Core i7 8700k
Motherboard MSI MPG Z390M GAMING EDGE AC
Cooling Corsair H115i, 2x Noctua NF-A14 industrialPPC-3000 PWM
Memory G. Skill TridentZ RGB 4x8GB (F4-3600C16Q-32GTZR)
Video Card(s) ZOTAC GeForce RTX 3090 Trinity
Storage 2x Samsung 950 Pro 256GB | 2xHGST Deskstar 4TB 7.2K
Display(s) Samsung C27HG70
Case Xigmatek Aquila
Power Supply Seasonic 760W SS-760XP
Mouse Razer Deathadder 2013
Keyboard Corsair Vengeance K95
Software Windows 10 Pro
Benchmark Scores 4 trillion points in GmailMark, over 144 FPS 2K Facebook Scrolling (Extreme Quality preset)
I've heard a fair bit of talk that zeroing out a SSD makes it completely full with zeros (obviously), the important part of that being it is full with zeros. The drive needs to understand that there isn't any data there at all, which is up to TRIM to bridge the gap between filesystem and SSD hardware.
 
Joined
Aug 26, 2019
Messages
558 (0.33/day)
Bummer then if there isn't a way to directly interact with that controller hardware and instead having to indirectly put it in a desired state via wearing the NAND and literally writing zeros. A direct reset as it were. I wonder if there could be a hardware route i.e. shorting out pins on a controller chip?
Such a controller reset, if possible, may not avoid a needful erase before write operation but should at least avoid a write amplification slowdown situation, I'm guessing? (Full disclosure, much of my low-level drive-fu is archaic, HDD info.)

Regardless, I'm really curious as to why your SanDisk Extreme Pro USB drive had the problem to begin with. In your journey, do you ever get a sense of how common the problem was for this drive?

Re blkdiscard, that seemed like an interesting potential solution. Do you recall what parameters you may have used and the error encountered?
 
Last edited:
Joined
Nov 10, 2006
Messages
4,665 (0.73/day)
Location
Washington, US
System Name Rainbow
Processor Intel Core i7 8700k
Motherboard MSI MPG Z390M GAMING EDGE AC
Cooling Corsair H115i, 2x Noctua NF-A14 industrialPPC-3000 PWM
Memory G. Skill TridentZ RGB 4x8GB (F4-3600C16Q-32GTZR)
Video Card(s) ZOTAC GeForce RTX 3090 Trinity
Storage 2x Samsung 950 Pro 256GB | 2xHGST Deskstar 4TB 7.2K
Display(s) Samsung C27HG70
Case Xigmatek Aquila
Power Supply Seasonic 760W SS-760XP
Mouse Razer Deathadder 2013
Keyboard Corsair Vengeance K95
Software Windows 10 Pro
Benchmark Scores 4 trillion points in GmailMark, over 144 FPS 2K Facebook Scrolling (Extreme Quality preset)
Regardless, I'm really curious as to why your SanDisk Extreme Pro USB drive had the problem to begin with. In your journey, do you ever get a sense of how common the problem was for this drive?
It was great out of the box and just noticed one day that write speeds were extremely slow. I noticed that reformatting seemed to speed it up a little but it would slow way down once the drive was about 25-50% full.
For me, this is a very consistent issue. For others, the average review seems really good but I've seen a good few support forum posts of people having similar issues.

Given that SanDisk support didn't seem to care at all about my absurdly low speeds, I suspect this is normal behavior for the drive. I personally plan on staying far away from their performance flash drives from now on unless I see a thorough review.
 

brummgrammierer

New Member
Joined
Oct 11, 2021
Messages
1 (0.00/day)
8a. You may also be able to simply disable BitLocker from the same panel from Step 2 and save all your data. I was not able to experiment with this. Please let me know below if you do!

I have just successfully restored write speeds by following your steps and trying out 8a (simply disable BitLocker).
It worked perfectly and no data was lost during the process.

(Disabling took as long as enabling, though, so I guess if you want to reduce wear of the device and were able to backup the data then deleting the partition is still better.)

Thank you for sharing your insights!
 
  • Like
Reactions: xvi
Joined
Nov 10, 2006
Messages
4,665 (0.73/day)
Location
Washington, US
System Name Rainbow
Processor Intel Core i7 8700k
Motherboard MSI MPG Z390M GAMING EDGE AC
Cooling Corsair H115i, 2x Noctua NF-A14 industrialPPC-3000 PWM
Memory G. Skill TridentZ RGB 4x8GB (F4-3600C16Q-32GTZR)
Video Card(s) ZOTAC GeForce RTX 3090 Trinity
Storage 2x Samsung 950 Pro 256GB | 2xHGST Deskstar 4TB 7.2K
Display(s) Samsung C27HG70
Case Xigmatek Aquila
Power Supply Seasonic 760W SS-760XP
Mouse Razer Deathadder 2013
Keyboard Corsair Vengeance K95
Software Windows 10 Pro
Benchmark Scores 4 trillion points in GmailMark, over 144 FPS 2K Facebook Scrolling (Extreme Quality preset)
Slow for sure but that's great to hear that it worked! Thanks for letting me know!
 

Highlanderix

New Member
Joined
Feb 26, 2023
Messages
1 (0.00/day)
I just found you post. As you, I had been looking for ideas to restore write performance of my Sandisk Extreme 128Gb and gave the Bitlocker route a try.

I did a real life copy test before and after each Bitlocker activation / deactivation (did 3 successive ones in total).
A single 9 GB file was copied over from an internal NVMe SSD and previous files were left on the device.

Here are the observed write speeds :

After simple reformatting of the device in NTFS : 60 MB/s

After Bitlocker activation 1 : 161 MB/s
After Bitlocker deactivation 1 : 182 MB/s

After Bitlocker activation 2 : 193 MB/s
After Bitlocker deactivation 2 : 237 MB/s

After Bitlocker activation 3 : 197 MB/s
After Bitlocker deactivation 3 : 237 MB/s

So it seems that the 2nd activation of Bitlocker provided some performance boost over the 1st one ^^
 
  • Like
Reactions: xvi
Joined
Nov 11, 2010
Messages
310 (0.06/day)
System Name Uzuki Toune
Processor AMD RYZEN 7 7700X (ASUS PBO 90C Mode)
Motherboard Asus ROG Strix X670E-E Gaming WIFI
Cooling Thermalright Frostspirit 140 White V3 ARGB
Memory 32GB DDR6000 CL36 Kingston (EXPO)(16GBx2)
Video Card(s) Zotac GTX 1050TI
Storage 2TB Kingston KC3000 + 1TB Crucial P2 + 480GB Samsung Evo 850 + 480GB Kingston A400
Display(s) Dell U2723QE + Philips 221V8 (Portrait)
Case NZXT H510
Audio Device(s) Auzen X-FI Forte + Onboard Realtek 4080 -> Creative Gigaworks T40II
Power Supply EVGA G+ 650W
Mouse Logitech MX Master 3 (Work) & G103 (Play)
Keyboard iRocks K71M
Software Windows 11 Professional
CrystalDiskInfo says the drive is TRIM capable and HD Sentinel says it is enabled, but running TRIM check seems to show that TRIM is not working. Some quick Googling doesn't turn up much in regard to getting TRIM working over USB with few relevant results and one mention of a "USB attached SCSI" protocol that I assume isn't supported by the controller they're using. Attempting to manually TRIM doesn't seem to help either.
Seems this wasn't addressed in this thread so I would like to add to this. TRIM doesn't require USB attached SCSI protocol or UASP, there are alot of older external hdd enclosures that don't support UASP but they support TRIM and can pass the TRIM command just fine.

The issue is when you have an older USB controller on your PC that either doesn't support UASP at all or doesn't support UASP natively, meaning it requires special drivers or software to enable UASP. When you connect a drive that has a native UASP controller to these older USB ports, the drive falls back to the older compatibility mode (also called USB 3.0 BOT or Bulk Only Transport which is supported by all USB 3.0 controllers). For some reason, those UASP controllers only support TRIM in UASP mode, they don't in BOT mode. Even though TRIM works fine on older BOT only USB external enclosures.

I found this out the long hard way when I finally changed my system from an older AMD FX based to the Zen 4 based system. I have multiple external HDD enclosures with SSDs in them. The enclosure that didn't support UASP could use TRIM just fine on my older AMD FX system. But then another enclosure that supports UASP doesn't pass the TRIM command to the SSD even though TRIM is reported as supported in Crystal Disk Info and HardDisk Sentinel. That old AMD FX system used an Asus motherboard that required their software called USB 3.0 boost to be installed and you must enable UASP for each individual device through that software. Even though with that software and UASP enabled, the UASP enclosure still couldn't use TRIM. I thought maybe it was a problem with the enclosure controller or something like you did and just ignored the problem. I also gave up on USB 3.0 boost software since motherboard software is almost always rubbish, it was unstable and ran really slow, not to mention cumbersome to enable each device manually.

Fast forward to end of last year I finally needed to upgrade as my AMD FX system was really really showing its age, so as I plugged in that same UASP external enclosure to my new system I discovered that TRIM works just fine on that drive. You just need a modern native UASP supported USB controller on your PC. What I mean by native is that when you plug it in it automatically connects in UASP mode, no driver or software required besides the one built into Windows.
 
Top