 12
12
Cooler Master Elite 120 Review
Value & Conclusion »Assembly
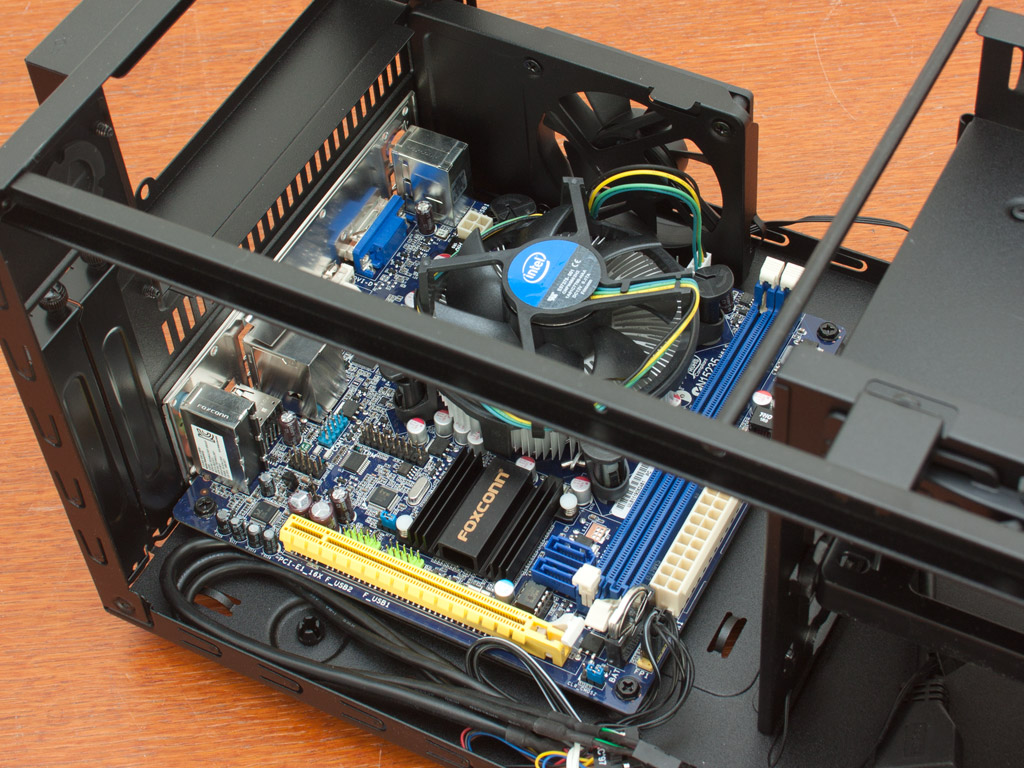
Installing the motherboard is painless, thanks to three open sides of the chassis. You should, however, put some thought into cable routing, and connect these before going on to the next step in the assembly process. As you can see, a standard Intel OEM cooler is used, since the chassis is not very tall.


Installing the hard drives is quite easy. Simply use the included rails, which do not require any tools, for the 3.5" drives. Placing a 2.5" drive onto the tray, however, does require screws, which means using a screwdriver to secure it properly.
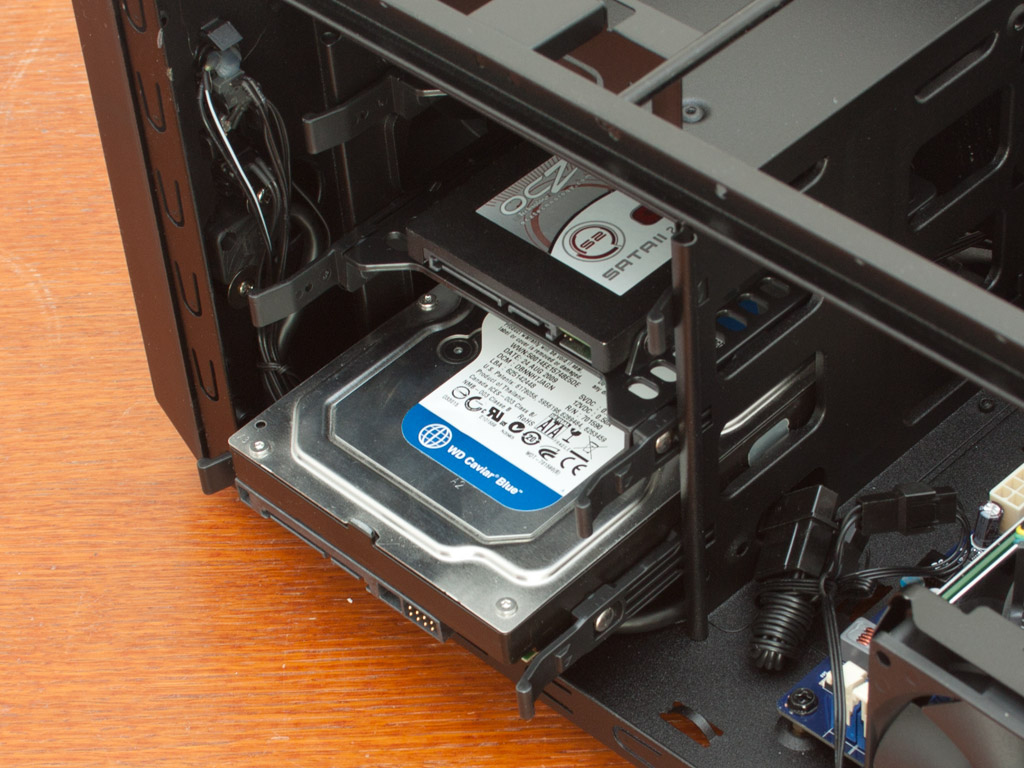

Once ready, simply slide them into the bay of your choice until they snap into place. The connectors of each drive point away from the side where the graphic card is to be installed. You should install the drives before adding a high-performance GPU because the graphics card will partially block access to the bays.


The installation of the optical drive requires you to pull the front cover off to free up the single external drive bay. Once the cover is removed, the single 120 mm intake fan is revealed as well. Simply slide the drive into place and flip the lever of the screw-less mechanism. You may want to secure the drive with an additional screw or two to make sure it doesn't pass any vibrations onto the metal structure of the Elite 120.
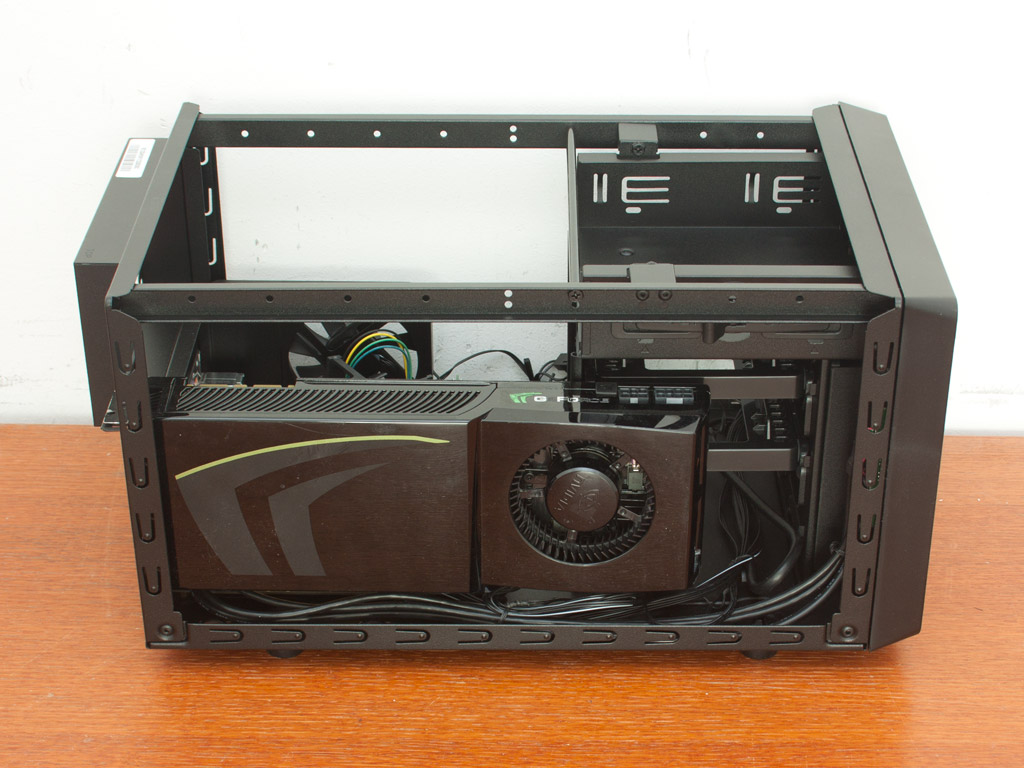
Installing the graphics card is rather simple, but you should make sure that all cables that need to be connected to the board are in place before inserting the graphics card. You should, thanks to the layout and the direction of the hard drives, have no issues installing most modern graphics cards, making a gaming rig a definitive possibility.


Once all the other hardware is in place, place the cap on the PSU and slide it into the bay through the back of the chassis. Once again, you have to make sure that all the required cables from the power supply are attached to the appropriate parts. I used a unit of standard length with plenty of room left for the slightly above average long ODD on the opposite side. You should, ultimately, be alright, even with a somewhat longer power supply.


Once everything is in place, the case seems to be jam packed to the rim, but the impression is a deceitful one. While the non-modular PSU used really adds a bit to the cable clutter, the entire motherboard area is pretty much free of cables. The majority of the cable clutter has been tucked away in-between the board and the drives, or below the hard drives.
Finished Looks

Once turned on, the Cooler Master Elite 120 makes a good impression. It is compact enough to be used as a LAN rig and quiet enough with the right components to act as a HTPC system.


The black optical drive looks like a good fit and the grey aluminum panel gives the entire front some much needed contrast. A blue LED lights up after turning the system on. It is not too strong, and you won't have to worry about it bothering anyone during a dark gaming session, or while watching your favorite movie.


Looking at the air vent, you can clearly see the graphics card fan through the air vent. This means that the GPU has access to fresh air, but also to dust because there is no protection in place. In the rear, everything is where it should be, with clear access to all the major aspects of the system.
Apr 24th, 2024 12:10 EDT
change timezone
Latest GPU Drivers
New Forum Posts
- How are MX330 and İ5 1135G7 ? (2)
- Is It The 1080 TI The Best GPU Ever? (207)
- What phone you use as your daily driver? And, a discussion of them. (1467)
- Cinebench crashed my PC. My Wi-Fi stopped working, and I keep getting a "Please wait" screen when I boot up my PC. (27)
- AAF Optimus DCH Audio Modded Driver for Windows 10/11 - For ALL HDAUDIO Enumerator Chips (651)
- Realtek Modded Audio Driver for Windows 10/11 - Only for HDAUDIO (5689)
- Is there a technical reason that Windows 11 doesn't have built into it battery charge limitation? (39)
- EK seems to be having major issues (45)
- Looking to build another system (7)
- Which new games will you be buying? (311)
Popular Reviews
- Fractal Design Terra Review
- Thermalright Phantom Spirit 120 EVO Review
- Corsair 2000D Airflow Review
- Minisforum EliteMini UM780 XTX (AMD Ryzen 7 7840HS) Review
- ASUS GeForce RTX 4090 STRIX OC Review
- NVIDIA GeForce RTX 4090 Founders Edition Review - Impressive Performance
- ASUS GeForce RTX 4090 Matrix Platinum Review - The RTX 4090 Ti
- MSI GeForce RTX 4090 Gaming X Trio Review
- MSI GeForce RTX 4090 Suprim X Review
- Gigabyte GeForce RTX 4090 Gaming OC Review
Controversial News Posts
- Sony PlayStation 5 Pro Specifications Confirmed, Console Arrives Before Holidays (116)
- NVIDIA Points Intel Raptor Lake CPU Users to Get Help from Intel Amid System Instability Issues (106)
- AMD "Strix Halo" Zen 5 Mobile Processor Pictured: Chiplet-based, Uses 256-bit LPDDR5X (101)
- US Government Wants Nuclear Plants to Offload AI Data Center Expansion (98)
- Windows 10 Security Updates to Cost $61 After 2025, $427 by 2028 (84)
- Developers of Outpost Infinity Siege Recommend Underclocking i9-13900K and i9-14900K for Stability on Machines with RTX 4090 (84)
- TechPowerUp Hiring: Reviewers Wanted for Motherboards, Laptops, Gaming Handhelds and Prebuilt Desktops (78)
- Intel Realizes the Only Way to Save x86 is to Democratize it, Reopens x86 IP Licensing (70)