 3
3
Thermaltake Aquabay M6 Review
Installation and impressions »A closer look
After unpacking everything, we can take a closer look at each component. Everything has 3/8” barbs installed from the factory, swapping these to 1/4” should be no problem. Regarding safety (chance of water leaks), no Teflon tape is used on the threads of barbs; o-rings are used instead. This is OK, however I would prefer “normal” barbs (+ worm-drive hose clamp) instead of the quick connect ones.The instructions are well written, documented with photos. There are two ways you can install the Aquabay M6: either you can replace the original reservoir, or you can just upgrade the original reservoir by installing the water level probe, and placing the temperature sensing unit somewhere in your loop.
The biggest of all components in the package is the reservoir:
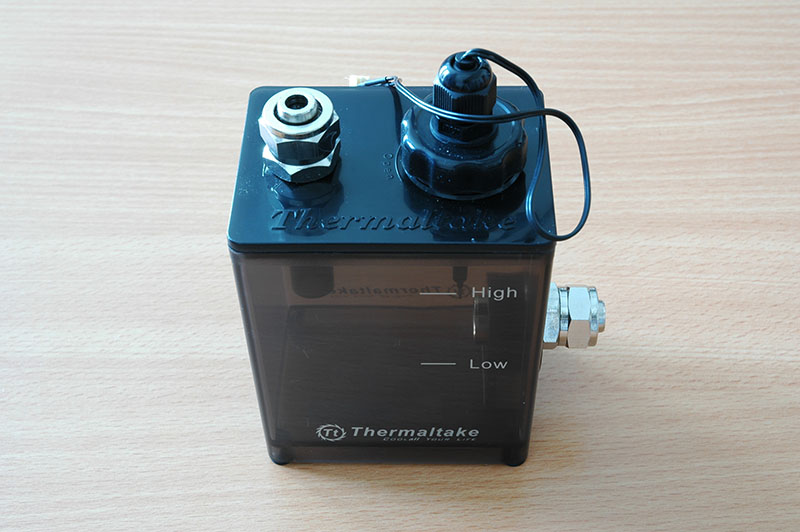

The reservoir is made of grey see-through plastic. This allows you to read the liquid level quickly and easily. Water is poured in after removing the cap, which has the water level sensor integrated:

Unfortunately, the water level indicator only has two positions: low water level (read: add water) or water level OK. This, however, is sufficient, as I cannot think of a situation when you would want to know the exact water level (except if you wanted to show-off). The water tank has rubber pads on the bottom. The reservoir is essentially the same as what is included in newer Thermaltake Bigwater kits.
Next, let’s take a look at the LCD:


This is very similar to Thermaltake’s T-Type water temperature indicator.
For those who have no more 5.25” bays to mount the LCD, I have good news: you can “pop” the LCD out of the bracket and mount it anywhere you wish. There is protective foil over the LCD which ensures that you get a flawless front surface. The LCD has three buttons. The Reset button allows you to switch off the beeping when the unit detects that your water level is low or temperature is too high. The button right below is self explanatory: it let’s you switch between Celsius and Fahrenheit. The On/Off button allows you to switch the unit on and off. When off, the unit will not beep if either your temperature rises above the set level, or your water level decreases. Finally, there is a potentiometer that allows you to set the temperature above which the unit should beep. Overall, the LCD unit has a nice and sturdy feel to it, no thin flexible metal is used.

The temperature sensor is identical to the one that you get with Thermaltake’s T-Type water temperature indicator. Essentially, this component is a T with a temperature probe screwed in the top. It is a shame that even though the connectors are 3/8”, the internal tube is only 1/4”, and adds further restriction to the setup.

The final components of the kit are 1/4” barbs, incase you would want to use 1/4” tubing with the kit.
With that done, it is time to install the reservoir and see how everything works!
Apr 25th, 2024 13:25 EDT
change timezone
Latest GPU Drivers
New Forum Posts
- What are you playing? (20526)
- Ghetto Mods (4321)
- Alphacool CORE 1 CPU block - bulging with danger of splitting? (10)
- Random blue screen from winload.efi error (0xc000000e) (2)
- Meta Horizon OS (20)
- WCG Daily Numbers (12497)
- Share your AIDA 64 cache and memory benchmark here (2917)
- Best SSD for system drive (76)
- How to check flatness of CPUs and coolers - INK and OPTICAL INTERFERENCE methods (110)
- Have you got pie today? (16317)
Popular Reviews
- Fractal Design Terra Review
- Thermalright Phantom Spirit 120 EVO Review
- Corsair 2000D Airflow Review
- Minisforum EliteMini UM780 XTX (AMD Ryzen 7 7840HS) Review
- ASUS GeForce RTX 4090 STRIX OC Review
- NVIDIA GeForce RTX 4090 Founders Edition Review - Impressive Performance
- ASUS GeForce RTX 4090 Matrix Platinum Review - The RTX 4090 Ti
- MSI GeForce RTX 4090 Suprim X Review
- MSI GeForce RTX 4090 Gaming X Trio Review
- Gigabyte GeForce RTX 4090 Gaming OC Review
Controversial News Posts
- Sony PlayStation 5 Pro Specifications Confirmed, Console Arrives Before Holidays (116)
- NVIDIA Points Intel Raptor Lake CPU Users to Get Help from Intel Amid System Instability Issues (106)
- AMD "Strix Halo" Zen 5 Mobile Processor Pictured: Chiplet-based, Uses 256-bit LPDDR5X (101)
- US Government Wants Nuclear Plants to Offload AI Data Center Expansion (98)
- Windows 11 Now Officially Adware as Microsoft Embeds Ads in the Start Menu (97)
- AMD's RDNA 4 GPUs Could Stick with 18 Gbps GDDR6 Memory (85)
- Developers of Outpost Infinity Siege Recommend Underclocking i9-13900K and i9-14900K for Stability on Machines with RTX 4090 (85)
- Windows 10 Security Updates to Cost $61 After 2025, $427 by 2028 (84)