 4
4
Thermaltake Commander MS-I USB 3.0 Review
A Closer Look - Inside »A Closer Look - Outside

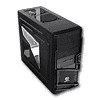
The chassis makes a good first impression. Even though it is really affordable, the overall design can be considered very detailed. The quality of the plastic front is excellent, while the metal frame - even though it is thinner than other cases - still feels sturdy enough for an enclosure of this price class.


Thermaltake has done an excellent job in giving the Commander MS-I a cool look. Straight lines in combination with metal mesh and a nicely placed logo, should make this a great choice for first time builders wanting to create a nifty looking chassis on a budget. Turning the case around, we can see that the PSU is bottom mounted and the interior of the case is all black as well.


Even though the Commander MS-I is quite cheap, both sides offer a great level of detail. With many edgy and straight lines in combination with the uniquely shaped window it looks refreshing. Thermaltake has gone the whole nine yards instead of keeping such elements isolated to the front of the chassis.


Taking a closer look at the front, the bottom utilizes metal mesh mostly, with the Thermaltake logo placed unto this material. This vent allows for fresh air to enter the front of the chassis. Above that you will find three 5.25 inch slots and a single 3.5 inch one. In-between these are the USB 2.0 & 3.0 ports and the traditional pair of audio connectivity.


In the rear, the bottom mounted PSU bay is multi-directional. This means that you may install the power supply with the fan facing up- or downward. Above that are seven standard motherboard expansion slots for an ATX case. These are protected by break-out covers, so you will not be able to reuse these once detached from the chassis, but Thermaltake goes a step further and adds two separate ones in the top and bottom bay. In the very top of the rear is the only fan within the chassis - a 120 mm, blue LED equipped one.

In the top are two openings to install two further 120 mm fans. Due to the distance between these to vents, it is not possible to install a 240 mm radiator properly. The different extrusion on the two vents for the screw holes is also a bit weird.
Apr 23rd, 2024 12:48 EDT
change timezone
Latest GPU Drivers
New Forum Posts
- Embracer Group is breaking into 3 smaller companies... lol who saw this coming, what a joke (8)
- Cinebench crashed my PC. My Wi-Fi stopped working, and I keep getting a "Please wait" screen when I boot up my PC. (24)
- Which new games will you be buying? (295)
- Unlock the shaders - AMD Radeon RX 560D (324)
- What's your latest tech purchase? (20299)
- FINAL FANTASY XIV: Dawntrail Official Benchmark (67)
- Is there a technical reason that Windows 11 doesn't have built into it battery charge limitation? (30)
- Asus Crosshair X670E - CPU Package temps (10)
- Core PL1 + GPU PL1 + Ring EDP OTHER (4)
- 5.1 or 7.1 software solutions (1)
Popular Reviews
- Horizon Forbidden West Performance Benchmark Review - 30 GPUs Tested
- Fractal Design Terra Review
- Corsair 2000D Airflow Review
- Thermalright Phantom Spirit 120 EVO Review
- Minisforum EliteMini UM780 XTX (AMD Ryzen 7 7840HS) Review
- ASUS GeForce RTX 4090 STRIX OC Review
- NVIDIA GeForce RTX 4090 Founders Edition Review - Impressive Performance
- ASUS GeForce RTX 4090 Matrix Platinum Review - The RTX 4090 Ti
- Creative Pebble X Plus Review
- MSI GeForce RTX 4090 Gaming X Trio Review
Controversial News Posts
- Sony PlayStation 5 Pro Specifications Confirmed, Console Arrives Before Holidays (116)
- NVIDIA Points Intel Raptor Lake CPU Users to Get Help from Intel Amid System Instability Issues (105)
- AMD "Strix Halo" Zen 5 Mobile Processor Pictured: Chiplet-based, Uses 256-bit LPDDR5X (101)
- US Government Wants Nuclear Plants to Offload AI Data Center Expansion (98)
- Windows 10 Security Updates to Cost $61 After 2025, $427 by 2028 (84)
- Developers of Outpost Infinity Siege Recommend Underclocking i9-13900K and i9-14900K for Stability on Machines with RTX 4090 (82)
- TechPowerUp Hiring: Reviewers Wanted for Motherboards, Laptops, Gaming Handhelds and Prebuilt Desktops (74)
- Intel Realizes the Only Way to Save x86 is to Democratize it, Reopens x86 IP Licensing (70)