 12
12
Quick Look: EK-Quantum Momentum² VRM Bridge ROG Z690 Formula
(12 Comments) »Introduction
For a few generations now, the ROG Maximus Formula motherboard has been synonymous with an integrated water block for the VRM section. In fact, my very first board was the ROG Maximus VI Formula, with its aluminium blocks that I swiftly replaced with EK's copper alternatives. Thankfully ASUS was quick to rectify this and uses EK's own blocks since—including on the new ROG Z690 Formula motherboard that you will see used in a few reviews here on TechPowerUp. This is a separate block with its own inlet and outlet ports in close proximity to the CPU itself and necessitates the use of deft hands and/or expensive rotary/angled fittings to fit both it, and the CPU block in the same loop. There is always the possibility to simply air cool the VRMs, but if that is the intention, buying the formula board wouldn't make sense.

Monoblocks come in handy, essentially cooling the CPU and VRMs using a large assembly, and either a stepped cold plate underneath, or multiple smaller ones connected internally. Monoblocks are becoming increasingly popular as we see VRMs being challenged by power-hungry CPUs, there is also something to be said about a single large block for aesthetics, if you are in the custom loop club. However, given there is already an integrated VRM block here, EK instead opted to create a bridge that costs less and is more of a manifold by design. Today we go over this particular design and test how well it works, thanks to a review sample provided by EKWB.
Packaging and Closer Examination


I've previously discussed how EK's product line is based on the still-relatively-new Quantum design philosophy, the new EK-Quantum Momentum² lineup consists purely of motherboard blocks. Despite not being a traditional monoblock, this VRM Bridge is still marketed in that category. The product box is in line with all other recent EK releases, adopting a black base with orange accents and has the company logo, product name, salient features, as well as a render of the product on the front. More marketing features are listed on the rear, in multiple languages to go with a list of contents inside and contact info for the company itself. On the side is a sticker with the exact configuration of the block (nickel/plexi here), along with a QR code that leading to the installation manual (online copy here). Removing the inner box reveals a simpler design, in all black and sporting the EK logo, there are two side flaps to keep the contents in place during transit along with a secondary cardboard layer acting as a protective lid as seen above.


The various items of interest come neatly packaged inside a thick foam piece, with shaped cutouts for individual components. EK provides here two G1/4" threaded nickel-plated brass extender fittings, for use on the VRM block, as well as two longer extensions that are meant for the CPU block, with both having a push-fit on the other side. An L-shaped 2.5 mm Allen key is paired with a larger EK-Loop Multi Allen key to help install/remove these fittings that have an internal hex shape. Rounding off the accessories is a small zip-lock bag containing a gob of water-soluble grease. Remember to peel off the plastic stickers off the bridge block to complete the unboxing experience.


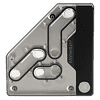
The EK-Quantum Momentum² VRM bridge block for the ROG Z690 Formula is not a rectangular shaped piece, as with most monoblocks, instead designed with a cut corner at the top left that I don't find particularly appealing. It measures in at 135 x 128 mm and is 18 mm thick. There is only a nickel/plexi version of this block in that the contact plate is nickel-plated copper and the top is cast acrylic, given a polish for aesthetics and better lighting. This comes courtesy of an RGB LED strip at the side that has the opaque acetal cover used also for branding with the EK badge at the bottom right corner and the Momentum² closer to the middle. There are two G1/4" threaded ports on the top with the bottom one serving as an inlet, feeding the coolant directly to the CPU block, then there are four openings in the bottom to accommodate the four fittings we saw before. Notice the O-rings used to carefully manuever the coolant around the bridge, feeding both the CrossChill EK III VRM block integrated on the motherboard and the chosen EK CPU block alongside.


A look from the side gives a good view at how this bridge is constructed, with multiple screws securing the assembly from the top and bottom alike. The LED strip is also seen through the side briefly here, turning the block around reveals the expected 3-pin, 5 V DC, addressable RGB cable that goes to a compatible port on the ROG Z690 Formula, or to your standalone LED controller. The nickel-plated copper contact plate is not a cold plate, given it does not do active cooling, so treat the bridge more as a distro-plate/manifold. This is also why it gets a shorter quick look article given the absence of any testing beyond simply making sure it installs properly and doesn't leak.
Installation and Lighting


Now is as good a time as any to inform you that this EK bridge block for the ROG Z690 Formula is only compatible with EK's own Quantum Velocity² CPU blocks. This is because of the port location chosen but also given those blocks have a unique mounting mechanism on the back with a clean top surface available. Logically you would use the LGA 1700 versions of these blocks, but the LGA 1200 variants should theoretically fit, if you already have one. Seen above is an EK-Quantum Velocity² D-RGB - 1700 Nickel + Plexi CPU block (review coming soon) installed on an Intel Core i9-12900K on the ROG Z690 Formula. Begin with the threading of the four fittings provided with the Bridge, such that the shorter extenders are on the VRM block which is taller than the CPU block itself. This allows for the tops of all four fittings to be level for the bridge to sit over. Now take the 2.5 mm Allen key and remove the sole screws on the top itself to allow the plexi top to be easily slid away to the left as seen above.


What this does is allow for the holes in the metal contact plate to now be perfectly aligned with the push-fit fittings on the two blocks. Grease the O-rings on these fittings lightly to make the next step easier as this is going to be the most challenging part of the otherwise simple installation process. You may have to use more force than you initially think, to get the push-fit sections through the metal plate and inside the top of the bridge itself. Essentially, you would want it to click in place enough to where the smoother, smaller diameter part of these fittings is now in-line with the thickness of the contact plate as seen in the middle photo above done purely for demonstration—do not push the fittings in as-is given they will be hard to remove otherwise! If you have all four fittings in place then this new patented method now allows you to push the plate/acetal section to the left as well to align with the top once more. Now secure the bridge block by re-using that removed screw from earlier and you are done. Well, at least until you decide on whether or not to use the integrated RGB LEDs anyway. Both the CPU block and the bridge block come with their own LED cables that thankfully can be installed together courtesy the two LED headers on the ROG Z690 Formula. Cable management will be tricky however, given these ports are at the bottom and the cables are not the longest!


A head-on view also reveals that EK could have gone with a rectangular form factor after all, but ended up going this route to reveal more of the motherboard given there isn't anything else immediately below. Apparently customers liked the design before so I also get why EK went this route even if I don't care for it personally—this is a subjective preference though. Now plumb this into the rest of your loop keeping in mind that the bottom port is the designated inlet port. I used an air pressure leak tester to confirm the installation mechanism works well, as long as you have followed the steps properly. Seen above is the assembly of both the bridge and CPU blocks lit up together, whereby the contact plate blocks off the light from the CPU block unless seen from the side, so perhaps you can get away with a single RGB header used here and the other one used for something else such as RGB LED strips inside the case. Ultimately the goal of this bridge block is to make things cleaner and simpler, using a single set of two ports rather than four, and it does the job well in that regard. It also enables the end user to accommodate the VRM block and CPU block far more easily into a distro plate-based loop too. I will also note the VRM bridge adds exactly 28 mm of height with the fittings to where it's still compatible with EK's Matrix7 system and also helps avoid the use of extenders with EK distro plates too. If you are interested in the EK-Quantum Momentum² VRM Bridge ROG Z690 Formula, you can find it for sale from the EK web shop for $110.99 as of the date of this article, as well as from authorized distributers worldwide.
Jun 1st, 2024 15:04 EDT
change timezone
Latest GPU Drivers
New Forum Posts
- 3DMARK "LEGENDARY" (213)
- Core counting (54)
- seeking advice about a new build (0)
- How do you get games for PC? (8)
- SPD Help (4)
- Best microATX case? (17)
- Overclock AMD Ryzen 9 5900X On ROG STRIX B550-A GAMING After New Bios Update. (28)
- What's your latest tech purchase? (20711)
- What are you playing? (20774)
- V Rising Lycanthropy Club (8)
Popular Reviews
- ID-Cooling FX360 PRO Review - Shots Fired @ Arctic
- SilverStone KL07E Review
- NuPhy Air96 V2 Low Profile Wireless Mechanical Keyboard Review
- Senua’s Saga: Hellblade II: DLSS vs. FSR vs. XeSS Comparison Review
- Upcoming Hardware Launches 2024 (Updated May 2024)
- Montech Titan Gold 1000 W Review
- Elysian Acoustic Labs Pilgrim In-Ear Monitors Review
- Waizowl OGM Cloud Review
- Ghost of Tsushima Performance Benchmark Review - 35 GPUs Tested
- Senua's Saga: Hellblade II Performance Benchmark Review
Controversial News Posts
- AMD to Redesign Ray Tracing Hardware on RDNA 4 (227)
- NVIDIA to Only Launch the Flagship GeForce RTX 5090 in 2024, Rest of the Series in 2025 (154)
- AMD Hits Highest-Ever x86 CPU Market Share in Q1 2024 Across Desktop and Server (140)
- AMD RDNA 5 a "Clean Sheet" Graphics Architecture, RDNA 4 Merely Corrects a Bug Over RDNA 3 (139)
- NVIDIA RTX 5090 "Blackwell" Founders Edition to Implement the "RTX 4090 Ti" Cinderblock Design (115)
- Core Configurations of Intel Core Ultra 200 "Arrow Lake-S" Desktop Processors Surface (101)
- Biden Administration to Revive Trump-Era Tariffs on China-made GPUs and Motherboards (95)
- AMD Ryzen 9000 Zen 5 Single Thread Performance at 5.80 GHz Found 19% Over Zen 4 (86)