- Joined
- Dec 17, 2011
- Messages
- 14 (0.00/day)
Now then, I was planning a new build for some time, I really fancied Silverstone cases, particularly the TJ07 or TJ11. Then a sheet of 10mm toughened glass sort of fell into my lap and sealed the deal... DESK!
I started getting parts together in late august then I was working for 6 weeks so it slowed the whole process down a bit.
The pictures are in the order I got everything with a few project log posts put together, so if something doesn’t make sense let me know and I can fix it
Bits:
EVGA SR-2
2x Intel Xeon 5650
24Gb Corsair Dominator
3x EVGA gtx580 SC
OCZ vertex 3 240Gb
2x Coolermaster silent pro gold 700W
Cooling:
EK-FB SR-2 Nickel plexi x2
EK-Supreme HF - Nickel
EK-FC580 GTX+ - Nickel x3
EK-RAM Dominator – Nickel x2
EK-Multioption RES X2 - 250 basic x2
EK d5 pump top rev 2 x2
Black Ice SR-1 360 Radiator x4
D5’s x2
It's all very shiny:

the quick test run")

The plans for the desk had a few revisions as I was working in wales without a pc for a few weeks, so I got back at weekends with a whole different idea on how to do it.
This is what I settled on...

The desk design took a while as I have this thing for symmetry. I can make the frame at home, but the panels might have to be cut somewhere else, hence the whole desk is modeled.
This will be the first big build I've done for myself my previous builds have been nothing special, hence I'm pushing the boat out a bit.
24-11-11
Started making the frame this afternoon, the first three sections will take the longest so I'm starting there, here's the first round
The box and angle, ready to go together with the plans on the desk.

The first side...

The tools I think I'm going to be sick of in a few days

The last (and most awkward) side

One down... 25 to go...

You know when you draw something and think "that will be be dead simple to make"...
never again will I think that... or, I'll make everything under 750mm long (the travel on the milling machine bed )
)
Will be doing more of the same until the frame is done, so I'll post anything interesting
..............................................................
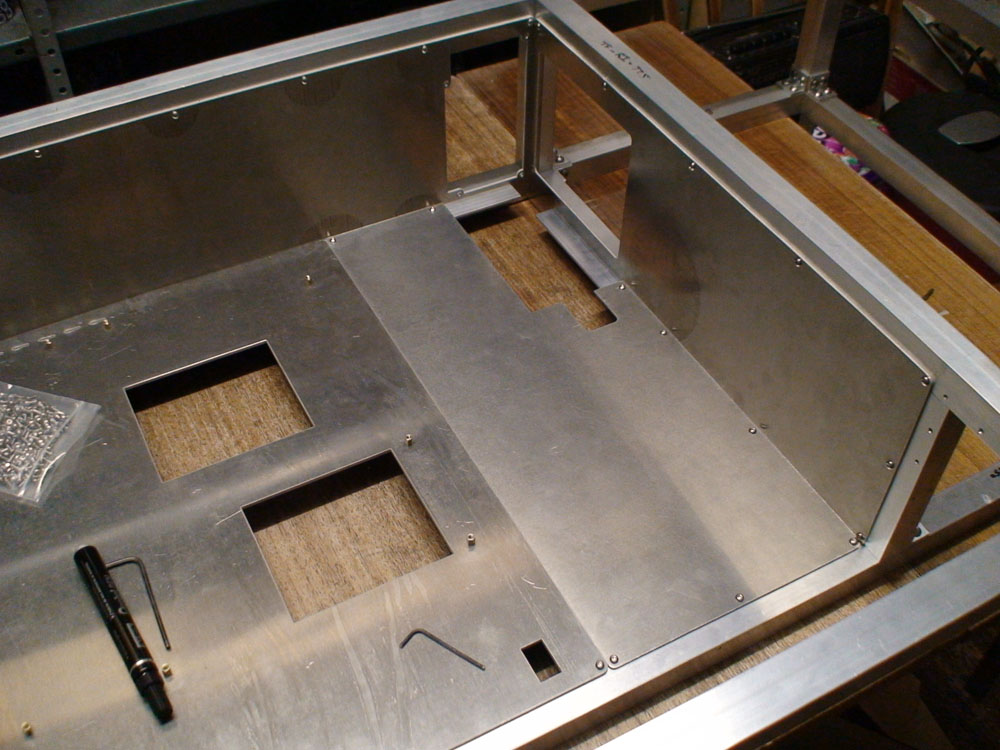
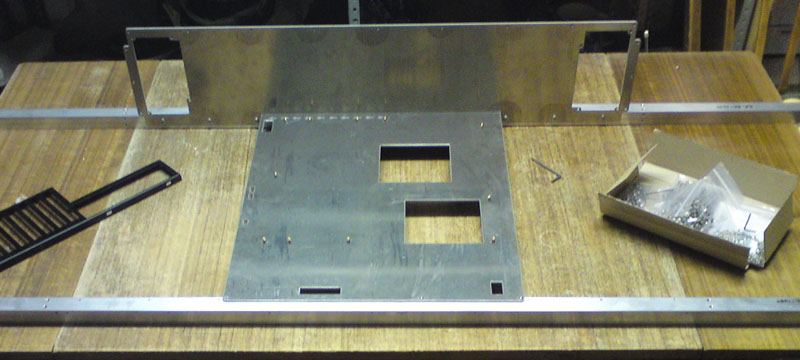
Picked up the panels on yesterday they turned out really well so hopefully I can make the desk to the same standard and let’s hope I didn’t miss anything when I drew them.
So here they are

I thought I'd start by making sure the motherboard tray fits, so cleaned up the edges and tapped the mounting holes.


Like a glove...

Throw in some cables


and a few blocks


Saving these till later as they'll be black sleeved

Making sure I my plan for the cables would work, I'll be tidying them up a bit but they seem to fit pretty well.

And some more of the cooling made its way here, only a few bits and pieces left now

And that’s pretty much it for now, got some more nuts and bolts on the way so I'll be carrying on with the frame midweek probably
Just a quick one, tarted up the rear panel, it still needs the hole cutting in the centre for the back of the Motherboard but I wanted to make sure the PSU's fit


Seems to worked well, I'll be carrying on with the frame tomorrow so hopefully I can see some parts fitting together soon.
I got bored and realised i could assemble one or two bits
With these :O

All the bolts for the desk (I hope)
plus a few bits and pieces


Still need to cut the hole for the back piece above, but thats some fun for another day
Good news everyone
my brother has let me use his camera so the pictures seem to have worked a bit better and I've pushed the boat out a bit and done a video :O
SO... I've been finishing off some of the frame, so I thought I'd play with this here camera and show you guys what I was upto.
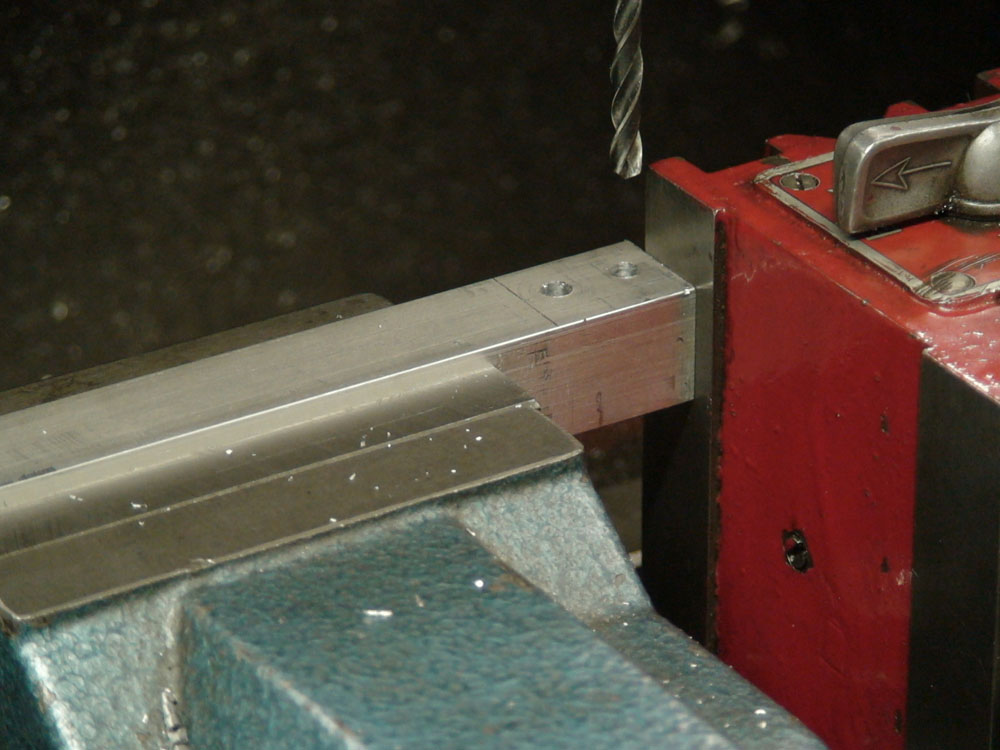
First, sawn box section, with the outside edge touched up a bit...

As you can see, the cut face looks rubbish, and the inside edge needs a lot of attention... but if you put it on the milling machine

and then do this
http://www.youtube.com/watch?v=XOSZ7h73ins&context=C3951a01ADOEgsToPDskKrSLqK_w8m8HHW9_I-J6up
It looks a little something like this...

and repeat...

So that's about 70% of the frame, the rest of it has 45 degree ends and could be a pain in the arse, but that's tomorrow's job
the pile of box section has got smaller too

If you guys want more videos of the making and stuff let me know I think this sort of stuff is interesting, but everyone else might think otherwise and to be honest, milling the ends was about the most exciting part of the frame
Only about another 100 M3 holes to drill and tap
Just a quick follow on from yesterday and some more video's
A video of one side of the smallest pieces, tried to keep it brief as it's not too thrilling, but at least you can see how I've been doing the frame.
http://www.youtube.com/watch?v=W4QCU6Pkzg8&context=C3d6a518ADOEgsToPDskIk6H5h5d_bhNzgA0PIKW7O
And I got some of the 45's cut today, the longer sections, I asked my Dad (as it's his workshop) what I could use for this, as I had in mind, just a vice with a rotating bed.
I was directed towards the vice in question...
I asked "could you not find a bigger one?" I asked in jest,
"That's the medium sized one, you can get the big one out of the garage if you can lift it..."
needless to say I did not see the need for a bigger vice, as you can see this one is a little on the meaty side as is...

But it certainly holds things very still.
http://www.youtube.com/watch?v=lS0nVw_B6ho&context=C389ce4dADOEgsToPDskIk4ncZVpCevIgKzg6qeF6J
And the finish turned out really well

and then they go on the stockpile ready to be drilled and tapped tomorrow

...................................................................................
Today was a really good day, mainly as you will see in the last three photos don't skip though, you'll spoil it !
to break up the tediousness of the day, I've done this update as a recipe, also my Mum was making my brothers birthday cake whilst I was working...
Today's to do list

First take your angle and square up the edge

Offset by the radius of your cutter


swap chucks

zero the Y axis

tool swap (centre drill)

score at 25mm and drill pilots then swap to 5mm drill

Get your magic magnet

Place magic magnet against the face of your angle and switch on.
release angle from the vice and rotate, then replace the angle using your magnet as a guide

repeat steps to score and drill

Enter the garage and try to spot the band saw

having located your saw, remove your bracket from the angle

take your newly liberated bracket and clamp it the the vice, then even up the edge, the same way the box section was done.

Measure the bracket and see how well your eyes did when you lined it up.

Pose your work on a non reflective surface


That kept me amused and for a little while I forgot that I needed to make 38 of these
But here's the best part
Grab some sections and have a play !


I think my mental age decreased to ten whilst putting these together
I managed to make ten this afternoon, before I retreated for food. Hopefully I can knock the rest of them out tomorrow, I had worked out some time saving methods by the 7th one Then maybe I can start assembling bits and cutting some more serious holes
And for those of you who are wondering the cake turned out pretty good too

thanks for reading guys, more to come over the weekend
I started getting parts together in late august then I was working for 6 weeks so it slowed the whole process down a bit.
The pictures are in the order I got everything with a few project log posts put together, so if something doesn’t make sense let me know and I can fix it
Bits:
EVGA SR-2
2x Intel Xeon 5650
24Gb Corsair Dominator
3x EVGA gtx580 SC
OCZ vertex 3 240Gb
2x Coolermaster silent pro gold 700W
Cooling:
EK-FB SR-2 Nickel plexi x2
EK-Supreme HF - Nickel
EK-FC580 GTX+ - Nickel x3
EK-RAM Dominator – Nickel x2
EK-Multioption RES X2 - 250 basic x2
EK d5 pump top rev 2 x2
Black Ice SR-1 360 Radiator x4
D5’s x2
It's all very shiny:
the quick test run
The plans for the desk had a few revisions as I was working in wales without a pc for a few weeks, so I got back at weekends with a whole different idea on how to do it.
This is what I settled on...
The desk design took a while as I have this thing for symmetry. I can make the frame at home, but the panels might have to be cut somewhere else, hence the whole desk is modeled.
This will be the first big build I've done for myself my previous builds have been nothing special, hence I'm pushing the boat out a bit.
24-11-11
Started making the frame this afternoon, the first three sections will take the longest so I'm starting there, here's the first round
The box and angle, ready to go
together with the plans on the desk.
The first side...
The tools I think I'm going to be sick of in a few days
The last (and most awkward) side
One down... 25 to go...
You know when you draw something and think "that will be be dead simple to make"...
never again will I think that... or, I'll make everything under 750mm long (the travel on the milling machine bed
)Will be doing more of the same until the frame is done, so I'll post anything interesting
..............................................................
Picked up the panels on yesterday they turned out really well so hopefully I can make the desk to the same standard
and let’s hope I didn’t miss anything when I drew them.So here they are
I thought I'd start by making sure the motherboard tray fits, so cleaned up the edges and tapped the mounting holes.
Like a glove...
Throw in some cables
and a few blocks
Saving these till later as they'll be black sleeved
Making sure I my plan for the cables would work, I'll be tidying them up a bit but they seem to fit pretty well.
And some more of the cooling made its way here, only a few bits and pieces left now
And that’s pretty much it for now, got some more nuts and bolts on the way so I'll be carrying on with the frame midweek probably
Just a quick one, tarted up the rear panel, it still needs the hole cutting in the centre for the back of the Motherboard but I wanted to make sure the PSU's fit
Seems to worked well, I'll be carrying on with the frame tomorrow so hopefully I can see some parts fitting together soon.
I got bored and realised i could assemble one or two bits
With these :O
All the bolts for the desk (I hope)
plus a few bits and pieces
Still need to cut the hole for the back piece above, but thats some fun for another day
Good news everyone
my brother has let me use his camera so the pictures seem to have worked a bit better
and I've pushed the boat out a bit and done a video :OSO... I've been finishing off some of the frame, so I thought I'd play with this here camera and show you guys what I was upto.
First, sawn box section, with the outside edge touched up a bit...
As you can see, the cut face looks rubbish, and the inside edge needs a lot of attention... but if you put it on the milling machine
and then do this
http://www.youtube.com/watch?v=XOSZ7h73ins&context=C3951a01ADOEgsToPDskKrSLqK_w8m8HHW9_I-J6up
It looks a little something like this...
and repeat...
So that's about 70% of the frame, the rest of it has 45 degree ends and could be a pain in the arse, but that's tomorrow's job
the pile of box section has got smaller too
If you guys want more videos of the making and stuff let me know
I think this sort of stuff is interesting, but everyone else might think otherwise and to be honest, milling the ends was about the most exciting part of the frameOnly about another 100 M3 holes to drill and tap
Just a quick follow on from yesterday and some more video's
A video of one side of the smallest pieces, tried to keep it brief as it's not too thrilling, but at least you can see how I've been doing the frame.
http://www.youtube.com/watch?v=W4QCU6Pkzg8&context=C3d6a518ADOEgsToPDskIk6H5h5d_bhNzgA0PIKW7O
And I got some of the 45's cut today, the longer sections, I asked my Dad (as it's his workshop) what I could use for this, as I had in mind, just a vice with a rotating bed.
I was directed towards the vice in question...
I asked "could you not find a bigger one?" I asked in jest,
"That's the medium sized one, you can get the big one out of the garage if you can lift it..."
needless to say I did not see the need for a bigger vice, as you can see this one is a little on the meaty side as is...
But it certainly holds things very still.
http://www.youtube.com/watch?v=lS0nVw_B6ho&context=C389ce4dADOEgsToPDskIk4ncZVpCevIgKzg6qeF6J
And the finish turned out really well
and then they go on the stockpile ready to be drilled and tapped tomorrow
...................................................................................
Today was a really good day, mainly as you will see in the last three photos
don't skip though, you'll spoil it !to break up the tediousness of the day, I've done this update as a recipe, also my Mum was making my brothers birthday cake whilst I was working...
Today's to do list
First take your angle and square up the edge
Offset by the radius of your cutter
swap chucks
zero the Y axis
tool swap (centre drill)
score at 25mm and drill pilots then swap to 5mm drill
Get your magic magnet
Place magic magnet against the face of your angle and switch on.
release angle from the vice and rotate, then replace the angle using your magnet as a guide
repeat steps to score and drill
Enter the garage and try to spot the band saw
having located your saw, remove your bracket from the angle
take your newly liberated bracket and clamp it the the vice, then even up the edge, the same way the box section was done.
Measure the bracket and see how well your eyes did when you lined it up.
Pose your work on a non reflective surface
That kept me amused and for a little while I forgot that I needed to make 38 of these
But here's the best part
Grab some sections and have a play !
I think my mental age decreased to ten whilst putting these together
I managed to make ten this afternoon, before I retreated for food. Hopefully I can knock the rest of them out tomorrow, I had worked out some time saving methods by the 7th one
Then maybe I can start assembling bits and cutting some more serious holes And for those of you who are wondering the cake turned out pretty good too
thanks for reading guys, more to come over the weekend