• Welcome to TechPowerUp Forums, Guest! Please check out our forum guidelines for info related to our community.
  • The forums have been upgraded with support for dark mode. By default it will follow the setting on your system/browser. You may override it by scrolling to the end of the page and clicking the gears icon.

[Case Gallery] Glass On Lumber

  • Thread starter Thread starter KingKinase
  • Start date Start date
K

KingKinase

Guest
To view this case mod, go here.


Specs:
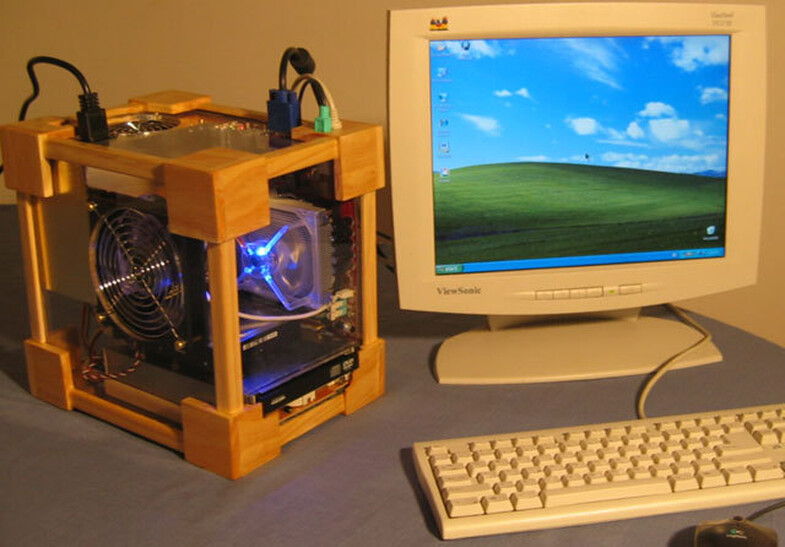
Motherboard: MSI P4MAM2-V


Mods:
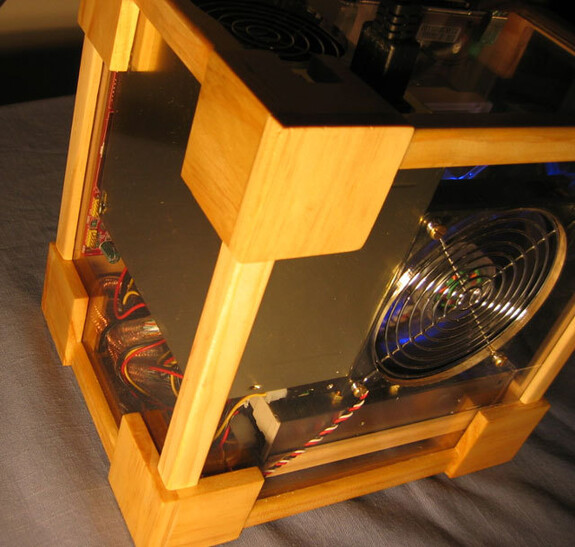
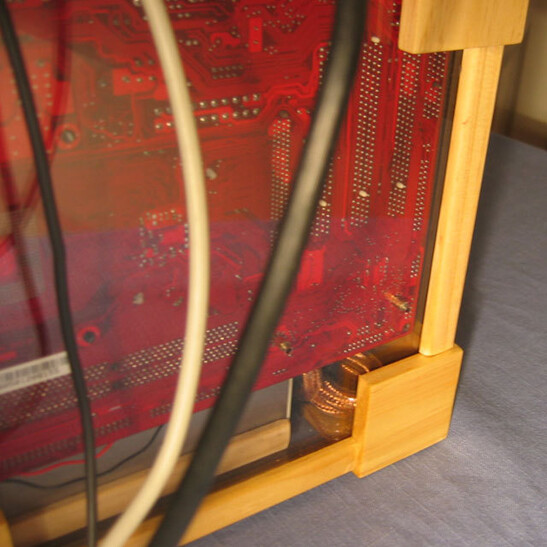
This project was an '08 mothers day gift! ( Hi Mom ) It uses a micro ATX mobo and pretends its a pico-ATX by conserving space through laying the PSU over the graphics slot and the PCI slots.

Built the box with pine molding and project pine from the local home-store, and the windows were cut acrylic.
 
Last edited by a moderator:
Excellent work, I had a look at you worklog, nice shark fin, Hope to see more of your work.
 
Thanks! Was going for humble :~O

Seriously though, I hope to be a power of example, because if someone w/ mediocre skills, and lousy equipment can put together something like this then anybody can do it!
 
I voted 3/10 because:

I really dont see why you want to build a computer out of wood?, and it does really look bad when you have to plug in on the top of the computer...
 
So harsh ! But to each their own.

The box sits under a wooden desk, hence the wood / acrylic theme fits the room nicely, and the cables have to go up to the keyboard / monitor / USB toys anyhow... Putting the inputs on top also allowed for the smallest possible form factor for this lot of equipment which was one of my main design criteria. One thing that unfortunately doesn't come across in these pictures is just how small the box is. Its just slightly larger then a micro-ATX motherboard, and about as wide a standard PSU.
 
i like it, wood shows an element of retro art , a mix of modern electronics with good old fashioned carpentry. very symbolic and unique too.
8/10 from me

PS- what did u use to make the perfect cuts in the plexi for the i/o panel? when i try to cut my plexi like that it cracks.
 
PS- what did u use to make the perfect cuts in the plexi for the i/o panel? when i try to cut my plexi like that it cracks.

Thanks Echo, Dremel on slow speed w/ a cutout wheel and sander was giving me results, but they didn't look finished at all. There may be a way to do it that way, by careful filing and sanding, but I got hooked up w/ a laser cutter and for very reasonable dough, I was able to get perfect cuts through 1/4" acrylic without actually having to do any cutting! Is that cheating? I did have to spend some time measuring to get it to come out perfect though.
 
ah i see, maybe i should be on the lookout for a laser cutter too if i find one at a reasonable price.
 
Nice job. The first case I made was housed in a 13 inch plexglas box with a wood side. Your case is nicer. Working with wood and plexiglas was a real challenge but yours looks like it was made by a pro. Good work.
 
9/10

Really nice work!
 
8/10 good job for sure ... if it were desk mounted, you could rotate it 90 degrees clockwise I think (moving the optical drive of course) and had a more convetional plug layout. But since that's not a factor, nice looking case.
 
I voted 4/10 because:

Dont like wood as it keeps heat in, so dont see the point in the time and effort in it
 
Back
Top