• Welcome to TechPowerUp Forums, Guest! Please check out our forum guidelines for info related to our community.
  • The forums have been upgraded with support for dark mode. By default it will follow the setting on your system/browser. You may override it by scrolling to the end of the page and clicking the gears icon.

[Gundam Case Mod] Unicorn Destroy Mod Project

Joined
Jun 20, 2016
Messages
66 (0.02/day)
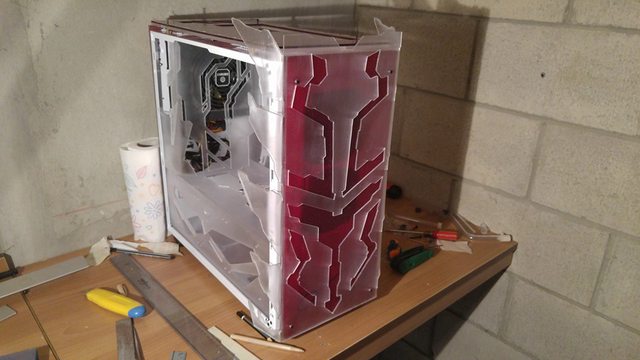
Hi guys! I'm Alessandro aka SaaintJimmy or St.Jimmy. I'm an italian modder and this is my first worklog on this forum. I'm going to realize a mod inspired by the design of the Unicorn Gundam Destroy Mode. The base is an NZXT Noctis 450 but in the end it won't be recognizible at all
biggrin3.gif


Special thanks go to my sponsors, Aquatuning and Enermax!

JuyW3exl.jpg

So, let's start with the worklog pictures!
biggrin3.gif

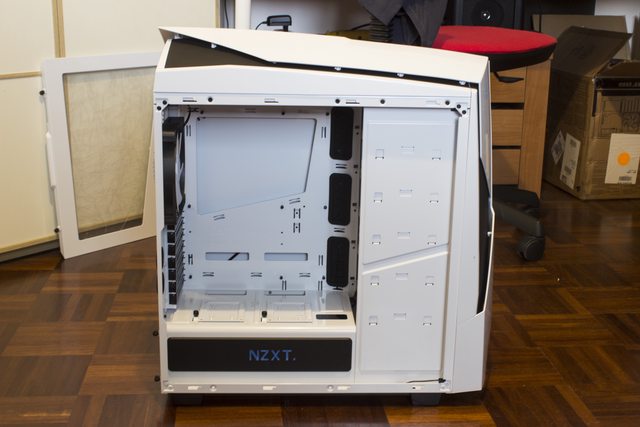
First of all, some shots of the case as it comes out of the box.

Qs3gZZRl.jpg

jjZIwFNl.jpg

qEoMvZ9l.jpg

mK8uqN0l.jpg


First of all, I removed the feet of the case because it's going to be rotated 90 degrees!

83piWs6l.jpg


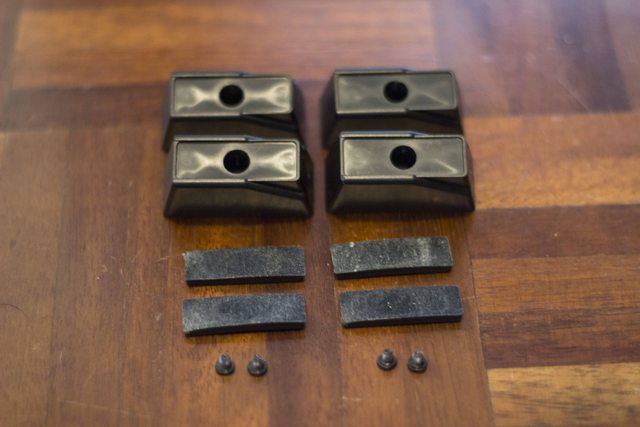
Then I mounted them on the side that is usually the front of the case... here's how I managed to secure them...

nK8G13Al.jpg


Every cover inside the case is going to be replaced by custom-made parts, so I had to remove everything
biggrin3.gif


wt5hTk0l.jpg


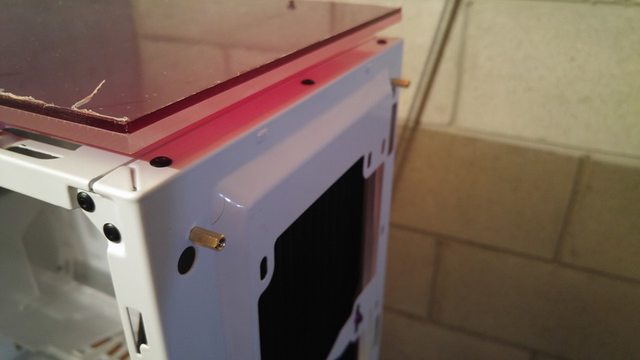
And this is a placement test of the 360mm radiator. I will be using Apollish Red Fans from Enermax and the radiator will be covered by some plexiglass... this still is 0,001% done, obviously!
laugh.png


SQNxEW7l.jpg


This is all for now... I'm still waiting for the lab to be done so I can start cutting and doing all that stuff: I'm stuck in the bedroom at the moment and I barely have the space to move! :banghead:
Stay tuned if you wanna see more amazing stuff!
happy1.gif


You have a LAB, but your working in the bedroom?
 
I've always worked in the bedroom until now, the lab is going to be done in the garage but it's not done yet, I'm waiting for the carpenter to take mesurements and then do it. I think and I hope this week he will do everything!
 
Thank you for sharing with us. Sounds like a fun mod/build. Welcome to TPU.
 
I'm glad to hear it man!
I actually thought about that but I prefer the colours of the Unicorn and a Banshee themed mod would be pratically identical except for the colours, so for now it has no point. I could think about other Gundam Mods in the future any way
 
Hi guys! Sorry for the delay but I've been pretty busy in the last two days so I had no time to post updates. Here is what I've done until now! :cool:

First of all, I wanna thank Enermax who provided me this amazing T.B. Apollish and Platimax 750W!

3ysukZ0l.jpg

zVVXEeGl.jpg

BtjBjfCl.jpg


But I obviously wanted to modify the fans somehow :D

eVIoXnIl.jpg


Do you like them white? :rolleyes:

2ie0YSll.jpg


The scroll saw arrived so I started to cut the first panels...

R6l6R8jl.jpg


This could look weird since as you can see it's going to be the mounting of the 360 radiator on it but you also can see that the panel is much larger than the rad... how do you think this is gonna be mounted? :D

ygcbfIIl.jpg


That's it for today. In the next update you'll see the material from Aquatuning and some update of the radiator cover and other panels... stay tuned :D
 
Hi guys! Sorry for the delay but I had no time this weekend to update the worklogs... but here I am now! Let's start with the pics :)

Drawing Gundam eyes and other details to allow the air to flow properly!

615HQgIl.jpg


Cutting time...

VF9r67xl.jpg


Effect with fans on!

xFmuZvGl.jpg


Drawing the other side of the panel... Gundam shoulder!

4fAVahjl.jpg


Cutting time pt.2 :D

r515Yp1l.jpg


Some other cuts for air flow!

cSuRu0pl.jpg


And it's finally done! Some cuts for cable management and stuff like that are still missing, and painting too but I will do those things after some other ones!

0zbcLDNl.jpg


kl6WUFNl.jpg


This is the second package I got from Aquatuning. All the other stuff are gonna be showed soon! Again thanks to Aquatuning!

CW5S3W6l.jpg


I hope you guys enjoy it! :D
See you at the next update!
 
Hi guys!! I'm here today with a little but interesting update! :D

Hooking system for the upper side of the cover: done! I utilized three strips of polycarbonate in different sizes and glued them together with Attak, in this way I'll be able to hook it to the cover without glue or screws anytime I want, and it will secure the cover to the mobo tray panel. Obviously I'm going to drill some holes for screws to have an even more stable mounting!

First piece of polycarbonate cut with scroll saw.

44JlLqPl.jpg


Details...

GjOG3asl.jpg


As you can see I used a shorter strip in the middle to allow the cover to slide into it!

JOochYgl.jpg


How it looks...

OJS2WMOl.jpg


rn9zlGWl.jpg


Fit test!

qMK1Yevl.jpg


That's it for today, I hope you guys will enjoy this! See you at the next update :D
 
Hi guys! Finally the PSU cover is done!
I tried to detail it as much as possible with the intention of make it unique. Two separate pieces, different types of cuts like the vents for the PSU, window for the Platimax logo, bends, engravings and tridimensional details... I like it!:D

Drawing the 1st piece...

dyji1SUl.jpg


Cuts done!

ajHqqWil.jpg


Drawing the 2nd piece...

XDkFzKZl.jpg


Cuts done!

zx5bq4gl.jpg


ewrbnoxl.jpg


And now let's add some details :D

bfzCxral.jpg


EVlQDPpl.jpg


Obviously this is waiting for the paintjob to be considered 100% finished, and it will be so much more beautiful, but I think I did a pretty good job with this!
See you at the next update mates :D
 
Finally plexy panels arrived and I did a quick lighting test (the plexy under the red one is designed to make light more homogeneous in the center of the panel too). Then I mounted them on three sides of the case. Obviously it's not done yet: I will put an aluminum layer on them with all the cuts which will show up the lit plexy, just like the Unicorn Gundam's Psycho Frame!
Check it out :D

Z69U7V1l.jpg


FOkn0hil.jpg


xf5A5oel.jpg


IpgcQPGl.jpg


CLQwcApl.jpg


rEGDtA6l.jpg


Stay tuned for more updates! :)
 
New update! I absented for awhile because I had to get some other polycarbonate and the drawing you will see now had me really busy since I didn't know exactly how to do it in some spots. In the previous update I told you that I would've used aluminum over the red panel, but I rejected this idea right after I cut the first aluminum panel: due to the 0.5mm thickness, it was getting crumpled just looking at it and it would've been so difficult to work on it compared to the polycarbonate.
So, today we're seeing first cuts on the two top panels and the third layer/panel on the front that has to be bent on both sides and detailed with other pieces. I'm planning to get it done within tomorrow. The look will be fantastic once the red panel will be lit evenly!

Lne7Hhal.jpg


DRKzDfUl.jpg


K9RAHztl.jpg


u66jtYfl.jpg


8Sh5mn4l.jpg


dvIETZ8l.jpg


Let me know that you guys think! :D
 
Here is a new update! I will show you the motherboard which is an MSI Z170 Gaming M7, some material for sleeved cable extensions Alchemy 2.0 from Bitfenix, and my new Silhouette Curio plotter! Also I continued the work on the front panel and I did a test with leds. Unfornately, since the panel is not painted yet, the light passes through it so the lit cuts aren' that visible but that will be fixed in the final result!
Check it out! :D

8z04tqcl.jpg


EwH1tayl.jpg


m80XDxll.jpg


FNbUlPfl.jpg


ZPwi2Gtl.jpg


XMW4Bnsl.jpg


SfoXav2l.jpg


bha8m4Yl.jpg


Stay tuned for more updates! :)
It just keeps getting better!
Looking forward to your next update ;)
 
Front panel unwrapped and mounted, Noctis 450's external panels fit test, they're going to be mounted with gas pistons or something like that to simulate Gundam cockpit. I've also made two little lateral panels for the top which will accomodate led strips behind. They're still missing some cuts because I wanted to see them mounted before!
Let me know what you guys think! :D

jr3aRmhl.jpg


MP5btm4l.jpg


EVDFiDLl.jpg


3gcz0jQl.jpg


MTuJcZAl.jpg


rOAEciXl.jpg


vjut1F7l.jpg


tPupmbql.jpg


0xm7PEhl.jpg
 
Here I am with probably the last update of the month since I'm going on holiday tomorrow. I did as much as I could to bring you some good pics! I mounted the two Alphacool reservoirs on the back, did some lighting testing and started the third rear polycarbonate layer.

gqzlqwbl.jpg


ZMG21oZl.jpg


tzR0m1al.jpg


IxsYxzul.jpg


GCixJoAl.jpg


Df0yXYnl.jpg


OQEDpYWl.jpg


6DVGTwil.jpg


I wish you all some happy holidays! :)
 
If i had the money id buy this case off you once its been completed :p
 
I'm finally back! First of all, I completed the rear panels and did some lighting test, then I started working on the mobo tray and I made one single hole for every single sleeved cable, this way I can keep the cables tidy even without cable combs! I also made a little fit test for the components and also to try to get a cleaner idea of the tubing setup, so I started the tubing job and took the measurements for some bulk-head connectors. There's still so much work to do, tubing's not the last stage! :D

2ZI8eeAl.jpg


JTiJjAQl.jpg


dK4E9MRl.jpg


pxvT5lKl.jpg


6jnz3GZl.jpg


LaasYnBl.jpg


XLZRG6il.jpg


Cqj8Xr2l.jpg


hHpmFe3l.jpg


lxli5Cxl.jpg


rD6HGG3l.jpg


1YwCUvil.jpg


Stay tuned!
 
Finally tubing is done! In the next days I'm going to finish off the panels that I still have to do, like the top ones, some details using polycarbonate, the hooking system of the Noctis 450's panels and we're pretty much ready for the giant paint job of every polycarbonate panel I made!

FNpPmmNl.jpg


vi4Vwtnl.jpg


kOBap36l.jpg


GKHo5ETl.jpg


3XmwoAQl.jpg


KlC4RcBl.jpg


CmMl8nnl.jpg


Jw8MCe4l.jpg


ZrGlt0ul.jpg


oeDmFIal.jpg


Moma7T1l.jpg


Uc9rLeQl.jpg


mnlLQBVl.jpg


Stay tuned!
 
Little update! Made a top-front panel which is gonna hold two Phobya button, one Power and one Reset. I also decided to put a Unicorn Gundam head (model kit) on this panel, and it will be lit as you can see in the pics. Almost finished the back side too, not very satisfied as it is at the moment but I think it'll do the job! Let me know what you think!

TWticFwl.jpg


fUpCbhTl.jpg


ntJwyM8l.jpg


knTIZRvl.jpg


CuJwROYl.jpg


MRIPl40l.jpg


KbNkJc3l.jpg
 
Back
Top