
- Joined
- Jun 7, 2015
- Messages
- 38 (0.01/day)
- Location
- France
| System Name | HAL (modded, 1.3U "pizza box") |
|---|---|
| Processor | Intel Core i7 4790K @4.6GHz |
| Motherboard | Asus ROG Maximus Impact VI |
| Cooling | Custom (flexible) loop: Alphacool NexXxoS XP³ Light / EK SBAY DDC 3.2 PWM / 2x Magicool G2 240 rads |
| Memory | 2x8Go DDR3 2400 - G-Skill Trident X |
| Video Card(s) | EVGA Geforce GTX 1080 Hydro Copper |
| Storage | Crucial M500 M.2 480GB + Samsung QVO 860 1TB SATA |
| Display(s) | HP Omen 35" 3440x1440 GSync 100Hz |
| Case | Modded iSTAR USA D-107V2, 1,3U rack case |
| Audio Device(s) | none |
| Power Supply | Corsair SF600 (SFX) |
| Mouse | Corsair Vengeance M65 |
| Keyboard | Cooler Master Quick Fire pro |
| Benchmark Scores | 3D Mark Time Spy: 7361 ( https://www.3dmark.com/spy/5334187 ) |
Hi everyone
I just wanted to share a case mod which main originality is to be based on a relatively slim rackmount case while being able to host a custom watercooling loop for overclocked CPU and GPU.
This comes as a follow-up of my IBM PS/1 projects (https://www.techpowerup.com/forums/...s-1-with-watercooling-update-15th-nov.214850/ and https://forums.bit-tech.net/index.php?threads/ibm-ps-1-2125-rog-06-june-2015.286496/)
From lessons learnt from both projects, I wanted:
Actually, this is pretty much inspired by the "pizza-box" format used for instance by SUN or NeXT in 1990s for some of their workstations:
The inspiration

Selected parts and implications:
A quest for slim parts (1/3): The case

A quest for slim parts (2/3): CPU waterblock

A quest for slim parts (3/3): pump/res combo

Wide screen, unlike its stand

An idea of the modifications to be made

My minimalistic tools set:
Let the fun begin!
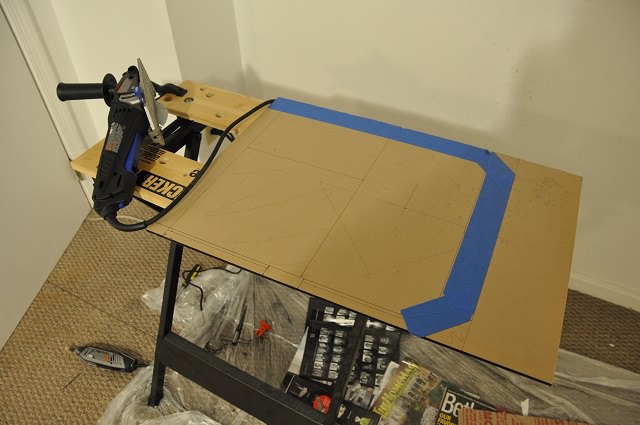
STEP 1: Case cut-outs
The bottom of the case, shortened, and with the 20cm hole for the fan

Cutting-out a hole for the PSU

Work on the inside and rear panels

PSU with its brackets

For the remaining stand-offs I found these...
...HiFi spikes

STEP 2: Work on the cover
Now for the cover, I picked a 6cm thick, black opaque acrylic sheet.
The prepared acrylic sheet
I added 5cm at the read so that the monitor stand would not overlap too much with the cooling system.
Everything seems to fit nicely

Just a try with all components inside

The picture was taken with a standard 1060 before I purchased the watercooled 1080, clearly showing that the GPU side will have to be cut.
On the PSU side it was necessary to bend the cables, also due to the peculiar VRM design of the Impact VI. I moved the motherboard 6mm on the left and used braided cables, more supple than the ones provided by default with the SF600.
For the fan/radiator grill I wanted an uncommon pattern and found this aluminium sheet at the local DIY store.
Work on the grill

STEP 3: Now for the paint work
Paint work

Going for the traditional black-red look

I found a nice metal-looking red mylar tape to cover the side of the top panel:

STEP 4: Internal layout
As for the layout of the loop, it proved to be easier than expected
Radiators, assembled

A nice Amazon: M3 nylon stand-offs, nuts, bolts and spacers

By combining stand-offs of various length I managed to get the 2.8cm needed to use the 90° Alphacool fittings.
Tubes layout

Water flow

A first look at the final look

Finger marks bliss...
Side view

At this stage something still needed to be found to cover the hole left by the lock.
View with the front cover opened

I used an RGB LED stripe (which would remain red). As my current motherboard does not have any RGB controler I used a small XSPC SATA powered one also used to control fan leds.
XSPC RGB controler

Rear view

Underneath view

I had a last minute issue: heads of the waterblock plate screws were longer than the motherboard stand-offs on such a slim case... I had to cut this square hole (since the picture I found a more elegant path for the PCI-E cables).
Once the EVGA 1080 GTX Hydro Copper received, as expected it would not fit without a cut on the side, for both the waterblock and PCI-E connectors.
This is how it looked:

Not too bad once illuminated as you'll see below.
Here is a view of the near final case, during the test of the loop.
Everything runs fine without a single lick

STEP 4: Final results (and name of the project finally explained)
Finally, a few views of the final project... the last touch, the replacement of the case lock, gave the name to the whole project (it's a wide-angle lense for mobile phone).
Desk view

Front view

GPU side view

I am completely operational, and all my circuits are functioning perfectly.

Comments, suggestions for improvements questions more than welcome. And if anyone knows about other slim case mods based on 1U/1.5U rackmount cases I'm always interested for new sources of inspiration.
I just wanted to share a case mod which main originality is to be based on a relatively slim rackmount case while being able to host a custom watercooling loop for overclocked CPU and GPU.
This comes as a follow-up of my IBM PS/1 projects (https://www.techpowerup.com/forums/...s-1-with-watercooling-update-15th-nov.214850/ and https://forums.bit-tech.net/index.php?threads/ibm-ps-1-2125-rog-06-june-2015.286496/)
From lessons learnt from both projects, I wanted:
- - to keep a relatively small footprint, in a desktop, under the screen, format. Yet to be able to host a 35" 21/9 screen. Rackmount case came as an obvious choice. However in terms of depth they are often too short or too long. Moreover 1U would not allow to have an all-internal loop, but 2U would be too massive.
- - to keep a custom watercooling loop, but this time without an external cooling tower. To do this I chose to use stand-offs and have the air flowing the bottom to top of the case.
- - to have a sufficiently powerful, yet relatively silent PSU... Modularity would also help with cable management this would exclude 1U PSUs.
Actually, this is pretty much inspired by the "pizza-box" format used for instance by SUN or NeXT in 1990s for some of their workstations:
The inspiration
Selected parts and implications:
- I chose a iSTAR USA D-107V2, 1,3U rack case (dimensions: 43x 5,8 x 54cm LxHxD, ). It was obviously too deep and would have to be cut to somewhat match a pizza-box format. Moreover, without turning the case into a Xmas tree, a few LEDs and a bit of plexiglas could help turning its rather industrial look in something more gaming-looking.
A quest for slim parts (1/3): The case
- a mini-ITX motherboard, for now I kept my Asus ROG Maximus Impact VI, with an Intel Core i5 Haswell 4670k, 2x8Go 2400 Gskill DDR3 RAM, et and a M.2 SATA Crucial 500GB SSD
- the PSU is a Corsair SF600. With 6.3cm height it is too thick for a 1.3U case. It required to cut the bottom of the case, that way the PSU was actually used as one of the stand-offs necessary for the cooling system.
- 2 Magicool G2 240 radiators, they are peculiarly slim (2.6cm thick), and ventilated by a single Cooler Master MF200R RGB, 20cm fan (found as a clearance sale, will switch to 4x EK Vardar 120 if not sufficient).
- an Alphacool NexXxoS XP³ Light CPU waterblock, packed for its height as well.
A quest for slim parts (2/3): CPU waterblock
- My ever reliable EK-SBAY DDC 3.2 PWM 5,25" pump/res combo , perfect for this slim, horizontal layout.
A quest for slim parts (3/3): pump/res combo
- as for the GPU, initially I thought about waiting for 2070/2080 but I found a bargain EVGA GTX 1080 FTW Hydro Copper. The only constraint, as it is rather wide, would be then to cut the side of the case for the the waterblock and PCI-E power connectors.
- Monitor: I chose the HP Omen X 35, as it was the only G-Sync monitor with a narrow enough base to be used on top of this case. Models from Asus, Acer all have tripod-style stands which would have been unstable.
Wide screen, unlike its stand
An idea of the modifications to be made
My minimalistic tools set:
- for 2D blueprints to have (almost) accurate cuts and holes I used Dassault Systèmes' Draftsight
- a Dremel 4300
- a Dremel Ultra Saw
Let the fun begin!
STEP 1: Case cut-outs
The bottom of the case, shortened, and with the 20cm hole for the fan
Cutting-out a hole for the PSU
Work on the inside and rear panels
PSU with its brackets
For the remaining stand-offs I found these...
...HiFi spikes
STEP 2: Work on the cover
Now for the cover, I picked a 6cm thick, black opaque acrylic sheet.
The prepared acrylic sheet
I added 5cm at the read so that the monitor stand would not overlap too much with the cooling system.
Everything seems to fit nicely
Just a try with all components inside
The picture was taken with a standard 1060 before I purchased the watercooled 1080, clearly showing that the GPU side will have to be cut.
On the PSU side it was necessary to bend the cables, also due to the peculiar VRM design of the Impact VI. I moved the motherboard 6mm on the left and used braided cables, more supple than the ones provided by default with the SF600.
For the fan/radiator grill I wanted an uncommon pattern and found this aluminium sheet at the local DIY store.
Work on the grill
STEP 3: Now for the paint work
Paint work
Going for the traditional black-red look
I found a nice metal-looking red mylar tape to cover the side of the top panel:
STEP 4: Internal layout
As for the layout of the loop, it proved to be easier than expected
Radiators, assembled
A nice Amazon: M3 nylon stand-offs, nuts, bolts and spacers
By combining stand-offs of various length I managed to get the 2.8cm needed to use the 90° Alphacool fittings.
Tubes layout
Water flow
A first look at the final look
Finger marks bliss...
Side view
At this stage something still needed to be found to cover the hole left by the lock.
View with the front cover opened
I used an RGB LED stripe (which would remain red). As my current motherboard does not have any RGB controler I used a small XSPC SATA powered one also used to control fan leds.
XSPC RGB controler
Rear view
Underneath view
I had a last minute issue: heads of the waterblock plate screws were longer than the motherboard stand-offs on such a slim case... I had to cut this square hole (since the picture I found a more elegant path for the PCI-E cables).
Once the EVGA 1080 GTX Hydro Copper received, as expected it would not fit without a cut on the side, for both the waterblock and PCI-E connectors.
This is how it looked:
Not too bad once illuminated as you'll see below.
Here is a view of the near final case, during the test of the loop.
Everything runs fine without a single lick
STEP 4: Final results (and name of the project finally explained)
Finally, a few views of the final project... the last touch, the replacement of the case lock, gave the name to the whole project (it's a wide-angle lense for mobile phone).
Desk view
Front view
GPU side view
I am completely operational, and all my circuits are functioning perfectly.
Comments, suggestions for improvements questions more than welcome. And if anyone knows about other slim case mods based on 1U/1.5U rackmount cases I'm always interested for new sources of inspiration.
Last edited:
