walkingdog105
New Member
- Joined
- Oct 28, 2016
- Messages
- 1 (0.00/day)
In this article I would like to introduce the Reshading world to those who are not
roaming in this field. Today many people use SweetFX to enhance their gaming
experience, now I’m one of them, but not the adventurous and desiring ones due to
laziness. Recently I played Mafia 3 and found the images were quite blurry, this
made me a little dizzy&crazy. In most cases, I just ignore the blur and focus on the
gameplay, but sometimes it got too far that I couldn’t bear it anymore. I randomly
found a reshade for Mafia 3, it’s called Nyclix reshade. After applying it I got a totally
shocking experience, and start to think maybe it’s time to move on to the post
processing world.
Not everybody likes reshading, they just want to enjoy games and relax themselves
a bit, if you are among them, then quit this article because it’s a waste of time, but if
you want to have a little funny visual contact of your gaming images, then the
following may be helpful.
There are other reshading tools, but in this post I just focus on the Reshade injector
and SweetFX, and thanks to those who devote themselves to the post-process
reshading tools that we may enjoy and shape the game presentation to our likings.
1. Reshade + SweetFX
This is the main tools I use for my favorite games, with Reshade the injector and
SweefFX the post-process reshading. I love manually adjusting the parameters and
see the difference, although there exists easy ways to do so, with in-game overlay and
tools to directly see the changes, that’s much conveniect for the lazy, and I'll leave it
to the later part.
You can download “Reshade+SweetFX” here
https://sfx.thelazy.net/downloads/
all the files of ReShade 1.1.0 & SweetFX 2.0

Now we’ll inject SweetFX to the game (or you can manually put necessary files to the
game directory). Run the file “Reshade Setup.exe”, a window will pop out, choose the
game execution file (assuming you know the location or path), the program will
autodetect the graphics API of the game, just wait and see, if the detection fails, then
manually select the API youself, don’t choose wrong or face the conquence (Frankly
speaking I don’t know the conquence ). The injection will probably be done within 3
seconds.

After the program showing “Run [game name]”, the injection is complete,
congratulations! This procedure only needs to be done once, so no need to do it again,
unless you mess up your configuration and want to rewind the change.
Before we discuss how to change post-process settings, let’s talk about how to remove
the injection first. Due to different SweetFX version, the uninstallation is a little
different but not difficult, the link below explains the difference
https://reshade.me/forum/troubleshooting/1600-solved-how-do-i-uninstall-sweetfx
I made a .bat file that autodeletes all files of SweetFX 2.0 and Reshade,
just put the file in the game exe directory and run it, you don’t have to del files one by
one. Make sure your games aren’t installed in the OS protected “Program Files”
directory or autodelete may fail. You can write your own .bat file according to your
SweetFX version. Below is my bat file content, you can copy it to your own.
rmdir /s/q SweetFX
del EULA.txt
del README.txt
del ReShade Setup.exe
del ReShade.fx
del ReShade32.dll
del ReShade64.dll
del Sweet.fx
del d3d9.dll
del dxgi.dll
del d3d11.dll
Now let’s talk about juicy part.
After injecting SweetFX, there should be a subdirectory named SweetFX in the
game directory where game execution file is located, inside there should be a file
named SweetFX_settings.txt , this file contains all post-process reshade parameters
that are crucial to the final images.

The upper part consists of many on&off “levers” that leave gamers to decide whether
to use it or not, “1” means enabled and “0” means disabled. In default condition, there
should be 2 reshades being used – SMAA & LUMASHARPEN.
all usable reshades in SweetFX 2.0 and default-enabled reshades

IMO these two are the most important and useful reshades SweetFX could provide.
SMAA blows in-game jaggies away efficently and LUMASHARPEN retains the
sharpness of textures, they both do a great job and the outcome is obviously good and
spectaculiar. For example, in Gothic 3, with community patch 1.75 carrying FXAA,
or community patch 1.74 carrying edge smoothing AA, the images are not so
impressive, sometimes jaggies still there, or textures a little blurry, especially while
facing light source, but by injecting SweetFX, I find all the problems have been taken
care of in a satisfying way, that’s really a huge improvement to the gaming
experience, although performance drop is unavoidable in most cases, sometimes a
little, sometimes a lot. You should evaluate the capability of your graphic card to
maintain a balance.
In the SweetFX_settings.txt each reshade has some parameters to adjust, you can
tweak them to your liking. Personally I don’t like to tweak the numbers unless I want
to make some presets for others to use. If you want to use another preset, just copy the
texts of the preset to SweetFX_settings.txt, replacing old texts.
The following is a before and after screenshots, you can toggle the two in game with
the key " Scroll Lock" (This key can be changed through "Global_settings.txt" file)
Gothic 3 - original vs injectSweetFX (SMAA、LUMASHARPEN)
https://cdn.knightlab.com/libs/juxt...html?uid=7425d39c-9d02-11e6-9008-0edaf8f81e27
Gothic 3 – original vs my current preset (CARTOON、SMAA、LUMASHARPEN、DITHER)
https://cdn.knightlab.com/libs/juxt...html?uid=0055e91a-9d03-11e6-9008-0edaf8f81e27
https://cdn.knightlab.com/libs/juxt...html?uid=3b1a7ea8-9d03-11e6-9008-0edaf8f81e27
2. ReShade 3.0.3
download
https://reshade.me/
This is a powerful reshade tool, probably designed for the lazy, just download
ReShade 3.0.3, run it, a window will pop out asking for the game execution file, give
the file to the injector and the graphics API version if a proper API can not be
auto-detected. Then the program will ask if you want to download some reshades
from the internet, answer yes and wait for several seconds, you should know that the
more reshades you import into a game, the more loading time when the game starts,
so I strongly recommand no more than 10 reshades. When “done” is shown in the
window, the injection is complete, but remember it’s still not enabled, now you can
quit the program and run the game.
list of all usable reshades from internet with ReShade 3.0.3, choose carefully

In game you can call up a overlay tool by tapping “SHIFT + F2”(default). For the first
time it will guide you how to use and implement reshades, just follow the tutorial.
Greeting message, click "continue"

First you must click "+" to name the profile

All the imported reshades you can use
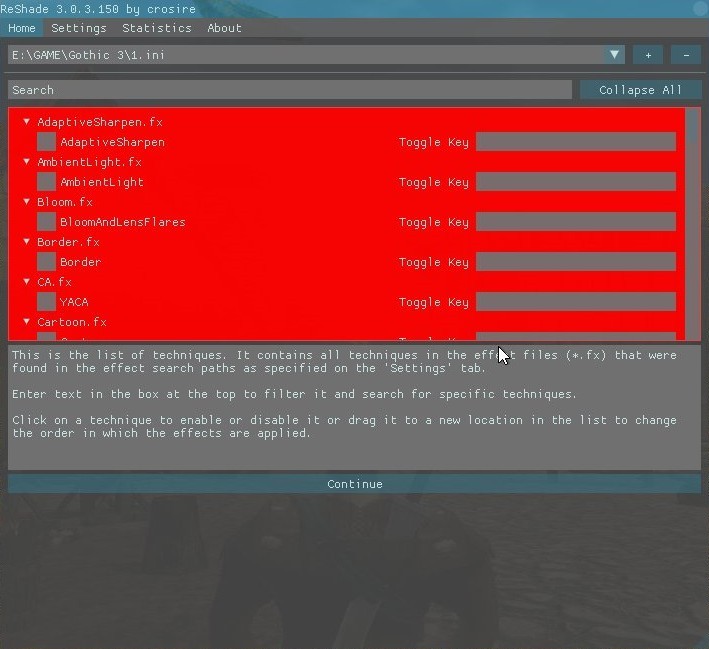
Select what reshades you want, each resahde has specific parameters that can be
tweaked in the region below

Adjust them to your style, every change you make will take effect immediately on the
screen, this will allow you to compare the difference as you change the parameters,
that’s very convenient for gamers to get the perfect images or style they want. The
following are some of the imported reshades compared to original images with AA off.
You can mix all imported reshades as you want, but some may not take effect as you
expect, and beware, the more reshades imported, the more loading time as game
starts...
AdaptiveSharpen
(use the slider bar to compare the difference)
https://cdn.knightlab.com/libs/juxt...html?uid=13ab0d6a-9d08-11e6-9008-0edaf8f81e27
HDR
(use the slider bar to compare the difference)
https://cdn.knightlab.com/libs/juxt...html?uid=5149d090-9d10-11e6-9008-0edaf8f81e27
AmbientLight
(use the slider bar to compare the difference)
https://cdn.knightlab.com/libs/juxt...html?uid=4407bce2-9d08-11e6-9008-0edaf8f81e27
Bloom
(use the slider bar to compare the difference)
https://cdn.knightlab.com/libs/juxt...html?uid=6867791a-9d08-11e6-9008-0edaf8f81e27
Cartoon
(use the slider bar to compare the difference)
https://cdn.knightlab.com/libs/juxt...html?uid=96ba9874-9d08-11e6-9008-0edaf8f81e27
Curves
(use the slider bar to compare the difference)
https://cdn.knightlab.com/libs/juxt...html?uid=680729ec-9d0e-11e6-9008-0edaf8f81e27
FilmicPass
(use the slider bar to compare the difference)
https://cdn.knightlab.com/libs/juxt...html?uid=03aedc40-9d10-11e6-9008-0edaf8f81e27
Vignette
(use the slider bar to compare the difference)
https://cdn.knightlab.com/libs/juxt...html?uid=922ba4aa-9d0e-11e6-9008-0edaf8f81e27
Levels
(use the slider bar to compare the difference)
https://cdn.knightlab.com/libs/juxt...html?uid=29ee6524-9d10-11e6-9008-0edaf8f81e27
GaussianBlur
(use the slider bar to compare the difference)
https://cdn.knightlab.com/libs/juxt...html?uid=7c66591a-9d10-11e6-9008-0edaf8f81e27
3. Examples
Not all games need reshading, sometimes it’s better not to do anything.
In some games though, like Mafia 3, if there’s no reshading, I probably won’t
play it. I can bear with low-quality textures, but can hardly stand with the serious
fuzziness. Everyone has his or her own style, my dislike may be your like, and vice
versa.
Mafia 2
I tweak this game to my liking, and in fact, I like the outcome. The color and
enviroment are more vivid and lively, the streets look vigorous and brisk, all
objects look more stereoscopic...
original:lots of jaggies, a little blurry, the light is too flat, the color is dull
reshade:SMAA, LUMASHARPEN, HDR, CLARITY (all with default parameters)
My used reshades in Mafia 2

Comparison 1
(use the slider bar to compare the difference)
https://cdn.knightlab.com/libs/juxt...html?uid=5e7f13fa-9d16-11e6-9008-0edaf8f81e27
Comparison 2
(use the slider bar to compare the difference)
https://cdn.knightlab.com/libs/juxt...html?uid=8a6ad47c-9d16-11e6-9008-0edaf8f81e27
Quantum Break
This game uses scaling to fit 1080P graphic output, but this causes serious blurry
image. Turn off scaling makes the game look better, but not good enough to meet the
standard of 2016 AAA titles. The texture details lose a bit due to other post process
interference. Since ReShade provides so many reshading modules, why not using
corresponding sharpen reshades to improve visual experience?
original:turn off scaling, some scenes a litte blurry, textures lose details
reshade:HighPassSharpen、AdaptiveSharpen、LumaSharpen...
Sharpen Reshades comparison

Original vs HighPassSharpen+AdaptiveSharpen+LumaSharpen
(use the slider bar to compare the difference)
https://cdn.knightlab.com/libs/juxt...html?uid=10811a0e-9d1b-11e6-9008-0edaf8f81e27
https://cdn.knightlab.com/libs/juxt...html?uid=48101c90-9d1b-11e6-9008-0edaf8f81e27
https://cdn.knightlab.com/libs/juxt...html?uid=61ae856a-9d1b-11e6-9008-0edaf8f81e27
roaming in this field. Today many people use SweetFX to enhance their gaming
experience, now I’m one of them, but not the adventurous and desiring ones due to
laziness. Recently I played Mafia 3 and found the images were quite blurry, this
made me a little dizzy&crazy. In most cases, I just ignore the blur and focus on the
gameplay, but sometimes it got too far that I couldn’t bear it anymore. I randomly
found a reshade for Mafia 3, it’s called Nyclix reshade. After applying it I got a totally
shocking experience, and start to think maybe it’s time to move on to the post
processing world.
Not everybody likes reshading, they just want to enjoy games and relax themselves
a bit, if you are among them, then quit this article because it’s a waste of time, but if
you want to have a little funny visual contact of your gaming images, then the
following may be helpful.
There are other reshading tools, but in this post I just focus on the Reshade injector
and SweetFX, and thanks to those who devote themselves to the post-process
reshading tools that we may enjoy and shape the game presentation to our likings.
1. Reshade + SweetFX
This is the main tools I use for my favorite games, with Reshade the injector and
SweefFX the post-process reshading. I love manually adjusting the parameters and
see the difference, although there exists easy ways to do so, with in-game overlay and
tools to directly see the changes, that’s much conveniect for the lazy, and I'll leave it
to the later part.
You can download “Reshade+SweetFX” here
https://sfx.thelazy.net/downloads/
all the files of ReShade 1.1.0 & SweetFX 2.0
Now we’ll inject SweetFX to the game (or you can manually put necessary files to the
game directory). Run the file “Reshade Setup.exe”, a window will pop out, choose the
game execution file (assuming you know the location or path), the program will
autodetect the graphics API of the game, just wait and see, if the detection fails, then
manually select the API youself, don’t choose wrong or face the conquence (Frankly
speaking I don’t know the conquence ). The injection will probably be done within 3
seconds.
After the program showing “Run [game name]”, the injection is complete,
congratulations! This procedure only needs to be done once, so no need to do it again,
unless you mess up your configuration and want to rewind the change.
Before we discuss how to change post-process settings, let’s talk about how to remove
the injection first. Due to different SweetFX version, the uninstallation is a little
different but not difficult, the link below explains the difference
https://reshade.me/forum/troubleshooting/1600-solved-how-do-i-uninstall-sweetfx
I made a .bat file that autodeletes all files of SweetFX 2.0 and Reshade,
just put the file in the game exe directory and run it, you don’t have to del files one by
one. Make sure your games aren’t installed in the OS protected “Program Files”
directory or autodelete may fail. You can write your own .bat file according to your
SweetFX version. Below is my bat file content, you can copy it to your own.
rmdir /s/q SweetFX
del EULA.txt
del README.txt
del ReShade Setup.exe
del ReShade.fx
del ReShade32.dll
del ReShade64.dll
del Sweet.fx
del d3d9.dll
del dxgi.dll
del d3d11.dll
Now let’s talk about juicy part.
After injecting SweetFX, there should be a subdirectory named SweetFX in the
game directory where game execution file is located, inside there should be a file
named SweetFX_settings.txt , this file contains all post-process reshade parameters
that are crucial to the final images.
The upper part consists of many on&off “levers” that leave gamers to decide whether
to use it or not, “1” means enabled and “0” means disabled. In default condition, there
should be 2 reshades being used – SMAA & LUMASHARPEN.
all usable reshades in SweetFX 2.0 and default-enabled reshades
IMO these two are the most important and useful reshades SweetFX could provide.
SMAA blows in-game jaggies away efficently and LUMASHARPEN retains the
sharpness of textures, they both do a great job and the outcome is obviously good and
spectaculiar. For example, in Gothic 3, with community patch 1.75 carrying FXAA,
or community patch 1.74 carrying edge smoothing AA, the images are not so
impressive, sometimes jaggies still there, or textures a little blurry, especially while
facing light source, but by injecting SweetFX, I find all the problems have been taken
care of in a satisfying way, that’s really a huge improvement to the gaming
experience, although performance drop is unavoidable in most cases, sometimes a
little, sometimes a lot. You should evaluate the capability of your graphic card to
maintain a balance.
In the SweetFX_settings.txt each reshade has some parameters to adjust, you can
tweak them to your liking. Personally I don’t like to tweak the numbers unless I want
to make some presets for others to use. If you want to use another preset, just copy the
texts of the preset to SweetFX_settings.txt, replacing old texts.
The following is a before and after screenshots, you can toggle the two in game with
the key " Scroll Lock" (This key can be changed through "Global_settings.txt" file)
Gothic 3 - original vs injectSweetFX (SMAA、LUMASHARPEN)
https://cdn.knightlab.com/libs/juxt...html?uid=7425d39c-9d02-11e6-9008-0edaf8f81e27
Gothic 3 – original vs my current preset (CARTOON、SMAA、LUMASHARPEN、DITHER)
https://cdn.knightlab.com/libs/juxt...html?uid=0055e91a-9d03-11e6-9008-0edaf8f81e27
https://cdn.knightlab.com/libs/juxt...html?uid=3b1a7ea8-9d03-11e6-9008-0edaf8f81e27
2. ReShade 3.0.3
download
https://reshade.me/
This is a powerful reshade tool, probably designed for the lazy, just download
ReShade 3.0.3, run it, a window will pop out asking for the game execution file, give
the file to the injector and the graphics API version if a proper API can not be
auto-detected. Then the program will ask if you want to download some reshades
from the internet, answer yes and wait for several seconds, you should know that the
more reshades you import into a game, the more loading time when the game starts,
so I strongly recommand no more than 10 reshades. When “done” is shown in the
window, the injection is complete, but remember it’s still not enabled, now you can
quit the program and run the game.
list of all usable reshades from internet with ReShade 3.0.3, choose carefully
In game you can call up a overlay tool by tapping “SHIFT + F2”(default). For the first
time it will guide you how to use and implement reshades, just follow the tutorial.
Greeting message, click "continue"
First you must click "+" to name the profile
All the imported reshades you can use
Select what reshades you want, each resahde has specific parameters that can be
tweaked in the region below
Adjust them to your style, every change you make will take effect immediately on the
screen, this will allow you to compare the difference as you change the parameters,
that’s very convenient for gamers to get the perfect images or style they want. The
following are some of the imported reshades compared to original images with AA off.
You can mix all imported reshades as you want, but some may not take effect as you
expect, and beware, the more reshades imported, the more loading time as game
starts...
AdaptiveSharpen
(use the slider bar to compare the difference)
https://cdn.knightlab.com/libs/juxt...html?uid=13ab0d6a-9d08-11e6-9008-0edaf8f81e27
HDR
(use the slider bar to compare the difference)
https://cdn.knightlab.com/libs/juxt...html?uid=5149d090-9d10-11e6-9008-0edaf8f81e27
AmbientLight
(use the slider bar to compare the difference)
https://cdn.knightlab.com/libs/juxt...html?uid=4407bce2-9d08-11e6-9008-0edaf8f81e27
Bloom
(use the slider bar to compare the difference)
https://cdn.knightlab.com/libs/juxt...html?uid=6867791a-9d08-11e6-9008-0edaf8f81e27
Cartoon
(use the slider bar to compare the difference)
https://cdn.knightlab.com/libs/juxt...html?uid=96ba9874-9d08-11e6-9008-0edaf8f81e27
Curves
(use the slider bar to compare the difference)
https://cdn.knightlab.com/libs/juxt...html?uid=680729ec-9d0e-11e6-9008-0edaf8f81e27
FilmicPass
(use the slider bar to compare the difference)
https://cdn.knightlab.com/libs/juxt...html?uid=03aedc40-9d10-11e6-9008-0edaf8f81e27
Vignette
(use the slider bar to compare the difference)
https://cdn.knightlab.com/libs/juxt...html?uid=922ba4aa-9d0e-11e6-9008-0edaf8f81e27
Levels
(use the slider bar to compare the difference)
https://cdn.knightlab.com/libs/juxt...html?uid=29ee6524-9d10-11e6-9008-0edaf8f81e27
GaussianBlur
(use the slider bar to compare the difference)
https://cdn.knightlab.com/libs/juxt...html?uid=7c66591a-9d10-11e6-9008-0edaf8f81e27
3. Examples
Not all games need reshading, sometimes it’s better not to do anything.
In some games though, like Mafia 3, if there’s no reshading, I probably won’t
play it. I can bear with low-quality textures, but can hardly stand with the serious
fuzziness. Everyone has his or her own style, my dislike may be your like, and vice
versa.
Mafia 2
I tweak this game to my liking, and in fact, I like the outcome. The color and
enviroment are more vivid and lively, the streets look vigorous and brisk, all
objects look more stereoscopic...
original:lots of jaggies, a little blurry, the light is too flat, the color is dull
reshade:SMAA, LUMASHARPEN, HDR, CLARITY (all with default parameters)
My used reshades in Mafia 2
Comparison 1
(use the slider bar to compare the difference)
https://cdn.knightlab.com/libs/juxt...html?uid=5e7f13fa-9d16-11e6-9008-0edaf8f81e27
Comparison 2
(use the slider bar to compare the difference)
https://cdn.knightlab.com/libs/juxt...html?uid=8a6ad47c-9d16-11e6-9008-0edaf8f81e27
Quantum Break
This game uses scaling to fit 1080P graphic output, but this causes serious blurry
image. Turn off scaling makes the game look better, but not good enough to meet the
standard of 2016 AAA titles. The texture details lose a bit due to other post process
interference. Since ReShade provides so many reshading modules, why not using
corresponding sharpen reshades to improve visual experience?
original:turn off scaling, some scenes a litte blurry, textures lose details
reshade:HighPassSharpen、AdaptiveSharpen、LumaSharpen...
Sharpen Reshades comparison
Original vs HighPassSharpen+AdaptiveSharpen+LumaSharpen
(use the slider bar to compare the difference)
https://cdn.knightlab.com/libs/juxt...html?uid=10811a0e-9d1b-11e6-9008-0edaf8f81e27
https://cdn.knightlab.com/libs/juxt...html?uid=48101c90-9d1b-11e6-9008-0edaf8f81e27
https://cdn.knightlab.com/libs/juxt...html?uid=61ae856a-9d1b-11e6-9008-0edaf8f81e27
