
- Joined
- Apr 19, 2009
- Messages
- 1,067 (0.18/day)
- Location
- Romania
| Processor | i7-9700 |
|---|---|
| Motherboard | Gigabyte Z390 AORUS PRO |
| Memory | 32GB DDR4 |
| Video Card(s) | msi 1080 |
| Storage | Samsung SSD 850 pro 2TB+1tb hdd 7200rpm+ 1tb 970pro |
| Software | Mageia 6 + Windows 10 |
Ubiquiti UniFi UDM teardown/partial disassembly and resolving my cooling problem:
I got an Ubiquiti UniFi UDM, from some yard sale(we call it 'talcioc'), for 30USD, in store you can't find it under 300USD, as new.
I installed, and saw a temperature from 83C to 95C, depending of the load, at 21C of the room.
At one point the internet was very slow , almost no browsing, I have a optical fiber with 500mb/s; looked at temps, 98C; on forums, people said it is normal for them, to be hot.
I don't think it is normal to be so hot, and from what I know, a chip don't work well over 95C, and if go over, will underclock, to cool down.
I tried to see why it is so hot, was the cooler broken, not working at all, tried to find another, I even asked on their support page, nobody have it.
So, next thing to do, make my own 'cooling system', make some holes at top and bottom, and putt a cooler that blow from top to bottom, the air to move like in a tunnel.
For me, functionality > design, so I knew the result will not look pretty.
First I draw the lines, for where and how the holes will be, like in p01.
Now for disassembly, I didn't found any tips or knowledge on web, I only found an image with the inside of the router, so was a little try and see if it works, and next are the 'good' steps:
First, you must detach the top dome, see p02, this have some plastic clips that hold it, see p003(I used a screwdriver to force the open), p004 it is how it looks after removing, one of clips can be seen as broken(after I forced, didn't knew what it is there).
Next, I removed the rubber circle from the bottom, it is glued like a sticker, easy to peel out, see p05 and p06; the result it is p07/p08.
Next, remove those 4 screws, see p09. And, as you can see in p10, are 2 cables that enter in a jack, if you have a pincers, you can drag the jack+the cables(I used to drag the cables, are strong so the jack get out easy), see p10.
Back to top, after I removed the dome, the main antenna will show, see p11. Here, 4 screw need to be un-screw, 3 are easy to see, see p12. The number 4 screw it is hidden under the metal sheet, you have to rotate the whole metal sheet a little(don't force to rotate more than 3cm), to see it, see p13 and p14.
You need to pull up the antenna and the semi-transparent plastic from under the metal sheet(are together), but beware that under, are the connections of the antenna, you will have to be a little gentle(and a lot of patience when put back), see p15 and p16.
The result, after removing that parts, see p17(the antenna it is flipped).
The result after removing the antenna in p18.
See p19, we have to remove those 3 screws, the result it is p20.Now just pull up that metal shield, it should get out easy, the result it is p21.
Now, you can remove the circuit board first, or the plastic circle, I removed the plastic circle from the edge, you have 4 screws and need to pull up(it have some plastic clips inside), see p22 and p23.
After removing the plastic circle, we have this, see p24.
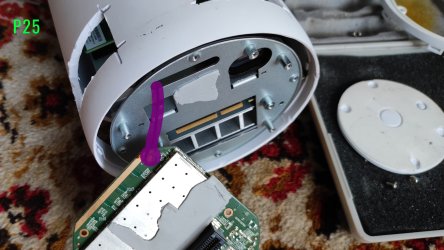
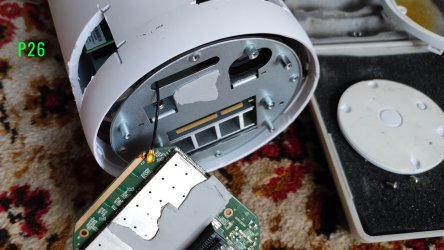
Now we need to pull out the circuit board, but beware , it have the second antena on it, and this is a little 'glued', see p25 and p26. You will have to disconnect it, because the other end it is better glued in the case, and you can't extract the hardware, without disconnect(I used some screwdriver and patience).
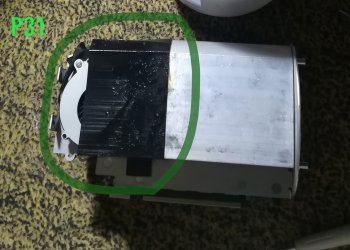
On p27 you will see the result, also was another 2 screws to remove there, see the green dots on p28.
Now you need only to pull out, the result can be seen in p29. On p30 you can see the inside with second antenna, but with power plug+cable removed(have 2 screws to remove, easy, see p40, p41 and p42 for how to remove it).
Next it is for those interested in cooling mod part:
First I removed the broken cooler(2 screws to remove) and some black plastic 'shields'(those are used to make the airflow), see p31, p32, p33, p34, and p35(the result).
Now, to cut the holes, I didn't found someone to do it, so I had to buy a tool and do myself; bought Dremel 4000, I learned that the cutting of the plastic need to be made at low speed/rpm, otherwise will melt.
The badpart, the plastic case have higher quality and thicker plastic than I expected, this mean that original small cutting discs are not good, more enforced ones are bigger, so bigger holes and not so nice cuts.
As you can see in p36 and p37, the melt of the plastic did occur, and the cuts are bigger than planned initially.
I cleaned a little, see p38 and p39.
I mounted back the power cable(it have a plastic bridge and 2 screws), see p40, p41 and p42.
Now we can start to put all back, in the reverse order we disassembled. Now it is more easy to connect the power cable and the screws from bottom, see p43, p44 and p45.
This is how it is looking after put all back, see p46, p47 and p48.
Now, I removed from a broken PSU and use, the top part, the one with the cooler and the grill, see p49 and p50. This cooler, I powered up with an old phone charger, because the fan need 12v and the charger can give only 9v, we will have low rotation speed, this mean it will be silent, but because it is 12cm fan, will move enough air, even at low speed, see p51.
The final result can be seen in p52 and p53, I didn't found a better option than to use that food wrap, at least for now(still searching how to make some cone from plastic), so the air be 'forced' to go from fan, through router.
Now about the numbers, the speed of the download, vs the old router, it is up, from 520mb/s to 580mb/s, the browsing feel more smooth(but this can be very subjective), it is dead silent(sometimes I put the hand to feel the air moving, to be sure it is working) and the temps are aroun 52C at the 21C of the room;
I downloaded 500GB of data at full speed, I uploaded some GB, the most heavy work I managed to do, download my gog games library and stream Witcher 3 on twitch,in same moment, for few hours, the use of cpu's router wasn't more than 35% and the temps no more than 54C.
For me was a win.
To sum up:
+good hardware
+many software updates
+wireless coverage
+good looking/design
+quality of most of the materials
-software very intricate
-not easy to find parts
-the cooling(look like was designed with passive cooling, at the beginning)
The rest of images:
I got an Ubiquiti UniFi UDM, from some yard sale(we call it 'talcioc'), for 30USD, in store you can't find it under 300USD, as new.
I installed, and saw a temperature from 83C to 95C, depending of the load, at 21C of the room.
At one point the internet was very slow , almost no browsing, I have a optical fiber with 500mb/s; looked at temps, 98C; on forums, people said it is normal for them, to be hot.
I don't think it is normal to be so hot, and from what I know, a chip don't work well over 95C, and if go over, will underclock, to cool down.
I tried to see why it is so hot, was the cooler broken, not working at all, tried to find another, I even asked on their support page, nobody have it.
So, next thing to do, make my own 'cooling system', make some holes at top and bottom, and putt a cooler that blow from top to bottom, the air to move like in a tunnel.
For me, functionality > design, so I knew the result will not look pretty.
First I draw the lines, for where and how the holes will be, like in p01.
Now for disassembly, I didn't found any tips or knowledge on web, I only found an image with the inside of the router, so was a little try and see if it works, and next are the 'good' steps:
First, you must detach the top dome, see p02, this have some plastic clips that hold it, see p003(I used a screwdriver to force the open), p004 it is how it looks after removing, one of clips can be seen as broken(after I forced, didn't knew what it is there).
Next, I removed the rubber circle from the bottom, it is glued like a sticker, easy to peel out, see p05 and p06; the result it is p07/p08.
Next, remove those 4 screws, see p09. And, as you can see in p10, are 2 cables that enter in a jack, if you have a pincers, you can drag the jack+the cables(I used to drag the cables, are strong so the jack get out easy), see p10.
Back to top, after I removed the dome, the main antenna will show, see p11. Here, 4 screw need to be un-screw, 3 are easy to see, see p12. The number 4 screw it is hidden under the metal sheet, you have to rotate the whole metal sheet a little(don't force to rotate more than 3cm), to see it, see p13 and p14.
You need to pull up the antenna and the semi-transparent plastic from under the metal sheet(are together), but beware that under, are the connections of the antenna, you will have to be a little gentle(and a lot of patience when put back), see p15 and p16.
The result, after removing that parts, see p17(the antenna it is flipped).
The result after removing the antenna in p18.
See p19, we have to remove those 3 screws, the result it is p20.Now just pull up that metal shield, it should get out easy, the result it is p21.
Now, you can remove the circuit board first, or the plastic circle, I removed the plastic circle from the edge, you have 4 screws and need to pull up(it have some plastic clips inside), see p22 and p23.
After removing the plastic circle, we have this, see p24.
Now we need to pull out the circuit board, but beware , it have the second antena on it, and this is a little 'glued', see p25 and p26. You will have to disconnect it, because the other end it is better glued in the case, and you can't extract the hardware, without disconnect(I used some screwdriver and patience).
On p27 you will see the result, also was another 2 screws to remove there, see the green dots on p28.
Now you need only to pull out, the result can be seen in p29. On p30 you can see the inside with second antenna, but with power plug+cable removed(have 2 screws to remove, easy, see p40, p41 and p42 for how to remove it).
Next it is for those interested in cooling mod part:
First I removed the broken cooler(2 screws to remove) and some black plastic 'shields'(those are used to make the airflow), see p31, p32, p33, p34, and p35(the result).
Now, to cut the holes, I didn't found someone to do it, so I had to buy a tool and do myself; bought Dremel 4000, I learned that the cutting of the plastic need to be made at low speed/rpm, otherwise will melt.
The badpart, the plastic case have higher quality and thicker plastic than I expected, this mean that original small cutting discs are not good, more enforced ones are bigger, so bigger holes and not so nice cuts.
As you can see in p36 and p37, the melt of the plastic did occur, and the cuts are bigger than planned initially.
I cleaned a little, see p38 and p39.
I mounted back the power cable(it have a plastic bridge and 2 screws), see p40, p41 and p42.
Now we can start to put all back, in the reverse order we disassembled. Now it is more easy to connect the power cable and the screws from bottom, see p43, p44 and p45.
This is how it is looking after put all back, see p46, p47 and p48.
Now, I removed from a broken PSU and use, the top part, the one with the cooler and the grill, see p49 and p50. This cooler, I powered up with an old phone charger, because the fan need 12v and the charger can give only 9v, we will have low rotation speed, this mean it will be silent, but because it is 12cm fan, will move enough air, even at low speed, see p51.
The final result can be seen in p52 and p53, I didn't found a better option than to use that food wrap, at least for now(still searching how to make some cone from plastic), so the air be 'forced' to go from fan, through router.
Now about the numbers, the speed of the download, vs the old router, it is up, from 520mb/s to 580mb/s, the browsing feel more smooth(but this can be very subjective), it is dead silent(sometimes I put the hand to feel the air moving, to be sure it is working) and the temps are aroun 52C at the 21C of the room;
I downloaded 500GB of data at full speed, I uploaded some GB, the most heavy work I managed to do, download my gog games library and stream Witcher 3 on twitch,in same moment, for few hours, the use of cpu's router wasn't more than 35% and the temps no more than 54C.
For me was a win.
To sum up:
+good hardware
+many software updates
+wireless coverage
+good looking/design
+quality of most of the materials
-software very intricate
-not easy to find parts
-the cooling(look like was designed with passive cooling, at the beginning)
The rest of images:
Attachments
-
 p02.jpg55.4 KB · Views: 2,424
 -
 p01.jpg1.5 MB · Views: 2,749
 -
 p03.jpg1.2 MB · Views: 2,407
 -
 p04.jpg1.2 MB · Views: 2,386
 -
 p05.jpg1 MB · Views: 2,299
 -
 p06.jpg1.1 MB · Views: 2,121
 -
 p07.jpg1.5 MB · Views: 2,202
 -
 p08.jpg1.4 MB · Views: 2,145
 -
 p09.jpg1.5 MB · Views: 2,055
 -
 p10.jpg1.5 MB · Views: 2,153
 -
 p11.jpg2.2 MB · Views: 2,164
 -
 p12.jpg2.2 MB · Views: 2,135
 -
 p13.jpg2 MB · Views: 2,054
 -
 p14.jpg2 MB · Views: 2,034
 -
 p15.jpg2.3 MB · Views: 2,029
 -
 p16.jpg2.3 MB · Views: 2,002
 -
 p17.jpg1.2 MB · Views: 1,937
 -
 p18.jpg2.2 MB · Views: 2,118
 -
 p19.jpg2.2 MB · Views: 1,867
 -
 p20.jpg2.2 MB · Views: 1,955
 -
 p21.jpg1.9 MB · Views: 1,973
 -
 p22.jpg1.9 MB · Views: 2,027
 -
 p23.jpg1.9 MB · Views: 1,944
 -
 p24.jpg2.2 MB · Views: 2,011
 -
 p25.jpg1.8 MB · Views: 1,980
 -
 p26.jpg1.9 MB · Views: 3,766
 -
 p27.jpg2.2 MB · Views: 2,087
 -
 p28.jpg2.2 MB · Views: 1,977
 -
 p30.jpg1.5 MB · Views: 2,045
 -
 p29.jpg1.8 MB · Views: 2,009
 -
 p31.jpg628.7 KB · Views: 2,016
 -
 p32.jpg2 MB · Views: 2,177
 -
 p33.jpg1.6 MB · Views: 2,052
 -
 p34.jpg1.5 MB · Views: 1,967
 -
 p35.jpg1.8 MB · Views: 1,792
 -
 p36.jpg1.4 MB · Views: 1,813
 -
 p37.jpg1.2 MB · Views: 1,729
 -
 p38.jpg1.1 MB · Views: 1,660
 -
 p39.jpg1.5 MB · Views: 1,601
 -
 p40.jpg1.5 MB · Views: 1,609
 -
 p42.jpg1.5 MB · Views: 1,594
 -
 p41.jpg1.2 MB · Views: 1,621
 -
 p43.jpg1.2 MB · Views: 1,678
 -
 p44.jpg1.3 MB · Views: 1,651
 -
 p45.jpg1.8 MB · Views: 1,649
 -
 p46.jpg1.5 MB · Views: 1,600
 -
 p47.jpg1.5 MB · Views: 1,577
 -
 p48.jpg1.9 MB · Views: 1,589
 -
 p49.jpg1.6 MB · Views: 1,659
 -
 p50.jpg2 MB · Views: 1,646
 -
 p51.jpg2.5 MB · Views: 1,868
 -
 p52.jpg2 MB · Views: 2,174
 -
 p53.jpg1.9 MB · Views: 2,627
Last edited:


