- Joined
- Nov 15, 2011
- Messages
- 70 (0.01/day)
- Location
- Portland OR
Looking awesome Stren! Big thanks for showing all the progress!
Looking awesome Stren! Big thanks for showing all the progress!

| System Name | Aki |
|---|---|
| Processor | AMD 7800X3D |
| Motherboard | ASUS ROG STRIX X670E-A |
| Cooling | MSI MAG CoreLiquid E360 |
| Memory | Patriot Viper Elite 5 32GB 6200 |
| Video Card(s) | PNY RTX 4090 XLR8 |
| Storage | Samsung 960 Pro 512 GB + WD Black SN850 1TB |
| Display(s) | Dell 32" Curved Gaming Monitor (S3220DGF) |
| Case | Corsair 5000D Airflow |
| Audio Device(s) | On-board |
| Power Supply | EVGA SuperNOVA 1000 G5 |
| Mouse | Roccat Kone Pure |
| Keyboard | ASUS ROG Strix Scope II Wireless |
| Software | Win 11 Pro |
| Benchmark Scores | Always changing~ |
| System Name | Ultimate Vortex III |
|---|---|
| Processor | Intel Core i7-9700K |
| Motherboard | Asus ROG MAXIMUS XI GENE |
| Cooling | Cooler Master Hyper 212 Black Edition |
| Memory | Corsair Vengeance LPX 16GB (2x8Gb) DDR4 DRAM 3200MHz C16 |
| Video Card(s) | Sapphire Pulse AMD Radeon RX 7700 XT - 12 GB |
| Storage | 2 x WD Blue SN550 1Tb NVMe in RAID 0 Striped Set |
| Display(s) | TUF Gaming VG279QL1A 165 Hz |
| Case | Cooler Master MasterBox Pro 5 ARGB |
| Audio Device(s) | Onboard Realtek |
| Power Supply | Coolermaster Silent Pro 850W |
| Mouse | Corsair RGB |
| Keyboard | K70 Rapidfire with Cherry MX Speed |
| Software | Windows 11 Pro x64 |
 I'm afraid to ask how much you're spending on this!!!! Nice stren!
Subbed! OMG!!!
| System Name | Desktop |
|---|---|
| Processor | i5 13600KF |
| Motherboard | AsRock B760M Steel Legend Wifi |
| Cooling | Noctua NH-U9S |
| Memory | 4x 16 Gb Gskill S5 DDR5 @6000 |
| Video Card(s) | Gigabyte Gaming OC 6750 XT 12GB |
| Storage | WD_BLACK 4TB SN850x |
| Display(s) | Gigabye M32U |
| Case | Corsair Carbide 400C |
| Audio Device(s) | On Board |
| Power Supply | EVGA Supernova 650 P2 |
| Mouse | MX Master 3s |
| Keyboard | Logitech G915 Wireless Clicky |
| Software | Fedora KDE Spin |
| Processor | 8700k Intel |
|---|---|
| Motherboard | z370 MSI Godlike Gaming |
| Cooling | Triple Aquacomputer AMS Copper 840 with D5 |
| Memory | TridentZ RGB G.Skill C16 3600MHz |
| Video Card(s) | GTX 1080 Ti |
| Storage | Crucial MX SSDs |
| Display(s) | Dell U3011 2560x1600 + Dell 2408WFP 1200x1920 (Portrait) |
| Case | Core P5 Thermaltake |
| Audio Device(s) | Essence STX |
| Power Supply | AX 1500i |
| Mouse | Logitech |
| Keyboard | Corsair |
| Software | Win10 |

| System Name | Apollo |
|---|---|
| Processor | Intel Core i9 9880H |
| Motherboard | Some proprietary Apple thing. |
| Memory | 64GB DDR4-2667 |
| Video Card(s) | AMD Radeon Pro 5600M, 8GB HBM2 |
| Storage | 1TB Apple NVMe, 2TB external SSD, 4TB external HDD for backup. |
| Display(s) | 32" Dell UHD, 27" LG UHD, 28" LG 5k |
| Case | MacBook Pro (16", 2019) |
| Audio Device(s) | AirPods Pro, AirPods Max |
| Power Supply | Display or Thunderbolt 4 Hub |
| Mouse | Logitech G502 |
| Keyboard | Logitech G915, GL Clicky |
| Software | MacOS 15.5 |
mother of god...

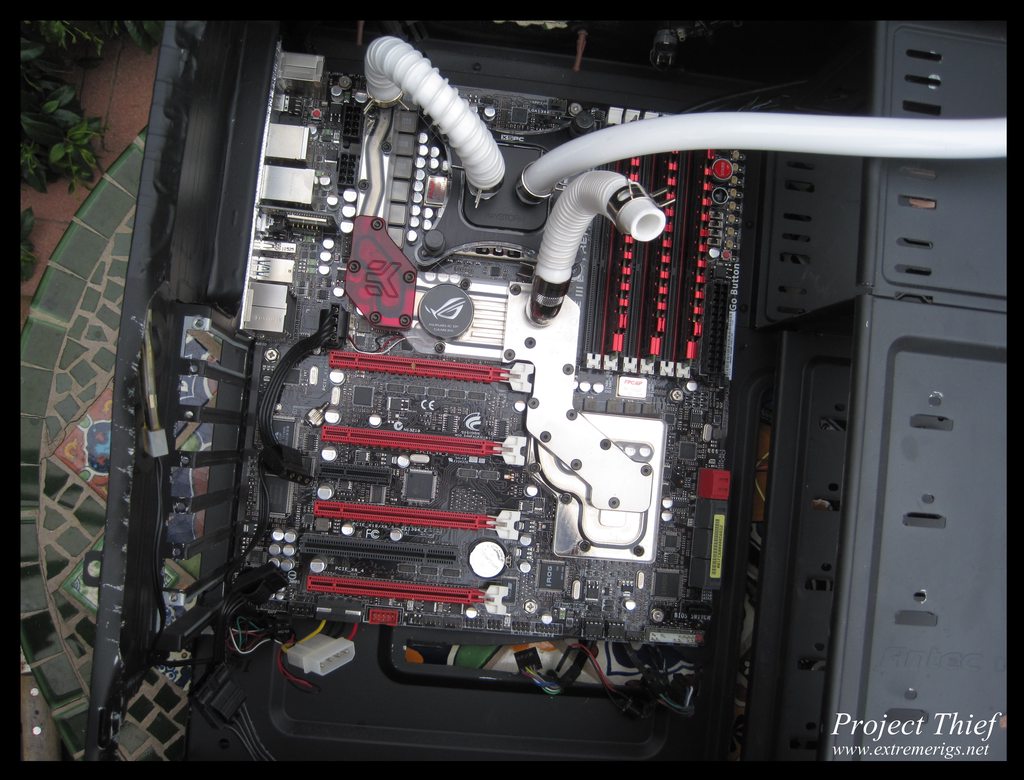
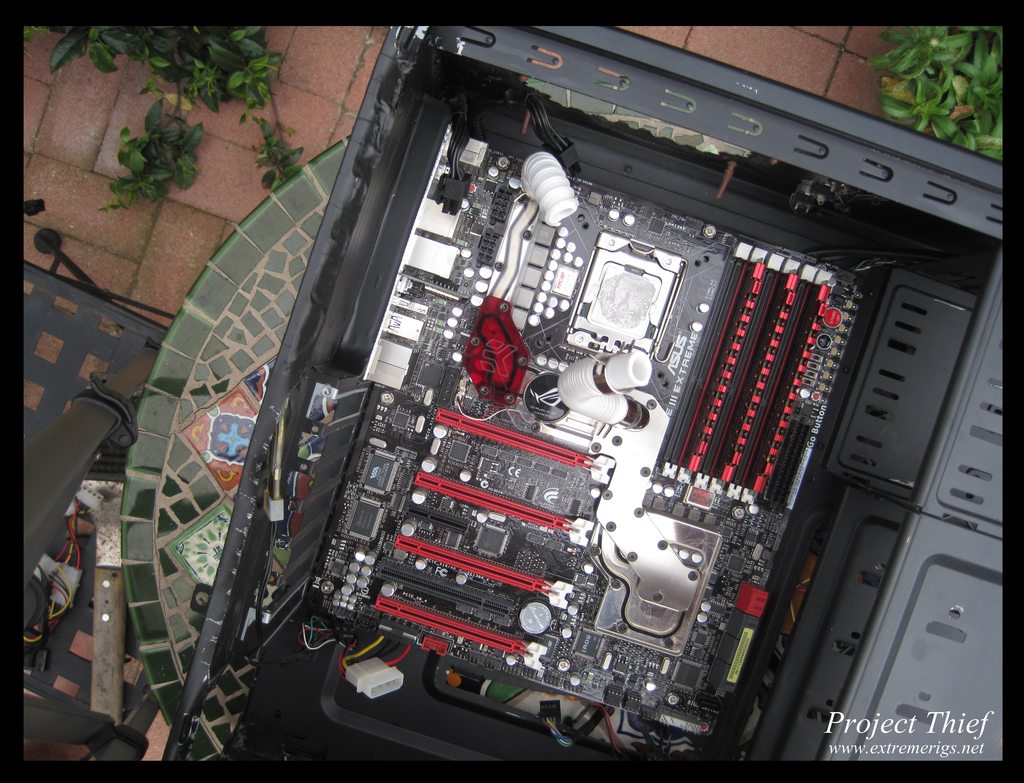
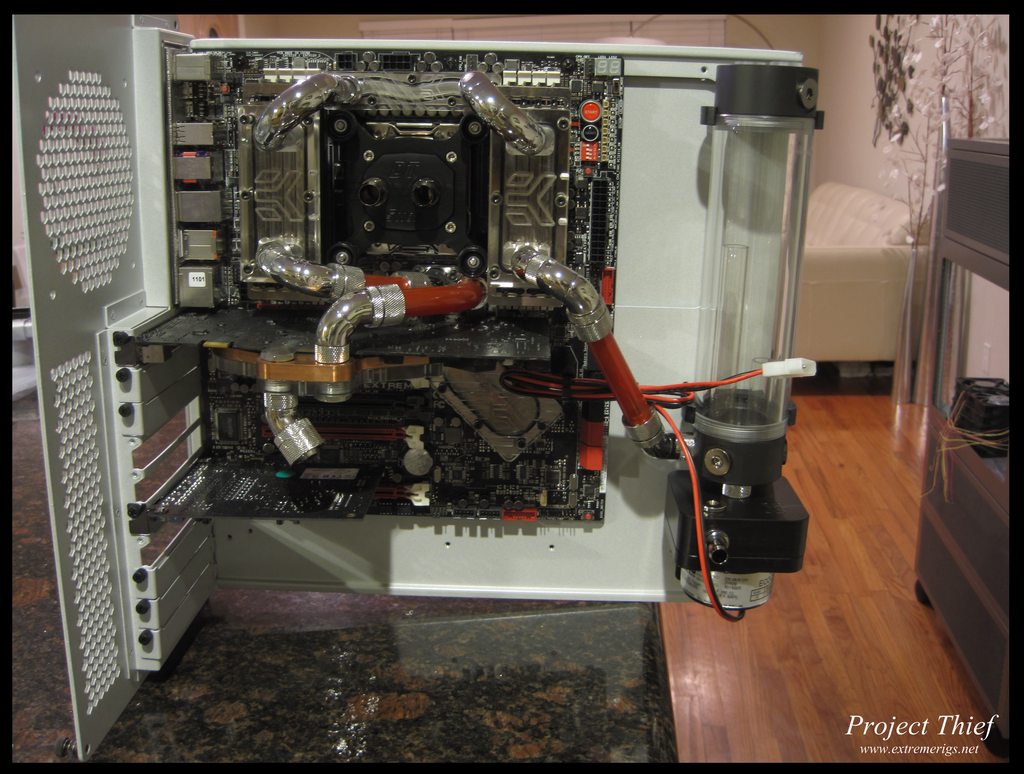
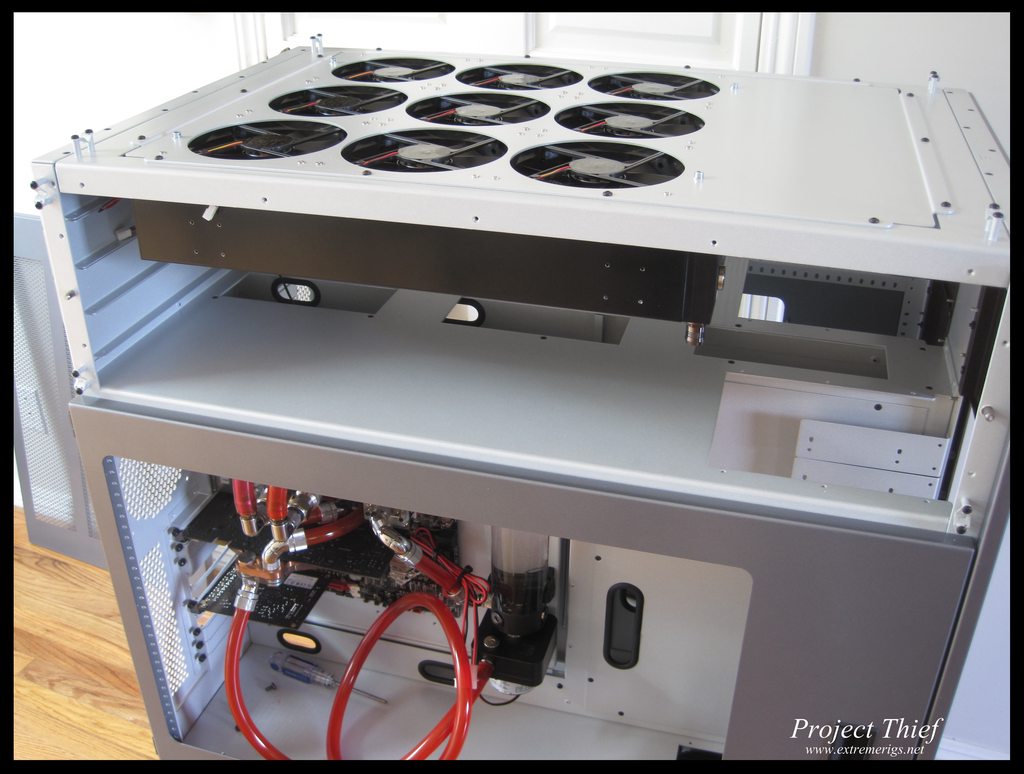
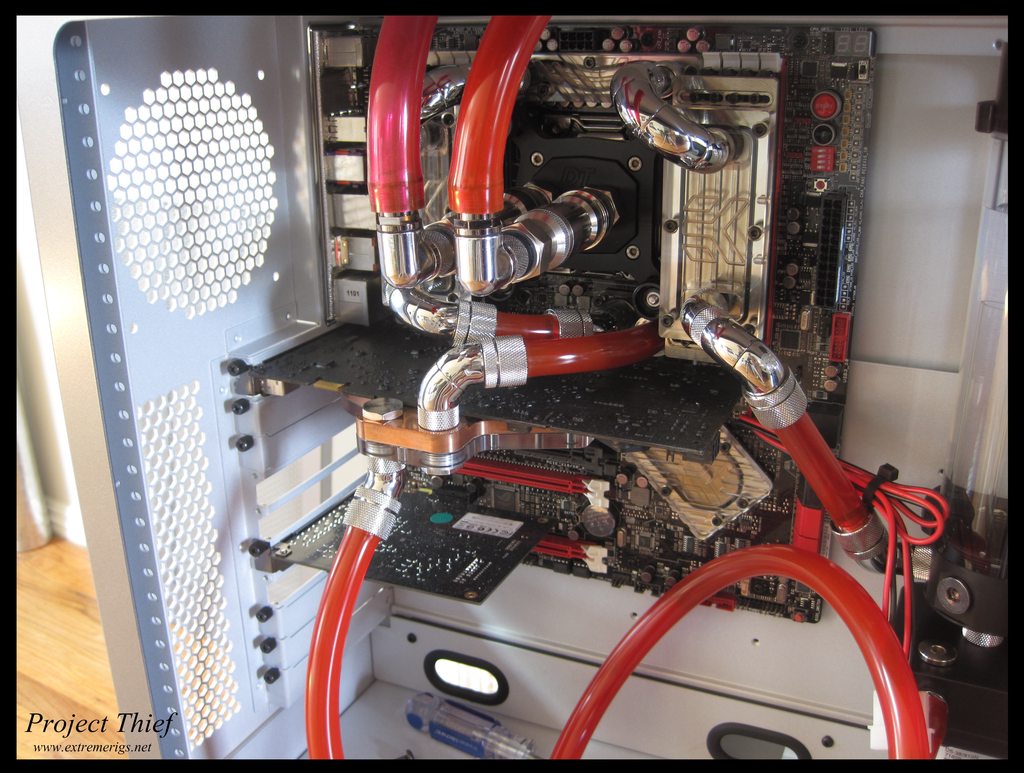
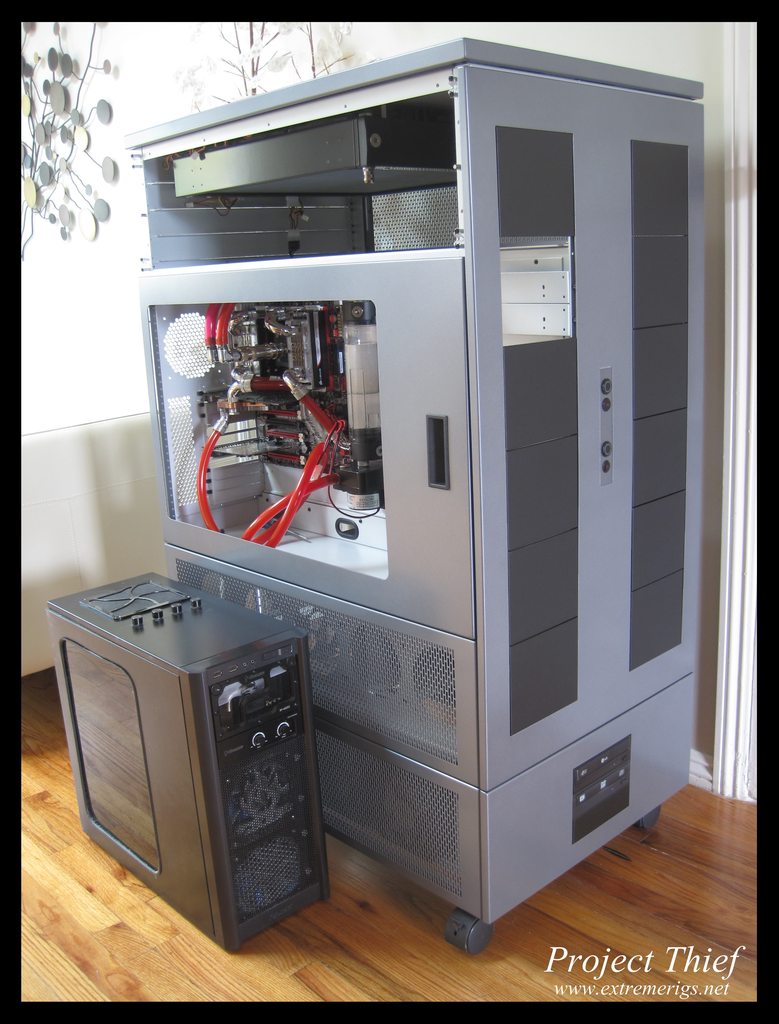
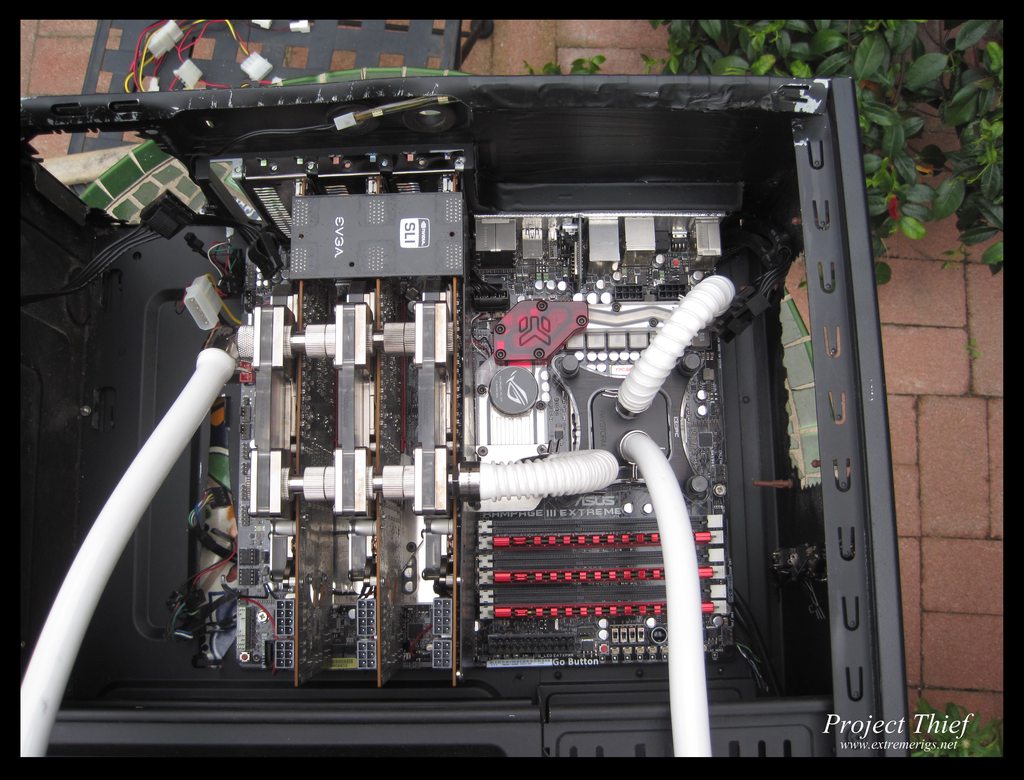
The motherboard seems a micro ATX inside that case
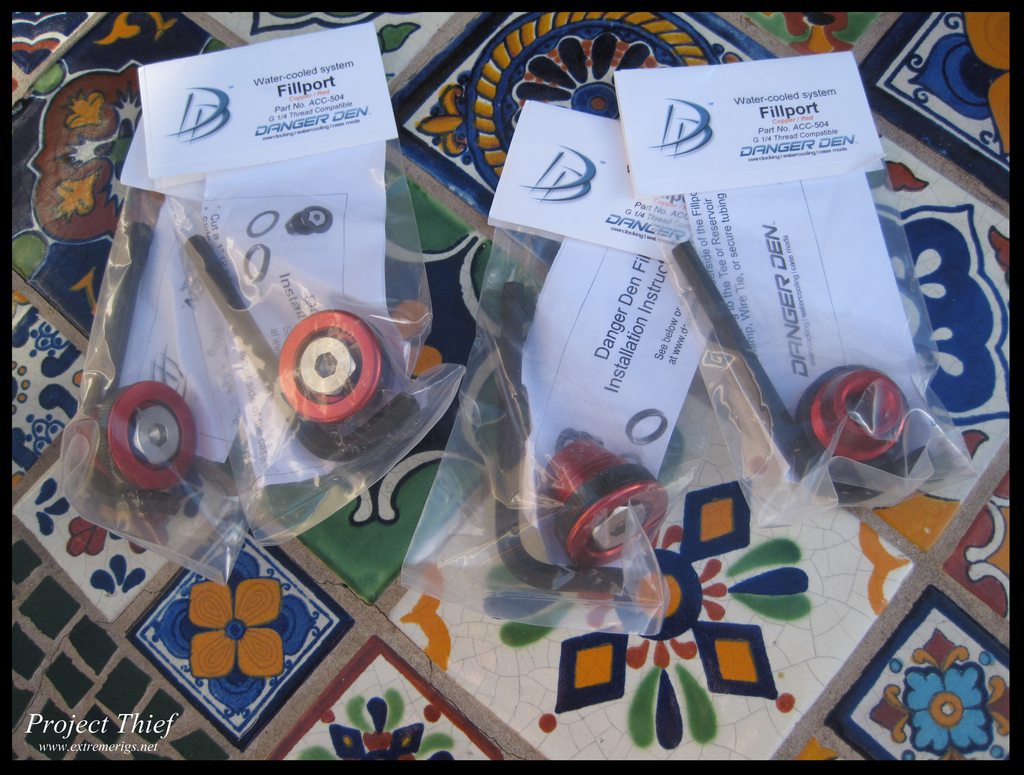
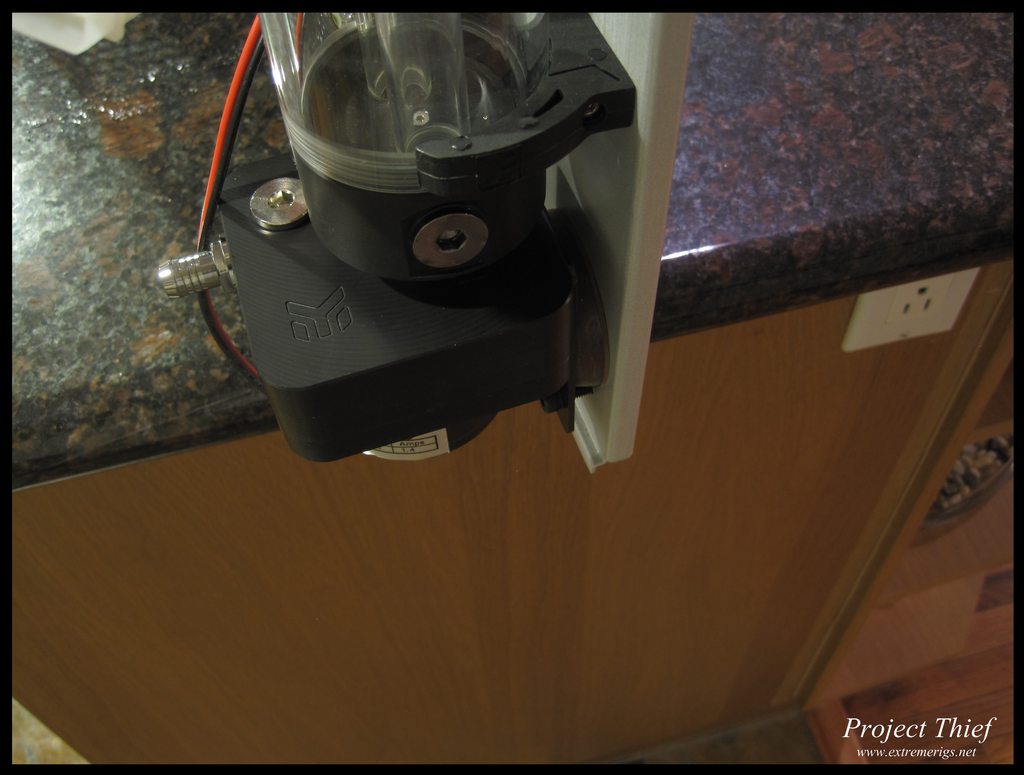
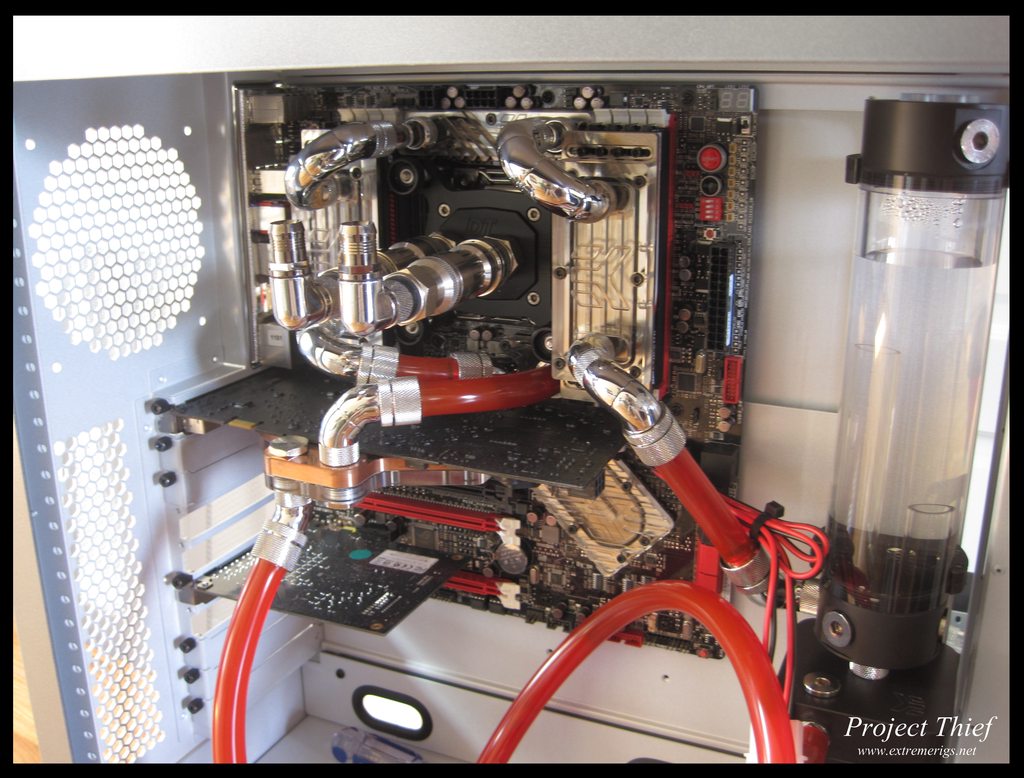
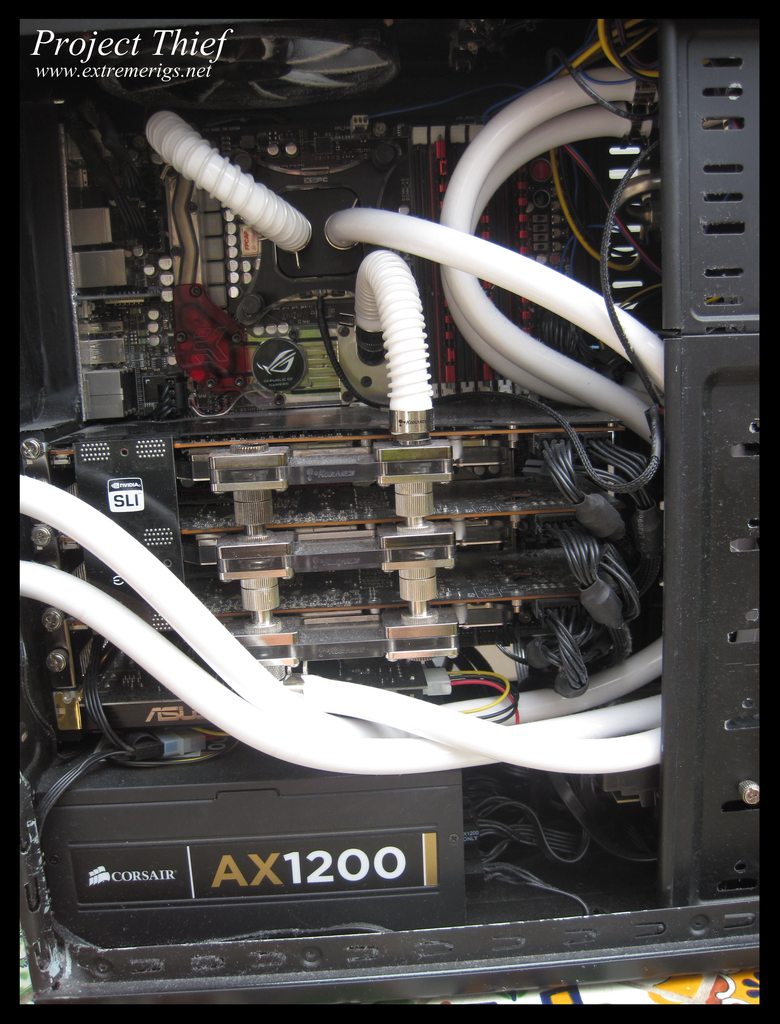
I like the idea of quick disconnects on the cpu, it's practical! Too bad they don't make black coloured quick disconnects.
Awesome job stren!
What loop will the top radiator be on? Do you have a diagram or what you have in mind for your finished loops? Great update to the log by the way. You should take a video of it with it running when you're done too.
")

| System Name | Dire Wolf IV |
|---|---|
| Processor | Intel Core i9 14900K |
| Motherboard | Asus ROG STRIX Z790-I GAMING WIFI |
| Cooling | Arctic Liquid Freezer II 280 w/Thermalright Contact Frame |
| Memory | 2x24GB Corsair DDR5-6600 |
| Video Card(s) | NVIDIA RTX4080 FE |
| Storage | Intel Optane P5801X 400GB + Intel Optane M10 64GB |
| Display(s) | Alienware AW3423DWF (QD-OLED, 3440x1440, 165hz) |
| Case | Corsair Airflow 2000D |
| Power Supply | Corsair SF1000L |
| Mouse | Razer Deathadder Essential |
| Keyboard | E-Yooso Rapid Trigger 80% |
| Software | Windows 11 Professional |
| System Name | Apollo |
|---|---|
| Processor | Intel Core i9 9880H |
| Motherboard | Some proprietary Apple thing. |
| Memory | 64GB DDR4-2667 |
| Video Card(s) | AMD Radeon Pro 5600M, 8GB HBM2 |
| Storage | 1TB Apple NVMe, 2TB external SSD, 4TB external HDD for backup. |
| Display(s) | 32" Dell UHD, 27" LG UHD, 28" LG 5k |
| Case | MacBook Pro (16", 2019) |
| Audio Device(s) | AirPods Pro, AirPods Max |
| Power Supply | Display or Thunderbolt 4 Hub |
| Mouse | Logitech G502 |
| Keyboard | Logitech G915, GL Clicky |
| Software | MacOS 15.5 |

| System Name | Desktop |
|---|---|
| Processor | i5 13600KF |
| Motherboard | AsRock B760M Steel Legend Wifi |
| Cooling | Noctua NH-U9S |
| Memory | 4x 16 Gb Gskill S5 DDR5 @6000 |
| Video Card(s) | Gigabyte Gaming OC 6750 XT 12GB |
| Storage | WD_BLACK 4TB SN850x |
| Display(s) | Gigabye M32U |
| Case | Corsair Carbide 400C |
| Audio Device(s) | On Board |
| Power Supply | EVGA Supernova 650 P2 |
| Mouse | MX Master 3s |
| Keyboard | Logitech G915 Wireless Clicky |
| Software | Fedora KDE Spin |
| System Name | Apollo |
|---|---|
| Processor | Intel Core i9 9880H |
| Motherboard | Some proprietary Apple thing. |
| Memory | 64GB DDR4-2667 |
| Video Card(s) | AMD Radeon Pro 5600M, 8GB HBM2 |
| Storage | 1TB Apple NVMe, 2TB external SSD, 4TB external HDD for backup. |
| Display(s) | 32" Dell UHD, 27" LG UHD, 28" LG 5k |
| Case | MacBook Pro (16", 2019) |
| Audio Device(s) | AirPods Pro, AirPods Max |
| Power Supply | Display or Thunderbolt 4 Hub |
| Mouse | Logitech G502 |
| Keyboard | Logitech G915, GL Clicky |
| Software | MacOS 15.5 |
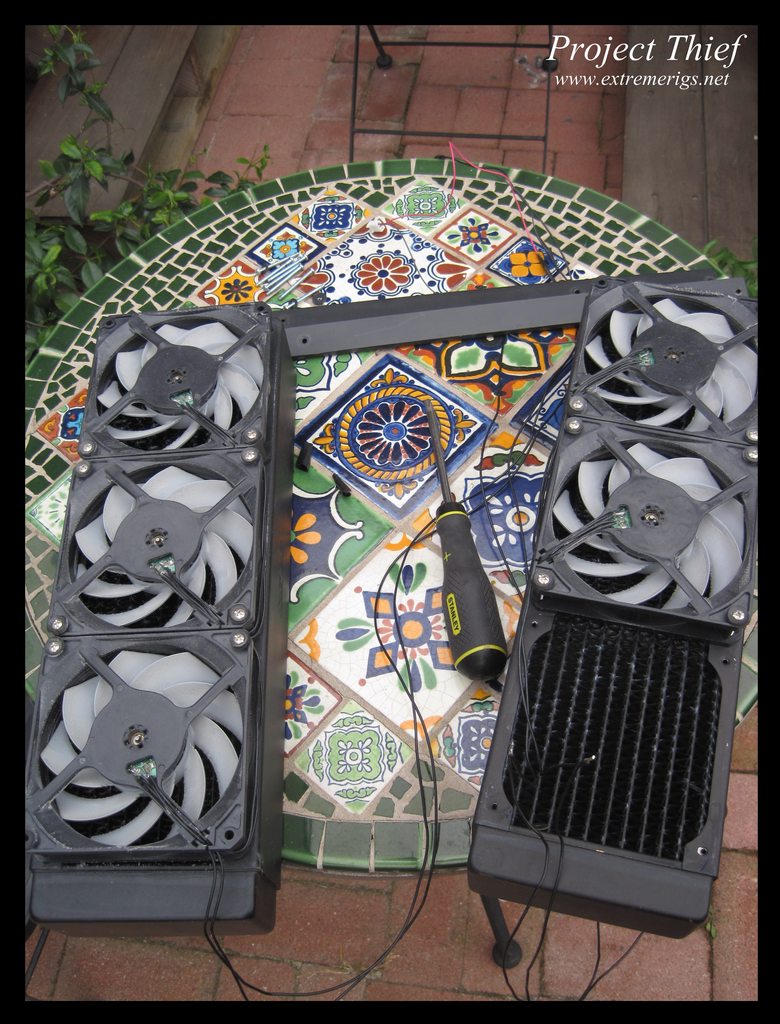
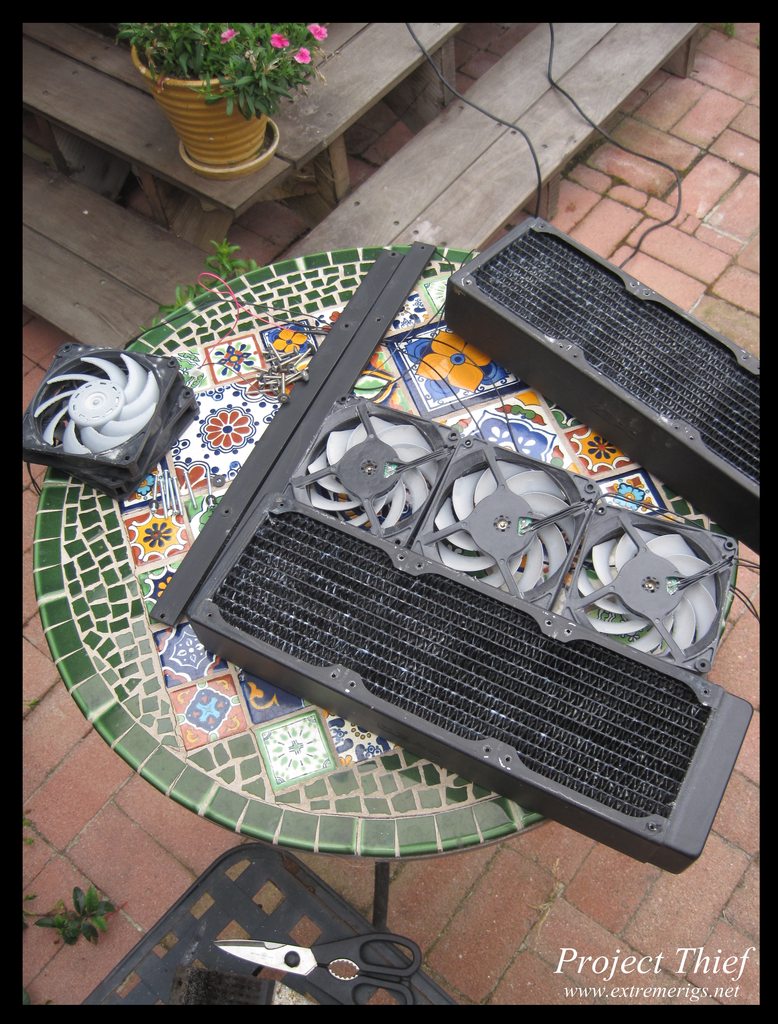
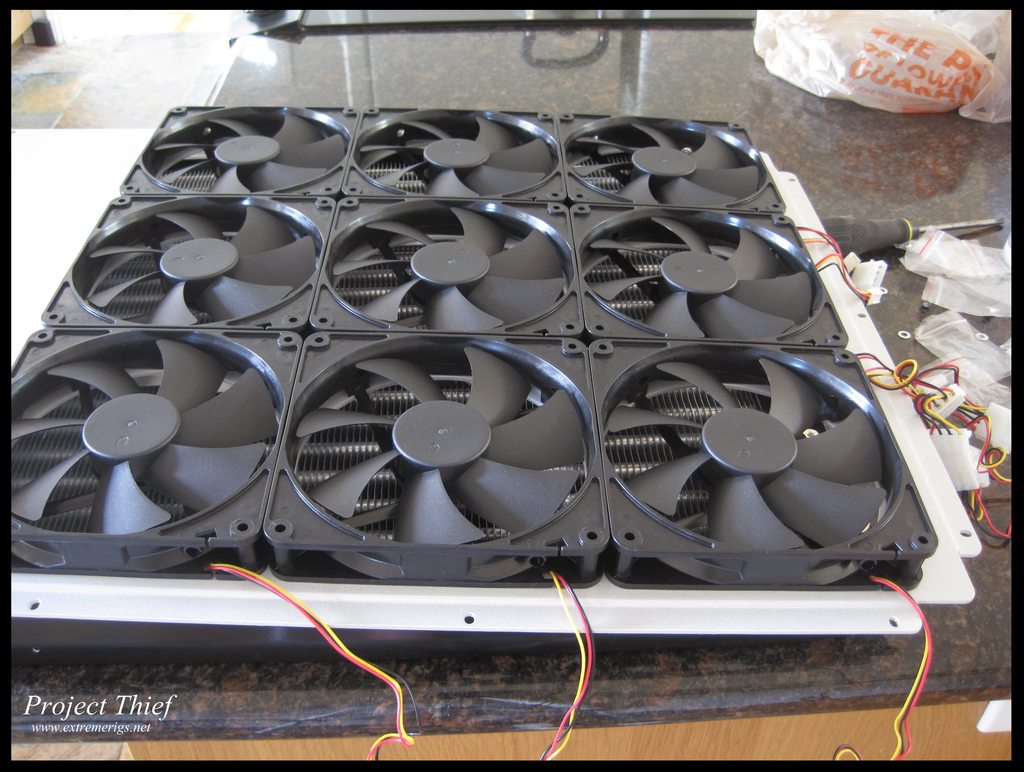
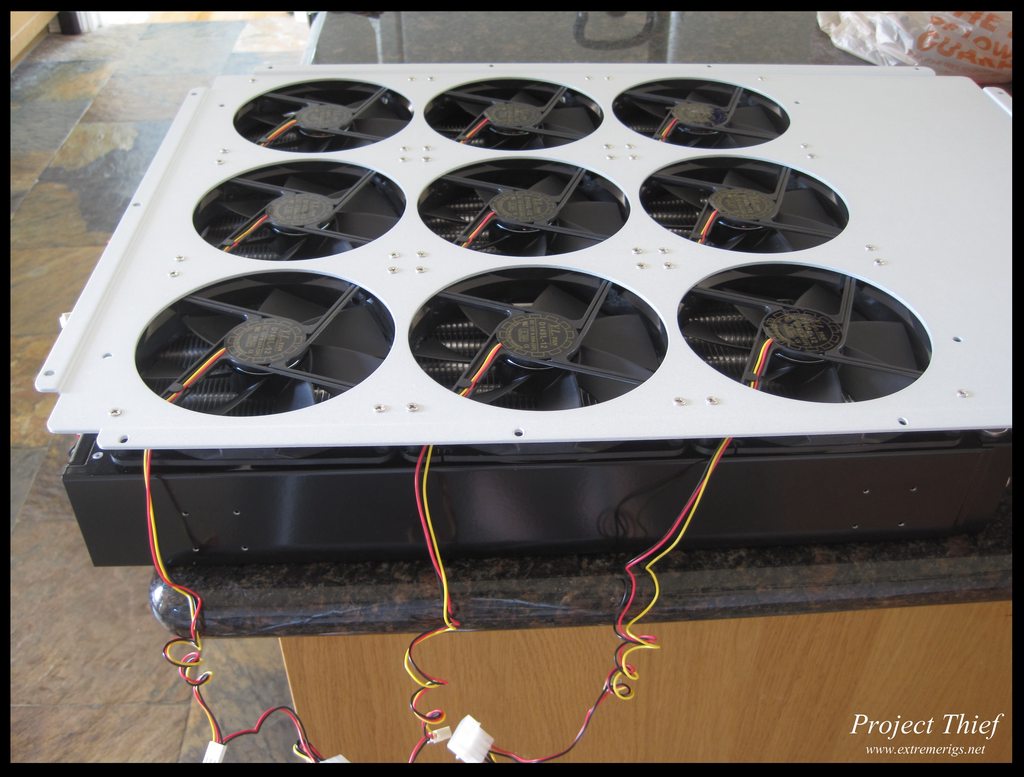
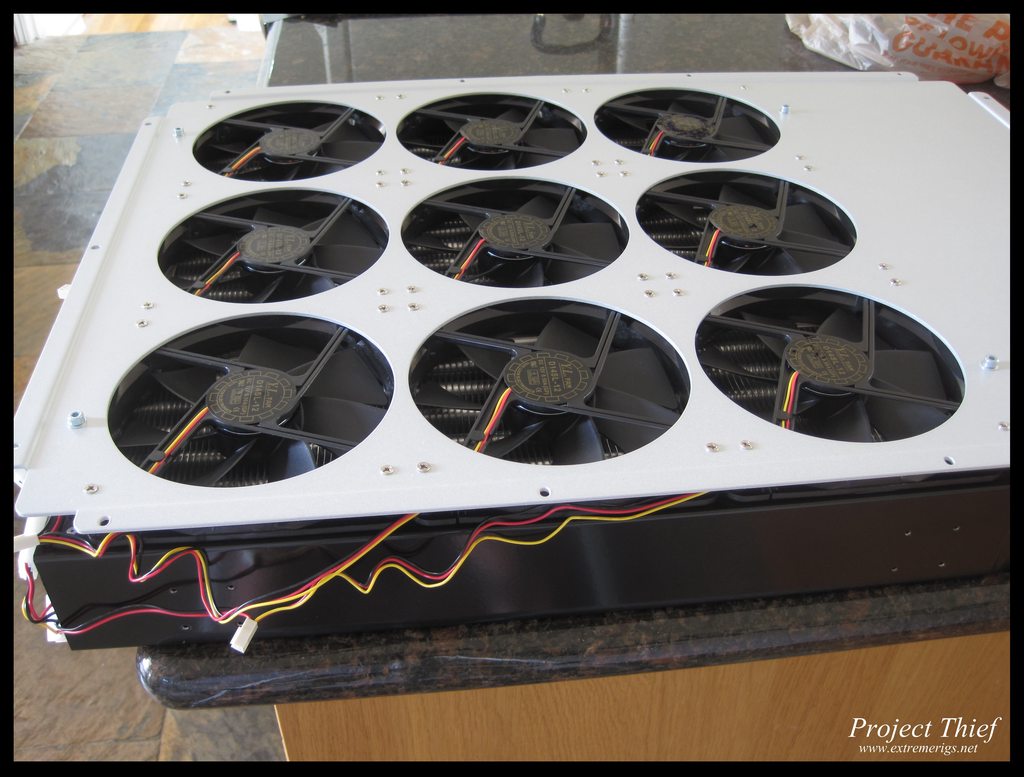
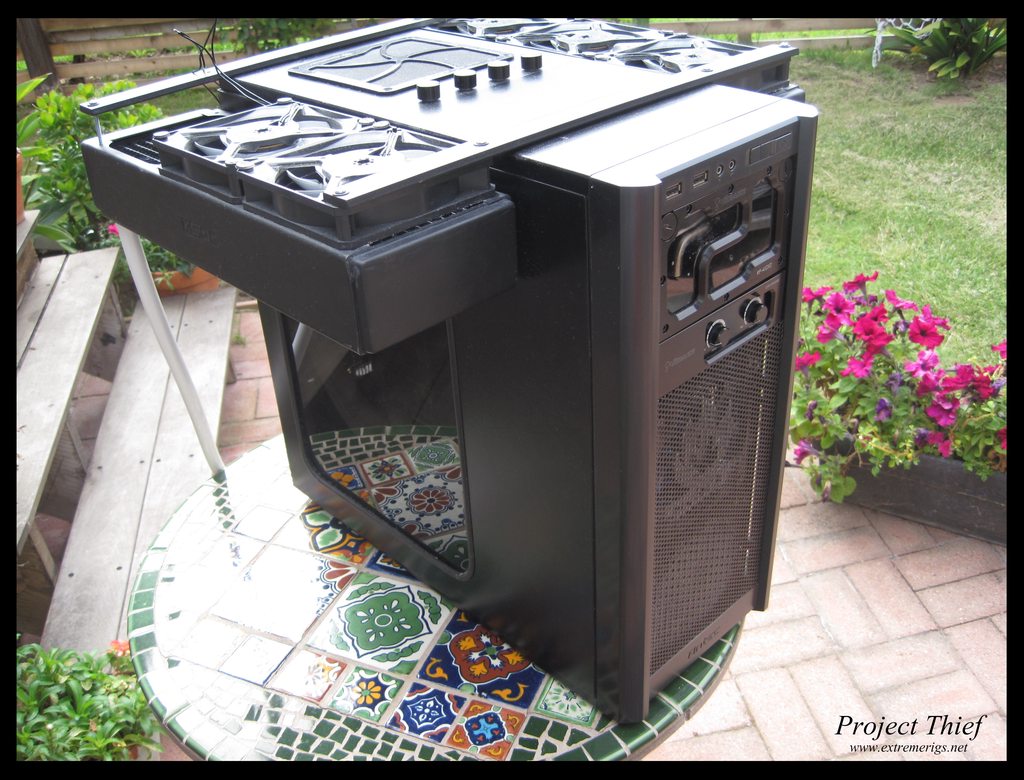
my question is since you have everything water-cooled then why so you need all the fans?
| System Name | Desktop |
|---|---|
| Processor | i5 13600KF |
| Motherboard | AsRock B760M Steel Legend Wifi |
| Cooling | Noctua NH-U9S |
| Memory | 4x 16 Gb Gskill S5 DDR5 @6000 |
| Video Card(s) | Gigabyte Gaming OC 6750 XT 12GB |
| Storage | WD_BLACK 4TB SN850x |
| Display(s) | Gigabye M32U |
| Case | Corsair Carbide 400C |
| Audio Device(s) | On Board |
| Power Supply | EVGA Supernova 650 P2 |
| Mouse | MX Master 3s |
| Keyboard | Logitech G915 Wireless Clicky |
| Software | Fedora KDE Spin |
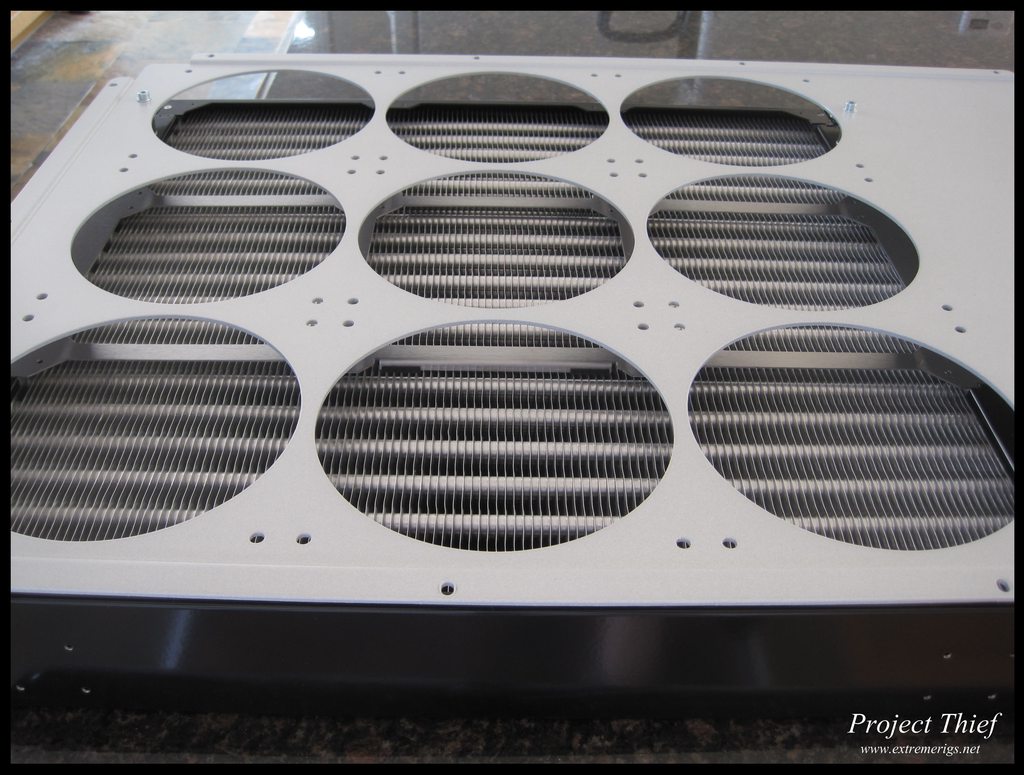
Heat exchangers use fans too. Water just moves the heat away from the CPU, something has to move heat away from the radiator and keep ambient temps low. Also note how almost all the fans are on a radiator.
| System Name | Gaming Rig |
|---|---|
| Processor | i7 2600k @ 4.5GHz |
| Motherboard | Asus Z77 Deluxe-V |
| Cooling | Corsair H100 |
| Memory | RipjawsX 8GB @ 2133MHz 11-11-11-30 |
| Video Card(s) | EVGA GTX670 SC @ 1300MHz core |
| Storage | OCZ Vertex 4 256GB + 1TB Samsung HDD |
| Display(s) | 23" LG W2343T |
| Case | Corsair 650D |
| Power Supply | Corsiar AX-850 |
| System Name | Desktop|| Virtual Host 0 |
|---|---|
| Processor | Intel Core i5 2500-K @ 4.3ghz || 2x Xeon L5630 (total 8 cores, 16 threads) |
| Motherboard | ASUS P8Z68-V || Dell PowerEdge R710 (Intel 5520 chipset) |
| Cooling | Corsair Hydro H100 || Stock hotplug fans and passive heatsinks |
| Memory | 4x4gb Corsair Vengeance DDR3 1600 || 12x4gb Hynix DDR3 1066 FB-DIMMs |
| Video Card(s) | MSI GTX 760 Gaming Twin Frozr 4GB OC || Don't know, don't care |
| Storage | Hitachi 7K3000 2TB || 6x300gb 15k rpm SAS internal hotswap, 12x3tb Seagate NAS drives in enclosure |
| Display(s) | ViewSonic VA2349S || remote iDRAC KVM console |
| Case | Antec P280 || Dell PowerEdge R710 |
| Audio Device(s) | HRT MusicStreamer II+ and Focusrite Scarlett 18i8 || Don't know, don't care |
| Power Supply | SeaSonic X650 Gold || 2x870w hot-swappable |
| Mouse | Logitech G500 || remote iDRAC KVM console |
| Keyboard | Logitech G510 || remote iDRAC KVM console |
| Software | Win7 Ultimate x64 || VMware vSphere 6.0 with vCenter Server 6.0 |
| Benchmark Scores | Over 9000 on the scouter |
| System Name | My i7 Beast |
|---|---|
| Processor | Intel Core i7 6800K |
| Motherboard | Asus X99-A II |
| Cooling | Nickel-plated EK Supremacy EVO, D5 with XSPC Bayres & BIX Quad Radiator |
| Memory | 4 x 8GB EVGA SuperSC DDR4-3200 |
| Video Card(s) | EVGA 1080 SuperClocked |
| Storage | Samsung 950 Pro 256GB m.2 SSD + 480GB Sandisk storage SSD |
| Display(s) | Three Asus 24" VW246H LCD's |
| Case | Silverstone TJ07 |
| Audio Device(s) | Onboard |
| Power Supply | Corsair AX1200 |
| Keyboard | Corsair K95 |
| Software | Windows 10 x64 Pro |
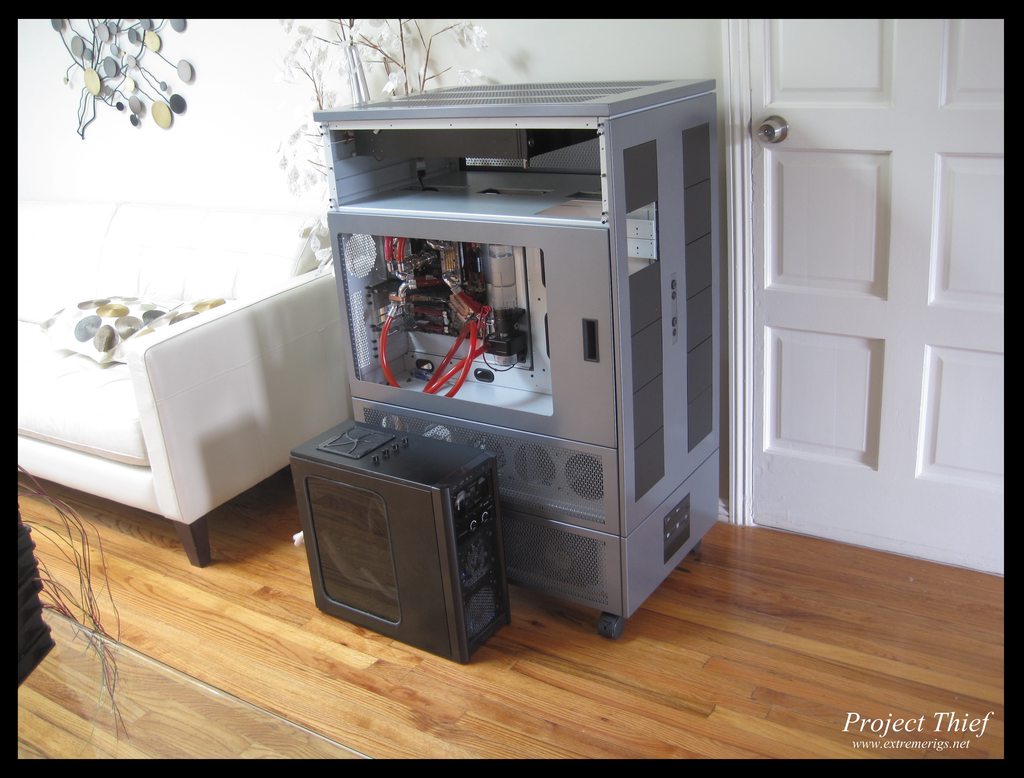
You could fit a small child in it.
| System Name | Monke | Work Thinkpad | Old Monke |
|---|---|
| Processor | Ryzen 5600X | Ryzen 5500U | FX8320 |
| Motherboard | ASRock B550 Extreme4 | ? | Asrock 990FX Extreme 4 |
| Cooling | 240mm Rad | Not needed | hyper 212 EVO |
| Memory | 2x16GB DDR4 3600 Corsair RGB | 16 GB DDR4 3600 | 16GB DDR3 1600 |
| Video Card(s) | Sapphire Pulse RX6700XT 12GB | Vega 8 | Sapphire Pulse RX580 8GB |
| Storage | Samsung 980 nvme (Primary) | some samsung SSD |
| Display(s) | Dell 2723DS | Some 14" 1080p 98%sRGB IPS | Dell 2240L |
| Case | Ant Esports Tempered case | Thinkpad | NZXT Guardian 921RB |
| Audio Device(s) | Logitech Z333 | Jabra corpo stuff | Some USB speakers |
| Power Supply | Corsair RM750e | not needed | Corsair GS 600 |
| Mouse | Logitech G400 | nipple | Dell |
| Keyboard | Logitech G213 | stock kb is awesome | Logitech K230 |
| VR HMD | ;_; |
| Software | Windows 10 Professional x3 |
| Benchmark Scores | There are no marks on my bench |
| System Name | Sovereign // HTPC |
|---|---|
| Processor | i7 3770k 4.2 // i7 3770k 4.2 |
| Motherboard | Maximus V Gene // Sabertooth Z77 |
| Cooling | Noctua D14 // Intel HSF |
| Memory | 16GB Samsung // 16GB VengeanceLP |
| Video Card(s) | Deciding // 660 DC2 |
| Storage | OS (X25-M), Data (Seagate 1TB) // Samsung 840 120GB & bunch of drives |
| Display(s) | Samsung T240HD // LG TV |
| Case | TJ08e // Grandia GD08 |
| Audio Device(s) | DT880 Pro 250 ohm // TV speakers |
| Power Supply | Seasonic Plat 1000 // Seasonic Gold 760 |
| Software | Windows 8 Pro x64 // Windows 7 Pro x64 |
You could fit a small child in it.
Oh. My. God.
You, sir, are a madman. And I mean that in the best way ever imagined.
Salute!
You should get a beagle board or RaspberryPi or some development board and build yourself a controller for the entire box. That way you can hit a button, first your cooling powers up, sends back an OK, then fire your rigs up and if you have LED BIOS output headers you could send an OK back when the BIOS is done loading. Not that your rigs needs to be any more beastly than they already are.
my question is since you have everything water-cooled then why so you need all the fans?
Heat exchangers use fans too. Water just moves the heat away from the CPU, something has to move heat away from the radiator and keep ambient temps low. Also note how almost all the fans are on a radiator.
awesome
You could fit a small child in it.
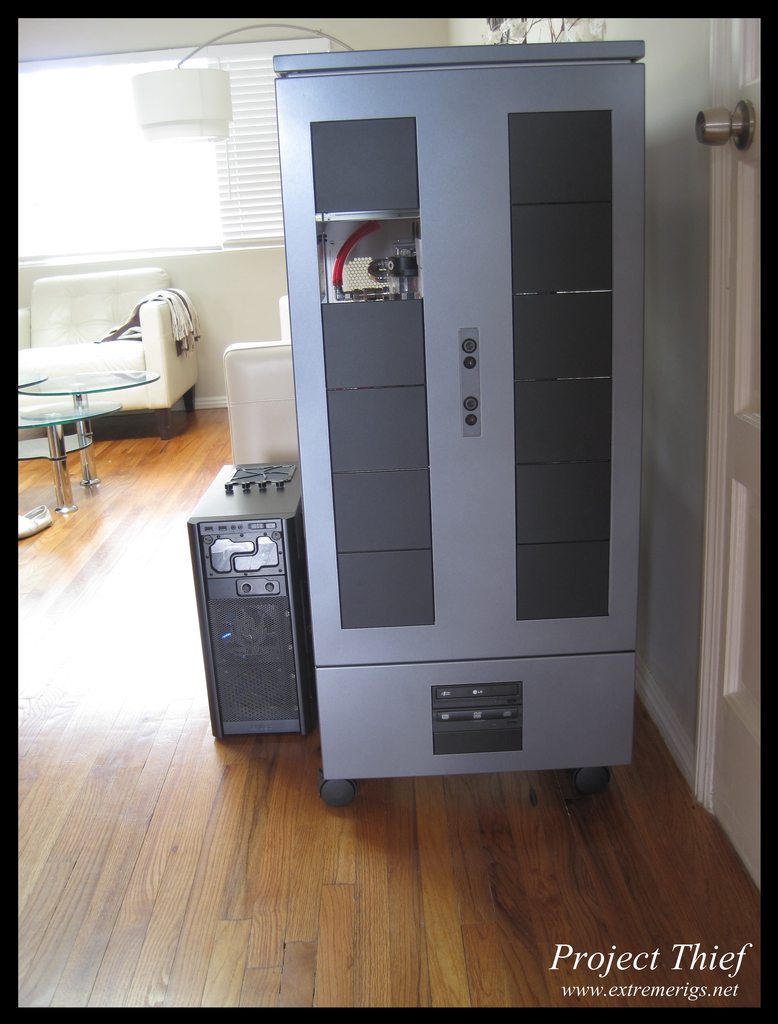
Holy crap, only once you put the other case next 2 it, did I really take full understanding of just how huge it is! Holy s**t!
"Honey, have you seen our kids? Oh, nevermind - they're hiding in the server again..."
Fuck i just jizzed in my brain. Dude, since the first build, did you get like an apple ceo year bonus? I mean the wc gear is worth how much? 4k?
Nope, a bigass child(s) could fit there
Also should be named project barbarian, aint no thief big like that.
This is D3 barbarian or Conan build