- Joined
- Aug 16, 2005
- Messages
- 27,955 (3.84/day)
- Location
- Alabama
| System Name | RogueOne |
|---|---|
| Processor | Xeon W9-3495x |
| Motherboard | ASUS w790E Sage SE |
| Cooling | SilverStone XE360-4677 |
| Memory | 128gb Gskill Zeta R5 DDR5 RDIMMs |
| Video Card(s) | MSI SUPRIM Liquid 5090 |
| Storage | 1x 2TB WD SN850X | 2x 8TB GAMMIX S70 |
| Display(s) | 49" Philips Evnia OLED (49M2C8900) |
| Case | Thermaltake Core P3 Pro Snow |
| Audio Device(s) | Moondrop S8's on Schitt Gunnr |
| Power Supply | Seasonic Prime TX-1600 |
| Mouse | Razer Viper mini signature edition (mercury white) |
| Keyboard | Wooting 80 HE White, Gateron Jades |
| VR HMD | Quest 3 |
| Software | Windows 11 Pro Workstation |
| Benchmark Scores | I dont have time for that. |
Blackcat expects the bios file to be packed in a Zip file which only complicates things.
For what programming the BC or the chip? because it doesnt either way. Also by forums Im assuming you must mean these.
https://blackcatusb.net/index.php
because that site is NOT the official in any way shape or form.


 I've been checking back to see how this goes.
") I first flashed with the original saved BIOS ...that was a different size from what the downloaded versions are but couldn't get it to boot again, just turn on.
I first flashed with the original saved BIOS ...that was a different size from what the downloaded versions are but couldn't get it to boot again, just turn on.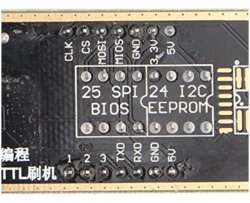
 I've tried it on two different boards.