• Welcome to TechPowerUp Forums, Guest! Please check out our forum guidelines for info related to our community.

Realizing my childhood dream [LGA775 / Nvidia SLI]

Joined
Mar 29, 2018
Messages
590 (0.27/day)
new ''old '' stock is that way . even a new old stock referb will cost plenty ... if a legacy build air is just fine , if just needing to run win - xp a more up to date AMD 990 , 970 fx build will do it and excepts more modern easy to find hardware . them amd bulldozer platforms were still full win -xp - vista - Linux supported . load and go [ that's one big thing amd use to have going for there platforms , not no more now another stranded to win -10 or it may not fully work if at all build ...lol ]
 
Joined
Jul 21, 2018
Messages
773 (0.37/day)
Location
Germany
System Name FATTYDOVE-R-SPEC
Processor Intel i9 10980XE
Motherboard EVGA X299 Dark
Cooling Water (1x 240mm, 1x 280mm, 1x 420mm + 2x Mo-Ra 360 external radiator)
Memory 64GB DDR4
Video Card(s) RTX 2080 Super / RTX 3090
Storage Crucial MX500
Display(s) 24", 1440p, freesync, 144hz
Case Open Benchtable (OBT)
Audio Device(s) beyerdynamic MMX 300
Power Supply EVGA Supernova T2 1600W
Mouse OG steelseries Sensei
Keyboard steelseries 6Gv2
Software Windows 10
Things are starting to fall into place now, one by one. I bought one single pcb waterblock from a very nice person and found a dual pcb innovatek waterblock. Now I can´t use both of those EVGA cards together, so I´ll keep one spare and now go hunt for a dual pcb card.
 
Joined
Jul 21, 2018
Messages
773 (0.37/day)
Location
Germany
System Name FATTYDOVE-R-SPEC
Processor Intel i9 10980XE
Motherboard EVGA X299 Dark
Cooling Water (1x 240mm, 1x 280mm, 1x 420mm + 2x Mo-Ra 360 external radiator)
Memory 64GB DDR4
Video Card(s) RTX 2080 Super / RTX 3090
Storage Crucial MX500
Display(s) 24", 1440p, freesync, 144hz
Case Open Benchtable (OBT)
Audio Device(s) beyerdynamic MMX 300
Power Supply EVGA Supernova T2 1600W
Mouse OG steelseries Sensei
Keyboard steelseries 6Gv2
Software Windows 10
I´m not dead, the project has been going on in the background for a while now and I´m getting close to completion! Part 1 of my Story (Part 2 in a later post):

Whew this is/was quite a rocky road so far. I´ve been busy in the past month(s) and found little time to work on my hobby. But I kept the parts in sight on my desk to remind me every day and now I sacrificed a few nights of sleep to finally get it running.

Since I was really tired and exhausted + feeling a little blue this winter season I had no nerve to document every process with pictures like I usually do. I hope you can forgive me, it would have meant many more hours of work, stopping what I do every few minutes to take a snap and later editing and cutting it all together. Hours that I just don´t have atm. I will take some shots of the finished build tho!
Instead I´ll write down the story and share my experience of putting this machine together.

My last post from november was back when I finally received a waterblock for one of my single pcb GTX 295s. A very friendly user offered me one from his collection and I bought it, thank you so much once more! It´s the key element that was really tough to find. If you read this and want to be mentioned feel free to post or write me and I´ll give you a shout :)
Now I had one single slot waterblock and lucky me found a dual pcb card + waterblock. The card was definitly used for a while, I hoped it would still work for a while since I have no backup dual-pcb. This is a picture of the cleaned innovatek waterblock:


Sadly it will not be a matching look with these two, but I don´t care. I got two watercooled cards, I can´t possibly ask for more. From here on out I finally had most parts together and felt motivated enough to start working on everything. First thing I did was the 771 to 775 mod.
First part was not very difficult, I put on the sticker and checked the position with a magnifying lens -> done.
Modding the socket however was a cold sweat moment for me. I picked a scalpel and very carefully, bit by bit, cut down the two plastic notches so that I can place 771 CPUs in my socket. I took my fair time for that, went really slow and tried to use as little force as possible. After about 30-45 minutes I was happy with the result and strapped the X5482 in place.

CPU is now shielding the pins, which meant I could more or less safely take off all the heatsinks from the motherboard. I replaced all of the old pads and paste with fresh material.

Next up, the RAM-heatsinks that were just a bit to wide to fit. I thought about sanding them down some fractions of a mm, but soon realized that this might not be enough. I took the heatsinks off from a stick and saw that these "heatsinks" were just connected to the memory modules by a rather thin line of thermal glue and the heatpipe inside did barely cover 1/3 of each module. So I figured that just maybe the heat from these parts will be rather manageable.
I decided to improvise and from 2 of the 4 sticks I took off one side from the heatsink and left it bare. Then I sanded the heatsink from the opposing module:


And slapped a thick thermal pad between the now bare modules and the sanded down part. I will take a picture of that later so you can see what I mean.

Next up I replaced the CMOS battery for good measure. Then I got to the waterblock for the CPU. I choose the Alphacool NexXxoS XP³, because it was readily available and I like that black finish. I installed the backplate for it, put the paste on and the block in place. Screwed it down with the springs, not very tight but just some pressure.

Now the board is ready to rock at this point. Next are the GPUs. I´m used to working on these (btw my GPU thread will be continued when I have my next semester break), so I had no trouble taking each apart, cleaning them and putting them back together with the waterblocks. Still on these dual GPU cards it´s quite some work to do. Many tiny screws, you need to be careful with your tools and they ate a LOT of thermal interface material. I like that the waterblocks feature very tight tolerances on most parts so you can put the pads in the bin and use thermal paste, but the huge GPU IHS + 28 memory modules on each card took me 2 syringes of MX4. I just barely had enough left for the trouble ahead.

With the GPUs done I turned to the watercooling loop I had already prepared weeks ago and realized with horror that I made a huge mistake. I left it standing still for 2 months and small spots of mold had started growing inside the tubing and reservoir...
This meant taking the whole thing I had already build with radiator, pump and all apart again. Flushing it, cleaning it. I threw the tubing away, flushed the radiator many many times and disassembled the pump as well as the reservoir to give both a proper clean-up. Had to re-order some tubing and then but it back together. Finally I had everything else I need and started to build the system.

At this point you might already realize how naive I went about the whole thing, not even testing parts before putting them under the loop and everything. Did not even test the GPUs if they work before. I was so focused on getting it together in the little free time I had. I did the same with my TR build, but those had been new parts.

First sketchy thing that I did was on the CPU waterblock. It said max. 5mm long threads on the fittings and guess what, my fittings were exactly 5mm. So as I picked one from the box, I picked exactly the one that had some burr left on it which made it 5mm and a half. I tried to get it in and felt it hit the bottom before really sealing on the O-ring. I was getting a little impatient and decided to just throw in a 2nd O-ring over the first, hoping it might seal this way... DUMBEST IDEA I´VE EVER HAD.
I however called it a day and decided to go into leak testing like this. Put the loop together inside the case and routed the tubes outside to the portable part of the loop. I put paper towel around every fitting and carefully padded the mainboard too. Filled the reservoir and send it into the loop. Guess where it was leaking.

Yes from the two double O-ringed fittings on the CPU-block. And it was leaking bad, the second O-ring was completly pushed out and visible. Thank god I had it standing and it dripped down on the paper. Nothing got into the socket, not even on the board. Only the top GPU got some water and ofc it crept under the backplate... Fun moment for my heart.


But this fail shows the strengths of quick release couplers, I could quickly disconnect the two lines on the lower back outside of the case and drain only the waterblocks. I took the tubing off and took a closer look at the fitting, realizing that the problem was only with this one. So I replaced it, replaced the O-rings and only used 1 this time, like you always should.
I dried everything as best as I could and closed the loop back up again. No leaks this time. I filled it up and let it running for several hours. Still no leak. But that water under the backplate had me worried. However to take it off, I would have to undo the screws that hold the whole block in place... So I just carefully put some towel into every nook I could get under, took it off after a while and let a fan blow air under the backplate for a whole night.

I plugged in the last cables, up to this point I never had power anywhere near the system. For good reasons I think ;)
My heart was really racing at this point. So much work up to here and I do not even know if any of the parts work at all. Is the board ok as the seller stated? Does the CPU mod work? Do my GPUs work? What if something does´nt work and I can´t even figure out what it is? What if I turn on power and some water is still left from the spill and I destroy something?

Would you have flicked to power-switch on your 1600W PSU and pushed the power on button?
Well I did.

It lit up. Fans spinning, roaring even. The first breath, the first stretch. LEDs on the board light up, blue and yellow above the RAM. I have no idea what they want to tell me but they are on and they stay on!
I heard my hdd start. I see green LEDs on my GPUs!

Then the beep, the single, satisfying and oh so sweet BEEP. It posted.

I still had no display out tho. Cable was plugged in the top GPU, but instead of a picture out I get a blue LED on the bottom card. Which told me something was going on. The blue LED only lights up on the dual pcb cards if they are recognized as the 'master card' and the blue LED is then indicating the DVI-Port to use for monitor signal.
I switched the cable to the blue port and saw the post screen for the first time. Many informations on there, good and bad. Xeon was detected and running like it should. However it claimed that there was no GPU in PCIe-Slot 1 and one in PCIe-Slot 3 and that I should re-seat it to the first slot...
Strange since the card in slot one was visibly running, indicated by the LED.

This is where part 1 ends, it´s getting late again and I´ve been sacrificing many hours of my sleep for this project as you may be able to tell already.
If you want to guess what the issue is and what caused it, feel free :D You may be surprised.

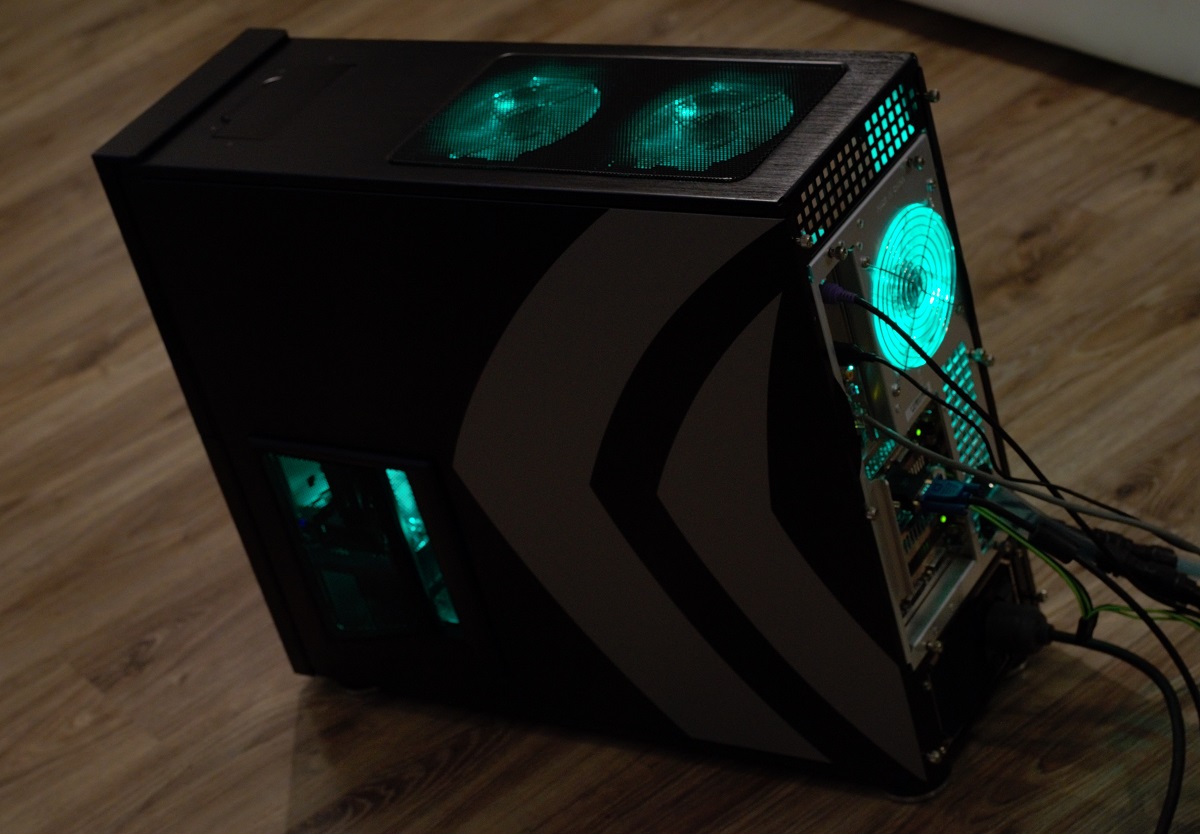
Some teaser shots of it currently running next to me:


Last edited:
Joined
Jul 21, 2018
Messages
773 (0.37/day)
Location
Germany
System Name FATTYDOVE-R-SPEC
Processor Intel i9 10980XE
Motherboard EVGA X299 Dark
Cooling Water (1x 240mm, 1x 280mm, 1x 420mm + 2x Mo-Ra 360 external radiator)
Memory 64GB DDR4
Video Card(s) RTX 2080 Super / RTX 3090
Storage Crucial MX500
Display(s) 24", 1440p, freesync, 144hz
Case Open Benchtable (OBT)
Audio Device(s) beyerdynamic MMX 300
Power Supply EVGA Supernova T2 1600W
Mouse OG steelseries Sensei
Keyboard steelseries 6Gv2
Software Windows 10
So then lets start where we left off, the non working or not detected GPU in slot 1:

I decided either way I´d have to take it out of the case again, so I disconnected the radiator/pump/reservoir and drained the waterblocks once more. As I removed the card I instantly spotted some physical damage on the pcb! Some components that sit directly on top of the PCIe pins broke off and were missing (3 or 4). I suspect that this meant these pins had no connection and therefor the mainboard did not detect the GPU.

Now I wondered if I caused this, since I could not remember any moment where I used force, I was extra careful when seating the waterblock. It could have been a damage that was there since they arrived, maybe during shipping the cards hit each other. Could also be my fault and I just didn´t notice.
Next thing I had to do then was swapping the card for the other single pcb one I got. Thank god I had one spare! Just another hour of taking cards apart, cleaning them, applying thermal paste and putting it back together.
Next up was the message I got on the POST screen. Why did it say that the working card was in slot 3? Well I did not check the manual of my mainboard and just assumed to use the slots 1 - 2 - 3 from top to bottom. But of course that would be not very practical for huge coolers or other PCI expansion cards, so they should be installed 1 - 3 - 2 instead.

I switched the card from slot 3 into slot 2 and put the new card very very carefully back in slot 1, closed the loop once more, replaced the volume of liquid that I had to drain and powered back on.

I got greeted with this screen now:


Looking alright, all drives detected, memory all there and no PCIe related errors. FSB seems to be set to low but I can live with that for now. Let´s press DEL to enter setup eh?

Well I pressed it, nothing happened. I restarted and pressed again, nope. I switched from USB to PS-2 keyboard (ofc with power off and restart), still nothing.
I was not impressed. Remembering that I did change the battery I also realized that I didn´t clear the bios with the jumper... So I took the battery out, shorted the pins and tried it once more.

This time it let me enter bios. I was so happy at this point. Finally I´m getting close to completion.

I relaxed a little, took a look around and played with fan settings, changed boot priority. I looked around for my Win 7 stick and couldn´t find it (thanks murphy), so I created a new one.
While waiting I had some time to take a look around the case and was hit with the beauty of green LED light, water filled tubes, two insane GPUs, a very special case and the completly overkill RAM heatsinks. I fell in love a little bit. As usual my build is not very 'clean' I did not bother with extreme tidy cable management:


Just sort of let it hanging around as it pleases. This is the side view through the window:


My camera tried its best with the LED lights, but in reality the light is a much deeper and richer green color. On the right side you can see the drive bay, which has its own fan with separated airflow.
Between this bay and the cables is another fan that is taking air in from the duct which you can barely see to the left of the drive bay. On the top are 2 fans blowing out and there is another one on the back blowing air out. I also had to rotate the PSU up, because the fan grill for it is not designed for this modern PSU, it is not in the right place and made for something like an 80mm fan, not a 140mm.

This all means intense negative pressure in theory, but it is compensated a bit by very tight closing panels which help to reduce air bleeding in from small gaps and in the top of the backside is a mesh cut-out that allows the 3 fans there to circulate air in order to relieve the negative pressure inside. I´ll see how it all turns out in the long run and I don´t need a very strong airflow in there.


The front is a bit dull, good thing that I don´t look at it very often. I placed the system in the VIP spot, replacing my current main rig on my right side under the desk. This way I was able to also get the radiator unit behind it under my desk.


This is the Mo-Cu-Wa-Lo in its current config. After cleaning and flushing everything I replaced the top fitting on the pump with a rotating 90° one. This gives me much more flexibilty when positioning it. The pump (Eheim 1048) is at the limit I´d say, with these 3 blocks and quite some amount of fluid. It was still capable of quickly filling it and getting the air flushed out, but I noticed a drop in pressure from the flow back into the reservoir. On the last fill of the reservoir it took the pump about 5 seconds to drain the ~250ml volume. That would equal to pretty much 3l per minute.

I´m not an expert on flow rates, but I´d say that is still ok. For anyone working with gallons, that would be ~ 0,79 GPM.

Next up the other side of the case:


Not as exciting, but the fans really add to the look from every angle.

And now my final shot for tonight. Maybe I will add some more pictures later, but the Windows 7 installer finished and I actually bought a real key for this one. Lets get it set up!


I have some first screenshots for the idle temps:


Driver install went like a charm, GPUs are in SLI and temps look promising. Still have to do load testing.


This is bothering me just a little bit, 3 of the 4 core temps (1,3 and 4) seem stuck in idle and don´t move at all, only with some load they can be bothered to move and even then core 3 is stuck at 36°C.
I will look further into this later. For now I need to get some load testing, raise the FSB a little and go from there. It is however again 2:30 am and I need to be at work in a couple of hours...

Update will follow.
 
Joined
May 15, 2014
Messages
235 (0.06/day)
Nice project, I like the case & fortunately you obtained the I/O shield. I'm almost inspired enough to do a retro build myself. Don't sweat the CPU temp sensors, it's rare that all four work properly. You might want to update firmware on ST500DM002-1BD142 to KC48.
 

hat

Enthusiast
Joined
Nov 20, 2006
Messages
21,731 (3.41/day)
Location
Ohio
System Name Starlifter :: Dragonfly
Processor i7 2600k 4.4GHz :: i5 10400
Motherboard ASUS P8P67 Pro :: ASUS Prime H570-Plus
Cooling Cryorig M9 :: Stock
Memory 4x4GB DDR3 2133 :: 2x8GB DDR4 2400
Video Card(s) PNY GTX1070 :: Integrated UHD 630
Storage Crucial MX500 1TB, 2x1TB Seagate RAID 0 :: Mushkin Enhanced 60GB SSD, 3x4TB Seagate HDD RAID5
Display(s) Onn 165hz 1080p :: Acer 1080p
Case Antec SOHO 1030B :: Old White Full Tower
Audio Device(s) Creative X-Fi Titanium Fatal1ty Pro - Bose Companion 2 Series III :: None
Power Supply FSP Hydro GE 550w :: EVGA Supernova 550
Software Windows 10 Pro - Plex Server on Dragonfly
Benchmark Scores >9000
Wow... GTX295 is retro now? And I have a GTX260 216 in my parts bin. It used to be fast...

I'm still rather young, but if I ever want to feel old I'll just remind myself of that. :nutkick:
 
Joined
Jul 21, 2018
Messages
773 (0.37/day)
Location
Germany
System Name FATTYDOVE-R-SPEC
Processor Intel i9 10980XE
Motherboard EVGA X299 Dark
Cooling Water (1x 240mm, 1x 280mm, 1x 420mm + 2x Mo-Ra 360 external radiator)
Memory 64GB DDR4
Video Card(s) RTX 2080 Super / RTX 3090
Storage Crucial MX500
Display(s) 24", 1440p, freesync, 144hz
Case Open Benchtable (OBT)
Audio Device(s) beyerdynamic MMX 300
Power Supply EVGA Supernova T2 1600W
Mouse OG steelseries Sensei
Keyboard steelseries 6Gv2
Software Windows 10
Nice project, I like the case & fortunately you obtained the I/O shield. I'm almost inspired enough to do a retro build myself. Don't sweat the CPU temp sensors, it's rare that all four work properly. You might want to update firmware on ST500DM002-1BD142 to KC48.

Thank you :) From what I read about these sensors I´m just happy they are not stuck at 95°C, like some people reported. That means constant thermal throttle no matter what.
Regarding the firmware you mention for that drive, is there a special reason you suggested it? Like does my old version produce any problems that I should be aware of?

So far it served me well, 'If it aint broke don´t fix it':


Wow... GTX295 is retro now? And I have a GTX260 216 in my parts bin. It used to be fast...

Hey I feel like that too, kinda. A GTX260 - 196 was my first GPU upgrade in my first pc back then. Had the 8600GT before. And this is the time I´m coming from, I dreamt about not having to worry about cost and build a sick watercooled PC with 295s. My dad took me to an expo back then, where they had some killer systems on display. There was a booth where you could play quake vs a pro player girl that wiped the floor with all the people that dared to try and beat her. If you could score just a single kill you´d win a price but I don´t think anyone made it. There was a row of high end systems next to that and I spend a long time looking at those and the specs they boasted.
Sorry for my flashback and little detour, that was quite a defining moment in my life. However, that is now over a decade in the past, which to me classifies this as barely retro already.
 
Joined
Jul 21, 2018
Messages
773 (0.37/day)
Location
Germany
System Name FATTYDOVE-R-SPEC
Processor Intel i9 10980XE
Motherboard EVGA X299 Dark
Cooling Water (1x 240mm, 1x 280mm, 1x 420mm + 2x Mo-Ra 360 external radiator)
Memory 64GB DDR4
Video Card(s) RTX 2080 Super / RTX 3090
Storage Crucial MX500
Display(s) 24", 1440p, freesync, 144hz
Case Open Benchtable (OBT)
Audio Device(s) beyerdynamic MMX 300
Power Supply EVGA Supernova T2 1600W
Mouse OG steelseries Sensei
Keyboard steelseries 6Gv2
Software Windows 10
Next update:

I took some time to inspect my bios settings and found many things I´m not familiar with. I never touched OC back in the day and my current experiences are all from the AMD Zen architecture. I´m not completly clueless, I could guess what most stuff does but I´m scratching my head about the feature of running FSB in linked mode or unlinked.

My board officially only supports 1333 MHz, but it can go much higher then that as I´ve seen in reviews from the time. First thing I want however is a baseline, so I set it to the 1600 MHz the CPU is rated for and checked into the memory frequency to see how this will effect my clocks there.
Well there I got the option to leave it on [auto] which resulted in 887 MHz for the RAM or linked with manual ratio (which gave some pretty extreme ratios like 1:1 [would equal 1600 MHz RAM] for my scenario with the locked CPU multiplier) or I can use unlinked mode and set the RAM frequency independent of FSB.

I tried the auto setting and it failed to boot, gave me a long and angry beep and restarted with default values. So I set it to unlinked, 1600 FSB and 800 on the memory. Voltages I left at auto for now.
A quick test run and it seems to work well:


CPU reaching the stock 3.2 GHz, it seemed to peak at 50°C during the first small FFT batch. I don´t have the patience to do a full stability test and I don´t see it necessary for now. Voltage droop had it drop to 1.264V during load, in idle it´s at 1.312V with the auto setting. I wonder what these chips can tolerate, if I remember correctly I read from intel something about a 1.35V limit.
Memory is at 800 like I set it, my guess would be that in linked mode the 887MHz threw the RAM off and this is why it was angry.


Yay already ~12% more meaningless points in a benchmark then before :p

Next up I installed a game to test 3D loads on the quad SLI config. Just a very easy to run game like Flatout 2. I knew this one worked with this driver and a single 295 before, so I´ll start there and see if the quad SLI is even going to work at all.


Yes it does. I did not see any artifacts, flickering or tearing either.
And after these short tests I looked at my water temp and saw that these low loads did not even bother the huge rad. It raised from 22.7°C to 23.4°C. I think in idle and desktop use I could cool it passive.

Now I´m torn between trying for some higher FSB and memory clock or installing a game to make these cards sweat a bit.
 
Last edited:
Joined
Jul 5, 2013
Messages
25,559 (6.47/day)
I´m scratching my head about the feature of running FSB in linked mode or unlinked.
Run unlinked. What that means, IIRC, is that the FSB clock is linked to the PCIE/PCI/RAM clocks. If you unlink them then you can OC the FSB without applying an OC to the other clocks.
So I set it to unlinked, 1600 FSB and 800 on the memory. Voltages I left at auto for now. A quick test run and it seems to work well
And it naturally would.
 
Last edited:
Joined
Jul 21, 2018
Messages
773 (0.37/day)
Location
Germany
System Name FATTYDOVE-R-SPEC
Processor Intel i9 10980XE
Motherboard EVGA X299 Dark
Cooling Water (1x 240mm, 1x 280mm, 1x 420mm + 2x Mo-Ra 360 external radiator)
Memory 64GB DDR4
Video Card(s) RTX 2080 Super / RTX 3090
Storage Crucial MX500
Display(s) 24", 1440p, freesync, 144hz
Case Open Benchtable (OBT)
Audio Device(s) beyerdynamic MMX 300
Power Supply EVGA Supernova T2 1600W
Mouse OG steelseries Sensei
Keyboard steelseries 6Gv2
Software Windows 10
And I decided to test my luck with the CPU / FSB OC first... Why, why do I do this to myself?

Well I was at the 1600 baseline stock settings for every part. My board set higher voltage on auto and I was curious if that is a fixed mode that toggled or a continues process e.g. does the board raise voltage higher with increased frequency?
So I had to test it out. I slightly raised the FSB to 1640, RAM to 820. On top of that I changed the RAM voltage, wanted to check how well measured voltages correspond to dialed in ones. It read 1.85V currently applied, so I went for a manual setting of 1.90V.

Saved settings and rebooted. Started up no problem. I got HWMonitor as additional monitoring, hoping that it could read MCP temps since I have no software to display any of my chipset temps yet. In bios it´s at 47°C and I´d like to keep an eye on that.


Everything looked ok at first glance but then I noticed that the mainboard CPU-temp has some strange spikes up to 85°C at times. They happen so short that I never caught one on current value. And I have no idea what the AUX temp is supposed to be, it toggles between 25 and 50...
All in all I was not too concerned, propably some wrong readouts. Core temps are fine, real temp showed the same values and it never got above 50°C in prime95.

Voltages did not get increased further by the auto setting, these seem to be the standard 'OC-mode' voltages. However the DRAM value did not change, it was 1.816V before (Bios read 1.85V) and now that I set it to 1.90V it still reads 1.816V.
Well it is what it is. Next thing I did was installing Nvidia system monitor as this tool supports my 780i chipset. After the installer finished I wanted to test stability and launched p95. The moment I started real temp 2 of the 4 workers stopped on rounding errors. This told me something was going on stability wise. I stopped the test and the moment I tried to close my browser window I got a BSOD.

This happens, no problem. I´ve seen a lot of these by now, they don´t jumpscare me like they used to years ago. Back into bios I decided to try and just manually set some slightly higher voltages. I left FSB on the auto value of 1.3V, set CPU to 1.35V (bios read 1.31V current) and raised DRAM to 1.95V but noticed that in bios it did read the 1.90V that the software did not.
I saved and restarted, went straight back into bios to check the voltage readings there.
I was surprised to find that my set value of 1.35V resulted in a lower 1.28V in bios, that is lower then the auto setting. The DRAM was at 1.95V now. I decided to try and get into windows now. Well I tried.

Windows now instantly bailed into a BSOD on the loading screen. Like within half a second. Not nice. I went back into bios and set all frequencies to default -> nope. Windows stuck in instant BSOD.
Extended starting options launched and did not detect anything wrong. No repair to be done, just suggested to unplug new devices...
Well then. I went into bios once more and set JUST the DRAM voltage back to auto and look at that it wants to start. Kind off. Now I´m stuck in the blackscreen mode with no login screen. I can only restart or shutdown from there.
Fun night so far. I got my repair stick and went into recovery mode, suspecting the Nvidia system monitor install a possible troublemaker. Recovery is always worth a shot, who knows what happened on that install during my unstable OC.
And look at that now it´s back.

Much work for nothing, I´m back on auto voltages with my 1600 FSB. This is working now, fingers crossed. Now finding what caused what will be fun. If anything this showed me how delicate you have to be with FSB-OC.
I mean I had my Ryzen first gen system running with deactivated CCX on 4.3GHz and unstable RAM for quite a while on a similar Win 7 install with many bluescreens but never experienced such a major brick.
 
Joined
Jul 5, 2013
Messages
25,559 (6.47/day)
I left FSB on the auto value of 1.3V, set CPU to 1.35V (bios read 1.31V current) and raised DRAM to 1.95V but noticed that in bios it did read the 1.90V that the software did not.
I was surprised to find that my set value of 1.35V resulted in a lower 1.28V in bios, that is lower then the auto setting.
On some boards, when you take one setting off auto, you'll need to set everything manually as the bios defaults will incorrectly read the manual settings and apply the wrong matching setting. So in other words, if you take the CPU off auto, you'll need to set everything else manually as well. And I've discovered that as a general rule, on 771/775 based systems, if you bump the CPU voltage up, you need to bump the FSB voltage one notch for every 3 you make to the CPU. It's a system voltage balance thing. Ram voltage however is completely separate and unaffected.
 
Joined
Jul 21, 2018
Messages
773 (0.37/day)
Location
Germany
System Name FATTYDOVE-R-SPEC
Processor Intel i9 10980XE
Motherboard EVGA X299 Dark
Cooling Water (1x 240mm, 1x 280mm, 1x 420mm + 2x Mo-Ra 360 external radiator)
Memory 64GB DDR4
Video Card(s) RTX 2080 Super / RTX 3090
Storage Crucial MX500
Display(s) 24", 1440p, freesync, 144hz
Case Open Benchtable (OBT)
Audio Device(s) beyerdynamic MMX 300
Power Supply EVGA Supernova T2 1600W
Mouse OG steelseries Sensei
Keyboard steelseries 6Gv2
Software Windows 10
On some boards, when you take one setting off auto, you'll need to set everything manually as the bios defaults will incorrectly read the manual settings and apply the wrong matching setting.

I´ll go slow now and start with exactly that, set all voltages manual and check without doing anything else. I do to many things at once and then have no real clue what actually went wrong :)

I do notice a very immense vdroop under load and on top a big gap between CPU voltage value set in bios and the real voltage applied. At 1.35V set in bios it applies 1.28V, these 1.28V are the idle voltage in windows as read by CPU-Z. Under small FFT load it droops down to 1.24V even, resulting in instability even at 3.2GHz. That is insane, over 100mV difference from the voltage I choose in bios.
For FSB voltage it seems to be rather managable. 1.3V setting results in 1.28V. And according to multiple sources FSB voltage on these 780i boards should not be much higher for 24/7 use. I think my main problem is the vdroop currently, and maybe the GTL offsets.
I did notice that before the crash the 2 workers from core 3 and 4 stopped with errors almost instantly while the other 2 went on, and in bios the auto setting for GTL made a +65mV offset to GTL-2 only. Other 3 were 0. So I read about this and it seems that on a quad core I should set the value on all GTLs or atleast 2 and 4.

Right now I´m looking into the vdroop and found that this is common with the 680i and 780i boards, they did pencil mods on a resistor to negate that. Seems a bit sketchy to me, but I might give it a careful try. But I´m thinking they put that resistor on that Vcore line for a reason, if I now step in and tweak that do I really take care of the root cause or am I just treating a symptom and fake my readouts / hide and underlying issue?
 
Joined
May 8, 2016
Messages
1,741 (0.60/day)
System Name BOX
Processor Core i7 6950X @ 4,26GHz (1,28V)
Motherboard X99 SOC Champion (BIOS F23c + bifurcation mod)
Cooling Thermalright Venomous-X + 2x Delta 38mm PWM (Push-Pull)
Memory Patriot Viper Steel 4000MHz CL16 4x8GB (@3240MHz CL12.12.12.24 CR2T @ 1,48V)
Video Card(s) Titan V (~1650MHz @ 0.77V, HBM2 1GHz, Forced P2 state [OFF])
Storage WD SN850X 2TB + Samsung EVO 2TB (SATA) + Seagate Exos X20 20TB (4Kn mode)
Display(s) LG 27GP950-B
Case Fractal Design Meshify 2 XL
Audio Device(s) Motu M4 (audio interface) + ATH-A900Z + Behringer C-1
Power Supply Seasonic X-760 (760W)
Mouse Logitech RX-250
Keyboard HP KB-9970
Software Windows 10 Pro x64
You can just go higher on Vcore, since Vdroop is so big.
Try 1,4V in BIOS and see how low it will go under load.
Sure you get a bit higher temps in Idle, but at least CPU will be stable.
Pencil mod may require unmounting heatpipe cooling system from motherboard.

@lexluthermiester Vcore to FSB Voltage/"FSB Termination"/VTT isn't always 3:1.
It depends on how far you have to push your FSB vs. actual core clock.
In short : If you need 500MHz (2GHz) FSB to get to 4GHz clock speed on CPU cores, you probably will need FSB Voltage on par or close to actual Vcore (on 45nm Quad Core CPU). I'm assuming no GTL/PLL tweaks that can lower it.
 
Joined
Jul 21, 2018
Messages
773 (0.37/day)
Location
Germany
System Name FATTYDOVE-R-SPEC
Processor Intel i9 10980XE
Motherboard EVGA X299 Dark
Cooling Water (1x 240mm, 1x 280mm, 1x 420mm + 2x Mo-Ra 360 external radiator)
Memory 64GB DDR4
Video Card(s) RTX 2080 Super / RTX 3090
Storage Crucial MX500
Display(s) 24", 1440p, freesync, 144hz
Case Open Benchtable (OBT)
Audio Device(s) beyerdynamic MMX 300
Power Supply EVGA Supernova T2 1600W
Mouse OG steelseries Sensei
Keyboard steelseries 6Gv2
Software Windows 10
Thank you all for the input, we are making progress.

You can just go higher on Vcore, since Vdroop is so big.
Try 1,4V in BIOS and see how low it will go under load.

I did try 1.375V just this moment. And like @lexluthermiester suggested set all other voltages manual to the values they had on auto.
That is 1.3V FSB, 1.5V MCP, 1.4V SPP, 1.2V HT link, 1.85V DRAM.
I noticed that I don´t have fine tuning for FSB voltage, I can only choose from 1.1, 1.2, 1.3 or 1.4. It has a slight droop from 1.3V down to 1.28V.

I booted 1600 FSB with these and ran prime95. I got these figures:


In idle the Vcore is now 1.328V with temps sitting in the mid 30s. During intense load it goes down to 1.28V on 50°C while during normal load it sits on 1.285V - 1.29V.
No errors or crashes this time. I wonder what happens with HWMonitor and the CPU temp, I found out that the max. temp value is reaching always double the current temp. When the CPU temp readout reached 45°C, it instantly read 90°C max. As it climbed to 50°C, max. hit 100°C. Strange.
I guess the AUX sensor has the same issue, the 'maximum' value is always on double the actual maximum. That sensor should be on the pcb reading case temp for the aux fan headers. I doubt that the air in my case jumps from 26°C to 52°C and back.

The TMPIN0 is interesting tho, this seems like a real and working value, the question is if that is MCP/SPP or VRM.

Now concluding these results I have some headroom in terms of CPU temp I would say. A little more Vcore should be fine, like the 1.4V @agent_x007 suggested. I will have to see how far that will get me before the FSB voltage becomes the limiting factor.

RAM stuff I will inspect after I´m done with that.
 
Joined
Jul 21, 2018
Messages
773 (0.37/day)
Location
Germany
System Name FATTYDOVE-R-SPEC
Processor Intel i9 10980XE
Motherboard EVGA X299 Dark
Cooling Water (1x 240mm, 1x 280mm, 1x 420mm + 2x Mo-Ra 360 external radiator)
Memory 64GB DDR4
Video Card(s) RTX 2080 Super / RTX 3090
Storage Crucial MX500
Display(s) 24", 1440p, freesync, 144hz
Case Open Benchtable (OBT)
Audio Device(s) beyerdynamic MMX 300
Power Supply EVGA Supernova T2 1600W
Mouse OG steelseries Sensei
Keyboard steelseries 6Gv2
Software Windows 10
I have slowly crept my FSB up, increasing by 10MHz each time and then running a short p95 blend test (past the 2nd small FFTs). Not touching anything else and with the slightly raised Vcore I went just a bit past the point it terminally crashed last time. I hit no trouble yet, so I´ll continue raising it tomorrow.


Something interesting is starting to happen now. Due to the extreme droop the idle voltage is high enough to produce temp spikes that reach nearly the same temp as under highest load scenario. The idle is still in the 30s on average but spikes with every activity up to 47°C, while the highest load temp I got was 52°C.
If I continue like this I will be at a point where my idle spikes on a single core are higher then load temps. I looked further into the pencil mod and the instructions and pictures I found indicate that the resistor in question is very accessible:


It is next to the RAM slots and looks exactly the same on my board. All SMDs are in the same spot, I would guess the IC part number is the same too but from the bad image quality I can´t tell.

I got a little bored and tested a game to finish this day. Unreal Tournament 3 is the title I choose, since it is up there in my top 10 all time favorite games. No trouble to get it running, just started it and disabled all artifical smoothing options for mouse movement and fps. Set resolution to 1080p and also disabled v-sync.
Worked like a charm, GPUs where not really bothered as expected. I played a 20 minute match and observed temps with afterburner.


I did not have any artifacting and performance was great. UT3 always ran great and was optimized for nvidia as one of their example titles for PhysX and SLI.
What I did notice however was some screen tearing and a little bit of micro stutter every now and then. Now I did play this on my old 60Hz display which always had some intense tearing in the past and I did upgrade to 144Hz freesync on my main rig, so I´m not sure if the tearing got any worse due to the quad-SLI rendering or if it has always been like this and my eyes now struggle to get back to the non-sync 60Hz.
It did not impact my performance tho ;)

Temperature wise I´m very happy. The cards are still far from their usage limit ofc, but these numbers equal the idle temp of my air-cooled 295. Water temperature inside the loop reached 24.9°C after these 20 minutes. Ambient is ~20°C at the moment. I think my cooling solution is capable to handle this on full throttle.

Games I´m planning to play and test on this include Far Cry 2, the Stalker-Series, maybe some Crysis just for the meme, I want to try and get Sacred 2 to run but this game is terribly optimized and already gave me trouble back in the day on a single 260.
 
Joined
Jul 21, 2018
Messages
773 (0.37/day)
Location
Germany
System Name FATTYDOVE-R-SPEC
Processor Intel i9 10980XE
Motherboard EVGA X299 Dark
Cooling Water (1x 240mm, 1x 280mm, 1x 420mm + 2x Mo-Ra 360 external radiator)
Memory 64GB DDR4
Video Card(s) RTX 2080 Super / RTX 3090
Storage Crucial MX500
Display(s) 24", 1440p, freesync, 144hz
Case Open Benchtable (OBT)
Audio Device(s) beyerdynamic MMX 300
Power Supply EVGA Supernova T2 1600W
Mouse OG steelseries Sensei
Keyboard steelseries 6Gv2
Software Windows 10
Sadly it seems like I already hit close to the wall. At 3.3GHz it seems stable but I fail to get 3.33GHz to run. I raised Vcore 3x, raised DRAM voltage just for good measure but it didn´t help. I played around with GTL values from 0mV to +60mV but nothing helped. I went down to 3.32GHz but I can already tell it´s not stable from chrome getting site display errors when a tab is open for more then 1 minute.
Seems like a memory communication related issue, but maybe not. I guess 3.3GHz it is then.

Funny enough I found a document about the 780i chipset:


In there they mention some funny voltages for 'safe' OC:


My board can´t even go that high on FSB.
 
Joined
Jul 5, 2013
Messages
25,559 (6.47/day)
Sadly it seems like I already hit close to the wall. At 3.3GHz it seems stable but I fail to get 3.33GHz to run. I raised Vcore 3x, raised DRAM voltage just for good measure but it didn´t help. I played around with GTL values from 0mV to +60mV but nothing helped. I went down to 3.32GHz but I can already tell it´s not stable from chrome getting site display errors when a tab is open for more then 1 minute. Seems like a memory communication related issue, but maybe not. I guess 3.3GHz it is then.
Yeah it does seem like you've hit a wall.
My board can´t even go that high on FSB.
That might not be the problem. It is possible that you've hit the "silicon lottery" wall. That CPU might just be limited to the clocks you've discovered. Personally, I'd drop it to 3.2ghz@1.3v and call it a day. You've achieved a good boost and even though it's not stellar, it's respectable and indeed very workable. Get yourself a GTX1060-6GB or R9-480-8GB and you'll have a damn decent 1080p gaming rig.
 
Joined
Jul 21, 2018
Messages
773 (0.37/day)
Location
Germany
System Name FATTYDOVE-R-SPEC
Processor Intel i9 10980XE
Motherboard EVGA X299 Dark
Cooling Water (1x 240mm, 1x 280mm, 1x 420mm + 2x Mo-Ra 360 external radiator)
Memory 64GB DDR4
Video Card(s) RTX 2080 Super / RTX 3090
Storage Crucial MX500
Display(s) 24", 1440p, freesync, 144hz
Case Open Benchtable (OBT)
Audio Device(s) beyerdynamic MMX 300
Power Supply EVGA Supernova T2 1600W
Mouse OG steelseries Sensei
Keyboard steelseries 6Gv2
Software Windows 10
That CPU might just be limited to the clocks you've discovered. Personally, I'd drop it to 3.2ghz@1.3v and call it a day. You've achieved a good boost and even though it's not stellar, it's respectable and indeed very workable. Get yourself a GTX1060-6GB or R9-480-8GB and you'll have a damn decent 1080p gaming rig.

I agree, it seems to be a hardware limit. I did expect a little more, after I saw reviews and user reports of this board and Q/QX CPUs hit close to 2000 FSB many times. But I have a different CPU, I guess the Xeons don´t like to be OC´d. Still every other example of X5482s I could find reached 3.4 GHz atleast, even in dual CPU setups.

I also agree that the speed I got is absolutly enough. I will leave it at the 3.2.

Might be to late for that tho, I discovered that my Windows install is hurt pretty bad from whatever happened so far. It started with chrome tabs closing with errors, prompting a refresh. I went back down to 3.2GHz and 1600 FSB, 800 on the RAM (which is its stock speed, no OC here). Rebooted and was greeted with my explorer crashing every time I open anything. Even opening the start menu crashed it almost instantly. It restarted no problem but then crashed again soon after.
So I typed fast and opened cmd.exe with admin rights, ran a couple sfc /scannow.


Many broken files, and about half of them could not be repaired as it said the file in store is corrupted too. After it repaired the things it could I can no longer start my browser, it just closes instantly without any error or crash report.
I repeated the repair process 5 times, after the 3rd it stopped repairing anything and just listed the things it couldn´t repair. These files are still many in number and I don´t think I have the patience to try and fix them manually. Something is still very busted, as I looked at the .txt file I got a hard freeze and had to reset. No BSOD.

Before I reinstall the OS, I´d like to find out what killed it to avoid that it all happens twice. Currently running memtest to check if any of my modules might be the culprit. If this shows no errors I´m unsure of where to look. CPU seems stable now, 2 hour prime95 test passed no problem.
Could the GPU setup break windows? I will try a different driver version next time just to be safe.
The only thing that I installed new after the last system recovery point was Sacred 2 from Steam, which came with a bunch of DirectX packages.

Maybe the installation was bad from the start, I don´t know how much I can trust the USB-stick to be reliable. Might try a different one next time.
I knew things like these would happen.

EDIT - Update:

First was a 1 hour pass with the TPU memtest, after that I let memtest86 have go at night. No errors.


My SSD is healthy too, so it should be a software related issue or it is the result of running unstable clocks for a couple of hours.
 
Last edited:
Joined
Jul 21, 2018
Messages
773 (0.37/day)
Location
Germany
System Name FATTYDOVE-R-SPEC
Processor Intel i9 10980XE
Motherboard EVGA X299 Dark
Cooling Water (1x 240mm, 1x 280mm, 1x 420mm + 2x Mo-Ra 360 external radiator)
Memory 64GB DDR4
Video Card(s) RTX 2080 Super / RTX 3090
Storage Crucial MX500
Display(s) 24", 1440p, freesync, 144hz
Case Open Benchtable (OBT)
Audio Device(s) beyerdynamic MMX 300
Power Supply EVGA Supernova T2 1600W
Mouse OG steelseries Sensei
Keyboard steelseries 6Gv2
Software Windows 10
One fresh windows install and everything is back to normal.

Today I went through the trouble to get Sacred 2 Gold edition to run in a manner where one can call the experience enjoyable.
Installed the Steam version as it has the right patch to install a community fix. I tried it without the fix first, but it had some very weird issues. Like frame rendering would suddenly stop, image frozen on a stand still frame while the game continued to run in the background. I could hear it going and even click around and move my character, but it refused to render or display another frame. It could be convinced to continue for another 2-3 minutes by tabbing out of it and back in.
Oh and the game engine does not start with riva tuner overlay in Raster-3D, only Vector-3D and 2D are ok.

After installing the patch it does no longer freeze. Next I had to tackle the graphic settings. The problem with this game engine is the CPU usage. It is a heavy single thread user, fixed on the first core only. GPUs had a usage between 40-60% depending on graphics setting I could even get it up to 70% with physX enabled and all sliders maxed. But none of these settings changed the framerate in a significant way. Medium settings? 70 fps with stutter and drops to 30. Highest settings + PhysX + dynamic weather effects and all the goodies: 65-70 fps with higher GPU usage but the exact same drops and stutter. It felt really bad, I´d call it unplayable. The savior with this title is V-Sync for me. Enabling it seemed to take some load of that single thread by not bothering it with the extra frames. A nice side effect was that all tearing was gone. Suddenly it felt really smooth, a day and night change. Still get some nasty dips with spikes on the CPU usage, but they are much less frequent.
I´m absolutly CPU bound in this game and/or the poor engine is struggling with itself.
And this is something I never managed to get around, even with modern hardware. Which is such a shame, I really love this game and the first one. Love the world that is not taking anything serious, the humor, the strange cast of voice actors for the german language (some famous voices, some of the main characters are spoken by voices that dubbed Star Trek TNG! e.g. the german Data voiced the Inquisitor, one of the playable characters and evil high priest).

<-Without V-Sync, 100% on CPU1 and stutter
<-With V-Sync, 60fps most of the time and a lot smoother + no more tearing

Highest temperature on the GPUs was reached on the dual pcb card at 39°C. Hottest core peaked on 49°C. This was when playing with V-Sync off.
I continued to play for a while and got really hooked with the game once again. If only it could run without that little hiccup every 15-20 seconds.

Next up I want to try one or two 3D benchmarks and raise the GPU clocks a little. I currently have the cores on 576 MHz and the memory on 1008 MHz. I think 600/1100 could be possible, everything on top is a gift. With 4 GPUs you´d have to win the lottery 4x...
 
Joined
Jul 5, 2013
Messages
25,559 (6.47/day)
If only it could run without that little hiccup every 15-20 seconds.
Looks like you have AA on. Turn it down to 2x or off. That hiccup will likely go away as a result. The problem is that the card is having to pause for a few frames while it loads data from system ram. AA takes up a ton of VRAM, so naturally, if you turn AA off or down, VRAM usage will be reduced and the card will not need to go to system ram as often. Your frame rate will increase as well because your GPU will not need to spend as much of it's time doing AA calculations.
 
Joined
Jul 21, 2018
Messages
773 (0.37/day)
Location
Germany
System Name FATTYDOVE-R-SPEC
Processor Intel i9 10980XE
Motherboard EVGA X299 Dark
Cooling Water (1x 240mm, 1x 280mm, 1x 420mm + 2x Mo-Ra 360 external radiator)
Memory 64GB DDR4
Video Card(s) RTX 2080 Super / RTX 3090
Storage Crucial MX500
Display(s) 24", 1440p, freesync, 144hz
Case Open Benchtable (OBT)
Audio Device(s) beyerdynamic MMX 300
Power Supply EVGA Supernova T2 1600W
Mouse OG steelseries Sensei
Keyboard steelseries 6Gv2
Software Windows 10
Looks like you have AA on.
Good catch, yes I had 4x AA (ingame max.) on. I´m not sure if the VRAM is the limitation here, the 295s have 896MB each which to me seems enough. Plus I had the same trouble on my Vega64 with 8GB...
It is the game that is not handling memory well. Turning AA off resulted in less stutter, but it is not gone.


First screen is AA off and you can see how the CPU is still up close to the limit. I may try -nocpubinding and check if that does anything for me. It did still hiccup on 100% usage when moving into an area with 5+ npcs.


This is 4x AA, CPU 100% most of the time and higher VRAM usage. I´d say 2x AA is the better option, 4x does get very blurry and seems to wash out colors on things like grass or the fence.
Something I want to try too is forcing AA via nvidia control panel.

What really hurts retro builds is the increase in missing support for hardware acceleration:


The modern video codecs can not be encoded or decoded in hardware mode it seems, only software and that is taking all of my resources. This 720p video in 60fps is dropping frames, CPU is busy at 80% on all 4 threads to keep up, GPU is up on 84-90% too. 1080p becomes a slideshow.
A bit sad to see that, the hardware is actually capable of playing high res content, but not with the modern standards. I can play in 1440p and 100+ fps, but can´t watch a 720p video :/
Really reducing the usability of such a build for anything other than games. Which is fine for me, but I feel like it doesn´t have to be that way. It´s all about the market and not about a lasting joy.
 
Joined
Jul 5, 2013
Messages
25,559 (6.47/day)
Ah, looks like you're hitting another platform limitation.
I can play in 1440p and 100+ fps, but can´t watch a 720p video :/
If you use Firefox there is an extention you can use to force video players to use h264 instead of VP8/9.
https://addons.mozilla.org/en-US/firefox/addon/h264ify/?src=search
There's also a Video Downloader which will let you download video's direct to your system so you can watch them natively on a video player.
https://addons.mozilla.org/en-US/firefox/addon/video-downloadhelper/?src=search
 
Joined
Jul 21, 2018
Messages
773 (0.37/day)
Location
Germany
System Name FATTYDOVE-R-SPEC
Processor Intel i9 10980XE
Motherboard EVGA X299 Dark
Cooling Water (1x 240mm, 1x 280mm, 1x 420mm + 2x Mo-Ra 360 external radiator)
Memory 64GB DDR4
Video Card(s) RTX 2080 Super / RTX 3090
Storage Crucial MX500
Display(s) 24", 1440p, freesync, 144hz
Case Open Benchtable (OBT)
Audio Device(s) beyerdynamic MMX 300
Power Supply EVGA Supernova T2 1600W
Mouse OG steelseries Sensei
Keyboard steelseries 6Gv2
Software Windows 10
You can call me insane, but fiddling around with all this really got me excited again. And I can´t help but fall in love with this 10 year old platform.

I know it's your childhood dream, and not mine, but I'd still recommend the X5470 over the X5482 if you decide to go XEON.

I will not half-ass this, it´s top-speed or bust. I got a Xeon X5470 to replace the 5482, I take the advise from @mouacyk . I got the x5482 for a pretty 'neutral' cost and thought I could atleast get it into the 3.4Ghz - 3.5GHz range. Not knowing about the limits of 780i when it comes to FSB oc.

The CPU is actually a bottleneck for many games, as I see usage always above 80%. The quad SLI setup is really adding stress on the CPU, as I checked benchmarks from back then I saw how just a single 295 did benefit most from high clocking Q9XXX CPUs and fps + GPU usage really seems to scale well even beyond 3.6GHz CPU clock. So to remove that I will try my luck with the X5470.


To prepare for the case of blowing something up I got spare parts incoming. Bought two more 780i boards (call me insane if you want but I made a decent deal as the one in the picture is a bit dirty and beaten up but still working and the second one coming in will be including a mystery CPU :p) and 2x X5470s. Currently also having my sight on some cheap offers for 1066 5-5-5 DDR2 modules, market is flooded with DDR2 atm. So I can do the science of probing things until they smoke and then try to stay below that line next time :D
I never killed hardware before and I don´t want to but at the same time I really want to see if 1.4V FSB does any harm and I´d like to test how well my RAM is scaling with voltage (or how well my ghetto mod heatsinks work). And before I take those risks I´d like to have spare parts ready.

Oh and I also have 295s on spare, one single pcb card and a dual pcb card. Just in case ;)
 

phill

Moderator
Staff member
Joined
Jun 8, 2011
Messages
15,989 (3.40/day)
Location
Somerset, UK
System Name Not so complete or overkill - There are others!! Just no room to put! :D
Processor Ryzen Threadripper 3970X
Motherboard Asus Zenith 2 Extreme Alpha
Cooling Lots!! Dual GTX 560 rads with D5 pumps for each rad. One rad for each component
Memory Viper Steel 4 x 16GB DDR4 3600MHz not sure on the timings... Probably still at 2667!! :(
Video Card(s) Asus Strix 3090 with front and rear active full cover water blocks
Storage I'm bound to forget something here - 250GB OS, 2 x 1TB NVME, 2 x 1TB SSD, 4TB SSD, 2 x 8TB HD etc...
Display(s) 3 x Dell 27" S2721DGFA @ 7680 x 1440P @ 144Hz or 165Hz - working on it!!
Case The big Thermaltake that looks like a Case Mods
Audio Device(s) Onboard
Power Supply EVGA 1600W T2
Mouse Corsair thingy
Keyboard Razer something or other....
VR HMD No headset yet
Software Windows 11 OS... Not a fan!!
Benchmark Scores I've actually never benched it!! Too busy with WCG and FAH and not gaming! :( :( Not OC'd it!! :(
I remember these boards, they did royally suck from my experience.. That north bridge temp is low compared to what mine was, about 60C if I recall, will need to do some digging for some pics etc :) Not quite the same with the GTX 295, but had dual 8800 GT's which weren't bad at all. Having gone nuts and bought a brand new QX9650 at the time, overclocking on that board was a nightmare.. Memory holes and temps on it were awful.

I'll see if I can grab some pictures of the setup, I believe it was when I had just started water cooling and a bit of benching as well... Was fun but that board was damn frustrating lol
 
Top