• Welcome to TechPowerUp Forums, Guest! Please check out our forum guidelines for info related to our community.

GPU deshroud thread

Joined
Nov 2, 2020
Messages
1,812 (1.05/day)
Location
Tel Fyr
System Name 1️Purple Haze 2️Vacuum Box
Processor 1️AMD Ryzen 7 5800X3D (-30 CO) 2️Intel Xeon E3-1241 v3
Motherboard 1️MSI B450 Tomahawk Max 2️Gigabyte GA-Z87X-UD5H
Cooling 1️Dark Rock 4 Pro, P14, P12, T30 case fans 2️212 Evo & P12 PWM PST x2, Arctic P14 & P12 case fans
Memory 1️32GB Ballistix (Micron E 19nm) CL16 @3733MHz 2️32GB HyperX Beast 2400MHz (XMP)
Video Card(s) 1️6900XTXH ASRock OC Formula LM'd & Phanteks T30x3 2️5700XT Sapphire Nitro+ LM'd & Arctic P12x2
Storage 1️ADATA SX8200 Pro 1TB, Toshiba P300 3TB x2 2️Kingston A400 120GB, Fanxiang S500 Pro 256GB
Display(s) TCL C805 50" 2160p 144Hz VA miniLED, Mi 27" 1440p 165Hz IPS, AOC 24G2U 1080p 144Hz IPS
Case 1️Modded MS Industrial Titan II Pro RGB 2️Heavily Modded Cooler Master Q500L
Audio Device(s) Audient iD14 MKII, Adam Audio T8Vs, Bloody M550, HiFiMan HE400se, Tascam TM-80, DS4 v2
Power Supply 1️Rosewill Capstone 1000M 2️Enermax Revolution X't 730W (both with P14 fans)
Mouse Logitech G305, Bloody A91, Amazon basics, Logitech M187
Keyboard Redragon K530, Bloody B930, Epomaker TH80 SE, BTC 9110
Software W10LTSC 21H2, PBO2, FF, MusicBee, mpv, ImageGlass, OpenRGB, FanControl, Greenshot, DS4Win, Signal
A lot of time has passed since I've wanted to make this thread. Postponed it mostly as I didn't had anything related to show as an example, and I didn't wanted just a little talk about it. The topic is kinda niche, people don't consider doing it because of the warranty void.
But it truly is maybe the best way to increase performance and lower noise. Enjoying the simplicity of an air cooling, as well as an overall cost. That nice water block you've been checking lately, but your wallet or wife (or both) won't let you do it, can wait a bit.
All you need is a flat surface heat sink GPU (or make one with a grinder), zip ties, 2 or 3 high pressure 120mm PWM fans with a decent RPM, mini 4-pin to 4-pin fan adapter (can vary depending on the GPU model, can be found on Aliexpress, Amazon, eBay, or you can make one yourself), a lot of patience and OFC, some skill and courage.

I'll start with my Sapphire 5700XT Nitro+, even though it was a second project (done today), but I forgot to take photos of my ASRock 6900XT OC Formula, and I'm kinda lazy to take it out of my main PC (I'm writing this on) for a photo session. Will do it tomorrow.

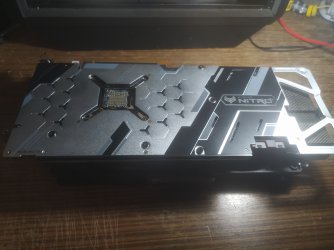
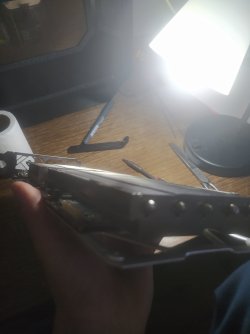
So, the first requirement, a flat surface:
IMG_20230427_182117.jpg

Luckily, it's flat from a factory.

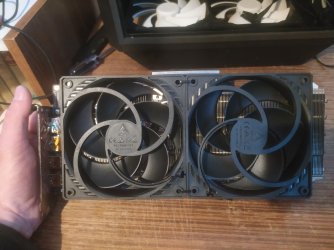
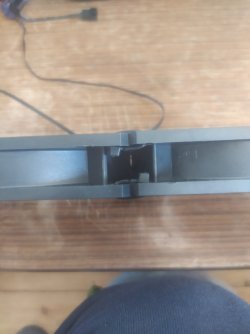
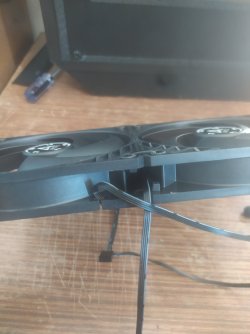
Two decent fans (Arctic P12 PWM PST), connected with a zip ties:
IMG_20230427_164224.jpgIMG_20230427_164241.jpg

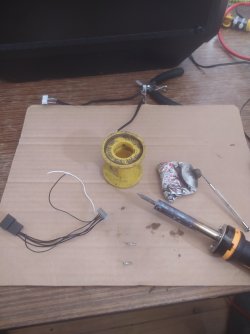
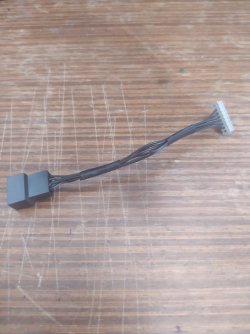
I've made a custom fan header/adapter, because I couldn't find parts to build one from scratch, or to wait a month to get it shipped from China. And OFC I didn't want to destroy the factory one. Not because I plan to sell anything, but because one day I might wish to assemble the card with all stock parts. This particular card is something special TBH. Cooling, design, RGB and everything else, including build quality is pretty amazing (for this tier anyway).

Soldering... Not that I suck at it, but my tools are kinda too hobbyish, IYKWIM.
But it gets the job done. I've found some 8-pin headers in the electric repair shop, know a guy, he let me search through his "soon to be trash" box of wires. Sacrificed one PST part of a fan, and another spare male header I had around for one of the pins:

IMG_20230427_160750.jpgIMG_20230427_163545.jpg

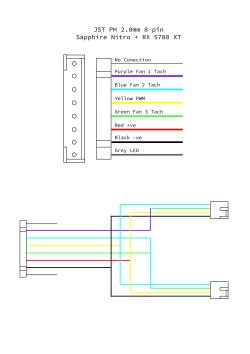
Got the diagram somewhere from Reddit long time ago. The only difference is that I've connected all PWM signal wires into one for obvious reason (one header):

4pindiag.jpeg

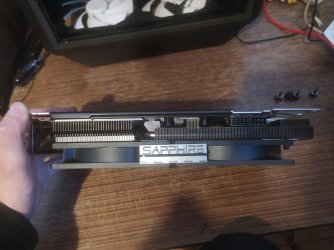
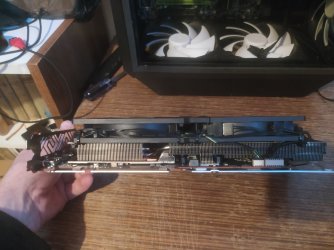
Final result:

IMG_20230427_192154.jpgIMG_20230427_192352.jpgIMG_20230427_192332.jpgIMG_20230427_192402.jpg

You've noticed that I've reused the LED logo from the shroud. Main reason is that the LED on the backplate doesn't work if the logo strip isn't connected.
Important thing to note, you shouldn't hook up fans onto just any spot on the card itself. Try to find the right holes, to prevent warping and bending the PCB too much. I've found the 3 perfect points, as they were already on the heatsink for connecting the shroud.
The fans are in the pull orientation, as it's going to The negative pressure build. Just another awesome trait of the deshroud mod: The ability to change airflow orientation with ease.

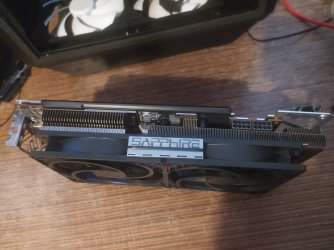
A beauty:

IMG_20230427_192317.jpgIMG_20230427_204419.jpg

--------------------------------------------------------------------------------------------------------------------------------------------------------------

Now, the ASRock 6900XT OC Formula.

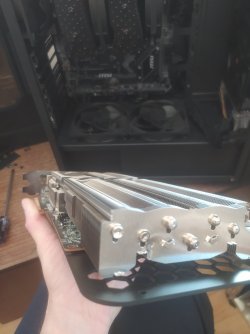
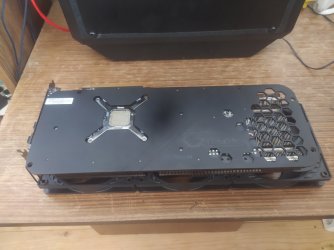
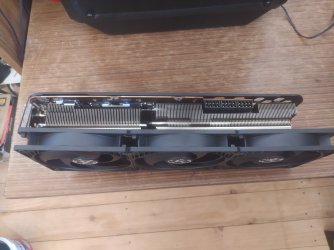
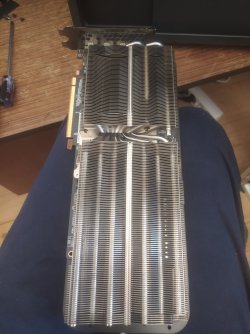
Flat heatsink:

IMG_20230421_133016.jpgIMG_20230421_133030.jpg

And the rest is coming tomorrow. That's it for now, Good night.

P.S.

I hope someone else will contribute to this thread as well, before the WW3 anyway.
 
Last edited:
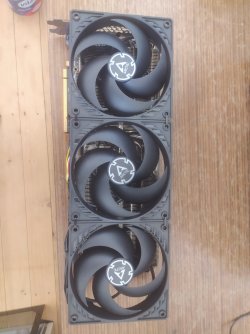
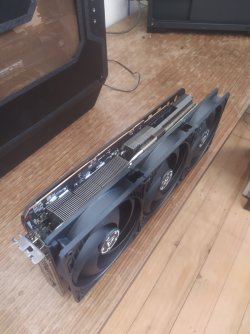
Decided to go with 3 fans:

IMG_20230428_130333.jpg

Soldered the mini 4-pin header onto the standard 4-pin within one of the fans:

IMG_20230428_130251.jpg

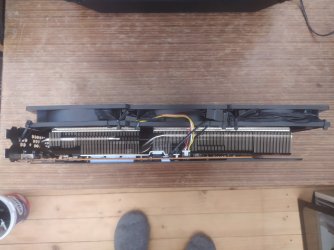
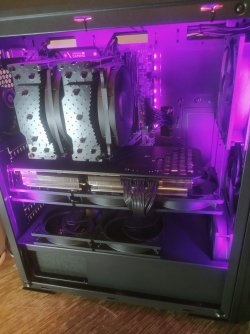
Chosen 3 points for a link to the heatsink, and that's it. Pretty simple and spartan, yet awesome in performance. Even at 1800RPM these fans are not loud. and the temps are excellent.

IMG_20230428_130231.jpgIMG_20230428_130401.jpgIMG_20230428_130451.jpgIMG_20230428_224010.jpg
 
As i really hate seeing Zip ties on hw... they're great for other jobs and i do use them a lot... here's an ideia to adapte (the bracket fix could used/modified or not used at all) and not expensive.
At least to get rid of some of the ties... because theres also a lot of fan clips models around but they will not be compatible with some of the heatsinks...
Theres a special wire (steel spring wire) similar to the pre-made fan clips, on general hardware stores that can be cut and bended for this... for ex., clipping them to the heatsink tubes chamber.
Cheers

1682728949588.png
1682731797752.png


Amazon.com: 104 Pcs 40 cm Stainless Steel Spring Wire Music Wire, 12 Different Straight Full Hard Spring Steel Wire, 0.3 mm, 0.4 mm, 0.5 mm, 0.6 mm, 0.8 mm, 1 mm, 1.2 mm, 1.4 mm, 1.6 mm, 1.8 mm, 2 mm, 3 mm : Industrial & Scientific
 
Last edited:
As i really hate seeing Zip ties on hw... they're great for other jobs and i do use them a lot... here's an ideia to adapte (the bracket fix could used/modified or not used at all) and not expensive.
At least to get rid of some of the ties... because theres also a lot of fan clips models around but they will not be compatible with some of the heatsinks...
Theres a special wire ((steel spring wire) similar to the pre-made fan clips, on general hardware stores that can be cut and bended for this... for ex., clipping them to the heatsink tubes chamber.
Cheers

View attachment 293640
Good idea. Thanks.
 
A lot of time has passed since I've wanted to make this thread. Postponed it mostly as I didn't had anything related to show as an example, and I didn't wanted just a little talk about it. The topic is kinda niche, people don't consider doing it because of the warranty void.
But it truly is maybe the best way to increase performance and lower noise. Enjoying the simplicity of an air cooling, as well as an overall cost. That nice water block you've been checking lately, but your wallet or wife (or both) won't let you do it, can wait a bit.
All you need is a flat surface heat sink GPU (or make one with a grinder), zip ties, 2 or 3 high pressure 120mm PWM fans with a decent RPM, mini 4-pin to 4-pin fan adapter (can vary depending on the GPU model, can be found on Aliexpress, Amazon, eBay, or you can make one yourself), a lot of patience and OFC, some skill and courage.

I'll start with my Sapphire 5700XT Nitro+, even though it was a second project (done today), but I forgot to take photos of my ASRock 6900XT OC Formula, and I'm kinda lazy to take it out of my main PC (I'm writing this on) for a photo session. Will do it tomorrow.

So, the first requirement, a flat surface:

View attachment 293457

Luckily, it's flat from a factory.

Two decent fans (Arctic P12 PWM PST), connected with a zip ties:
View attachment 293459View attachment 293460

I've made a custom fan header/adapter, because I couldn't find parts to build one from scratch, or to wait a month to get it shipped from China. And OFC I didn't want to destroy the factory one. Not because I plan to sell anything, but because one day I might wish to assemble the card with all stock parts. This particular card is something special TBH. Cooling, design, RGB and everything else, including build quality is pretty amazing (for this tier anyway).

Soldering... Not that I suck at it, but my tools are kinda too hobbyish, IYKWIM.
But it gets the job done. I've found some 8-pin headers in the electric repair shop, know a guy, he let me search through his "soon to be trash" box of wires. Sacrificed one PST part of a fan, and another spare male header I had around for one of the pins:
View attachment 293461View attachment 293463

Got the diagram somewhere from Reddit long time ago. The only difference is that I've connected all PWM signal wires into one for obvious reason (one header):
View attachment 293471

Final result:

View attachment 293465View attachment 293468View attachment 293467View attachment 293469

You've noticed that I've reused the LED logo from the shroud. Main reason is that the LED on the backplate doesn't work if the logo strip isn't connected.
Important thing to note, you shouldn't hook up fans onto just any spot on the card itself. Try to find the right holes, to prevent warping and bending the PCB too much. I've found the 3 perfect points, as they were already on the heatsink for connecting the shroud.
The fans are in the pull orientation, as it's going to The negative pressure build. Just another awesome trait of the deshroud mod: The ability to change airflow orientation with ease.

A beauty:
View attachment 293466View attachment 293470

--------------------------------------------------------------------------------------------------------------------------------------------------------------

Now, the ASRock 6900XT OC Formula.

Flat heatsink:
View attachment 293472View attachment 293473

And the rest is coming tomorrow. That's it for now, Good night.

P.S.

I hope someone else will contribute to this thread as well, before the WW3 anyway.
Why? Do you also have the "buzzing-like-a-wasp-syndrome" as well? That's an issue that I'm having with the shroud of my Sapphire Nitro+ RX 6750 XT.

Even though I don't want to change the fans now.
 
As i really hate seeing Zip ties on hw... they're great for other jobs and i do use them a lot... here's an ideia to adapte (the bracket fix could used/modified or not used at all) and not expensive.
At least to get rid of some of the ties... because theres also a lot of fan clips models around but they will not be compatible with some of the heatsinks...
Theres a special wire ((steel spring wire) similar to the pre-made fan clips, on general hardware stores that can be cut and bended for this... for ex., clipping them to the heatsink tubes chamber.
Cheers

View attachment 293640
I ordered these twice and love them. Have a couple fans always ready for my deshrouded GTX690 that has the one fan on it still.
 
I enjoy modifying stuff, as well as experimenting.

No, both of these cards have superb stock cooling solutions, noise and temps wise.
My cooling is good, just that it's too easy for a fan to rub on part of the shroud. In my case, it started after upgrading my cooling to an AIO, after I pulled the video card out then popped the video card back in.
 
My cooling is good, just that it's too easy for a fan to rub on part of the shroud. In my case, it started after upgrading my cooling to an AIO, after I pulled the video card out then popped the video card back in.
Time for a deshroud mod! :D
 
As i really hate seeing Zip ties on hw... they're great for other jobs and i do use them a lot... here's an ideia to adapte (the bracket fix could used/modified or not used at all) and not expensive.
At least to get rid of some of the ties... because theres also a lot of fan clips models around but they will not be compatible with some of the heatsinks...
Theres a special wire (steel spring wire) similar to the pre-made fan clips, on general hardware stores that can be cut and bended for this... for ex., clipping them to the heatsink tubes chamber.
Cheers

View attachment 293640View attachment 293643

Amazon.com: 104 Pcs 40 cm Stainless Steel Spring Wire Music Wire, 12 Different Straight Full Hard Spring Steel Wire, 0.3 mm, 0.4 mm, 0.5 mm, 0.6 mm, 0.8 mm, 1 mm, 1.2 mm, 1.4 mm, 1.6 mm, 1.8 mm, 2 mm, 3 mm : Industrial & Scientific
I recommend getting those fan brackets from ebay, mine cost about 1/3 that what it would have cost in Finland. Practically similar one.
 
Gotta love ghetto mods done to a professional level

I recommend getting those fan brackets from ebay, mine cost about 1/3 that what it would have cost in Finland. Practically similar one.
You mean like these?

$50 Au on amazon (ouch), but if the dimensions fit it would look nice and guide the airflow slightly better
1682738971922.png


These kits never made sense to me before this thread, but now they do
1682739049649.png


You ghetto up your fans, but have a PCI slot cover to help lock them in place
1682739078182.png
 
LoL... your not going to put a plate like that attached on a GPU heatsink...:eek: besides the off fan excess size, thickness, weight and fixed size... thats a plate for other tasks...
But ok... theres tastes of all kind :laugh:
 
Gotta love ghetto mods done to a professional level


You mean like these?

$50 Au on amazon (ouch), but if the dimensions fit it would look nice and guide the airflow slightly better
View attachment 293647


These kits never made sense to me before this thread, but now they do
View attachment 293648

You ghetto up your fans, but have a PCI slot cover to help lock them in place
View attachment 293649
Yup, those PCI slot cover ones. Mine supports 2x 80 or 92mm fans and cost like 3EUR when the same thing with a brand costs like 10EUR. :D
 
LoL... your not going to put a plate like that attached on a GPU heatsink...:eek: besides the off fan excess size, thickness, weight and fixed size... thats a plate for other tasks...
But ok... theres tastes of all kind :laugh:
Just examples of different types of the fan shrouds that exist, i can absolutely see someone modding that into the side of a case for extra GPU cooling.
 
LoL... your not going to put a plate like that attached on a GPU heatsink...:eek: besides the off fan excess size, thickness, weight and fixed size... thats a plate for other tasks...
But ok... theres tastes of all kind :laugh:
The only issue with that expansion slot bracket I can see is in the fact that you want your fans as close to the heatsink as it can get, maximizing the static pressure. Even the 5mm gap can result in a big temperature jump, and I don't think the GPU manufacturers took the deshroud mods in consideration when deciding how thick the heatsink will be.
 
  • Like
Reactions: N/A
The only issue with that expansion slot bracket I can see is in the fact that you want your fans as close to the heatsink as it can get, maximizing the static pressure. Even the 5mm gap can result in a big temperature jump, and I don't think the GPU manufacturers took the deshroud mods in consideration when deciding how thick the heatsink will be.
Offset the entire thing slightly higher with some washers, til it's where you need it - then seal the deal with some gaffer tape
 
If you seal the gap just above the fans, you'll get more static pressure and get better cooling with lower RPM's

Card is sagging so my photoshop isnt level either - but if you had it covered up less than the halfway mark (Even just thick paper/card), you'd guide more air over the fins, while still leaving room for the air to exhaust out the remainder (increasing the pressure, but also letting it vent out quietly)

1687673660710.png


definitely add some support at the back of that GPU, it'll eventually take damage from the sag
 
Sealing is not so easy tbh, because the edge of the fans is not aligned with the heatsink. Since the card is already very quiet with the modification as is, I don't see a reason to put in much more effort. I also don't plan to do anything about the sag, it does not seem to be worse than with the stock card since the fans aren't really heavy.

IMG20230625115212.jpg
 
Last edited:
That's the thing with brackets vs full zipties solution. With brackets in 99% there will be a gap I strictly want to avoid. Even a few mm gap will count towards a big pressure loss. But these beasts already have a huge heatsinks, and a P12's 1800rpm will suffice anyway. So if the temps are in check, there's no need to nitpick.
 
That's the thing with brackets vs full zipties solution. With brackets in 99% there will be a gap I strictly want to avoid. Even a few mm gap will count towards a big pressure loss. But these beasts already have a huge heatsinks, and a P12's 1800rpm will suffice anyway. So if the temps are in check, there's no need to nitpick.
And screws would damage fins unless if you find tiny bolts, nuts, plastic/rubber washers
 
As i really hate seeing Zip ties on hw... they're great for other jobs and i do use them a lot... here's an ideia to adapte (the bracket fix could used/modified or not used at all) and not expensive.
At least to get rid of some of the ties... because theres also a lot of fan clips models around but they will not be compatible with some of the heatsinks...
Theres a special wire (steel spring wire) similar to the pre-made fan clips, on general hardware stores that can be cut and bended for this... for ex., clipping them to the heatsink tubes chamber.
Cheers

View attachment 293640View attachment 293643

Amazon.com: 104 Pcs 40 cm Stainless Steel Spring Wire Music Wire, 12 Different Straight Full Hard Spring Steel Wire, 0.3 mm, 0.4 mm, 0.5 mm, 0.6 mm, 0.8 mm, 1 mm, 1.2 mm, 1.4 mm, 1.6 mm, 1.8 mm, 2 mm, 3 mm : Industrial & Scientific
1687718029303.png


Multi PURPSE!
 
Sealing is not so easy tbh, because the edge of the fans is not aligned with the heatsink. Since the card is already very quiet with the modification as is, I don't see a reason to put in much more effort. I also don't plan to do anything about the sag, it does not seem to be worse than with the stock card since the fans aren't really heavy.

View attachment 302375
Long term the card will fail as it flexes and cracks the solder - heat speeds it up.
It wont take much to lift it up, even just routing the power cables from above can be enough.

On the shroud/guiding airflow it's not always needed since the heatsink fins themselves help, depending how close they are but its something that can be done for very low cost depending what you have on hand.

Back when i had my NZXT Kraken G12, i used that spacing with regular old paper and LED light strips behind it to block the air going a direction i didnt want, and it looked fancy as a diffuser
PXL_20201204_044906311.MP-2.jpg
 
Last edited:
Due to some mistakes in my recent post, I got it removed and now want to bring a corrected version back online:

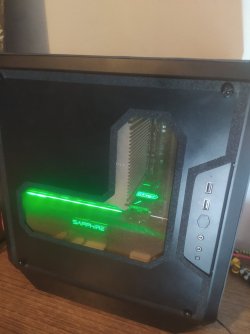
Hi all! I also want to showcase my deshrouded XFX Radeon 6950XT MERC. I got the inspiration from theborv, I basically copied his work on a 6900XT MERC. This is an awesome alternative to watercooling imo, since you don't break any warranty void stickers, the mod is easy to do and it really does reduce noise AND temps at the same time. The stock card was unbearable in terms of loudness for me personally, thus I always used the silent preset (-10% power target) in the AMD settings. Now it is dead quiet at the stock profile, and also bearable with OC settings.

Since there are not so many pictures of this process for the XFX MERC models, I decided to document this process in order to encourage more people to silence their XFX 6800-6950XT MERC cards. First, you need to unscrew the six screws between the fans. These were really tight on my card, so you should use a screwdriver that really fits into the tiny screw head and also apply some downward pressure while untightening the screws. Luckily, the LEDs on the card are wired to the fans, so you only need to worry about the single 4pin header while taking of the shroud. Also, the fans are screwed to the shroud, so the whole assemly comes of in one piece, making mods/repairs on this card very easy.

01_shroud_unscrewed.jpg
02_fan_connector.jpg


I next plugged an adapter into the card's fan header, so that I can hook the 120mm fans directly to the card. Alternatively, hooking the fans to the motherboard and using FanControl would also work fine. With the shroud removed, there is much less restriction on the side, where you normally have the illuminated XFX and Radeon logos.

03_6950XT_merc_deshrouded.jpg
04_6950XT_merc_deshrouded_2.jpg


I bought a kit that allows to fixate 120mm fans to a PCIe slot. Since the kit was only designed for two fans, I used both metal brackets on one side to hold all three fans together, and used zipties on the other side. The fans are the Arctic P12 PWM PST.

05_fan_array.jpg


This assembly can be installed in the slot right below the graphics card, leaving only a small gap between the fans and finstack. A strap prevents the fans to hang ~1.5cm below the finstack at the right edge. Finally, I secured the cabling mess at the side and was done with the mod.

06_card_installed.jpg


Now I happily use my card with the stock preset, the default fan curve also works surprisingly well with these fans.
 
Due to some mistakes in my recent post, I got it removed and now want to bring a corrected version back online:

Hi all! I also want to showcase my deshrouded XFX Radeon 6950XT MERC. I got the inspiration from theborv, I basically copied his work on a 6900XT MERC. This is an awesome alternative to watercooling imo, since you don't break any warranty void stickers, the mod is easy to do and it really does reduce noise AND temps at the same time. The stock card was unbearable in terms of loudness for me personally, thus I always used the silent preset (-10% power target) in the AMD settings. Now it is dead quiet at the stock profile, and also bearable with OC settings.

Since there are not so many pictures of this process for the XFX MERC models, I decided to document this process in order to encourage more people to silence their XFX 6800-6950XT MERC cards. First, you need to unscrew the six screws between the fans. These were really tight on my card, so you should use a screwdriver that really fits into the tiny screw head and also apply some downward pressure while untightening the screws. Luckily, the LEDs on the card are wired to the fans, so you only need to worry about the single 4pin header while taking of the shroud. Also, the fans are screwed to the shroud, so the whole assemly comes of in one piece, making mods/repairs on this card very easy.

View attachment 302585View attachment 302586

I next plugged an adapter into the card's fan header, so that I can hook the 120mm fans directly to the card. Alternatively, hooking the fans to the motherboard and using FanControl would also work fine. With the shroud removed, there is much less restriction on the side, where you normally have the illuminated XFX and Radeon logos.

View attachment 302587View attachment 302588

I bought a kit that allows to fixate 120mm fans to a PCIe slot. Since the kit was only designed for two fans, I used both metal brackets on one side to hold all three fans together, and used zipties on the other side. The fans are the Arctic P12 PWM PST.

View attachment 302589

This assembly can be installed in the slot right below the graphics card, leaving only a small gap between the fans and finstack. A strap prevents the fans to hang ~1.5cm below the finstack at the right edge. Finally, I secured the cabling mess at the side and was done with the mod.

View attachment 302590

Now I happily use my card with the stock preset, the default fan curve also works surprisingly well with these fans.
You could've just ask any mod for a post edit though.
Off topic: I see you're using dark rock pro 4 as well. Which CPU, and how are your temps? You happy with it?
 
You could've just ask any mod for a post edit though.
Off topic: I see you're using dark rock pro 4 as well. Which CPU, and how are your temps? You happy with it?
Well I reported it and a mod removed it, doesn't matter. ^^
I originally bought the Dark Rock Pro 4 for a 9700K. It could handle this power hungry CPU very well. Now I am in a 7800X3D, the cooler is totally overkill obviously, but it made no sense to sell it for a cheaper one. Temps reach up to 85C, but probably due to the high power density. Funnily, fan speed setting almost doesn't make any difference on the temps.
 
Back
Top