• Welcome to TechPowerUp Forums, Guest! Please check out our forum guidelines for info related to our community.

Night Fury - SR-2 [dual LGA1366]

Joined
Jul 21, 2018
Messages
773 (0.37/day)
Location
Germany
System Name FATTYDOVE-R-SPEC
Processor Intel i9 10980XE
Motherboard EVGA X299 Dark
Cooling Water (1x 240mm, 1x 280mm, 1x 420mm + 2x Mo-Ra 360 external radiator)
Memory 64GB DDR4
Video Card(s) RTX 2080 Super / RTX 3090
Storage Crucial MX500
Display(s) 24", 1440p, freesync, 144hz
Case Open Benchtable (OBT)
Audio Device(s) beyerdynamic MMX 300
Power Supply EVGA Supernova T2 1600W
Mouse OG steelseries Sensei
Keyboard steelseries 6Gv2
Software Windows 10
Oh at that point it was still far from 'up and running' for the system...

The past two days were an interesting set of ups and downs. This is for sure the most complicated thing I´ve build so far. There are still so many things to do, but I can give you all an update on what happened so far and where I stand right now.

Let´s start with me getting the waterblock and jumping into action. I immediatly finished the work on both CPUs, that means sanding and lapping the surface of each die to make them even.


I had hoped I would not have to remove the top layer, but there was no way around it. The die on this one was so uneven that while the center was already through the diffusion barrier, the corners still had traces of indium left on them...
So this is where I ended up with the whole die now being shiny from edge to edge.

Next up was mounting the waterblock.

(yes the top CPU was not yet lapped in this pic, don´t worry I did not forget about it!)


I went with Kryonaut on the ASICs and the Thermal Grizzly minus pads for the VRMs including the inductors. After installation I checked from the side with a strong flashlight if I had good contact all around and noticed that while it made contact, the copper surface of the cooler came very very close to the SMD caps on the chip substrates. So close in fact that I got a little nervous and for good measure I removed the cooler again and put a very thin slice of non-conductive thermal pad across them and remounted everything. Now I felt a lot better about it.

Next was installing the CPU blocks. I removed the sockets and used my own backplates to go direct die. I put liquid metal on the die and covered the surrounding SMDs with kapton-tape. Before mounting the second block I connected them with the first tube and my 90° fittings to have atleast one connection that does not have to go straight up, as these were my only 90° fittings. I did not plan that very well, but it resulted in something (for my eyes) beatiful which you will see later.


Having the board prepared I went back to my case. I installed drives, PSU etc.. I mounted the fans and radiators. After that I tried to fit the mainboard, and wow. It´s really large who would have thought. So large in fact that I had to remove the radiator in front of the drive bay, because it was blocking the 24-pin power connector. So I had to attach the connector, then put the mainboard in and then remount the radiator.

No, this time I actually did not forget to install the I/O-Shield beforehand! First time!
With the board, coolers and radiators in place it was time to build the loop. And that was like staring at a blank piece of paper with the goal to draw a cubistic horse. Once I had a start tho, it all kinda came together.
I only moved two connections around in the end so that I had the internal radiators sit between the board/CPU side and the GPU.

Speaking of the GPU, I made my life a little easier by buying a waterblock version. It was not my first choice brand, I had to go with Inno3D but they are ok I think and after all it´s just a reference model with a mediocre waterblock on top. Plus this is the first time I can have a warranty on a watercooled part, as in Germany as soon as you touch a screw you loose all warranty support.
It´s an RTX2080 Super, this should make for a perfectly CPU bottlenecked system and show exactly what this platform can and can not do.

So this is what the loop looks like:


The 'mess' of tubes you are looking at is the magnificent, beating heart of this beast. Let me explain the loop order:
We start with the tube that is split by fittings and the inline-temp sensor. This tube comes from the pump/res combo outflow and goes into the mainboard block. From there we go straight up into the right CPU, out of the right CPU into the left CPU, out of the left CPU into the drive bay radiator, out of that radiator into the top radiator, out of the top radiator into the GPU, out of the GPU into the VRM-cooler, out of the VRM cooler to the external radiator and from there back into the reservoir.
The line back from the external rad is hidden behind the top radiator, I had to get that in with the mainboard out of the case too.

This is madness you may say, well yes it is but there will be two D5s powering this heart.

Next up was filling the loop, leak testing and bleeding the air out. As you can imagine by looking at this now, getting the air out was a bit of a pain. But as another first for my builds this one had not a single leak. Apart from me leaving the fill port open while carrying it so I had some spills.

The D5s were airlocked from the start, so I used a long tube and my lung to fill most of it up. In total I got 1.6 liters of fluid in there. To bleed it, I let it run at different speed settings, from slow to full blast. After that there were still two major pockets in the system, one on the left CPU block. That one always got pushed down into the drive bay radiator but never made it fully through to the other side. I carefully removed the radiator with the tubes attached and tilted it a bit while running and gave it a shake. This got the air through, after that I had some big bubbles left in the GPU block. Same procedure, took the GPU out and carefully moved it around with the tubes attached.

Finally I had the air out. Next I had to do the power cables for the board and GPU. I managed them as well as I could but the big mainboard cable was not possible to hide. In the front it looks ok-ish, but
the backside is where the copper-snakes party:


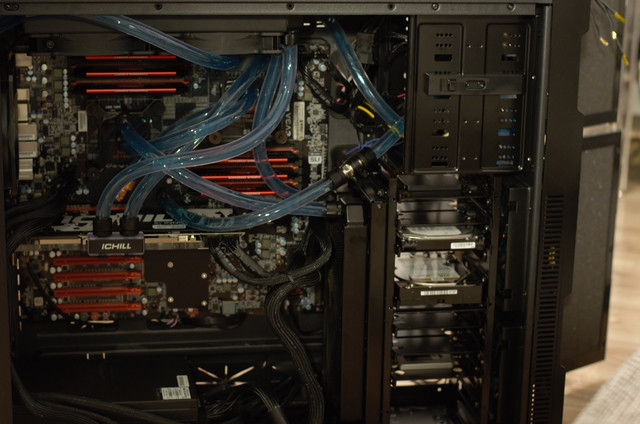
This is the system wired up and filled:


Through all these steps I carefully checked underneath each socket multiple times to see if I had any liquid metal spills. Upon attaching the tubes I had to push down on the CPUs to get them on, that was one of the most nerve wrecking things as I knew I was pushing straight on a bare die with liquid metal and the socket of a rare/expensive collectors board.

But after all I now had no excuse to wait any longer with the first power-on. I think you all believe me when I say this was a special moment.

Pushed the button and... Absolute quietness. A bit too quiet to be comfortable. LEDs suddenly light up, temp-sensor is on, fan controller is on, board starts going through all post codes and when it spoke to me with it´s clacking speaker noise I knew it was as happy to be alive as I was.
But still absolutly no noise apart from the barely noticable pumps. The fans were not spinning. My controller was on but the fans were not. I checked the connections, all wired up.
Well with so much fluid in the system it can run passive for a while. I went into bios and checked my system temps. All looked perfectly fine.

I powered off again and went to troubleshoot the fan-controller... To be continued, I need to grab a coffee :p
Build is running, no major issues but many small things that I will tell you about how I solved them soon and many things that I still need to do at this point.


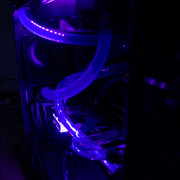
EDIT: That is the vortex from the photo during bleeding the air out
 
Joined
Jul 21, 2018
Messages
773 (0.37/day)
Location
Germany
System Name FATTYDOVE-R-SPEC
Processor Intel i9 10980XE
Motherboard EVGA X299 Dark
Cooling Water (1x 240mm, 1x 280mm, 1x 420mm + 2x Mo-Ra 360 external radiator)
Memory 64GB DDR4
Video Card(s) RTX 2080 Super / RTX 3090
Storage Crucial MX500
Display(s) 24", 1440p, freesync, 144hz
Case Open Benchtable (OBT)
Audio Device(s) beyerdynamic MMX 300
Power Supply EVGA Supernova T2 1600W
Mouse OG steelseries Sensei
Keyboard steelseries 6Gv2
Software Windows 10
Next up I looked at the fan controller, scratching my head why the fans would not spin. It turned on, it had all the lights going and everything.

I hooked it up outside of the case with a different PSU and the same thing happened except that one of the test fans, a very small one, turned on while the bigger ones did not. So I looked at the manual and found out that the controller defaults to an 'auto-mode' that applies 4V at all times and only ramps up when the temperature probes report higher temperatures (40°C and up).
You need to switch back into manual mode to control the fans yourself, otherwise you can push the buttons all day long and nothing will change.

Well I was pleased to find everything working and put it back in, had to do all the fan cables again etc.. Powered back on and this time I had fans too. So time for the windows installation.
I installed windows 10 and all the drivers for chipset, USB etc.. Got some monitoring software going and let CPU-Z stresstest run for a bit:


Don´t get fooled by the big temp delta between the cores, as you can see by the idle temps most of the core sensors read far to low. The 38°C / 39°C load figures seem to be most realistic, as that is what my OC-bench X5650 did with the same direct die, liquid metal cooling under the same model waterblock.
I´m a bit confused by the readouts from the SR-2. What does it mean by CPU-PWM? Is that an offset temperature to control the CPU-fan headers? Or do they mean the VRMs with that?
What are the nebulous 'System' and 'System 2' temps? They do seem to correspond with the water-temp of the loop so maybe those are NB and SB?

After that I turned everything off and hooked up my other drives. I usually start with only the boot drive attached, so that I can´t be an idiot and choose the wrong partition for installation. Yes that happened to me before...
After the restart I noticed something unpleasent, the fans were not spinning again. I had to switch back to manual mode on each channel again and set the speeds for each channel too. It did not remember my settings, which is odd because it should do that according to the manual. And if I remember correctly, it actually did that 3 months ago when I received the unit and tested it. What the heck.
The auto-translated manual is not very detailed so I can´t figure out if there is a button combination I need to press or something in order to save my profile. I´m currently looking into that issue.

Upon booting with all drives attached (I have 2x SSDs 250GB / 500GB and 2x HDDs 1TB / 4TB) it started loading windows 7 and BSODed. You read that correct, it attempted to boot Win 7 from a partition I had left on the other SSD. I had a very short moment where I thought I messed something up or the controller on the board could not handle my drives until I remembered that and I realized I saw the Win 7 loading screen and not Win 10.
Back into bios I found a weird issue with the RTC as the time had just been dialed back exactly 4 hours. No idea what caused that, but I set it to the correct time again and for now it seems to hold it.

Here is a quick peek of it running:


The LEDs from the GPU are burning holes in my camera, I need to play with the RGB software and set that up too, but that is for later. I also need to set up my RGB-strips and hook up the RGB controller I got. But the most pressing issue atm is to figure my fan controller out.
I would not mind setting it up with each boot IF it wouldn´t be such a long process. I need to hold the buttons on each channel for 3 seconds to switch over to manual mode, that alone is 12 seconds. After that I need to set the voltages on each channel with 0,5V bumps per click, that is another 40-60 button presses each time. If I can´t figure this out, the beautiful CU423 sadly has to go.

The GPU-blocks performance is another thing I´m considering to investigate next. It reached already 45°C with the GPU-Z render test at only 160W and 60% load. To be fair it did boost to full clockspeed of 2050MHz but at full load that temp would be hitting in the 60°C range. Absolutly horrible for a custom watercooled card. Either the block design is bad (by looking at it I can see multiple reasons why) or they used horrible TIM (most likely they did, that´s a common thing among pre-build GPUs) and/or the mounting pressure is not enough and I need to look into that.
Problem is, if I do anything to the card like changing TIM or removing the backplate to check the screws to the block I would loose the warranty. I might just run it as is for a year and then fix it myself, but that depends how horrible it really is. Some customer claimed his card with this block reached 70°C, I hope mine doesn´t. If so I´ll return it.

And thats all for now. Will report back as soon as I got most things sorted out :)
 

phill

Moderator
Staff member
Joined
Jun 8, 2011
Messages
15,989 (3.40/day)
Location
Somerset, UK
System Name Not so complete or overkill - There are others!! Just no room to put! :D
Processor Ryzen Threadripper 3970X
Motherboard Asus Zenith 2 Extreme Alpha
Cooling Lots!! Dual GTX 560 rads with D5 pumps for each rad. One rad for each component
Memory Viper Steel 4 x 16GB DDR4 3600MHz not sure on the timings... Probably still at 2667!! :(
Video Card(s) Asus Strix 3090 with front and rear active full cover water blocks
Storage I'm bound to forget something here - 250GB OS, 2 x 1TB NVME, 2 x 1TB SSD, 4TB SSD, 2 x 8TB HD etc...
Display(s) 3 x Dell 27" S2721DGFA @ 7680 x 1440P @ 144Hz or 165Hz - working on it!!
Case The big Thermaltake that looks like a Case Mods
Audio Device(s) Onboard
Power Supply EVGA 1600W T2
Mouse Corsair thingy
Keyboard Razer something or other....
VR HMD No headset yet
Software Windows 11 OS... Not a fan!!
Benchmark Scores I've actually never benched it!! Too busy with WCG and FAH and not gaming! :( :( Not OC'd it!! :(
Looking great my man!! :D :D So glad everything is working and running well :) These Xeon's do not heat up very much at all at stock but I think with a little voltage put through them, they can most definitely get a little warmer :D

I've now two X5675's but I've yet to have a play around with them... I might just have to have a go but it's not the best loop in the world for me.. I love how your's is soooooo complex!! :D Looks most definitely like a heart :D :D Can't wait to see more.... :)
 
Joined
Jul 21, 2018
Messages
773 (0.37/day)
Location
Germany
System Name FATTYDOVE-R-SPEC
Processor Intel i9 10980XE
Motherboard EVGA X299 Dark
Cooling Water (1x 240mm, 1x 280mm, 1x 420mm + 2x Mo-Ra 360 external radiator)
Memory 64GB DDR4
Video Card(s) RTX 2080 Super / RTX 3090
Storage Crucial MX500
Display(s) 24", 1440p, freesync, 144hz
Case Open Benchtable (OBT)
Audio Device(s) beyerdynamic MMX 300
Power Supply EVGA Supernova T2 1600W
Mouse OG steelseries Sensei
Keyboard steelseries 6Gv2
Software Windows 10
I´m mostly done with it now. I did some finishing touches, added a few things like the RGB-strips and closed the side panels for the first time.

Here it is teasing me since august, my 'Night Fury':


I´ve added another fan on the drive-bay radiator so atleast the lower part is now push/pull. As you can see from the light, I´ve also added the RGB strips and the controller from CoolerMaster. One strip on the top-front side and one on the front-backside of the case. Very simple to control, plugs into an empty USB-header on the board.
I matched to color of the card to the purple glow and lowered the brightness 3 steps, for the camera it´s still too much but in person it´s ok now.

I finished the 'cable-management' on the backside. With that I mean I tied them up so that I can close the side panel without the use of excessive force. Please ignore the one white cable, it was all I had for RGB-extensions.


The two yellow kapton-taped probes are temperature sensors for the fan-controller. I placed them close to the socket and I have two more with one just hanging somewhere in that cable mess and one taped to the top of an HDD right in the stream of my front intake.

I had to improvise with the RGB-cable connection, as my LEDs did not have the same connector as the controller and extension cable.


I did manage to get one of the double-male connectors wedged in the female end of the cable but had to secure it with shrink-wrap. Works perfect and is more durable than I thought.

As for the GPU, this is why I think the block design is not good:


The arrows mark where most of the flow will pass through as the direct passage from in to out is not blocked in any way. On the box of the card there is a rendered waterblock image that shows a completly different design. And they did team-up with Alphacool on this block, but I can´t find this design anywhere to buy on their website, they all have a more aggressive flow-guidance. I wonder why....
The card without my scribbles:


But thanks to a high flowrate it should be good enough, there is still some water going across the whole finstack.

Some more photos:


Sadly my camera has some trouble with the strong LEDs. The bright purple color comes throught mostly realistic, but the temp-display for example should be deep red but shows up orange.


The view behind the upper front door turned out okay the way it is I think. I was a bit worried the missing cover and recessed res / fan-controller would look horrible.


Again the bright LEDs upsetting my camera.

As for the fan-controller I did not yet figure out the issue with it and how to save my profile. So I´m using a workaround: I hooked up the 280mm push/pull fans to the controller built into the case and only use two channels of the fancy controller. These can be set-up in a reasonable amount of time (exactly the time it takes for the SR-2 to complete it´s long boot time) and I can use the free two channels just as temperature gauges for the probes.
I have written an email to the manufacturer, the manual was a bit so and so on the english translation but they seem rather friendly. I hope to hear back from them, if they can´t help me I´m a bit torn between getting something else and keeping this unique look. Replacing it would be more simple than you might think, as the cables are standard between most of these units and I´d just have to unplug them from the back of the current one.

Maybe I´ll just make setting it up each time a 'start-up procedure' like aircrafts have them and scribble it on a post-it note that I hide on the back of the swing-open door.


And from the outside it looks so tame and innocent.


Excuse the bad smartphone pictures, it was kind of an afterthought to include pics of the outside.

And after all this I was still not 100% satisfied with the air-cooling part of this. I´m fixed on constant improvement, maybe also on complicating things just a bit further each time and felt like I could do some more. A final touch. My usual ghetto-mod style was still missing. Something that lives on from my previous build. I held my face close to the board to find places emitting heat. I found the QPI-VRMs from each CPU to be the 'hottest' parts now. By hot I mean at current stock settings you could touch them and it felt skin-warm. Can´t be more than 36°C-38°C. Still. Let´s put some airflow over that:


Now it´s ready for the drag-strip. The part below the GPU has some activ airflow over it too by the side-panel intake fans that I decided to include. ALL intake fans (front/side and bottom PSU) are behind dust-filters.
I´ve hidden the connectors for the side-panel fans in a neat spot beneath the lower SSD-tray. A simple noctua Y-cable going to the back.


And with that it´s closed, beating heart and breathing lung. It´s alive. I got exactly the look I wanted it to have. Clean, tame on the outside. But there is this faint glow on the top vents, the deep but soft hum and that not so subtle external MO-RA 360. VERY quiet! The PSU fan makes the most noise but is muffled by the heavy noise-dampened side-panels. The big external radiator fans spin very slow at ~ 500RPM.
The loop water-temp at idle is only 1,5-2°C above ambient but I think the system has a serious idle power consumption.

Looking at this I feel pleased. Next will be overclocking and some game testing. But first I have to clean up my apartment a bit. There are zip ties everywhere, cable bags, coffee mugs, boxes on top of boxes.
 
Joined
Mar 16, 2017
Messages
1,675 (0.64/day)
Location
Tanagra
System Name Budget Box
Processor Xeon E5-2667v2
Motherboard ASUS P9X79 Pro
Cooling Some cheap tower cooler, I dunno
Memory 32GB 1866-DDR3 ECC
Video Card(s) XFX RX 5600XT
Storage WD NVME 1GB
Display(s) ASUS Pro Art 27"
Case Antec P7 Neo
Very nice work. Do you plan to OC the Xeons? That era had a lot of headroom.
 

phill

Moderator
Staff member
Joined
Jun 8, 2011
Messages
15,989 (3.40/day)
Location
Somerset, UK
System Name Not so complete or overkill - There are others!! Just no room to put! :D
Processor Ryzen Threadripper 3970X
Motherboard Asus Zenith 2 Extreme Alpha
Cooling Lots!! Dual GTX 560 rads with D5 pumps for each rad. One rad for each component
Memory Viper Steel 4 x 16GB DDR4 3600MHz not sure on the timings... Probably still at 2667!! :(
Video Card(s) Asus Strix 3090 with front and rear active full cover water blocks
Storage I'm bound to forget something here - 250GB OS, 2 x 1TB NVME, 2 x 1TB SSD, 4TB SSD, 2 x 8TB HD etc...
Display(s) 3 x Dell 27" S2721DGFA @ 7680 x 1440P @ 144Hz or 165Hz - working on it!!
Case The big Thermaltake that looks like a Case Mods
Audio Device(s) Onboard
Power Supply EVGA 1600W T2
Mouse Corsair thingy
Keyboard Razer something or other....
VR HMD No headset yet
Software Windows 11 OS... Not a fan!!
Benchmark Scores I've actually never benched it!! Too busy with WCG and FAH and not gaming! :( :( Not OC'd it!! :(
I´m mostly done with it now. I did some finishing touches, added a few things like the RGB-strips and closed the side panels for the first time.

Here it is teasing me since august, my 'Night Fury':


I´ve added another fan on the drive-bay radiator so atleast the lower part is now push/pull. As you can see from the light, I´ve also added the RGB strips and the controller from CoolerMaster. One strip on the top-front side and one on the front-backside of the case. Very simple to control, plugs into an empty USB-header on the board.
I matched to color of the card to the purple glow and lowered the brightness 3 steps, for the camera it´s still too much but in person it´s ok now.

I finished the 'cable-management' on the backside. With that I mean I tied them up so that I can close the side panel without the use of excessive force. Please ignore the one white cable, it was all I had for RGB-extensions.


The two yellow kapton-taped probes are temperature sensors for the fan-controller. I placed them close to the socket and I have two more with one just hanging somewhere in that cable mess and one taped to the top of an HDD right in the stream of my front intake.

I had to improvise with the RGB-cable connection, as my LEDs did not have the same connector as the controller and extension cable.


I did manage to get one of the double-male connectors wedged in the female end of the cable but had to secure it with shrink-wrap. Works perfect and is more durable than I thought.

As for the GPU, this is why I think the block design is not good:


The arrows mark where most of the flow will pass through as the direct passage from in to out is not blocked in any way. On the box of the card there is a rendered waterblock image that shows a completly different design. And they did team-up with Alphacool on this block, but I can´t find this design anywhere to buy on their website, they all have a more aggressive flow-guidance. I wonder why....
The card without my scribbles:


But thanks to a high flowrate it should be good enough, there is still some water going across the whole finstack.

Some more photos:


Sadly my camera has some trouble with the strong LEDs. The bright purple color comes throught mostly realistic, but the temp-display for example should be deep red but shows up orange.


The view behind the upper front door turned out okay the way it is I think. I was a bit worried the missing cover and recessed res / fan-controller would look horrible.


Again the bright LEDs upsetting my camera.

As for the fan-controller I did not yet figure out the issue with it and how to save my profile. So I´m using a workaround: I hooked up the 280mm push/pull fans to the controller built into the case and only use two channels of the fancy controller. These can be set-up in a reasonable amount of time (exactly the time it takes for the SR-2 to complete it´s long boot time) and I can use the free two channels just as temperature gauges for the probes.
I have written an email to the manufacturer, the manual was a bit so and so on the english translation but they seem rather friendly. I hope to hear back from them, if they can´t help me I´m a bit torn between getting something else and keeping this unique look. Replacing it would be more simple than you might think, as the cables are standard between most of these units and I´d just have to unplug them from the back of the current one.

Maybe I´ll just make setting it up each time a 'start-up procedure' like aircrafts have them and scribble it on a post-it note that I hide on the back of the swing-open door.


And from the outside it looks so tame and innocent.


Excuse the bad smartphone pictures, it was kind of an afterthought to include pics of the outside.

And after all this I was still not 100% satisfied with the air-cooling part of this. I´m fixed on constant improvement, maybe also on complicating things just a bit further each time and felt like I could do some more. A final touch. My usual ghetto-mod style was still missing. Something that lives on from my previous build. I held my face close to the board to find places emitting heat. I found the QPI-VRMs from each CPU to be the 'hottest' parts now. By hot I mean at current stock settings you could touch them and it felt skin-warm. Can´t be more than 36°C-38°C. Still. Let´s put some airflow over that:


Now it´s ready for the drag-strip. The part below the GPU has some activ airflow over it too by the side-panel intake fans that I decided to include. ALL intake fans (front/side and bottom PSU) are behind dust-filters.
I´ve hidden the connectors for the side-panel fans in a neat spot beneath the lower SSD-tray. A simple noctua Y-cable going to the back.


And with that it´s closed, beating heart and breathing lung. It´s alive. I got exactly the look I wanted it to have. Clean, tame on the outside. But there is this faint glow on the top vents, the deep but soft hum and that not so subtle external MO-RA 360. VERY quiet! The PSU fan makes the most noise but is muffled by the heavy noise-dampened side-panels. The big external radiator fans spin very slow at ~ 500RPM.
The loop water-temp at idle is only 1,5-2°C above ambient but I think the system has a serious idle power consumption.

Looking at this I feel pleased. Next will be overclocking and some game testing. But first I have to clean up my apartment a bit. There are zip ties everywhere, cable bags, coffee mugs, boxes on top of boxes.

For a rough estimate for you, 200w at idle with a pair of X5675's and then under load again at stock, 400w+ :) It's a bit of a beast :D :D
 
Joined
Jan 29, 2012
Messages
6,443 (1.44/day)
Location
Florida
System Name natr0n-PC
Processor Ryzen 5950x/5600x
Motherboard B450 AORUS M
Cooling EK AIO 360 - 6 fan action
Memory Patriot - Viper Steel DDR4 (B-Die)(4x8GB)
Video Card(s) EVGA 3070ti FTW
Storage Various
Display(s) PIXIO IPS 240Hz 1080P
Case Thermaltake Level 20 VT
Audio Device(s) LOXJIE D10 + Kinter Amp + 6 Bookshelf Speakers Sony+JVC+Sony
Power Supply Super Flower Leadex III ARGB 80+ Gold 650W
Software XP/7/8.1/10
Benchmark Scores http://valid.x86.fr/79kuh6
For a rough estimate for you, 200w at idle with a pair of X5675's and then under load again at stock, 400w+ :) It's a bit of a beast :D :D

Have you tested with HT off to see how low the watts get ? I dont have a watt meter yet. I do run my stock x5675's with ht off though.
 
Joined
Jul 21, 2018
Messages
773 (0.37/day)
Location
Germany
System Name FATTYDOVE-R-SPEC
Processor Intel i9 10980XE
Motherboard EVGA X299 Dark
Cooling Water (1x 240mm, 1x 280mm, 1x 420mm + 2x Mo-Ra 360 external radiator)
Memory 64GB DDR4
Video Card(s) RTX 2080 Super / RTX 3090
Storage Crucial MX500
Display(s) 24", 1440p, freesync, 144hz
Case Open Benchtable (OBT)
Audio Device(s) beyerdynamic MMX 300
Power Supply EVGA Supernova T2 1600W
Mouse OG steelseries Sensei
Keyboard steelseries 6Gv2
Software Windows 10
Very nice work. Do you plan to OC the Xeons? That era had a lot of headroom.

Yes I will OC them, 4.4GHz would be my first goal.

From the first testing I got to 4GHz on just 1.28Vcore without LLC (1.23V load). Both of these CPUs seem to do very well, much better than my X5650 sample but that was kind of expected given the big difference in binning / base frequency.

BUT I encountered an issue with the secondary CPU and one core temp. I did not notice at first, because it was still so close to ambient and not heating up at all. But now at 4GHz the 4th core of CPU1 (2nd CPU) has a massive delta of 14°C over the other cores. At first glance I was thinking that maybe the sensor itself was to blame, but further investigation leads me to believe I used just a tiny bit to little LM on the die. Guess I was a bit too careful there.
The core in question idles on the same 20°Cish values as the other cores on that CPU, even a bit below the average but under load it shows 52°C where as the others are at 38°C-42°C and it cools down slower than the others. While all other cores drop almost instantly back down, this one drops to ~30°C and takes two seconds to reach its idle temp.
This makes me believe that there is a spot that does not have proper contact and I want to fix this before I go any higher. It will be a pain but I want to do it right. I don´t have to take the loop apart, luckily there is just enough room and tube length to get just the waterblock out.
And I have already tried everything else at this point, like tightening the screws a bit, loosening them up etc.. All I managed was to drop the temp on just that core by 2°C, which again supports my theory of too little LM.
 
Joined
Jul 21, 2018
Messages
773 (0.37/day)
Location
Germany
System Name FATTYDOVE-R-SPEC
Processor Intel i9 10980XE
Motherboard EVGA X299 Dark
Cooling Water (1x 240mm, 1x 280mm, 1x 420mm + 2x Mo-Ra 360 external radiator)
Memory 64GB DDR4
Video Card(s) RTX 2080 Super / RTX 3090
Storage Crucial MX500
Display(s) 24", 1440p, freesync, 144hz
Case Open Benchtable (OBT)
Audio Device(s) beyerdynamic MMX 300
Power Supply EVGA Supernova T2 1600W
Mouse OG steelseries Sensei
Keyboard steelseries 6Gv2
Software Windows 10
For a rough estimate for you, 200w at idle with a pair of X5675's and then under load again at stock, 400w+ :) It's a bit of a beast :D :D

I´m sure my idle is much higher, without the speedstep and C-states. I might try to enable them again when I have found a stable OC that I´m happy with but it will still be very power hungry.

As for the higher core temp, I had to perform two surgeries. First I had the wrong CPU out as for whatever reason the AIDA64 CPU2 = CPU0 on the SR-2.


And after I had added some LM it now no longer posted. I got stuck at FF instantly after power on. My heart really sank quite low in that moment. I found the culprit an hour later, it was a bend pin in the socket. Right below the opening in the middle, the top row. There was one single pin that had probably caught on an SMD from the CPUs bottom while removing it.
After bending it back in place I got to code 68 and got stuck on that one. This time I had used very little mounting pressure on the springs, thinking that the pin may also have been a sign of too much pressure from the cooler.
Adding two turns on each screw and I finally got it running again. In windows I saw that I still had too little pressure as half of the cores on CPU 1 were hitting 65°C under load. Again I fixed that by adding another turn on the screws and finally I had everything back to where it was before but of course still with that single high core temp on the other CPU.
I performed the second surgery, atleast it was simple enough to work on the socket even with the tubes all over. This time everything went well, I added a little bit of LM and spread it around. Remounted the cooler with just the right amount of pressure (I´m starting to get a good feeling for that now).

Just to find out that all of this was not helping and I still hit exactly the same temp as before... So now I think the sensor itself is a bit more sensitive compared to the others. Thinking about it there is no other way a single core hits so much higher compared to all the others on that die after confirming that A) there is a good amount of liquid metal and B) my mounting pressure and alignment is spot on.
After all the other cores on the same die are very close to each other, IF there was a contact problem then atleast one adjacent core should be a little above the others as it has to take the additional heat from the neighbor.

In hindsight I should have tested both CPUs before delidding to spot something like this. And I´ll now continue like it is and not mess with anything further. After all, IF that CPU bites the dust it is easy to replace in terms of price, availability and work involved while the board is not.

Some CB15 runs:


phill

Moderator
Staff member
Joined
Jun 8, 2011
Messages
15,989 (3.40/day)
Location
Somerset, UK
System Name Not so complete or overkill - There are others!! Just no room to put! :D
Processor Ryzen Threadripper 3970X
Motherboard Asus Zenith 2 Extreme Alpha
Cooling Lots!! Dual GTX 560 rads with D5 pumps for each rad. One rad for each component
Memory Viper Steel 4 x 16GB DDR4 3600MHz not sure on the timings... Probably still at 2667!! :(
Video Card(s) Asus Strix 3090 with front and rear active full cover water blocks
Storage I'm bound to forget something here - 250GB OS, 2 x 1TB NVME, 2 x 1TB SSD, 4TB SSD, 2 x 8TB HD etc...
Display(s) 3 x Dell 27" S2721DGFA @ 7680 x 1440P @ 144Hz or 165Hz - working on it!!
Case The big Thermaltake that looks like a Case Mods
Audio Device(s) Onboard
Power Supply EVGA 1600W T2
Mouse Corsair thingy
Keyboard Razer something or other....
VR HMD No headset yet
Software Windows 11 OS... Not a fan!!
Benchmark Scores I've actually never benched it!! Too busy with WCG and FAH and not gaming! :( :( Not OC'd it!! :(
It's a shame that you never did a quick test with them standard as then we could see whether or not the delidding helped or not... I'm guessing that it might not have but I was also wondering, are you putting the block directly on the die of the CPU or are you still using the standard IHS?

Glad to hear it's all back up and running. I literally sweat like god knows what when I have to mess about with the socket, always so worried I'll drop the CPU into the socket or just end up bricking the board because of the socket.. It's a nightmare loI
I do need to get mine running Windows for a bit, I'd like to test the CPUs (both X5675 and my Ryzen 1700X's....)
 
Joined
Jul 21, 2018
Messages
773 (0.37/day)
Location
Germany
System Name FATTYDOVE-R-SPEC
Processor Intel i9 10980XE
Motherboard EVGA X299 Dark
Cooling Water (1x 240mm, 1x 280mm, 1x 420mm + 2x Mo-Ra 360 external radiator)
Memory 64GB DDR4
Video Card(s) RTX 2080 Super / RTX 3090
Storage Crucial MX500
Display(s) 24", 1440p, freesync, 144hz
Case Open Benchtable (OBT)
Audio Device(s) beyerdynamic MMX 300
Power Supply EVGA Supernova T2 1600W
Mouse OG steelseries Sensei
Keyboard steelseries 6Gv2
Software Windows 10
It's a shame that you never did a quick test with them standard as then we could see whether or not the delidding helped or not... I'm guessing that it might not have but I was also wondering, are you putting the block directly on the die of the CPU or are you still using the standard IHS?

Glad to hear it's all back up and running. I literally sweat like god knows what when I have to mess about with the socket, always so worried I'll drop the CPU into the socket or just end up bricking the board because of the socket.. It's a nightmare loI
I do need to get mine running Windows for a bit, I'd like to test the CPUs (both X5675 and my Ryzen 1700X's....)

I run direct-die, no IHS involved. I tested this method with a single X5650 on my OC-benchtable. I can give you those numbers.

Running 4GHz @ fixed 1.3V with 50% LLC (1.27V load voltage). QPI 1.3V / 182 bclk x22 / water temp 21.8°C / room ambient 18°C

For Stock IHS with Kryonaut paste on top: ~37°C idle / 54°C hottest core during load
With direct die Conductonaut: ~32°C idle / 46°C hottest core during load

That test showed a small improvement by using LM and going direct die. And my X5690s show nearly the same numbers for the 4.1GHz run! CPU0 is perfectly matching only exception is that single core on CPU1.
Keep in mind that on my X5690s the water temp is unavoidably higher, the load voltage is a bit lower and I hit 43°C hottest core if I ignore the questionable one.

I´ll see where I land further down the road. I saw the video from 'Tech YES City' and he pushed his stock IHS all the way up to 1.4V / 4,4GHz with LLC and hit 82°C core temp. I just don´t know his ambient / water temperatures.

As for intense sweating, working on the socket I feel fine. My delidded chips have such a little weight that they can barely do any damage, I start to feel it when mounting the cooler onto a bare die. Since the die surface is so small underneath the cooler coldplate, it is very wobbly and if you don´t watch out you can tighten the CPU down with an angle into the socket. And that is definitly NOT good.
 

phill

Moderator
Staff member
Joined
Jun 8, 2011
Messages
15,989 (3.40/day)
Location
Somerset, UK
System Name Not so complete or overkill - There are others!! Just no room to put! :D
Processor Ryzen Threadripper 3970X
Motherboard Asus Zenith 2 Extreme Alpha
Cooling Lots!! Dual GTX 560 rads with D5 pumps for each rad. One rad for each component
Memory Viper Steel 4 x 16GB DDR4 3600MHz not sure on the timings... Probably still at 2667!! :(
Video Card(s) Asus Strix 3090 with front and rear active full cover water blocks
Storage I'm bound to forget something here - 250GB OS, 2 x 1TB NVME, 2 x 1TB SSD, 4TB SSD, 2 x 8TB HD etc...
Display(s) 3 x Dell 27" S2721DGFA @ 7680 x 1440P @ 144Hz or 165Hz - working on it!!
Case The big Thermaltake that looks like a Case Mods
Audio Device(s) Onboard
Power Supply EVGA 1600W T2
Mouse Corsair thingy
Keyboard Razer something or other....
VR HMD No headset yet
Software Windows 11 OS... Not a fan!!
Benchmark Scores I've actually never benched it!! Too busy with WCG and FAH and not gaming! :( :( Not OC'd it!! :(
I would hope that the numbers are in fact lower because there's a direct touch to the die, my only fear of doing that would be if I over tightened something and either cracked the die or put too much pressure on the CPU pins underneath... Just my luck that would be :)

The X5650's I had seemed to be really low load temps, I think 40C under 100% load from WCG, which was great considering the rest of the loop and such.. I've not had any real time with the X5675's since I've swapped them over and pressed on lol I need to get Linux Mint 19.3 installed as well and see how that behaves. If it continues to mess about and be very sluggish, I'll ignore WCG under Linux and put it under Windows and see how that goes.. If it's any better, I'll leave it there :)

I imagine the temps are due to the higher clock speeds and so on.. They do take a bit more power as well which is not unsurprising considering the extra clock speed. I think it's nearly 500Mhz per thread (or it is exactly that... Scary stuff)
 
Joined
Jul 21, 2018
Messages
773 (0.37/day)
Location
Germany
System Name FATTYDOVE-R-SPEC
Processor Intel i9 10980XE
Motherboard EVGA X299 Dark
Cooling Water (1x 240mm, 1x 280mm, 1x 420mm + 2x Mo-Ra 360 external radiator)
Memory 64GB DDR4
Video Card(s) RTX 2080 Super / RTX 3090
Storage Crucial MX500
Display(s) 24", 1440p, freesync, 144hz
Case Open Benchtable (OBT)
Audio Device(s) beyerdynamic MMX 300
Power Supply EVGA Supernova T2 1600W
Mouse OG steelseries Sensei
Keyboard steelseries 6Gv2
Software Windows 10
I´ve hit 4.4GHz without much trouble, only 1 BSOD on the way as I tried to maintain LLC - off. But at 4.2GHz the Vdroop got so much that I had to enable LLC.


Still got some headroom for voltage and temperature, and I have not yet hit the max. frequency on 1.32V.

There is however one issue I get with my RAM, as one stick seems to drop out above 170 BCLK. I could not bring it back yet, I tried higher DRAM voltage and loosened timings all the way to 11-13-13-31 244 (the rated timings on this kit for 2400 MHz). Still it´s not coming back. CPU-Z is not much help in identifying which CPU is missing a dimm, since it reads only 2 slots populated and thinks my board has 18 slots.
I also tried higher PLL, VTT, IOH voltages but the 8GB stay MIA. I wouldn´t mind if its only the capacity thats missing, but it seems to hurt multithread performance a lot. One CPU is forced back to dual channel.
The missing 8GB show back up as soon as I lower BCLK again to values below 165-170. I have to look into the MCH-strap setting and hope I can get it back somehow.


phill

Moderator
Staff member
Joined
Jun 8, 2011
Messages
15,989 (3.40/day)
Location
Somerset, UK
System Name Not so complete or overkill - There are others!! Just no room to put! :D
Processor Ryzen Threadripper 3970X
Motherboard Asus Zenith 2 Extreme Alpha
Cooling Lots!! Dual GTX 560 rads with D5 pumps for each rad. One rad for each component
Memory Viper Steel 4 x 16GB DDR4 3600MHz not sure on the timings... Probably still at 2667!! :(
Video Card(s) Asus Strix 3090 with front and rear active full cover water blocks
Storage I'm bound to forget something here - 250GB OS, 2 x 1TB NVME, 2 x 1TB SSD, 4TB SSD, 2 x 8TB HD etc...
Display(s) 3 x Dell 27" S2721DGFA @ 7680 x 1440P @ 144Hz or 165Hz - working on it!!
Case The big Thermaltake that looks like a Case Mods
Audio Device(s) Onboard
Power Supply EVGA 1600W T2
Mouse Corsair thingy
Keyboard Razer something or other....
VR HMD No headset yet
Software Windows 11 OS... Not a fan!!
Benchmark Scores I've actually never benched it!! Too busy with WCG and FAH and not gaming! :( :( Not OC'd it!! :(
I take it your just running 6 sticks total for the moment? 3 x 2 for each CPU? I had my previous X5650's running 200+ BCLK without too much issue, they weren't the best overclockers but they weren't to bad up to 3.6Ghz :) Not bad for a 1Ghz per thread over stock I suppose :)

Just a thought, what size sticks are they? 2Gb, 4Gb or bigger?
 
Joined
Jul 21, 2018
Messages
773 (0.37/day)
Location
Germany
System Name FATTYDOVE-R-SPEC
Processor Intel i9 10980XE
Motherboard EVGA X299 Dark
Cooling Water (1x 240mm, 1x 280mm, 1x 420mm + 2x Mo-Ra 360 external radiator)
Memory 64GB DDR4
Video Card(s) RTX 2080 Super / RTX 3090
Storage Crucial MX500
Display(s) 24", 1440p, freesync, 144hz
Case Open Benchtable (OBT)
Audio Device(s) beyerdynamic MMX 300
Power Supply EVGA Supernova T2 1600W
Mouse OG steelseries Sensei
Keyboard steelseries 6Gv2
Software Windows 10
I take it your just running 6 sticks total for the moment? 3 x 2 for each CPU? I had my previous X5650's running 200+ BCLK without too much issue, they weren't the best overclockers but they weren't to bad up to 3.6Ghz :) Not bad for a 1Ghz per thread over stock I suppose :)

Just a thought, what size sticks are they? 2Gb, 4Gb or bigger?
I´m running 48GB in 6x8 GB. From what I read on the internet this is a common problem with X58 and especially the Xeons. Seems like some specific CPU steppings and serial numbers do better than others, but maybe it´s all just luck.
 
Joined
Mar 16, 2017
Messages
1,675 (0.64/day)
Location
Tanagra
System Name Budget Box
Processor Xeon E5-2667v2
Motherboard ASUS P9X79 Pro
Cooling Some cheap tower cooler, I dunno
Memory 32GB 1866-DDR3 ECC
Video Card(s) XFX RX 5600XT
Storage WD NVME 1GB
Display(s) ASUS Pro Art 27"
Case Antec P7 Neo
The cheese grater era of Mac Pro managed to do a good job of handling lots of RAM, even though Apple didn’t say anything beyond 8GB sticks were supported officially. I think folks were having luck with 16 and 32GB sticks x 4, so the x-series Xeon could certainly handle it. I think the Mac Pro didn’t use x58 though, it used a workstation chipset. Maybe some of the problem is having 6 slots per CPU? The Mac only had 4 slots per CPU and dropped to dual channel when all 4 were populated.
 

phill

Moderator
Staff member
Joined
Jun 8, 2011
Messages
15,989 (3.40/day)
Location
Somerset, UK
System Name Not so complete or overkill - There are others!! Just no room to put! :D
Processor Ryzen Threadripper 3970X
Motherboard Asus Zenith 2 Extreme Alpha
Cooling Lots!! Dual GTX 560 rads with D5 pumps for each rad. One rad for each component
Memory Viper Steel 4 x 16GB DDR4 3600MHz not sure on the timings... Probably still at 2667!! :(
Video Card(s) Asus Strix 3090 with front and rear active full cover water blocks
Storage I'm bound to forget something here - 250GB OS, 2 x 1TB NVME, 2 x 1TB SSD, 4TB SSD, 2 x 8TB HD etc...
Display(s) 3 x Dell 27" S2721DGFA @ 7680 x 1440P @ 144Hz or 165Hz - working on it!!
Case The big Thermaltake that looks like a Case Mods
Audio Device(s) Onboard
Power Supply EVGA 1600W T2
Mouse Corsair thingy
Keyboard Razer something or other....
VR HMD No headset yet
Software Windows 11 OS... Not a fan!!
Benchmark Scores I've actually never benched it!! Too busy with WCG and FAH and not gaming! :( :( Not OC'd it!! :(
I´m running 48GB in 6x8 GB. From what I read on the internet this is a common problem with X58 and especially the Xeons. Seems like some specific CPU steppings and serial numbers do better than others, but maybe it´s all just luck.

I do know there was some unsupported SR-2's running 96Gb of ram (all slots with 8Gb sticks) but how good they all were with that amount of ram I'm unsure. I've gone from 48Gb total (12 x 4Gb) to 6 x 2Gb when testing :) I think that might make it easier on the memory controllers which might help with the overclocking.. I know I was struggling after 4Ghz with 48Gb but that's all I had at the time...
If you can, go with smaller sticks if you want a higher overclock... It'll be the possible issue :)
 
Joined
Jul 21, 2018
Messages
773 (0.37/day)
Location
Germany
System Name FATTYDOVE-R-SPEC
Processor Intel i9 10980XE
Motherboard EVGA X299 Dark
Cooling Water (1x 240mm, 1x 280mm, 1x 420mm + 2x Mo-Ra 360 external radiator)
Memory 64GB DDR4
Video Card(s) RTX 2080 Super / RTX 3090
Storage Crucial MX500
Display(s) 24", 1440p, freesync, 144hz
Case Open Benchtable (OBT)
Audio Device(s) beyerdynamic MMX 300
Power Supply EVGA Supernova T2 1600W
Mouse OG steelseries Sensei
Keyboard steelseries 6Gv2
Software Windows 10
The cheese grater era of Mac Pro managed to do a good job of handling lots of RAM, even though Apple didn’t say anything beyond 8GB sticks were supported officially. I think folks were having luck with 16 and 32GB sticks x 4, so the x-series Xeon could certainly handle it. I think the Mac Pro didn’t use x58 though, it used a workstation chipset. Maybe some of the problem is having 6 slots per CPU? The Mac only had 4 slots per CPU and dropped to dual channel when all 4 were populated.
I don´t know, what I do know is that the SR-2 can handle triple channel and it can do my config 6 x 8GB with all 48GB running 2000MHz CL8 (saw some G.Skill sticks could do that). And I know that I previously had all 48GB running. https://valid.x86.fr/sb00w6

But after going back and forth a couple of times I can´t even make the 8GB show up at stock.

I do know there was some unsupported SR-2's running 96Gb of ram (all slots with 8Gb sticks) but how good they all were with that amount of ram I'm unsure. I've gone from 48Gb total (12 x 4Gb) to 6 x 2Gb when testing :) I think that might make it easier on the memory controllers which might help with the overclocking.. I know I was struggling after 4Ghz with 48Gb but that's all I had at the time...
If you can, go with smaller sticks if you want a higher overclock... It'll be the possible issue :)

I don´t have smaller ones to try, my DDR3 stuff is limited. I´ll look around for some kits tho.

What I find strange is that Windows, BIOS and CPU-Z can´t see every stick BUT Aida64 can:

RAM.PNG


It reads the information correctly from each DIMM and sees all 6. Whatever wichcraft that is. Aida64 having more access than bios??
 
Joined
Jun 29, 2009
Messages
1,875 (0.35/day)
Location
Heart of Eutopia!
System Name ibuytheusedstuff
Processor 5960x
Motherboard x99 sabertooth
Cooling old socket775 cooler
Memory 32 Viper
Video Card(s) 1080ti on morpheus 1
Storage raptors+ssd
Display(s) acer 120hz
Case open bench
Audio Device(s) onb
Power Supply antec 1200 moar power
Mouse mx 518
Keyboard roccat arvo
got some ocz blade 2000cl7-8-7 tripple channel 3x2gb if ya wanna go the Elpida-hyper road but i think ya need more than 6 or 12gb
 

phill

Moderator
Staff member
Joined
Jun 8, 2011
Messages
15,989 (3.40/day)
Location
Somerset, UK
System Name Not so complete or overkill - There are others!! Just no room to put! :D
Processor Ryzen Threadripper 3970X
Motherboard Asus Zenith 2 Extreme Alpha
Cooling Lots!! Dual GTX 560 rads with D5 pumps for each rad. One rad for each component
Memory Viper Steel 4 x 16GB DDR4 3600MHz not sure on the timings... Probably still at 2667!! :(
Video Card(s) Asus Strix 3090 with front and rear active full cover water blocks
Storage I'm bound to forget something here - 250GB OS, 2 x 1TB NVME, 2 x 1TB SSD, 4TB SSD, 2 x 8TB HD etc...
Display(s) 3 x Dell 27" S2721DGFA @ 7680 x 1440P @ 144Hz or 165Hz - working on it!!
Case The big Thermaltake that looks like a Case Mods
Audio Device(s) Onboard
Power Supply EVGA 1600W T2
Mouse Corsair thingy
Keyboard Razer something or other....
VR HMD No headset yet
Software Windows 11 OS... Not a fan!!
Benchmark Scores I've actually never benched it!! Too busy with WCG and FAH and not gaming! :( :( Not OC'd it!! :(
It might be a case of just taking out the sticks of ram and putting them back into the system, sometimes for whatever reason, that does help bring them back to life. Failing that it might be a reseat of the CPUs, as some of the pads might not be making contact correctly and only showing so much ram up.

If you'd like I could always send you some 2Gb sticks and you could do some testing with that? :) I'm not sure that the postage would be very much and I think I have enough to send over possibly 12 sticks.. I'll take a look this evening for you :)
 
Joined
Jul 21, 2018
Messages
773 (0.37/day)
Location
Germany
System Name FATTYDOVE-R-SPEC
Processor Intel i9 10980XE
Motherboard EVGA X299 Dark
Cooling Water (1x 240mm, 1x 280mm, 1x 420mm + 2x Mo-Ra 360 external radiator)
Memory 64GB DDR4
Video Card(s) RTX 2080 Super / RTX 3090
Storage Crucial MX500
Display(s) 24", 1440p, freesync, 144hz
Case Open Benchtable (OBT)
Audio Device(s) beyerdynamic MMX 300
Power Supply EVGA Supernova T2 1600W
Mouse OG steelseries Sensei
Keyboard steelseries 6Gv2
Software Windows 10
Thank you both for the instant support @basco and @phill ! I think I solved it, so I don´t need to get another kit just yet. But if I encounter some issue reaching clockspeeds again I just might contact you.

It might be a case of just taking out the sticks of ram and putting them back into the system, sometimes for whatever reason, that does help bring them back to life.

This was a good suggestion, I took them out and found a bit of thermal paste on the pins of one DIMM and its slot. Must have gotten there from the previous owner, as I had never taken the sticks out to check...
I treated all contacts with teslanol T6:

Teslanol-t6.jpg


Its a contact cleaner for HiFi equipment, works very well with cleaning metal surfaces from all kinds of unwanted stuff.


RAM 2.PNG


It is back to all 48 again. I must have bumped into the sticks a lot while taking the CPUs out previously and that must have caused the dirty contact pad to loose connection.


EDIT: And this time it stays for good!

RAM 3.PNG
 
Last edited:
Joined
Jun 29, 2009
Messages
1,875 (0.35/day)
Location
Heart of Eutopia!
System Name ibuytheusedstuff
Processor 5960x
Motherboard x99 sabertooth
Cooling old socket775 cooler
Memory 32 Viper
Video Card(s) 1080ti on morpheus 1
Storage raptors+ssd
Display(s) acer 120hz
Case open bench
Audio Device(s) onb
Power Supply antec 1200 moar power
Mouse mx 518
Keyboard roccat arvo
this was a prob on all x58 mainboards-tested a lot of them.
all their products work really well
i sprayed kontakt 60 in sockets and all over the motherboard. keep care after cleaning with this-electrostatic is higher then normal- i think thats kontakt 61 for
 
Joined
Jul 21, 2018
Messages
773 (0.37/day)
Location
Germany
System Name FATTYDOVE-R-SPEC
Processor Intel i9 10980XE
Motherboard EVGA X299 Dark
Cooling Water (1x 240mm, 1x 280mm, 1x 420mm + 2x Mo-Ra 360 external radiator)
Memory 64GB DDR4
Video Card(s) RTX 2080 Super / RTX 3090
Storage Crucial MX500
Display(s) 24", 1440p, freesync, 144hz
Case Open Benchtable (OBT)
Audio Device(s) beyerdynamic MMX 300
Power Supply EVGA Supernova T2 1600W
Mouse OG steelseries Sensei
Keyboard steelseries 6Gv2
Software Windows 10
I´ve spend some time fiddling with OC on the CPU and RAM. Once I hit unstable settings it really slowed progress down as there is so much to tweak and the boot time becomes a bit exhausting.

I was surprised to find the CPUs nearly maxing out the 2080 Super:


It hits 90%+ GPU load on 1440p and is more than capable of maxing out my 144hz refresh rate. Gameplay in PUBG and CS:GO was fluid, no hard stutters or framedrops. Temperatures are all in check, CPU staying well below 50°C while the GPU maxed out at 56°C.
The 2080 Super maintained a boost clock above 2010MHz at all times, sometimes reaching 2055MHz. No OC from me yet.

The first picture shows the water-temp after a 1 hour session. Very nice, my room had 19°C ambient.

And this is where I maxed out the CPUs for the moment:


A perfect 2100 score in CB15. Vcore had to go up to 1.4V in order to keep the 4.61GHz stable. I think going any higher would not gain much. I had to loosen the memory timings a bit, but now I´m error free in memtest!
Going to tighten them again next to find my limits.
 

phill

Moderator
Staff member
Joined
Jun 8, 2011
Messages
15,989 (3.40/day)
Location
Somerset, UK
System Name Not so complete or overkill - There are others!! Just no room to put! :D
Processor Ryzen Threadripper 3970X
Motherboard Asus Zenith 2 Extreme Alpha
Cooling Lots!! Dual GTX 560 rads with D5 pumps for each rad. One rad for each component
Memory Viper Steel 4 x 16GB DDR4 3600MHz not sure on the timings... Probably still at 2667!! :(
Video Card(s) Asus Strix 3090 with front and rear active full cover water blocks
Storage I'm bound to forget something here - 250GB OS, 2 x 1TB NVME, 2 x 1TB SSD, 4TB SSD, 2 x 8TB HD etc...
Display(s) 3 x Dell 27" S2721DGFA @ 7680 x 1440P @ 144Hz or 165Hz - working on it!!
Case The big Thermaltake that looks like a Case Mods
Audio Device(s) Onboard
Power Supply EVGA 1600W T2
Mouse Corsair thingy
Keyboard Razer something or other....
VR HMD No headset yet
Software Windows 11 OS... Not a fan!!
Benchmark Scores I've actually never benched it!! Too busy with WCG and FAH and not gaming! :( :( Not OC'd it!! :(
@Dinnercore - Awesome work my man!! This board can certainly deliver when you put the time in it.. The boot process is a nightmare when you want to do something quickly, its certainly a beast of a motherboard with a million different settings :)

For giggles, plug in a watt meter if you dare ;) :D
 
Top