• Welcome to TechPowerUp Forums, Guest! Please check out our forum guidelines for info related to our community.
  • The forums have been upgraded with support for dark mode. By default it will follow the setting on your system/browser. You may override it by scrolling to the end of the page and clicking the gears icon.

Project: Server and Gaming Case

Very nice work. I know nothing about working with aluminum. Like a class.
 
Looks awesome dude. Subbed!
 
Santoprene rubber/plastic tubing was slipped over 1/4-inch threaded rods to form a "cage" to contain the HDs.

HDCageParts.jpg


Here's why the routed slots are superior to individual holes.

HDCageAssembly.jpg


HDCage.jpg


HDCageMockup.jpg
 
A last minute design change was to go with SATA backplanes. This required having to route-out 24 phalanx shaped areas for the LED and power cables to pass through.

BackplaneTemplate.jpg


[These photos are just quick mockups, the perforate aluminum will eventually get mounted to the bottom of the drive cage. ]

Backplanesheet1.jpg


Backplanesheet2.jpg


The backplanes rest on some soft rubber grommets and are attached via two #4 socket head cap screws.

The 1/16-inch perforated aluminum was a good choice because I didn't have to drill a boat load of holes.

BackplaneMockupCU2.jpg


BackplaneMockupCU1.jpg
 
I finished the bottom of the HD cage by adding four support beams made from 1x.5-inch u-channels.

HDCageBottom.jpg


HDCageBottomCU.jpg


To further dampen vibrations some 1x.25-inch soft foam will be stuck between the beams and the perforated aluminum.

HDCageBottomFoam.jpg


HDCageBottomWFoamAndBackplanes.jpg
 
Looking at your aluminum work is like looking at the Mona Lisa, everything's simply beautiful!
 
Finally managed to mount the HD cage to the case via 12 #6-32 stainless steel socket cap bolts.

HDCageMounted.jpg
 
Nice work Spotswood. I will watch this project closely.
 
How much more awesome can this get?? dude your work is amazing!
 
nice, i can't wait to see how it ends out ^^

erm what hardware r u planing on? ^^;
 
Another requirement for this case is the ability to mount six SSD drives. The original plan was to mount them to the bottom of the case, but if there ever was a leak in the water cooling system, all of the SSDs would be toast. So instead, I came up with the idea to mount the drives to the underside of a motherboard tray.

SSDTray.jpg


Half-inch standoffs were screwed into the MB tray's existing PEM nuts.

MBSSDModStandoff.jpg


And onto that a .10-inch thick sheet of aluminum was bolted.

SSDTray.jpg


MBSSDModCU1.jpg


MBSSDModCU2.jpg
 
The front inner sheet was turned into Swiss cheese via 9 holes for the 120mm intake fans. The holes were cut with a 1/2-inch flush trimming router bit, guided by a template.


InnerFrontSheetwFanHoles.jpg


InnerFrontSheetwFanHolesCU.jpg
 
The top motherboard tray support is the last piece of the case frame.


SupportBeamCU.jpg


MBSupport.jpg


MBSupportCU2.jpg


MBSupportCU.jpg
 
I spent a full day squaring up the case frame, squaring joints, re-aligning joints etc. in preparation of fastening the sheeting.

The steps I use to attach a sheet are:
  • Drill a hole in the sheet.
  • Use the hole in the sheet to guide the drill bit for the hole in the frame.
  • Thread the frame hole.

    HowToAttachSheet1.jpg

  • Countersink the sheet hole.

    HowToAttachSheet2.jpg

  • Admire work.
    HowToAttachSheet3.jpg


The case with the inner front, bottom and lower back panels attached.

BottomAndLowerbackAttached.jpg
 
This will be so frickin' awesome. I love the detailed touches with sunken screws and stuff!
 
its awesome ... i am curious to see the final stage
 
I love aluminium and like your work, very much!

Only 'but' is : a server doesn't need a big mobo, and a gaming rig doesn't benefit from the heat and obstacles of a neigbouring server in the same case, but i am sure you will solve this!
 
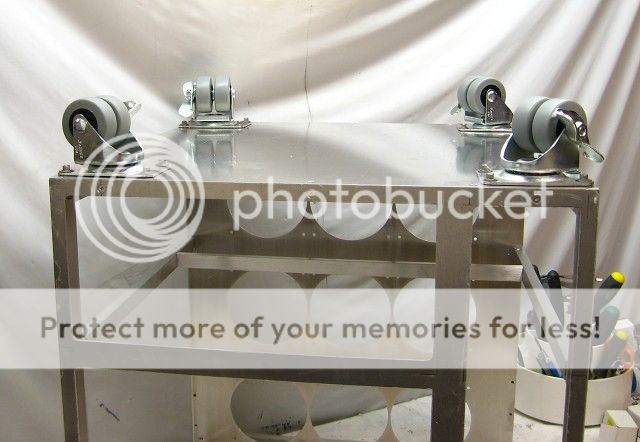
My client selected some nice low-profile casters (with 2-inch wheels) which I mounted right away since the case is all nice and square.

CasterCU.jpg


Three of the #8-32 stainless steel bolts were screwed directly into the frame via hand tapped holes.

CastersMountedCU.jpg


CastersMounted.jpg
 
I attached the .1-inch thick side and front panels with 6 stainless steel flat head socket cap screws. The front panel extends past the tops of the side panels by .10-inch in order to hide the top's front edge.

FrontAndSideSheetsInstalled2.jpg


The process to attach the panels is:
  • Drill pilot holes along the edges of the panel
  • Clamp the panel to frame and use the pilot holes to drill tap holes into the frame
  • Remove the panel and tap the frame holes
  • Countersink the panel holes

The side panels extend past the top of the frame by the thickness of the hinge. These will later be scribed and cut to length along the back of the case.

FrontAndSideSheetsInstalled.jpg
 
sub'd and that thing is huge. but i guess its small compared to your other builds :p
 
insane project!

---subscribed!
 
Absolutely MAAD build, Sub'd :D
 
I made the top back plate for three 120mm exhaust fans. Once the back was completed I was then able to scribe and trim the sides to their final depth.

Back120sAndSidesCut1.jpg


Back120sAndSidesCut2.jpg


Back120sAndSidesCut3.jpg
 
Back
Top