• Welcome to TechPowerUp Forums, Guest! Please check out our forum guidelines for info related to our community.
  • The forums have been upgraded with support for dark mode. By default it will follow the setting on your system/browser. You may override it by scrolling to the end of the page and clicking the gears icon.

Project Timeless Warriors Samurai themed build COMPLETE

Wow it’s been super-hot lately, but excitement is boiling over as we get to a stage were the etching is getting closer and closer to completed on the other side of the desk. I’ll just leave you with these pics.

image001.jpg

image002.jpg

image003.jpg

image004.jpg


I have to say as well as my wife and boy I am in love with something not human its officially gone crazy, but super stoked and pleased with how the design I made is coming out.

Also had time to play with some things and just lay down samurai armour style covers over the gpu blocks to get a feel for them, these will be cleaned and polished and put on gpu’s for all 4 cards (2 one side and two the other).

image005.jpg


I reckon its going to look lush once done, let just get a move on and in the coming weeks I will be starting internals ect with the engraving so close to being done.​
 
oh my god ... the engraving alone make it totally worth it ...

Razer gear on the other hand .... oh well i am a "Razer hater" (due to personal experiences and reason ofc) but that doesn't affect my opinion on the rig itself ...
 
oh my god ... the engraving alone make it totally worth it ...

Razer gear on the other hand .... oh well i am a "Razer hater" but that doesn't affect my opinion on the rig itself ...

I see razer rub some people the wrong way but for some reason I ha e not had any issues with there products ever and have Modded a few
 
I see razer rub some people the wrong way but for some reason I ha e not had any issues with there products ever and have Modded a few
well i can see some people are lucky with them (not many tho ... i see more dissatisfied user, usually )

but well as i said ... it's not that part that make this project awesome in my eyes :D

the more i see the scenery of that build the more i have that song in my head ...
 
well i can see some people are lucky with them (not many tho ... i see more dissatisfied user, usually )

but well as i said ... it's not that part that make this project awesome in my eyes :D

the more i see the scenery of that build the more i have that song in my head ...

I Think that is the same across the brands, just think razer pops up more because they sell more really if you think about it.
 

So guys and gals it’s been a while since I updated, but the exciting news is we are getting very close to the end of the engraving side and onto the building side, ill just through these pics up for you to see how close we really are.

image002.jpg

image003.jpg

image004.jpg

image005.jpg

image006.jpg

image007.jpg


Oh I wonder what the lines to the right are for…………………………………..

image008.jpg

image009.jpg

image010.jpg


So finally getting to the end of the amazing engraving and then onto the building part.​
 
Back again with another update to the build, a long time coming was waiting and stalling it for some special items that a due in for the build (well 2 of them) but I thought I better put something out there to keep you all keen.

image001.jpg

image002.jpg

image003.jpg

So engraving has finally finished at last, and boy is it truly an amazing piece of work do I call the build a build now or a piece of art, or artisan PC mod, god knows but I just can help staring at it. Time to put it back on top of the desk and get drilling some fill and drain ports in.

image004.jpg

This is starting to take shape now, also one thing I decided to change was the toughened glass top, not only for practicality but also for the fact the std glass top was tinted and I did not want to dull the engraving down on the build.

image005.jpg

image006.jpg

I also added some extra overhang on the rear when sizing the replacement up, I wanted to ensure I had this to aid with my lighting plan for the rear of the desk and will aid in spreading light behind the monitors.

image007.jpg

I also added a cut out to the rear of the desk were the monitor mount goes, my thought behind this is if for any reason I change something be it ram ect ect in the future, I wanted to be able to lift the glass off without going through the process of breaking down the monitors pulling the desk out and undoing the clamp on monitor mount as on the original glass it would of sat on top of it.

image008.jpg
image009.jpg

Finally I added a vanity panel to behind the legs and desk for cable tidying, which will enable me to only have three cables coming from the desk as the panel will allow for the power adaptor, router, network switch ect to be place in this. Which leaves only one power cable to wall socket and two network cables to the nas.

That’s all for now, as soon as the final two pieces turn up ill photograph them and get them up (although its four pieces in reality to give you a clue to what I am waiting for).
 
Back again guys with another small update, still waiting on a few items to turn up to get into the actual build part, but started working out layout ect, so here are some pics.

image004.jpg

Memory is ready to go into the motherboards, have replaced logos as well to match paint job I done them with, now to put them in these two puppies

image005.jpg
image006.jpg

Also some other parts turned up too, firstly the fans and cables needed to complete the build.

image007.jpg

image008.jpg

Yes that is 12 fans, a couple of splitters and 24 extensions for the fans…. A lot I agree, but I want to run the fan cables around the sides of the desk to keep them out of site as much as possible, a big thanks to noctua for sorting these out, much appreciated. Also the rads turned up and as I wanted crossflow, well thanks to the guys at Aquatuning they did.

image009.jpg

Simple position of getting the fans on the radiators and putting them in and we can finally see what is starting to happen.

image010.jpg

Let’s put the SSD’s in place and glass back on to get the look I am going for as a little test.​

image011.jpg

My samurai Armour SSD’s are now in place, now the one thing I had not taken into account when planning this was the length of Sata Data cables to reach round, even 90cm ones are not long enough, so I have had to outsource so small male to male data connectors and run over 2 cables each of the on show drives. And yes I do expect I will see a slight decrease on performance on 2 each on each side as they will be using these male to male adapters.

Good news is why I was doing this, two of the other 4 items I need to get stuck in turned up to, A huge massive thanks to my contact at Gigabyte for pulling these out of a magic hat, I did not expect them and thank you.

image012.jpg

image013.jpg

Now just waiting for the other 2 items, the waterblocks for these to turn up and I can finally start assembly, yes there are many minor and small things to do yet. But we are finally getting near the end.
 
I would have liked to seen you do a single 2080 ti personally + official one from nvidia store, then waterblock on that. SLI isn't supported so much these days
 
A single card would of looked small in this case plus I do quite a bit of 3dwork so it will be handy
 
Wow it’s been a while with any update so this will be a longer than normal post.

First off the GPU blocks have arrived (eureka) so let’s take a look at them.

image001.jpg


image002.jpg


image003.jpg


Overall I like the design of these BP-VG2080RD-A2 blocks and they are also very heavy.

image004.jpg


One thing I did like about this design is the use of the extra support for block on the back bracket

image006.jpg


A nice small addition to help with the support of the heavy block, now shall we see how they look in place with the covers.

image007.jpg


image008.jpg


image009.jpg


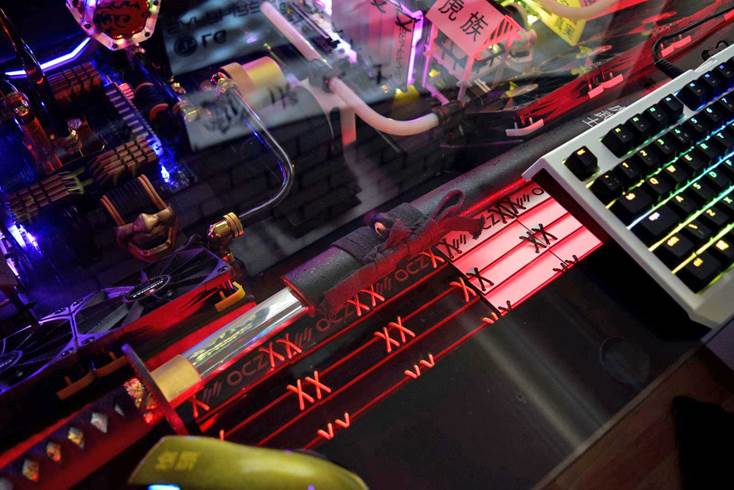
To be honest I was now at an small stall, waiting for a few more things to turn up so I thought I would figure out a cunning plan to hide the cables coming out of the PSU, despite them being mostly hidden by the top anyway. Also something to aid in my plan of having green gpu cables both sides to represent bamboo and tie in with the Japanese/samurai theme of it all.

image010.jpg
image011.png


So being me, I ordered to self-construct type Japanese houses and 2 watch towers for this sort of placement, thus hiding the psu output cables and guiding the green cables to the gpus, of course I will be painting them to match the colour schemes of each side.

image012.png


Wanted to hide these cables specifically with the houses.

image013.jpg
image014.jpg


After doing this and despite knowing the houses won’t be hardly visible with top back on, I still wanted to spruce them up a bit… but first let me show you how this looks in

image015.jpg
image016.jpg


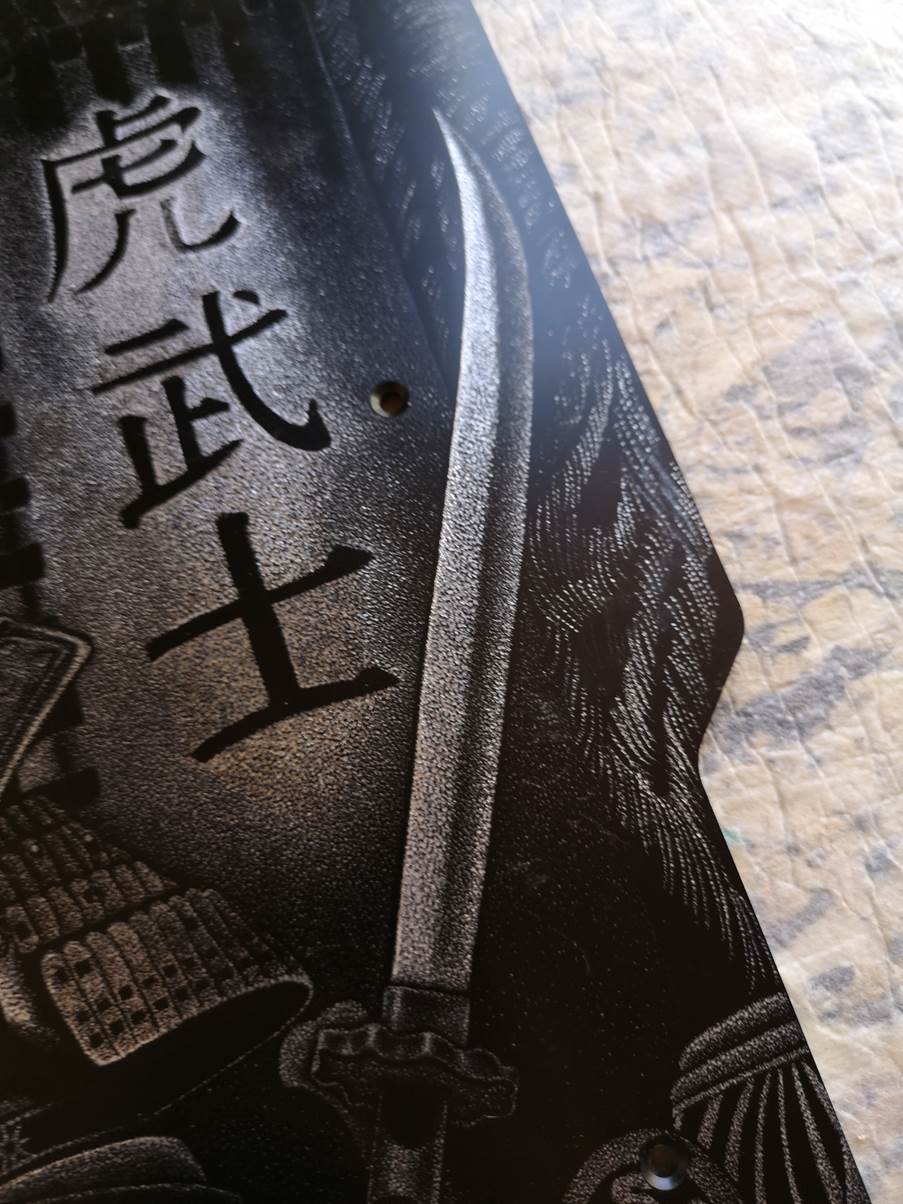
I know some people won’t like this idea, but I love it and it ties in with the theme, and wanted them to match the theme, translation of writing is dragon clan, then tiger clan on the matching sides to match the engraving. And know I won’t ever do stencils this small again and then hand paint them on (more on that later in post). The most shocking part of this stage is working out how to hide nearly 38 meters of cables and lighting in the desk :O.

On another note, I also decided to mod one of the bitspower hex tanks, the one for the black and gold side already had a black dragon on it (bitspower logo) I decided for the tiger side of the build I would try to make something not like bitspower logo, but very similar with tiger logo. I made this with vinyl.

image017.jpg


It should match the general theme of one side of engraving being a tiger and samurai and one side being a dragon and samurai.

Now I did warn this was going to be a long post, so I’ll start by mentioning I am now lucky enough to be permanently sponsored now going forward by airbrushes.com on this a future builds (wish it would of arrived before I done the houses :p and hence my comment of I will not be hand painting ever again and can get back to airbrushing stuff again.

image018.jpg


image019.jpg


image020.jpg


image021.jpg


image022.jpg


image023.jpg


Hopefully I get the rest of the stuff soon to finish this massive project, on a plus note I don’t have to hand paint my planned stuff on the vanity cover on the bottom of the desk now this has arrived J

Mod notes to do list, fittings for gpu blocks to connect to each other to do, painting of vanity panel, tidying of the cables and extensions to go in and make acrylic covers for cable tidying inside the desk, fill and get air out of the loops, then sit and install windows on both machines and check for any conflicts or issues.. then book time to do photos and video of this epic piece.

 
Last edited:
So just another small little update, remember this.​

image001.jpg
image002.jpg

This is the vanity panel I made to hide the power strip, switch ect under the desk, of course I decided to airbrush this too and tie it in with the inside.

image003.jpg


I used a samurai quote in this which is used to describe two samurai warriors working as one.

Translation is “Different body, same mind.” Which for us westerners means Harmony of mind between two people. While I am here, I should also translate the writing on the houses for you, the lower roof on the house on black side says Dragon clan and on the white roof says Tiger clan. On the side of both the houses the translation is honor and truth.

Any way guys stay tuned as more of the small stuff is done before the big reveal

 
At last we got there in the end, it was a long process but I am so happy with how this mod/art piece came out, there were a lot of choices to make and I am amazed with the end result, it truly is a one off piece, some ups and downs during the build but got there in the end, enjoy the pics and the videos guys.

image001.jpg


image002.jpg


image004.jpg


image005.jpg


image006.jpg


image008.jpg


image009.jpg


image010.jpg


image011.jpg


image012.jpg


image013.jpg


image014.jpg


image015.jpg


image016.jpg


image017.jpg


image018.jpg


image019.jpg


image020.jpg


image021.jpg


image022.jpg


image023.jpg


image024.jpg


image025.jpg


image026.jpg


image027.jpg


image028.jpg


I Love it, but just when you think I already posted too many pictures, here are some different lighting modes for you of course with the rainbow unicorn too :P

image029.jpg


image030.jpg


image031.jpg


image032.jpg


image033.jpg


image034.jpg


image035.jpg


image036.jpg


image037.jpg


image038.jpg


image039.jpg


image040.jpg


image041.png


And to finish it off, here are some videos for you to watch, first up is the video of how the engraving was done by my wife.


Second the Desk in normal mode


Last but not least Desk in unicorn mode ;)


One massive journey (and desk :P) but we got there in the end and I love my new art piece in my home, special thanks to the sponsors involved and also my wife for the engraving.
 
Back
Top