Convective silence


Owner:
Posted:
April 22nd 2008
Updated:
Viewed:
10,731 times
Rating:
 9 votes total
Superb (8.0)
Submit vote:
Please register on the forums & login to vote.
Key Features:


System Specs:
Performed Mods:
Watercooling, DIY passive radiator, Switchpanel for the pre assembled (and quite unnecessary) case fans.
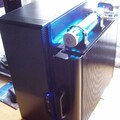
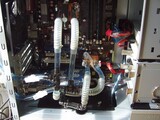
The idea was to make a pc that would be totally silent.
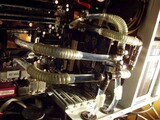
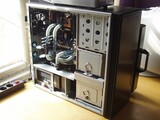
I also wanted a somewhat Darth Vaderish look since Las-Vegas-in-a-box like LED pollution annoys me a bit. I constructed a passive heat exchanger for my old watercooling rig so I could get rid of all the fans in the system. Of course, it also required a power supply that had no actively rotating fans (the Antec Phantom). I mounted the Eheim pump and Innovatek tank on top of the DIY radiator, so it is a separate module with shut off valves and quick connectors and can be disconnected easily for maintenance. This thing turned out to be quite good, the noisiest part of the system is now my second monitor (old 17" CRT) that keeps a slight humming sound.
Update: the second CRT broke, so I swapped to 2 x 22" LCD:s,
totally silent now....
May 12th, 2024 05:00 EDT
change timezone
Latest GPU Drivers
New Forum Posts
- FINAL FANTASY XIV: Dawntrail Official Benchmark (85)
- Ryzen 7 5800X is it worthed upgrade from Ryzen 7 5700X ? (10)
- Purchased an AX1200i PSU as part of some forward planning, what tier is this PSU? (5)
- PSU Option for my PC (6)
- What's your latest tech purchase? (20516)
- monitor w good contrast and viewing angle for my sister with eye problems (14)
- Flash VBIOS to turn RX 580 2048SP into RX 570 (38)
- X670 owners, what kind of PCH temps do you you see? (20)
- What's an inexpensive AIO product line with a strong pump and low price? (102)
- Homeworld 3 [Official Thread] (13)
Popular Reviews
- ZMF Caldera Closed Planar Magnetic Headphones Review
- ThundeRobot ML903 NearLink Review
- Corsair MP700 Pro SE 4 TB Review
- Bykski CPU-XPR-C-I CPU Water Block Review - Amazing Value!
- CHERRY XTRFY M64 Pro Review
- Upcoming Hardware Launches 2023 (Updated Feb 2024)
- ASRock NUC BOX-155H (Intel Core Ultra 7 155H) Review
- AMD Ryzen 7 7800X3D Review - The Best Gaming CPU
- Corsair iCUE Link RX120 RGB 120 mm Fan Review
- ASUS Radeon RX 7900 GRE TUF OC Review
Controversial News Posts
- Intel Statement on Stability Issues: "Motherboard Makers to Blame" (266)
- AMD to Redesign Ray Tracing Hardware on RDNA 4 (206)
- Windows 11 Now Officially Adware as Microsoft Embeds Ads in the Start Menu (171)
- NVIDIA to Only Launch the Flagship GeForce RTX 5090 in 2024, Rest of the Series in 2025 (147)
- Sony PlayStation 5 Pro Specifications Confirmed, Console Arrives Before Holidays (119)
- AMD's RDNA 4 GPUs Could Stick with 18 Gbps GDDR6 Memory (114)
- NVIDIA Points Intel Raptor Lake CPU Users to Get Help from Intel Amid System Instability Issues (106)
- AMD Ryzen 9 7900X3D Now at a Mouth-watering $329 (104)
16 Comments on Convective silence
Looks good like to see more pics though ones that show more of what you have done.
I added one picture , and I will post more when I get a decent cam.
Dont want to snap the new ones with a crappy cell phone camera...
Nice rig! Care to share some more details about your rad?
This will do for a one more year or so, after that, I will a replace these with the best MOBO, CPU, RAM & 3D card that i can find and so we go for another few years....
The watercooling parts (except the rad) in this setup date back to 2001 and have seen 24/7 use in three setups before this.
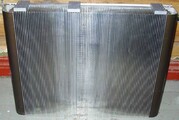
The rad itself is an old crude aluminium 20kW DC power supply cooling profile.
The rounded aluminium corner pieces and backplate are made from a
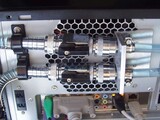
telecommunications cabinet manufactured in the 70's. Four meters of copper tubing is connected using silver soldered capillary T-pieces that i bought for about 2$.
The copper tubes are soldered to silvered flat copper pieces used to link battery terminals
and screwed in to the rad (with some heat sink paste).
After this, I painted it with acrylic silk black (for the not so glossy finish).
Convection rad
idle CPU 30C, GPU 35C, MOBO 26C, full overnight torture CPU 40C, GPU 55C, MOBO 28C
Old rad
idle CPU 26C, GPU 32C, MOBO 26C, full overnight torture CPU 38C, GPU 50C, MOBO 28C
You can see that with the old radiator the temps were few degrees lower than with this, but hey...the old one had four 120mm fans on it .....
Also, the hotter this gets, the more efficient it is as it is not cooled by force.
^^
pShh, hardware is unimportant in a good mod. There's a lot of work done to this thing, I see it, and much appreciate it. Making your own rad out of copper tubing, and silver solder is worthy of a 10 to me.