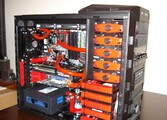
Guts of my HAF922

Posted:
October 15th 2009
Updated:
Viewed:
12,070 times
Rating:
Superb (7.9)
Voting Graph 32 votes total
Submit vote:
Please register on the forums & login to vote.
Key Features:
High Rated Intel CPU NVIDIA Graphics Custom Paint Job Water-cooled
This modder's other projects:
System Specs:
  • CM HAF 922 » CPU Intel Core i7 940 OC'd to 3.69 » Motherboard: Evga X58 » CORSAIR DOMINATOR 6GB (3x2GB) » EVGA GeForce GTX 295 » WD VelociRaptor 600 (2x300) Raid 0 » WD Black 1TB (2x1TB) Raid 1 » 1 LG DVD SATA Model » CORSAIR 850W » Creative Sound Blaster X-Fi XtremeGamer 7.1 » Scythe Fan Controller » Vista 64 » Dell 2707WFP
  • Cooling
  • RAD - XSPC RS360 & XSPC RS120 » CPU Block - Alphacool H14 Yellowstone BRB » Koolance Northbridge/Southbridge Water Block » Black Feeser Mosfet Block » EK-Multioption RES 150 » Swiftech MCP655™ Series 12 VDC Water Pump » Koolance-D5 X-TOP
Add your own comment

30 Comments on Guts of my HAF922

#1
Anath
Wow man that is sweet looking. I thought about doing the same thing to my haf. I just need to pick up a push pin remover so I cant start spraying.
Posted on Reply
#2
mav2000
Nice,,...btw what paint did u use for the red cd bay clips?
Posted on Reply
#3
steelkane
All that nice,,, Then you threw in a blue PSU
Posted on Reply
#4
theorw
The PSU makes the difference with the hole theme.I think its nice!
i gave u a 10 cos of the great looks and the tons of great hardware fitted in your case!
Posted on Reply
#5
triggs75
AnathWow man that is sweet looking. I thought about doing the same thing to my haf. I just need to pick up a push pin remover so I cant start spraying.
Thank you. I did not take the rivets out of the case. Just stripped it down to the bare metal case and sprayed.
mav2000Nice,,...btw what paint did u use for the red cd bay clips?
Thank you It was Rustoleum Universal gloss Spray COLOR: 245211 - Gloss Cardinal Red
steelkaneAll that nice,,, Then you threw in a blue PSU
Thank you and I know, I know. I really like the corsair PSU's and the red one is only 650 watts. I was thinking of covering it up or pealing it off.
theorwThe PSU makes the difference with the hole theme.I think its nice!
i gave u a 10 cos of the great looks and the tons of great hardware fitted in your case!
Thank you
Posted on Reply
#7
Animalpak
Wuehehe you spend alot of money on it dude, Congrats nice painting and ... ohh man awesome specs.
Posted on Reply
#8
triggs75
Bjorn_Of_IcelandNice specs, cool color combi! 9/10
Thank you
AnimalpakWuehehe you spend alot of money on it dude, Congrats nice painting and ... ohh man awesome specs.
Thank you and yeah the price is up there but it's been fun putting it together.
Posted on Reply
#9
t77snapshot
You came a long way from what you started with. All your work paid off and this is an amazing rig. EPIC mod bro, great job! 9/10

As far as the Blue on the psu: you could paint it all black, paint the label with a fine red paint, or you can get even more crazy and print a custom red decal identical to Corsair's label. haha
Posted on Reply
#10
triggs75
t77snapshotYou came a long way from what you started with. All your work paid off and this is an amazing rig. EPIC mod bro, great job! 9/10

As far as the Blue on the psu: you could paint it all black, paint the label with a fine red paint, or you can get even more crazy and print a custom red decal identical to Corsair's label. haha
Thank you. I wonder if a sticker shop would be able to make one red, or not... hmmm

Good thoughts on the PSU.
Posted on Reply
#12
pentastar111
RED!! Cool color, very neat and tidy....9/10 from me
Posted on Reply
#14
msgclb
Did you install your motherboard before or after installing the XSPC RS360 radiator? It sure looks like it would be hard to install the motherboard with your radiator installed.

Looking at the top case image it looks you're using only 4 screws to secure the XSPC RS360 radiator to the case. Did the other holes not line up or were you just missing some screws?
Posted on Reply
#15
triggs75
I installed the motherboard before the radiator. Yeah it would not be possible installing the RAD first.

As for the 360 RAD, the holes do not match up as the fans are closer together on the radiatior. I do have those four screws in it along with two screws attached to the RAD under the top plastic section. I just drilled two holes to attached the RAD. The radiator is solid with zero movement at all even with the 4 screws attached to it, but I did add 2 more.
Posted on Reply
#16
triggs75
I just added a couple of pics with the LED's in the case.
Posted on Reply
#17
pantherx12
Like the colour coordination, sell that PSU and get one that's red so it matches ha ha
Posted on Reply
#18
Howard
great work and spec 9/10 may i know wht fitting u r using? thx
Posted on Reply
#19
El_Mayo
probably the best case design i've ever seen!
but i haven't seen that many...
it is good though :D
Posted on Reply
#20
triggs75
pantherx12Like the colour coordination, sell that PSU and get one that's red so it matches ha ha
Thank you and yeah the PSU is going to get covered up.
Howardgreat work and spec 9/10 may i know wht fitting u r using? thx
Thank you. The fittings are all bitspower barb fittings with koolance clamps on them.
El_Mayoprobably the best case design i've ever seen!
but i haven't seen that many...
it is good though :D
Thank you....
Posted on Reply
#21
El_Mayo
how much did all that stuff cost? :O
Posted on Reply
#22
triggs75
El_Mayohow much did all that stuff cost? :O
I'm afraid to add it all up. The parts for the WC is around $800+ but well worth it. It was a really fun first liquid build for me. Not that this build will ever be finished as there will always be more fun stuff to buy.
Posted on Reply
#23
El_Mayo
triggs75I'm afraid to add it all up. The parts for the WC is around $800+ but well worth it. It was a really fun first liquid build for me. Not that this build will ever be finished as there will always be more fun stuff to buy.
haha fair enough
btw man your post count is set to 0 for some reason
that's weird lol
Posted on Reply
#24
Howard
would u mind also show how the cable managed on the other side? thx..
until then, i would still hold the vote!
hehe j/k would be still 9/10 from me..
Posted on Reply
#26
Howard
triggs75Um..... I do not think you want to see back There..... JK. I will take some pics later. As for now, Here are some pics of the CM Sniper Side Window Panel on my HAF922. It is a great buy for $10 to have an extra side panel along with being a full window. Also added the pics in my gallery.

img197.imageshack.us/img197/5365/dsc01649v.jpg

img197.imageshack.us/img197/2420/011od.jpg

img34.imageshack.us/img34/695/012qb.jpg

Chad
thx for providing those pics, it looks so tight and sophisticated!!!

i just ordered some extra parts for my WC, which will looks pretty same as urs when its finished, just that i will use 2nd pump, and maybe apply 3 radiator if possible..

www.techpowerup.com/gallery/2255.html
Posted on Reply
#27
triggs75
Just changed out the blue sticker on my PSUand replaced it with a Red one. Next is to change the color of the modular plug ins to get rid of that blue?

Pic is posted, it's the last pic.
Posted on Reply
#28
shevanel
are you using 4 fans on your rad or only 2? how are your temps?
Posted on Reply
#29
triggs75
shevanelare you using 4 fans on your rad or only 2? how are your temps?
I have the XSPC RS360 RAD on top with 3 120mm x 20mm fans on it. I cut out the top section along with where the fins or plastic grill are up top for the air to flow through. Temps are good, I average 23 Celcuis CPU on idle and about 42 celcius on load. I have my CPU oc'd to 3.69 also.

Chad
Posted on Reply
#30
lelouchvi
Sweet, overclock only that little ? ? =p
Posted on Reply
Add your own comment
May 2nd, 2024 19:50 EDT change timezone

New Forum Posts

Popular Reviews

Controversial News Posts