 19
19
Corsair Hydro Series H100i PRO Review
Test System & Temperature Results »A Closer Look


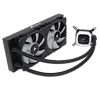
The radiator has a square design with no indents or accents other than the Corsair name and logo on the side in silver. Taking a closer look at the radiator itself, I found no bent fins or other quality control issues. Simply put, it was clean and 100% functional, which is as it should be. It has a measured FPI (fins-per-inch) of 21, which is rather dense, but par the course for Asetek-based units. The tubing, much like on the H150i PRO, is sleeved, giving it a nicer appearance than the plain black rubber tubing. It is also a huge improvement over the ugly corrugated offerings still used by a some of Corsair's competitors.


Much like its larger sibling, the H100i PRO uses the same pump. It is quite small and lightweight in regards to its design when compared to some of the hulking offerings some of the competition is using. The pump also features a gray aluminium accent that goes around the RGB LED illuminated logo and ties it in with the silver logo on the radiator. The wiring is placed between the two swivel fittings on the block. Meanwhile, the Corsair link/iCUE software control is enabled via the USB port on the other side. In regards to the copper cold plate, it comes with thermal paste pre-applied, as is the norm for a Corsair liquid cooler. Removing said thermal paste shows the cold plate to be quite smooth. While some very light machining marks are visible, they were not noticeable to the touch.

Corsair is of course using their high quality magnetic levitation fans on this unit as well. Specifications show a PWM range of 400–2400 and a maximum CFM of 75.
Installation


Installing the Corsair H100i PRO is rather easy and begins with securing the backplate to the motherboard with the proper standoffs.


If you're using the pre-applied thermal paste, just position the cooler in place and secure it with the Phillips head thumb screws. Otherwise, apply your preferred thermal paste and then mount the pump.


Next, secure the radiator to the chassis to then install the fans once it is mounted.

Finally, connect all the various wires and Corsair Link cable.
The Hydro Series H100i PRO is relatively easy to install, and I would rate it an 8 on a scale of 1 (hardest) to 10 (easiest) in terms of installation. The only thing I dislike, having worked with two of these units, is how the mounting plates attach to the pump. It's a simple twist and lock mechanism. I myself prefer mounting hardware that is firmly attached as the current mounting bracket design can pop free of the pump. Granted, it's a rare, but is still an unexpected annoyance if it happens.
Finished Looks


The H100i PRO keeps the same black and gray color scheme of its larger sibling, which, when paired with the smaller pump design and square radiator, results in a clean and attractive design. While it does have RGB LEDs built into the pump block, they can be turned off via software if you are not a fan of that particular feature. Otherwise, load up the iCUE software and pick your favorite color.


Like most all-in-one liquid coolers, clearance around the socket is perfect. The Hydro Series H100i PRO does not conflict with graphics cards or cause memory clearance issues on the test bench.


As can been seen, making the Corsair H100i PRO match any system theme is not a problem. Any color imaginable is available due to the RGB LEDs and Corsair Link/iCUE software.
Jun 3rd, 2024 06:34 EDT
change timezone
Latest GPU Drivers
New Forum Posts
- DTS DCH Driver for Realtek HDA [DTS:X APO4 + DTS Interactive] (1925)
- The TPU UK Clubhouse (24809)
- SVM SME extensions, [Secure Memory Encryption]. Are they implemented on Ryzen 3000, and Windows 10? (2)
- Cpu Fan Not Spinning But Detected (0)
- V Rising Lycanthropy Club (13)
- What's your latest tech purchase? (20722)
- Your PC ATM (34595)
- Current Sales, Bundles, Giveaways (10240)
- How do you get games for PC? (40)
- All Intel DG1 needs special bios? (24)
Popular Reviews
- SilverStone KL07E Review
- NuPhy Air96 V2 Low Profile Wireless Mechanical Keyboard Review
- Upcoming Hardware Launches 2024 (Updated May 2024)
- Elysian Acoustic Labs Pilgrim In-Ear Monitors Review
- ID-Cooling FX360 PRO Review - Shots Fired @ Arctic
- Ghost of Tsushima Performance Benchmark Review - 35 GPUs Tested
- AMD Ryzen 7 7800X3D Review - The Best Gaming CPU
- Senua’s Saga: Hellblade II: DLSS vs. FSR vs. XeSS Comparison Review
- Senua's Saga: Hellblade II Performance Benchmark Review
- Montech Titan Gold 1000 W Review
Controversial News Posts
- NVIDIA to Only Launch the Flagship GeForce RTX 5090 in 2024, Rest of the Series in 2025 (154)
- AMD Hits Highest-Ever x86 CPU Market Share in Q1 2024 Across Desktop and Server (140)
- AMD RDNA 5 a "Clean Sheet" Graphics Architecture, RDNA 4 Merely Corrects a Bug Over RDNA 3 (139)
- NVIDIA RTX 5090 "Blackwell" Founders Edition to Implement the "RTX 4090 Ti" Cinderblock Design (118)
- Core Configurations of Intel Core Ultra 200 "Arrow Lake-S" Desktop Processors Surface (101)
- Biden Administration to Revive Trump-Era Tariffs on China-made GPUs and Motherboards (95)
- AMD Ryzen 9000 Zen 5 Single Thread Performance at 5.80 GHz Found 19% Over Zen 4 (88)
- NVIDIA Testing GeForce RTX 50 Series "Blackwell" GPU Designs Ranging from 250 W to 600 W (84)