 16
16
Danger Den Torture Rack Review
(16 Comments) »Introduction
My thanks go out to Danger Den for providing the test sample.Today, we will take a look at Danger Den’s venture into the area of computer cases and enclosures. Before, Danger Den offered custom case projects – which, most of the time, were expensive, and one-off jobs. Now, the company brings its cases to the masses. Three cases are offered – starting with the Airbox through the Waterbox Plus, ending at the Torture Rack. We will take a look at the latter today.
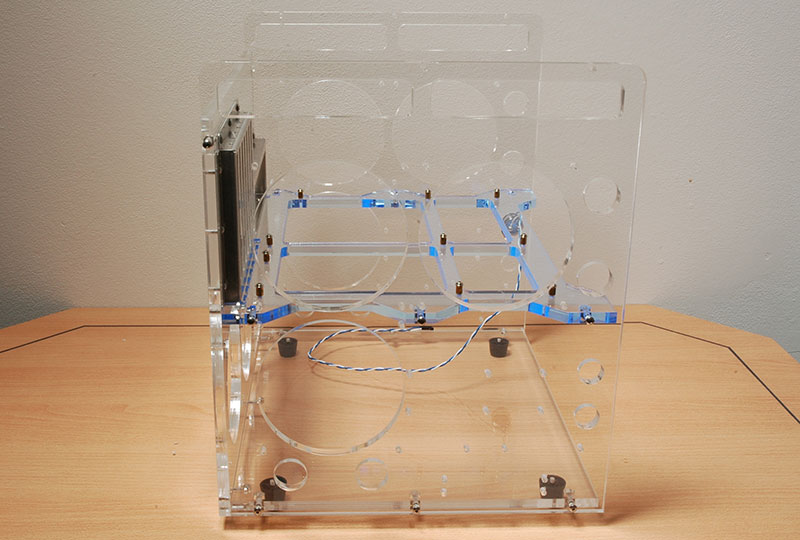
What makes Danger Den’s cases stand out is the fact that their motherboards are mounted horizontally, instead of vertically as in most cases. This allows better serviceability of the computer's internals, at the same time providing better cooling, as you get rid of most of the cable clutter. All of Danger Den’s cases are made of thick acrylic, which should not crack easily, and also allows people to feast their eyes with the internals of your PC.
Specifically for the Torture rack, the case was designed by Danger Den for internal testing. The motherboard is placed atop, and the components that are rarely changed are located at the bottom (PSU, HDD, disc drive). The case itself is made from clear acrylic, but the motherboard tray can be made out of UV-sensitive material, as well as the optional top and side panel.
Specifications
Directly from the Danger Den website:- Motherboard – ATX and Micro ATX
- Supports ATX PSU
- 3 x 3.5” Internal Drives
- 1 x 5.25” External Drive Bay
- Supports up to 8 x 120mm case fans
- Compatible With Aftermarket Air Coolers
- Strong and Durable Acrylic construction
- Size: 14.7” x 12.1” x 14.4” (373mm x 308 x 365mm) W x D x H
- Black Ice Series I or II radiators (Xtreme, Pro, GTS, and GTX)
- Coming Soon - Send us your graphics and we'll cut it into the case
- Case Panel Colors (available soon - standard is all clear)
- Top Panel - For Security or Stacking Purposes
- Front Panel - Covers the Front Top to Motherboard Tray for Security
Unpacking & assembly


The case arrived in a brown box, inside, everything was very well packed. And I really do mean very, very well packed – the panels rest on dampening foam, additionally, each panel is packed separately in plastic wrap. Furthermore, each panel is covered from one side with paper. This prevents it from getting scratched, and makes handling easier. Two pairs of white gloves are provided, so you don’t get your fingerprints on the case. As you can see, everything needed for assembly is split up into zip-loc bags that are clearly labeled. This makes installation a lot easier. Danger Den also gives you a very nice vandal-proof switch to power on your PC.


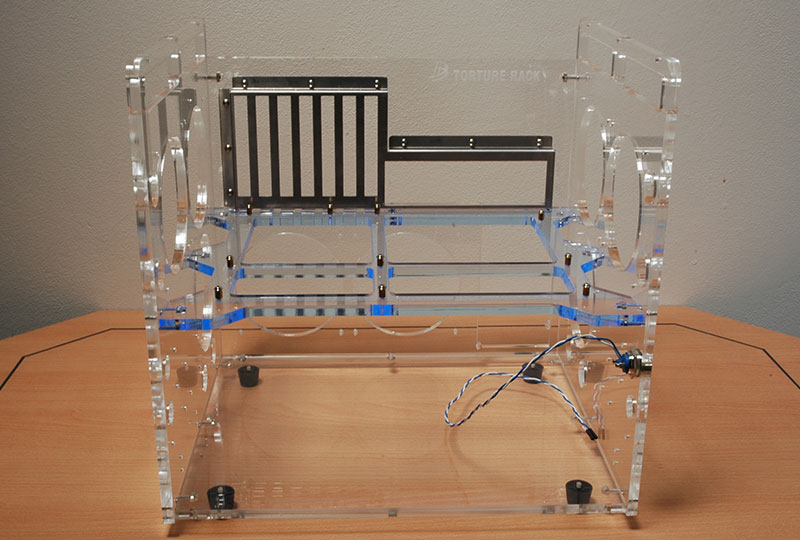


Assembly of the case was relatively easy and took about 1 hour. There was a slight issue with one of the screws on the I/O Shield, as it didn’t fit (the hole on the metal shield would not align with the one in the motherboard tray.) Now, one screw probably wouldn’t make a difference, but just to be sure I took a file and enlarged the screw hole on the metal shield – then, everything was OK. Also, there is a mistake in the instructions, which suggested the use of screws in bag 15 instead of those clearly labeled “I/O shield” Following my intuition, I used the I/O shield screws without any problems. Before you even begin assembling the case, do yourself a favor though – head out to a DIY store and purchase a proper screwdriver. All of the screws provided with the case have the same head, so one screwdriver will do. Being in Europe, I ended up using a 2.5mm hex screwdriver, which fit the screw heads fine. The only time I needed to use the allen wrench was when screwing in the bottom three screws on the I/O shield. I also recommend not to throw away the packaging, as it comes in handy when you assemble the case. I used the box as support during assembly as you can see in one of the pictures above.

As the picture above shows, most of the time, you do not screw into the acrylic directly. Instead, Danger Den has designed a clever system, where you place the screw into the acrylic and secure it on the opposite end with a nut. This should yield less stress on the panels.
Once you assemble the whole case, it is necessary to loosen all of the screws, and get all the panels aligned (getting someone to help you makes this process much, much easier).
Then, you’re ready to install all of the hardware!
Our Patreon Silver Supporters can read articles in single-page format.
May 8th, 2024 15:48 EDT
change timezone
Latest GPU Drivers
New Forum Posts
- Your way of cooling your PC? (32)
- Arkane Austin and Redfall: what happened? (49)
- Epic Games launcher's ridiculous CPU usage (29)
- High c0% and system idle process (4)
- not impressed - nvme vs ssd (69)
- Arc OC'ing, anyone? (10)
- Does anyone here overclock their video cards? Is it really worth it? (68)
- PSU making a clicking sound, PC wont turn on (27)
- POLL: Can you see the difference past 60fps (gaming/other) (52)
- Last game you purchased? (266)
Popular Reviews
- CHERRY XTRFY M64 Pro Review
- Corsair iCUE Link RX120 RGB 120 mm Fan Review
- Finalmouse UltralightX Review
- Upcoming Hardware Launches 2023 (Updated Feb 2024)
- Bykski CPU-XPR-C-I CPU Water Block Review - Amazing Value!
- Cougar Hotrod Royal Gaming Chair Review
- Meze Audio LIRIC 2nd Generation Closed-Back Headphones Review
- AMD Ryzen 7 7800X3D Review - The Best Gaming CPU
- ASRock NUC BOX-155H (Intel Core Ultra 7 155H) Review
- ASUS Radeon RX 7900 GRE TUF OC Review
Controversial News Posts
- Intel Statement on Stability Issues: "Motherboard Makers to Blame" (261)
- AMD to Redesign Ray Tracing Hardware on RDNA 4 (205)
- Windows 11 Now Officially Adware as Microsoft Embeds Ads in the Start Menu (167)
- NVIDIA to Only Launch the Flagship GeForce RTX 5090 in 2024, Rest of the Series in 2025 (142)
- Sony PlayStation 5 Pro Specifications Confirmed, Console Arrives Before Holidays (119)
- AMD's RDNA 4 GPUs Could Stick with 18 Gbps GDDR6 Memory (114)
- NVIDIA Points Intel Raptor Lake CPU Users to Get Help from Intel Amid System Instability Issues (106)
- AMD Ryzen 9 7900X3D Now at a Mouth-watering $329 (104)