 1
1
Gigabyte iSOLO 210 Review
Value & Conclusion »Installation

Installing the mainboard is done as it would in any other standard case. Place the golden mainboard spacers at the right location, insert the backplate of the mainboard and secure the board on the spacers. The PCI bracket clips hold quite well, but you should secure larger graphic cards with the supplied screws as well - especially if you plan to go to LAN parties.


Installing the hard drive on the other hand is done without the use of a screw driver. Just snap the rails onto the side of the drive and slide it into the case until it snaps into place - done.

Installing the optical drive can be performed after removing the front. Simply push it in and then slide over the lock. This holds the drive quite well on this side, but it still gives away a bit on the other side, so you will have to use the supplied screws to secure the ODD.
Finished Looks


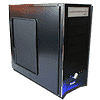
Once everything was installed, just replace the side panels and connect the computer. Even though Gigabyte did not use any foam spacers, the rubber rings do a great job from stopping any vibration. A silver drive was used in this case, which looks fine, but even a beige drive should not disturb the entire look and feel of the case. Obviously the color of choice to use would be black. The blue LED of the front looks great and the glow is quite strong. This should turn a few heads at a LAN party in the dark.

The case itself does take fingerprints easily, but as mentioned before, Gigabyte includes a cloth to wipe such residue off. The iSOLO looks great and is certainly a welcome addition in any setting - home office, gaming room, living room or at a LAN party.
May 8th, 2024 20:56 EDT
change timezone
Latest GPU Drivers
New Forum Posts
- Ubuntu 24.04 LTS released (8)
- Flash VBIOS to turn RX 580 2048SP into RX 570 (19)
- Specific telemetry disabled under expert tweaks (1)
- What are you playing? (20601)
- Your way of cooling your PC? (42)
- Urgent: PC wont turn on with PSU connected to MOBO (29)
- What's a good option for a digital touchless thermometer? (14)
- Post your Cinebench R23 Score (2953)
- Lofree Edge Ultra-Low Profile Wireless Mechanical Keyboard (1)
- im new to throttelstop and i think i messed it up by copying others any hints would be very much aprreciated (15)
Popular Reviews
- CHERRY XTRFY M64 Pro Review
- Corsair iCUE Link RX120 RGB 120 mm Fan Review
- Bykski CPU-XPR-C-I CPU Water Block Review - Amazing Value!
- Finalmouse UltralightX Review
- Upcoming Hardware Launches 2023 (Updated Feb 2024)
- Cougar Hotrod Royal Gaming Chair Review
- AMD Ryzen 7 7800X3D Review - The Best Gaming CPU
- Meze Audio LIRIC 2nd Generation Closed-Back Headphones Review
- ASRock NUC BOX-155H (Intel Core Ultra 7 155H) Review
- ASUS Radeon RX 7900 GRE TUF OC Review
Controversial News Posts
- Intel Statement on Stability Issues: "Motherboard Makers to Blame" (261)
- AMD to Redesign Ray Tracing Hardware on RDNA 4 (206)
- Windows 11 Now Officially Adware as Microsoft Embeds Ads in the Start Menu (167)
- NVIDIA to Only Launch the Flagship GeForce RTX 5090 in 2024, Rest of the Series in 2025 (142)
- Sony PlayStation 5 Pro Specifications Confirmed, Console Arrives Before Holidays (119)
- AMD's RDNA 4 GPUs Could Stick with 18 Gbps GDDR6 Memory (114)
- NVIDIA Points Intel Raptor Lake CPU Users to Get Help from Intel Amid System Instability Issues (106)
- AMD Ryzen 9 7900X3D Now at a Mouth-watering $329 (104)