 24
24
Cooler Master Cosmos S Review
Value & Conclusion »Installation

Once the mainboard is installed, it becomes apparent how big the case really is. The full size ATX board looks tiny within the chassis. This case is possibly even a bit too big, but you will need the space for eATX boards like the Skulltrail. Graphic cards have plenty of space, much more than needed.


The hard drive cage is installed the same way as it is removed. Simply slide it back into the case and secure it with the push lock and four screws. Installing the optical drive is done the same way and, if you do not mind a little play, does not require any further screws - allthough I would recommend at least one to stabilize the drive.
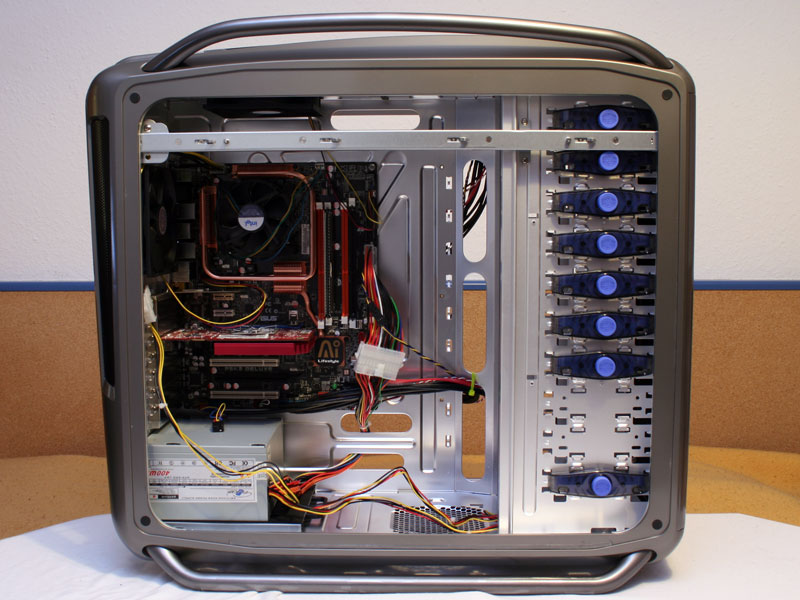
Even the PSU can be longer than anything I have ever seen on the market. The holes in the mainboard help to keep things clean. The only real restriction with the case comes in form of a height requirement for the CPU heatsink. A Scythe Mugen would never fit due to the 200 mm fan of the side door. So your best bet is getting a flat and large CPU cooler or go straight with water cooling and a triple radiator.
Finished Looks


Once you turn on the system, the previously hidden, touch sensitive power button can be seen, glowing red. Even though there is no physical button, you can still perform all the usual actions like holding it down for four seconds to turn off the system.


Once all the fans are plugged in and the case is turned on, the red glow of the front fan, cooling the hard drives is seen through the front mesh. This reminds us of the Stacker series once more, but the red color is a very nice and appropriate change. The fans are very quiet, including the 200 mm one. I even connected it directly to the PSU to check its noise level at full speed, but it is almost silent at full throttle.
Apr 26th, 2024 00:45 EDT
change timezone
Latest GPU Drivers
New Forum Posts
- What's your latest tech purchase? (20341)
- Horizontal black lines popping up on my screen? (0)
- Which new games will you be buying? (316)
- Alphacool CORE 1 CPU block - bulging with danger of splitting? (20)
- Black screen after muting (5)
- What phone you use as your daily driver? And, a discussion of them. (1481)
- What are you playing? (20530)
- Secure boot already open help (0)
- TPU's Nostalgic Hardware Club (18465)
- Post your Speedometer 3.0 Score (36)
Popular Reviews
- Fractal Design Terra Review
- Thermalright Phantom Spirit 120 EVO Review
- Corsair 2000D Airflow Review
- ASUS GeForce RTX 4090 STRIX OC Review
- NVIDIA GeForce RTX 4090 Founders Edition Review - Impressive Performance
- ASUS GeForce RTX 4090 Matrix Platinum Review - The RTX 4090 Ti
- MSI GeForce RTX 4090 Suprim X Review
- Gigabyte GeForce RTX 4090 Gaming OC Review
- MSI GeForce RTX 4090 Gaming X Trio Review
- MSI GeForce RTX 4090 Suprim Liquid X Review
Controversial News Posts
- Sony PlayStation 5 Pro Specifications Confirmed, Console Arrives Before Holidays (117)
- Windows 11 Now Officially Adware as Microsoft Embeds Ads in the Start Menu (110)
- NVIDIA Points Intel Raptor Lake CPU Users to Get Help from Intel Amid System Instability Issues (106)
- AMD "Strix Halo" Zen 5 Mobile Processor Pictured: Chiplet-based, Uses 256-bit LPDDR5X (101)
- US Government Wants Nuclear Plants to Offload AI Data Center Expansion (98)
- AMD's RDNA 4 GPUs Could Stick with 18 Gbps GDDR6 Memory (88)
- Developers of Outpost Infinity Siege Recommend Underclocking i9-13900K and i9-14900K for Stability on Machines with RTX 4090 (85)
- Windows 10 Security Updates to Cost $61 After 2025, $427 by 2028 (84)