 20
20
Lian Li PC-A04 Review
Assembly & Finished Looks »A Closer Look - Inside
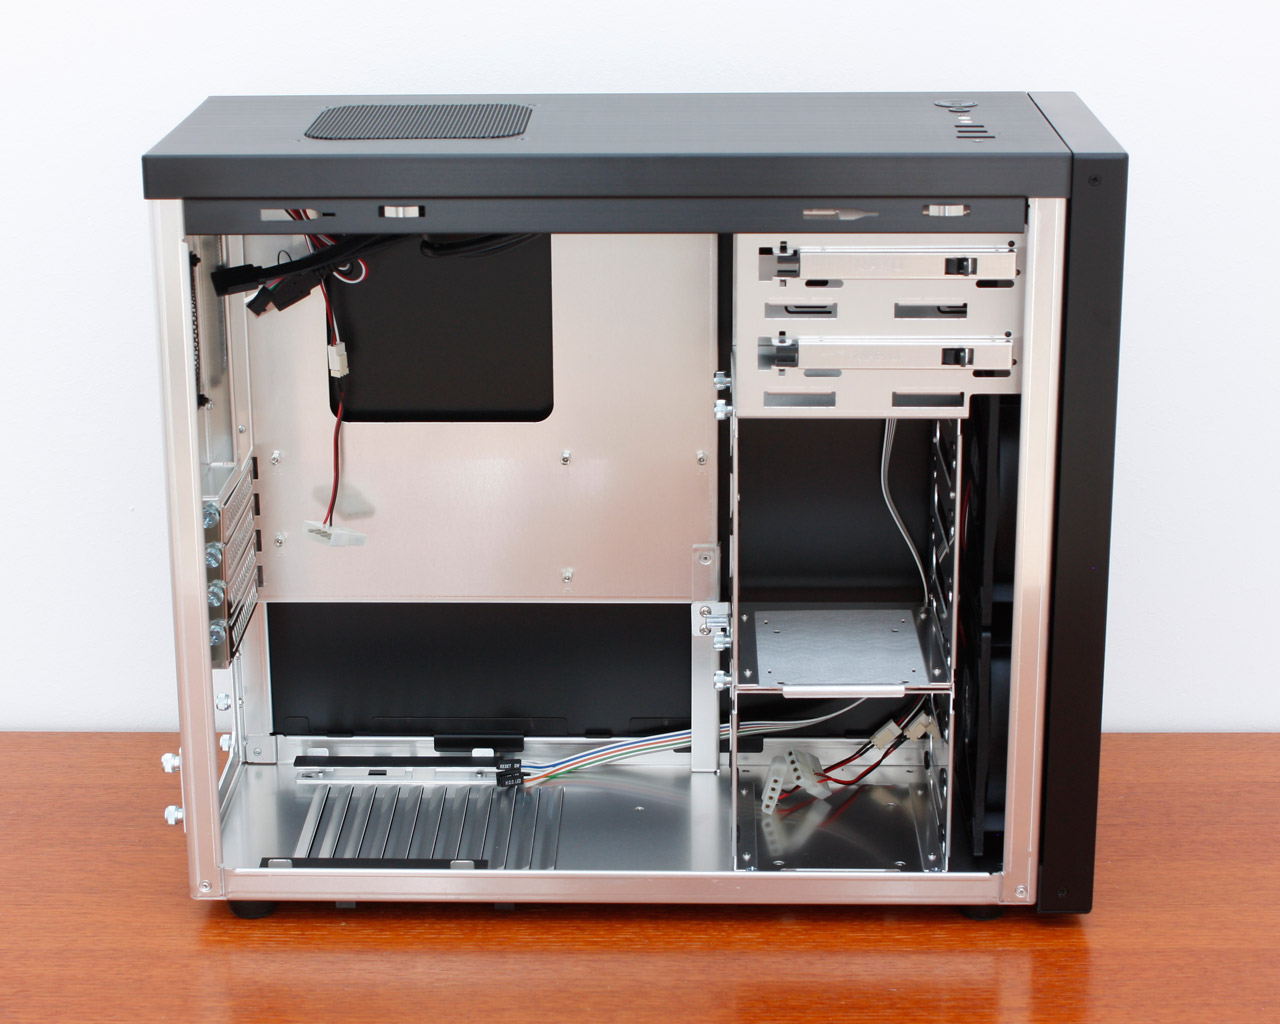


Simply remove the pair of thumb screws holding each side panel in place to gain access to the interior of the A04. While things look rather simple at first sight, Lian Li has put a few very useful features inside the chassis. The layout is clean and everything is where you would expect to find it upon first inspection. Turning things around, one can clearly see the large opening below the CPU area and the fact that there are no openings for cable routing. It will be interesting to see what is possible in terms of cable management. You can gain access to the external drive bay covers and fans by simply pulling off the front cover of the chassis. Both intake units are covered by dust filters, so you won't have to worry about that aspect when using this case.


You can stuff up to seven 3.5 inch drives into the miniscule A04, which is more than some mid-tower cases out there. Lian Li has divided the bays into two cages, so that you may remove one or both if your large expansion cards require the space. You may also choose which of the two cages will remain in the system, if there is not enough room for them both. The two fans reach all seven hard drives and should also aid in cooling the graphics cards if the cages are removed.


Both external drive bays utilize the Lian Li locking bars. These allow for a screwless installation of your 5.25 inch drives - but more on that during the assembly process.


Turning our focus to the rear of the chassis, we have the PSU bay on the bottom, with an air vent, which has simply been punched into the flooring to allow for fresh air to enter the PSU. As you can see, the case feet do not breach the flooring in any way, which means that they are glued on. If you are moving around the case on a carpet, these are bound to peel off eventually. Above the power supply bay are the four mainboard expansion slots. Nothing out of the ordinary here. Lian Li has once more chosen to use thumb screws for these. On the very top we have that 80 mm air vent, covered by a square metal mesh. This opening allows hot air which is pushed this way by a tower cooler to exit the case.


Taking a quick look at the underside of the A04, we can see the dust filter placed under the PSU vent. This means that all intake areas are covered and the parts protected from dust build-up. Here you can also see the basic rubber feet which are glued unto the floor of the chassis. The 120 mm top fan does not come with a dust filter or fan guard. Neither is really necessary as the hot air is pushed out through the roof of the system and you should not be messing with a running system anyways.


Lian Li went a bit overboard in terms of cable length. My guess is that these were intended for mid or full tower enclosures and the company did not bother installing special, shorter ones in this mini tower. This means that you will have to invest some time to have a clean interior once all the parts are in place. All the I/O cables are black - including the USB 3.0 lead and the power/reset and LED strands are nothing out of the ordinary. Lian Li still employs the 3 pin wide power LED connector instead of two seperate connectors. This means that mainboards with a two pin configuration will not be compatible to this connector unless you decide to break it apart.
Apr 25th, 2024 23:54 EDT
change timezone
Latest GPU Drivers
New Forum Posts
- Alphacool CORE 1 CPU block - bulging with danger of splitting? (18)
- What's your latest tech purchase? (20340)
- Black screen after muting (5)
- What phone you use as your daily driver? And, a discussion of them. (1481)
- What are you playing? (20530)
- Secure boot already open help (0)
- TPU's Nostalgic Hardware Club (18465)
- Post your Speedometer 3.0 Score (36)
- Size on Disk Excessively Different than Size (9)
- Dell Workstation Owners Club (3056)
Popular Reviews
- Fractal Design Terra Review
- Thermalright Phantom Spirit 120 EVO Review
- Corsair 2000D Airflow Review
- ASUS GeForce RTX 4090 STRIX OC Review
- NVIDIA GeForce RTX 4090 Founders Edition Review - Impressive Performance
- ASUS GeForce RTX 4090 Matrix Platinum Review - The RTX 4090 Ti
- MSI GeForce RTX 4090 Suprim X Review
- Gigabyte GeForce RTX 4090 Gaming OC Review
- MSI GeForce RTX 4090 Gaming X Trio Review
- MSI GeForce RTX 4090 Suprim Liquid X Review
Controversial News Posts
- Sony PlayStation 5 Pro Specifications Confirmed, Console Arrives Before Holidays (117)
- Windows 11 Now Officially Adware as Microsoft Embeds Ads in the Start Menu (110)
- NVIDIA Points Intel Raptor Lake CPU Users to Get Help from Intel Amid System Instability Issues (106)
- AMD "Strix Halo" Zen 5 Mobile Processor Pictured: Chiplet-based, Uses 256-bit LPDDR5X (101)
- US Government Wants Nuclear Plants to Offload AI Data Center Expansion (98)
- AMD's RDNA 4 GPUs Could Stick with 18 Gbps GDDR6 Memory (88)
- Developers of Outpost Infinity Siege Recommend Underclocking i9-13900K and i9-14900K for Stability on Machines with RTX 4090 (85)
- Windows 10 Security Updates to Cost $61 After 2025, $427 by 2028 (84)