 0
0
Raidmax Aeolus Review
Assembly & Finished Looks »A Closer Look - Inside


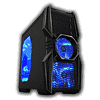
Opening the case by unscrewing four thumb screws at the back will unlock the side panels. Sliding them off and setting them aside we see the inner workings of our chassis. The all black interior is certainly eye pleasing as well as the openings on the motherboard tray. It's nice to see these openings included for CPU backplates and cable routing.


Up front we have two HDD mounting bays which hold two hard drives for a total of four internal storage drives. The left HDD bay is removable with four thumb screws from the underside. The HDD holders snap into place in the holder providing a nice housing for your storage. Slightly above the front HDD bay is a single blue LED 120 mm fan. Above the fan is our optical bay which Raidmax has equipped with a tool-less locking design.


Swinging our view to the rear we have the power supply mounted on the base. The power supply is mounted directly over a vented and filtered opening to draw cool air in. Just above are the seven PCI brackets which are all perforated for maximum air flow and painted a nice blue that matches the fans. The inner top displays an outward facing 120 mm exhaust fan.

Packed in across the top are two more 120 mm fans, matched with the blue accent color. These two fans help pull hot air out of the case and when added to the rear facing 120 mm fan there's no doubt a sizeable amount of airflow will be flowing in this case.

Prior to installation, it's important to recognize the internal cable connectors. The grouping is the standard connectors: 1 USB 2.0, 1 SATA, 1 audio, 1 HDD activity, and power and reset. Additionally, all the fan connectors are Molex connections. It would have been nice to see some of these opted for a three pin connection.
Jun 9th, 2024 01:42 EDT
change timezone
Latest GPU Drivers
New Forum Posts
- Overthinking case design and airflow/thermals. (12)
- 9900X3D - Will AMD solve the split CCD issue (126)
- What are you playing? (20815)
- 14900k or 14700k | Aircooling | Noctua U14S | Adobe Premiere Pro? (18)
- Windows 11 General Discussion (5071)
- What's your latest tech purchase? (20753)
- Cheap source of adapters, plugs and sockets for fans? (6)
- Need help reaching Package C8 on Intel N100 (29)
- CYBERPUNK 2077 O.F. (16)
- EPIC Games Launcher now verifies existing installs better (21)
Popular Reviews
- Intel Lunar Lake Technical Deep Dive - So many Revolutions in One Chip
- Pulsar Xlite V3 Review
- AQIRYS HYDRA 360 AIO Review
- NZXT H6 Flow RGB Review
- Upcoming Hardware Launches 2024 (Updated May 2024)
- AMD Ryzen 7 7800X3D Review - The Best Gaming CPU
- Senua's Saga: Hellblade II Performance Benchmark Review
- Kioxia Exceria Plus G3 2 TB Review
- Thermal Grizzly KryoSheet Review - Tested on RX 7900 XTX with 475 W
- Corsair iCUE XC7 RGB Elite LCD CPU Water Block Review
Controversial News Posts
- AMD RDNA 5 a "Clean Sheet" Graphics Architecture, RDNA 4 Merely Corrects a Bug Over RDNA 3 (142)
- AMD Hits Highest-Ever x86 CPU Market Share in Q1 2024 Across Desktop and Server (140)
- NVIDIA RTX 5090 "Blackwell" Founders Edition to Implement the "RTX 4090 Ti" Cinderblock Design (118)
- AMD Zen 5 Storms into Gaming Desktops with Ryzen 9000 "Granite Ridge" Processors (97)
- Biden Administration to Revive Trump-Era Tariffs on China-made GPUs and Motherboards (95)
- ASRock Innovates First AMD Radeon RX 7000 Graphics Card with 12V-2x6 Power Connector (94)
- AMD Ryzen 9000 Zen 5 Single Thread Performance at 5.80 GHz Found 19% Over Zen 4 (90)
- NVIDIA Testing GeForce RTX 50 Series "Blackwell" GPU Designs Ranging from 250 W to 600 W (84)