 24
24
Zalman VF1000 LED & RHS88 Review
Performance »Installation

Installing the VF1000 LED and RHS88 on a NVIDIA 8800 card should be quite simple even though you have some extra things you need to assemble. The first thing you got to do before installing the VF1000 LED is to assemble the FET heat sinks. As you can see the two profiles differ a bit in their shape. The 8800 GTS FET heat sink is the right one, you can see that there is a "hole" in it in order to avoid clearance issues with two components on the VGA card.


The RHS88 needs some assembly before you can put it together with the VF1000 LED. You have to screw together the FET and RAM I/O Chipset profile. This is done via three screws. The assembly of the two profiles is quite easy and Zalman has even embossed a label on each FET heat sink so that it's easy to find out which one you should use.

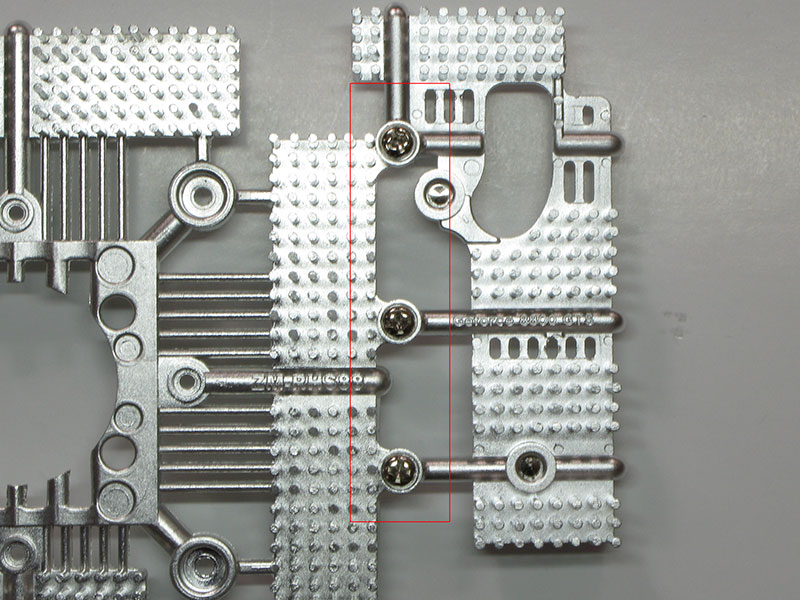
This is how the customized RHS88 cooling profile looks after you have put together both the FET and RAM heatsinks. On the right picture you can see the three screws that hold the two pieces together.

Like with any high performance VGA cooler the RHS88 has a lot of small thermal pads on the back of the profile. All of them are covered with a clear piece of plastic that needs removal before installation. Beware that the plastic coverings on the RHS88 are clear and therefore easy to miss.

For my graphics card cooler tests I always use Arctic Cooling MX-1 ceramique thermal paste. As you may notice you have to remove the GPU guide around the GPU's integrated heatsink. This is because of way the RHS88 is constructed. The GPU guide is quite easy to remove since it's only held in place by eight small screws on the back of the card.
Once you have removed the GPU guide frame and the plastic coverings from the thermal pads you can go ahead and push the RHS88 in place. I found that the thermal pads that Zalman uses have a relatively weak adhesive on. I messed around with the RHS88 a bit during installation. it simply fell off because I thought the pads would hold it in place after pressing down each thermal pad, but it didn't.
So after I figured this out I went ahead and mounted the VF1000 LED on top of the RHS88. The fit between the two pieces was absolutely perfect and it was really easy getting them to align properly (this can be quite hard if the construction is tight).


All you got to do to prep the VF1000 LED is screw in some silver nipples just like described in the manual. After doing this you put on some rubber grommets and then you can go ahead and put it on the card. Once you got it on you need to fix it in place. This is done by some thumb or normal screws (Zalman supplies both). I chose to go ahead and mount the cooler with the thumb screws since it was the easiest way for me (the normal screw option is needed if you have a CrossFire or SLI setup because the thumbs screws take up some room on the back of the card). Before putting in the thumb screws you need to put a PVC washer on the nipple sticking out on the back of the card, and a small spring that insures a tight fit and avoids overtightening the screws. Once this is done it's all a matter of tightening the screws in a way that puts minimal stress on the GPU. On a 8800 card the CPU is covered by a on-die heat sink which makes it hard to break the core, but if you are installing this cooling solution on an old card with an exposed core you should pay a great amount of attention to your tightening of the screws so that you don't ruin your graphics card. On the rightmost picture above the Styrofoam is where your graphics card's PCB would be in the nipple/thumb screw sandwich.


Immediately after I had installed the cooler I removed it to check that it had made contact with the heat sink on the GPU. And I must admit it looked really good, as you can see on the two pictures above, the thermal paste had be flattened out and was pushed towards the edges of the heat sink. There was a constant layer of thermal paste on both the GPU and the heatsink which means that contact was excellent and that the base of the cooler is flat enough to prevent a buildup of thermal paste in, i.e. the center of the base.

The manual is really good and has a lot of nice explanatory diagrams. Besides that it also features a sequence of how to put the pieces together. I found this small piece of information to be quite useful, I had it laying next to me on that page throughout the entire installation process. Every time I couldn't work it out I just referred to that simple list.


With the card completely assembled it was time to take a step back and enjoy the awesome looks of the thing. This is by far one of the best looking VGA card cooling solutions out there.

I did a quick visual inspection of the cooler in order to make sure that the RHS88 was making contact with all the components on the board and wasn't touching something it wasn't supposed to. As you can see on the image the contact between the profile and the RAM was excellent, enough pressure to squeeze the thermal pads yet still not bending the PCB.
Here you can see why you have to mount the correct FET heat sink on the RHS88. Two components are a bit higher than the rest.
Time to re-insert the card into my PC (uhh can't wait).

The cooler looks great. It just makes me a bit sad that my X-Fi and Wifi card block the view of the cooler.


Since the 80 mm fan in the center of the cooler is a LED one I decided to make a little night photo shot just to show all you die hard modders out there how this cooler looks. Compared to what I'm used to this cooler looks really nice, but lets see how it performs before we make any conclusions.
May 10th, 2024 06:42 EDT
change timezone
Latest GPU Drivers
New Forum Posts
- What are you playing? (20609)
- ALPHACOOL - ideas for IMPROVING products and NEW products (4)
- AM5 boot times improve RADICALLY with memory context restore enabled (29)
- RM750x (2021) enough for my 5800X3D + 7900XT system? (13)
- Graphics card running at 8x 4.0 not 16x 4.0 (19)
- Homeworld 3 [Official Thread] (0)
- EKWB - ideas for IMPROVING products and NEW products (0)
- Ghost of Tsushima PC Port !!!! (24)
- Battery swap for cyberpower UPS (68)
- RTX 4070 vs RTX 4070 Ti power scaling (9)
Popular Reviews
- CHERRY XTRFY M64 Pro Review
- Bykski CPU-XPR-C-I CPU Water Block Review - Amazing Value!
- Corsair iCUE Link RX120 RGB 120 mm Fan Review
- Corsair MP700 Pro SE 4 TB Review
- ThundeRobot ML903 NearLink Review
- Upcoming Hardware Launches 2023 (Updated Feb 2024)
- Finalmouse UltralightX Review
- AMD Ryzen 7 7800X3D Review - The Best Gaming CPU
- Sapphire Radeon RX 7700 XT Pure Review
- ASUS Radeon RX 7900 GRE TUF OC Review
Controversial News Posts
- Intel Statement on Stability Issues: "Motherboard Makers to Blame" (264)
- AMD to Redesign Ray Tracing Hardware on RDNA 4 (206)
- Windows 11 Now Officially Adware as Microsoft Embeds Ads in the Start Menu (169)
- NVIDIA to Only Launch the Flagship GeForce RTX 5090 in 2024, Rest of the Series in 2025 (144)
- Sony PlayStation 5 Pro Specifications Confirmed, Console Arrives Before Holidays (119)
- AMD's RDNA 4 GPUs Could Stick with 18 Gbps GDDR6 Memory (114)
- NVIDIA Points Intel Raptor Lake CPU Users to Get Help from Intel Amid System Instability Issues (106)
- AMD Ryzen 9 7900X3D Now at a Mouth-watering $329 (104)