
- Joined
- Jun 28, 2007
- Messages
- 55 (0.01/day)
- Location
- Hannover / Germany
Hi Guys in 15 countries and 25 forums where i released this review,
Many from you Enthusiasts out there worldwide already heard from XSPC, based in England, Producer from Watercooling Products since many years.
Now, XSPC has Aluminum Cases in their Portofolio, the H1 Cube, which i tested for you and the H2 Big Tower aswell. Both Cases are ideal for watercooling setups, because there are plenty of space to install many radiators and High End Hardware !
I want to show you the Case in details and equiped with hardware, but first:
The technical specifications:
Dimensions (DxWxH): 619,3 x 475,6 x 529,8mm
Colour: Matte black
Material: Brushed aluminium
Fan openings: 16x120mm
Space for 5x Triple 120mm Radiators
and 1x Single 120mm Radiator
Drive bays:
8x 5.25" drive bays (Baycovers not included!)
5x HDD bay (up to 10 with optional HDD cage)
1x SSD bay (Up to 10 with optional drive bays)
2 Acrylic windows build in
Extent of delivery:
1x XSPC H1 Cube Case
Mounting screws (6 - 32UNC)
Price: ~ 400 Euro
http://www.aquatuning.de/product_info.php/language/en/info/p11643_XSPC-H1-Cube-Case.html

H1 Cube Case | XSPC
The XSPC H1 is a huge Aluminum Case which comes with a build in side window and another one in the top, so you always can see your nice hardware and watercooling gear")
The H1 looks stylish and has so much space for mounting radiators in there. You can install 5x 360 triple rads plus 1x 120mm Rad in the back. So, even a high end Triple-SLI
System could be handled complete internal will all those cooling power from the masses of radiators, which can find their home in this monster case !
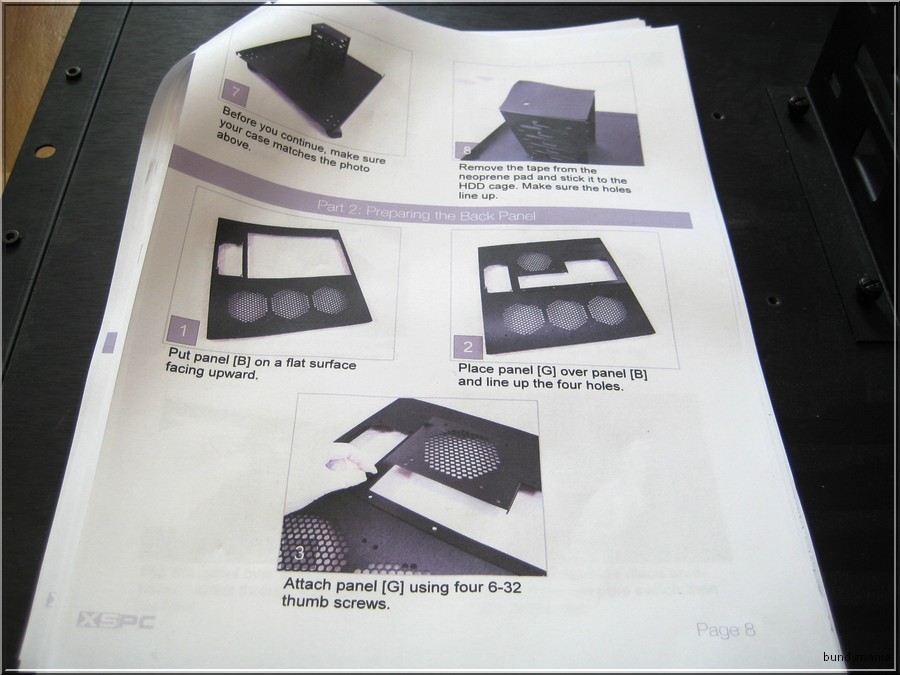
The manual is in english and avaiable to download at the manufacturer site, not included in the package.
Depending on your skills, it takes about 1-2 hours to completly bring all parts together to a complete functional case.
Most parts fits good, i only had a little problem with the mainboard tray. I had to bend the slot bracket from the graphic card a bit and then it fits and i can fix it with the screw.
The Side panels and top comes together with many thumb screws, so you need no screwdriver to open the case. Same Mechanism inside for the SSD Cage.
In the Frontplate is a nice bulgin power button located, it looks good and is very massive. The Connector cables are not sleeved here. A Reset Button or Front USB/E-Sata Connectors are not available.
Here and there are some sharp edges, so take care, when mounting the optical drives in the front. Best method is, to dismount the top, when you install optical drives.
There are some holes in the Mainboardtray, so you can bring the hose easily down to the pump and rads here. No Problem to use 1/2" Tubing (19/13mm) here ! (like in my example setup)
When it comes to cable management, you have to be a bit creative, i attached many cables under the mainboard tray, so they are not visible when looking through the side window.
But enough words now, let me show you the pictures, they speak for themselves
The Case has to be build by the Customer, many parts in the big package:

packed well and safe:

After 20 Minutes, all Parts are packed out and sorted:


In the back there is space for a 120mm Single Radiator, or a fan:

The SSD / 2,5" HDD Mounting Mechanism:


The HDD Cage will be installed via Thumbscrews:

The Manual:


More Pics from Case Parts and the Build Process:


Conclusion: With their first PC Alu Case Series XSPC goes in the right direction. Here and there are details, that could be done better, but overall, it´s a good case and every PC Watercooling Enthustiast will have many fun with it ! What i don´t like is the fact, that the drive bays are sold separatly and the Aluminum Material itself could be a bit thicker in my opionion ! When equiped with hardware, the case looks really good and it´s no problem to install a very huge watercooling setup, it´s fun to put all the hardware and watercooling stuff in the case - even 2 watercooling loops with 2 pumps are possible to realize. When it comes to the retail price and i compare the XSPC H1 with some cases from Mountain Mods, the price seems ok. So, when you´re in the market for a really huge case, check this one out !
Thanks for the kind support goes to the following companies:
XSPC , Aquatuning , Phobya , Noiseblocker , Bitspower , Alphacool , Home | EkWaterBlocks , www.watercool.de , www.kingston.com , MIPS Computer , COUGAR , Corsair , www.caseking.de
Many from you Enthusiasts out there worldwide already heard from XSPC, based in England, Producer from Watercooling Products since many years.
Now, XSPC has Aluminum Cases in their Portofolio, the H1 Cube, which i tested for you and the H2 Big Tower aswell. Both Cases are ideal for watercooling setups, because there are plenty of space to install many radiators and High End Hardware !
I want to show you the Case in details and equiped with hardware, but first:
The technical specifications:
Dimensions (DxWxH): 619,3 x 475,6 x 529,8mm
Colour: Matte black
Material: Brushed aluminium
Fan openings: 16x120mm
Space for 5x Triple 120mm Radiators
and 1x Single 120mm Radiator
Drive bays:
8x 5.25" drive bays (Baycovers not included!)
5x HDD bay (up to 10 with optional HDD cage)
1x SSD bay (Up to 10 with optional drive bays)
2 Acrylic windows build in
Extent of delivery:
1x XSPC H1 Cube Case
Mounting screws (6 - 32UNC)
Price: ~ 400 Euro
http://www.aquatuning.de/product_info.php/language/en/info/p11643_XSPC-H1-Cube-Case.html
H1 Cube Case | XSPC
The XSPC H1 is a huge Aluminum Case which comes with a build in side window and another one in the top, so you always can see your nice hardware and watercooling gear
The H1 looks stylish and has so much space for mounting radiators in there. You can install 5x 360 triple rads plus 1x 120mm Rad in the back. So, even a high end Triple-SLI
System could be handled complete internal will all those cooling power from the masses of radiators, which can find their home in this monster case !
The manual is in english and avaiable to download at the manufacturer site, not included in the package.
Depending on your skills, it takes about 1-2 hours to completly bring all parts together to a complete functional case.
Most parts fits good, i only had a little problem with the mainboard tray. I had to bend the slot bracket from the graphic card a bit and then it fits and i can fix it with the screw.
The Side panels and top comes together with many thumb screws, so you need no screwdriver to open the case. Same Mechanism inside for the SSD Cage.
In the Frontplate is a nice bulgin power button located, it looks good and is very massive. The Connector cables are not sleeved here. A Reset Button or Front USB/E-Sata Connectors are not available.
Here and there are some sharp edges, so take care, when mounting the optical drives in the front. Best method is, to dismount the top, when you install optical drives.
There are some holes in the Mainboardtray, so you can bring the hose easily down to the pump and rads here. No Problem to use 1/2" Tubing (19/13mm) here ! (like in my example setup)
When it comes to cable management, you have to be a bit creative, i attached many cables under the mainboard tray, so they are not visible when looking through the side window.
But enough words now, let me show you the pictures, they speak for themselves
The Case has to be build by the Customer, many parts in the big package:
packed well and safe:
After 20 Minutes, all Parts are packed out and sorted:
In the back there is space for a 120mm Single Radiator, or a fan:
The SSD / 2,5" HDD Mounting Mechanism:
The HDD Cage will be installed via Thumbscrews:
The Manual:
More Pics from Case Parts and the Build Process:

Conclusion: With their first PC Alu Case Series XSPC goes in the right direction. Here and there are details, that could be done better, but overall, it´s a good case and every PC Watercooling Enthustiast will have many fun with it ! What i don´t like is the fact, that the drive bays are sold separatly and the Aluminum Material itself could be a bit thicker in my opionion ! When equiped with hardware, the case looks really good and it´s no problem to install a very huge watercooling setup, it´s fun to put all the hardware and watercooling stuff in the case - even 2 watercooling loops with 2 pumps are possible to realize. When it comes to the retail price and i compare the XSPC H1 with some cases from Mountain Mods, the price seems ok. So, when you´re in the market for a really huge case, check this one out !
Thanks for the kind support goes to the following companies:
XSPC , Aquatuning , Phobya , Noiseblocker , Bitspower , Alphacool , Home | EkWaterBlocks , www.watercool.de , www.kingston.com , MIPS Computer , COUGAR , Corsair , www.caseking.de

