• Welcome to TechPowerUp Forums, Guest! Please check out our forum guidelines for info related to our community.

Crunching on Linux Tips, Tricks, and Useful Hints

Joined
Jun 27, 2011
Messages
6,683 (1.43/day)
Processor 7800x3d
Motherboard Gigabyte B650 Auros Elite AX
Cooling Custom Water
Memory GSKILL 2x16gb 6000mhz Cas 30 with custom timings
Video Card(s) MSI RX 6750 XT MECH 2X 12G OC
Storage Adata SX8200 1tb with Windows, Samsung 990 Pro 2tb with games
Display(s) HP Omen 27q QHD 165hz
Case ThermalTake P3
Power Supply SuperFlower Leadex Titanium
Software Windows 11 64 Bit
Benchmark Scores CB23: 1811 / 19424 CB24: 1136 / 7687
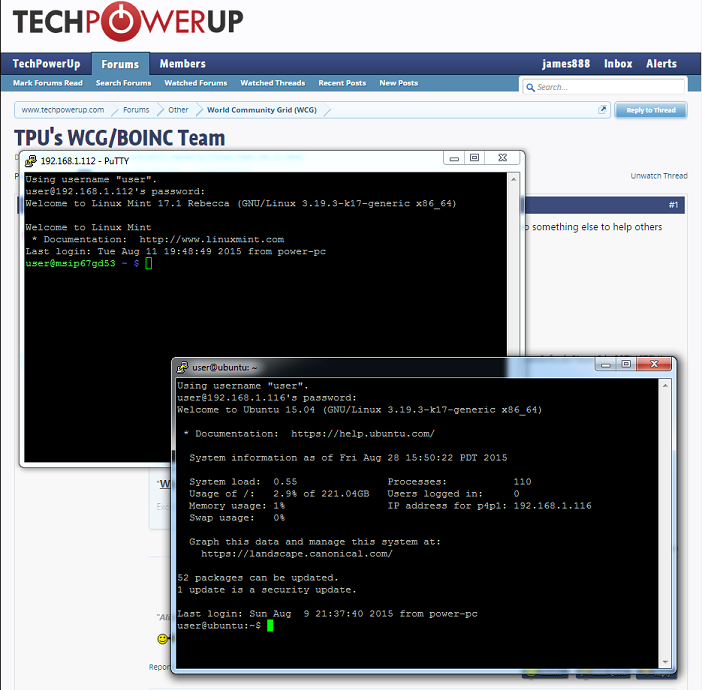
My purpose in making this thread, is to share some information I have been gathering on how to potentially obtain better WCG performance from linux. I have been messing around with a few things, and have realized there are better ways to benchmark and test. It would also be better to share as I go, so we can all hopefully help each other out.

I will be making lots of posts and putting up directions at first, but my goal is to have this be a general purpose thread for the team. So please feel free to post any tips, tricks, and useful hints for crunching on linux.

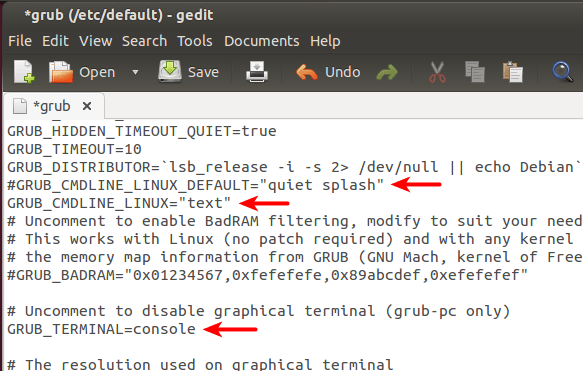
I will be making several posts today and this weekend, detailing everything I can think of that should be in this thread. If expect over the next few weeks, I will be updating and revising my directions to make them more clear and concise so be sure to watch the thread over time.
 
Joined
Jun 27, 2011
Messages
6,683 (1.43/day)
Processor 7800x3d
Motherboard Gigabyte B650 Auros Elite AX
Cooling Custom Water
Memory GSKILL 2x16gb 6000mhz Cas 30 with custom timings
Video Card(s) MSI RX 6750 XT MECH 2X 12G OC
Storage Adata SX8200 1tb with Windows, Samsung 990 Pro 2tb with games
Display(s) HP Omen 27q QHD 165hz
Case ThermalTake P3
Power Supply SuperFlower Leadex Titanium
Software Windows 11 64 Bit
Benchmark Scores CB23: 1811 / 19424 CB24: 1136 / 7687
All directions I am providing are assuming a debian or ubuntu based linux with apt installed.

Configuring Boinc on Linux

To take a bit of wisdom from @ThE_MaD_ShOt, with this you can have your work report immediately with. You can also add in any options from here if you like.
Here's how I do it.

First I fire up terminal.
Then I type " sudoedit /ect/boinc-client/cc_config.xml"
It will ask for root password \, I enter it and hit enter
then it will pop up the file and I add in
"<options>
<report_results_immediately>1</report_results_immediately>
</options>"

screenies after this line


For example, my config file looks like this.
Code:
<cc_config>
  <log_flags>
    <task>1</task>
    <file_xfer>1</file_xfer>
    <sched_ops>1</sched_ops>
  </log_flags
<options>
<report_results_immediately>1</report_results_immediately>
<no_priority_change>1</no_priority_change>
<no_gpus>1</no_gpus>
</options>
</cc_config>
Benchmarking
Most of the things I will mention in following posts, will be with the intention of increasing performance on linux for WCG. To know if anything actually changed, you should benchmark before and after.

This is the best way I know and it is the same with windows and linux. Go to the advanced options tab, and select "Run Cpu benchmarks" and then go to the "Event Log..." to see the results.


For example, the results from my g1620 celeron are:
3420 floating point MIPS (Whetstone)
18213 integer MIPS (Dhrystone)

Before doing any potential performance improvements, I would do this and write the results down somewhere to get a before and after.

----------------------------------------------------------------------------

As an alternative, you can use UNIXBENCH. I was using it before I realized I had a much better and more direct benchmark built right into boinc. It does a whole system benchmark, and can show gains in other areas compared to BOINCS cpu only benchmark. Directions are in the spoiler.
Unixbench provides a performance overview at a system level by testing a number of various factors:

· Dhrystone

· Whetstone

· Excel Throughput

· File Copy

· Pipe Throughput

· Pipe-based Context Switching

· Process Creation

· Shell Scripts

· System Call Overhead

· Graphical Tests

At the end you’ll get an overall system score for a single process utilising 1 CPU Core or parallel processes utlising all the CPU Cores in your system. If you want an idea on how your server compares to other hosts you can check ourserver benchmarks.

There’s two ways you can get UnixBench running on your Ubuntu system:

In order to compile Unixbench yourself you will need to make sure you have the right packages installed in Ubuntu:

Code:
sudo apt-get install libx11-dev libgl1-mesa-dev libxext-dev perl perl-modules make && sudo apt-get install build-essential
Once everything is installed you can then grab the latest UnixBench version (5.1.3) from Google Code, the following command will also run UnixBench:

Code:
wget http://byte-unixbench.googlecode.com/files/unixbench-5.1.3.tgz
tar xvf unixbench-5.1.3.tgz
cd unixbench-5.1.3
./Run

It will take a while to run. It took over over an hour on my 2500k system with ssd. Write down the single threaded and multithreaded number, those will be the “before” optimization to compare to after all of this is done. For reference, my 2500k system has 2190.4 for single threaded and 6215.0 for multithreaded on a fresh install of Ubuntu.
Source https://www.bitronictech.net/knowle...nd-Run-UnixBench-on-CentOS-or-Debian-VPS.html

Useful Software

SSH
One of the most useful softwares I have used on linux is openssh. It allows me to use the linux terminal from the comfort of my main computer running windows. I can have directions up on my nice big 1080p monitor, and just copy and paste them into the terminal. I can have multiple computers up at once. This was very useful when I was trying to do the same thing to more than one computer, because I could do them from the same screen and same keyboard saving time. SSH will make the performance related directions I have in the next post much easier.

To get started with ssh, follow these commands:
Type into the terminal:
Code:
sudo apt-get update && sudo apt-get install openssh-server && sudo ufw allow 22

This will install open ssh. Since these are crunchers with nothing on them, I did not care about security. If you do, I leave it to you to figure out how to use SSH securely. There are many great guides that are a quick google search away.

You are not done though. You need to install an ssh client on your preferred windows computer. I recommend putty, which you can download here.

This is what it looks like on windows. I have two ssh terminals up, one to my g1620 linux mint system, and the other to my 2500k ubuntu server system. Notice, the ubuntu server gives some nice stats by default.

Monitoring Temperature, Cpu Mhz, and More
Just to list off some other useful software, there is psensor and conky. Psensor will allow you to check the temperature on your cpu. Conky does that and a whole lot more. Conky will let you see nearly any stat about your system that you want. It will check your email, and tell you the weather if you want it too. I only mention psensor in case conky does not work for you.

Use the following commands to get Conky:
Code:
sudo apt-get install conky curl lm-sensors hddtemp

To start conky type conky into the console.
Code:
conky

Conky starts out pretty basic. Just a little black box in the corner with some information. If configured it can get as crazy as something like this.


Here is a basic guide on how to configure conky. You can use it to go as crazy as that picture above.

Or you can edit my personal conky config to your own liking.
Code:
# conky configuration
#
# The list of variables has been removed from this file in favour
# of keeping the documentation more maintainable.
# Check http://conky.sf.net for an up-to-date-list.
#
# For ideas about how to modify conky, please see:
# http://crunchbanglinux.org/forums/topic/59/my-conky-config/
#
# For help with conky, please see:
# http://crunchbanglinux.org/forums/topic/2047/conky-help/
#
# Enjoy! :)
##############################################
#  Settings
##############################################
background yes
    use_xft yes
    xftfont HandelGotD:size=8
    xftalpha 0.5
    update_interval 4.0
    total_run_times 0
    own_window yes
    own_window_type normal
    own_window_transparent yes
    own_window_hints undecorated,below,sticky,skip_taskbar,skip_pager
    double_buffer yes
    minimum_size 200 5
    maximum_width 220
    draw_shades no
    draw_outline no
    draw_borders no
    draw_graph_borders yes
    default_color black
    default_shade_color red
    default_outline_color green
    alignment top_right
    gap_x 10
    gap_y 10
    no_buffers yes
    uppercase no
    cpu_avg_samples 2
    override_utf8_locale no
    temperature_unit Celsius

TEXT
${font sans-serif:bold:size=8}SYSTEM ${hr 2}
${font sans-serif:normal:size=8}$sysname $kernel $alignr $machine
Hostname:$alignr$nodename
Uptime:$alignr$uptime

${font sans-serif:bold:size=8}PROCESSORS ${hr 2}
${font sans-serif:normal:size=8}${execi 5000 cat /proc/cpuinfo | grep 'model name' | sed -e 's/model name.*: //'| uniq | cut -c 1-30}
${font sans-serif:normal:size=8}Temperature:$alignr $acpitemp ${iconv_start UTF-8 ISO_8859-1}°${iconv_stop}C
CPU1: ${exec awk '/cpu MHz/{i++}i==1{printf "%.f",$4; exit}' /proc/cpuinfo} MHz $alignr ${cpu cpu1}% ${cpubar cpu1 8,60}
CPU2: ${exec awk '/cpu MHz/{i++}i==2{printf "%.f",$4; exit}' /proc/cpuinfo} MHz $alignr ${cpu cpu2}% ${cpubar cpu2 8,60}
${font sans-serif:normal:size=8}${cpugraph cpu0 33ffff 0000ff}

${font sans-serif:bold:size=8}GRAPHICS ${hr 2}
${font sans-serif:normal:size=8}Temperature:$alignr ${execi 3 nvidia-settings -query GPUCoreTemp | grep Attribute | grep -o '[0-5]\{2,3\}'}${iconv_start UTF-8 ISO_8859-1}°${iconv_stop}C
Fan Speed: ${alignr}${execi 5 nvidia-settings -q [fan:0]/GPUCurrentFanSpeed -t}%
${font sans-serif:normal:size=8}Core,Vram:$alignr ${execi 1 nvidia-settings -query GPUCurrentClockFreqs | grep Attribute | cut -c50-59}Mhz
Mem Used: ${alignr}${execi 5 nvidia-settings -q [gpu:0]/UsedDedicatedGPUMemory -t} / ${exec nvidia-settings -q [gpu:0]/TotalDedicatedGPUMemory -t} MiB
GPU Clock: ${alignr}${nvidia gpufreq} MHz
Mem Clock: ${alignr}${nvidia memfreq} MHz

${font sans-serif:bold:size=8}TOP PROCESSES ${hr 2}
${font sans-serif:normal:size=8}${top name 1}${alignr}${top cpu 1} %
${top name 2}${alignr}${top cpu 2} %
$font${top name 3}${alignr}${top cpu 3} %
$font${top name 4}${alignr}${top cpu 4} %
$font${top name 5}${alignr}${top cpu 5} %

${font sans-serif:bold:size=8}MEMORY ${hr 2}
${font sans-serif:normal:size=8}RAM $alignc $mem / $memmax $alignr $memperc%
$membar
SWAP $alignc ${swap} / ${swapmax} $alignr ${swapperc}%
${swapbar}

${font sans-serif:bold:size=8}DISK ${hr 2}
${font sans-serif:normal:size=8}Temperature:$alignr ${execi 120 sudo hddtemp /dev/sda -n --unit=C}${iconv_start UTF-8 ISO_8859-1}°${iconv_stop}C
${font sans-serif:normal:size=8}/ $alignc ${fs_used /} / ${fs_size /} $alignr ${fs_used_perc /}%
${fs_bar /}

${font sans-serif:bold:size=8}NETWORK ${hr 2}
${font sans-serif:normal:size=8}IP address: $alignr ${addr eth0}
ESSID: $alignr ${wireless_essid wlan0}
Connection quality: $alignr ${wireless_link_qual_perc wlan0}%
${downspeedgraph eth0 99cc33 006600}
Download:${downspeed eth0} kb/s $alignr total: ${totaldown eth0}
${upspeedgraph eth0  ffcc00 ff0000}
Upload:${upspeed eth0} kb/s $alignr total: ${totalup eth0}

Use the following commands to get psensor:
Code:
sudo apt-get install lm-sensors hddtemp
sudo dpkg-reconfigure hddtemp
Select "Yes" when asked if hddtemp should run at boot. Select the defaults for the other questions.
Code:
sudo sensors-detect
Say yes to all questions.
Code:
sudo service kmod start && sudo apt-get install psensor

-------------------------------------------------------
For those of you who don't have a desktop environment, or if you just want a quick way to view information, I know of two applications that will output information in the terminal. One being top, and the other being lm-sensors.
Top is a sort of process viewer, like the windows task manager. Just a lot less intuitive to use. I just use it to make sure WCG is using most of the cpu.

To use top type in:
Code:
top
To get out of it, press q.

You have to install lm-sensors first.
Code:
sudo apt-get install lm-sensors

After that you can check your temperatures any time with the following command:
Code:
sensors

To check you clockspeed:
Code:
lscpu | grep "MHz"

As some of this can be pretty technical, if it does not make much sense please tell me so I can try and make it more clear.
 
Last edited:
Joined
Jun 27, 2011
Messages
6,683 (1.43/day)
Processor 7800x3d
Motherboard Gigabyte B650 Auros Elite AX
Cooling Custom Water
Memory GSKILL 2x16gb 6000mhz Cas 30 with custom timings
Video Card(s) MSI RX 6750 XT MECH 2X 12G OC
Storage Adata SX8200 1tb with Windows, Samsung 990 Pro 2tb with games
Display(s) HP Omen 27q QHD 165hz
Case ThermalTake P3
Power Supply SuperFlower Leadex Titanium
Software Windows 11 64 Bit
Benchmark Scores CB23: 1811 / 19424 CB24: 1136 / 7687
Since anything involving improving performance, is unconfirmed and experimental, I ask that you benchmark before and after each step. Please share your results. Lets find out what works and what does not together.


Improving Performance
I do not guarantee these tips will actually increase performance. I am still trying to figure that out for myself. Most of these tips could make your system less stable, but crunching stable. If it is a computer with any other purpose than crunching, I would recommend thinking long and hard before following any of the directions below. You can pick and choose what you want to try, and nothing mentioned relies on another.

Don't use a Desktop
If you have a dedicated cruncher that is running linux, why do you need a desktop? All it does is at a 1-5% cpu load for nothing. Every bit of cpu time is important to us crunchers, as that could be 1-5% more ppd. Especially if you easily accessing your linux cruncher with ssh, which I have a tutorial for, then you don't even need a desktop.
With these directions you will edit your grub config so that you boot without a desktop.

Make a backup by running the command below:
Code:
sudo cp -n /etc/default/grub /etc/default/grub.orig

If for some reason you want to revert to original settings, just run command below in terminal:
Code:
sudo mv /etc/default/grub.orig /etc/default/grub && sudo update-grub

Copy and paste below command into terminal and hit enter:
Code:
sudo nano /etc/default/grub

This opens Grub boot loader config file with text editor.

Do below changes:

  • Comment the lineGRUB_CMDLINE_LINUX_DEFAULT=”quiet splash”, by adding # at the beginning, which will disable the Ubuntu purple screen.
  • Change GRUB_CMDLINE_LINUX=”" toGRUB_CMDLINE_LINUX=”text”, this makes Ubuntu boot directly into Text Mode.
  • Uncomment this line #GRUB_TERMINAL=console, by removing the # at the beginning, this makes Grub Menu into real black & white Text Mode (without background image)


After saved the changes, update grub via command and reboot.
Code:
sudo update-grub && sudo reboot

Source http://ubuntuhandbook.org/index.php/2014/01/boot-into-text-console-ubuntu-linux-14-04/

Update your Kernel
Linux Mint has an ancient Kernel of 3.13. This is like being on a windows 10 skinned version of Windows 95. The modern linux kernel is on 3.19. With it comes many performance improvements; this has the biggest potential performance increase.
Before you try this, I recommend you benchmark with boinc before hand.

Check what kernel version you have with this command.
Code:
uname -a
It will output your kernal version. No need to write this down, just useful to see how old your kernel is.

The following commands will update your kernel to 3.19.3-k17-generic which is a slightly customized version of the latest kernel. A friend made this kernel for his own server purposes where he needs high cpu performance. After you update, you will reboot your computer.
This kernel is for intel cpu's and X64 bit systems only!!
Code:
wget http://multiclangaming.com/files/linux-headers-3.19.3-k17-generic_3.19.3-k17-generic-10.00.Custom_amd64.deb

wget http://multiclangaming.com/files/linux-image-3.19.3-k17-generic_3.19.3-k17-generic-10.00.Custom_amd64.deb

sudo dpkg -i *.deb

sudo reboot

After it reboots check if the kernel update worked by typing in a terminal:
Code:
uname -a
You should see 3.19.3-k17-generic.

Then update your system.
Code:
sudo apt-get update && sudo apt-get upgrade

If the update was a success, run the boinc benchmark again. Please post how much it increased.

Apt-build
I have heard before that using arch linux, or a similar distribution, can net you 10-15% more cpu performance in certain applications because everything is compiled for the native system. You can install apt-build on any debian or Ubuntu based system to also have the same advantages. You need to install apt-build. Its a comand line tool like apt-get, but instead of downloading and installing the binary package, apt-build downloads the source code of the package, compiles it and then installs it to your system.

You can do many things with apt-build, but the most useful are:apt-build update — updates repo list, (like apt-get update)
apt-build upgrade — updates operating system, (like apt-get upgrade)
apt-build install program — installs an application,(like apt-get install)
apt-build world — something for hard-core users, it recompiles whole system!
For example:Lets say you want to compile/install Gedit. Instead of apt-get install you dos udo apt-build install boinc-client
Apt-build makes use of deb-src entries contained in the /etc/apt/sources.list file so the compilation and installation processes are fully automatic (similar to emerge found in Gentoo). Apt-build downloads sources of the main application and its dependencies, compiles them, creates a deb package, and finally installs the package.

There are two ways we as crunchers can use apt-build. One, being you can use apt-build world and compile everything on the system. Unless you have a fresh install of ubuntu server, you are likely to corrupt your OS. If you are interested in that, as it has the most potential to give performance gains, skip below to that.
The other is manually building everything that boinc uses. I have provided a list of dependencies that boinc may use.

Install and Configure Apt-build
In the future use it in place of apt-get. It does take longer though.
Code:
sudo apt-get install apt-build
To configure apt-build type in the following, and answer all questions as follows.
Code:
sudo dpkg-reconfigure apt-build
Directory used by apt-build to download and build packages:
Code:
/var/cache/apt-build/build
Directory used to store packages built by apt-build:
Code:
/var/cache/apt-build/repository
Add apt-build repository to sources.list?
Code:
Yes

Optimization level:
Code:
Medium
Use Strong as your own risk. I tried strong on a fresh install of Ubuntu Mate and it corrupted the OS. On a fresh Ubuntu server install, I used strong and it worked. Personally, I want the Strongest possible so I used Ubuntu server. If you are coming from a mostly already configured linux, including a fresh install of an OS with a gui, I would not use Strong.

Options to add to gcc:
Code:
-pipe
This flag actually has no effect on the generated code, but it makes the compilation process faster. It tells the compiler to use pipes instead of temporary files during the different stages of compilation.

Options to add to make:
Depending on how many cores your processor has:
-jN (where N=NUM_OF_CORES_YOUR_PROCESSOR_HAS + 1)
For example, if you have Dual Core you set -j3. For a Quad Core you set -j5 and so on. This flag specifies the number of jobs to run simultaneously (effectively utilizing different cores).

Architecture:
Code:
native
Most users with modern computers should select native, but if you have an older processor choose your specific architecture.

You can then install boinc in two parts. Using apt-build this will take hours because it is compiling for your exact system.
Code:
sudo apt-build install boinc-client

When that eventually finishes...
Code:
sudo apt-build boinc-manager

Most of the beneifits of building would not come from building boinc, but from building the packages that boinc uses. I found this list here. Not everything there might be needed on your system, but you can uninstall them pretty easily after.
User the command,
Code:
sudo apt-get build install "package"
Then replace "package" with what you need from this list.

build-essentials
ibnotify-dev
git
python
make
m4
pkg-config
dh-autoreconf
libssl-dev
python-mysqldb
php5-mysql
libapache2-mod-php5
php5-gd
freeglut3-dev
libsm-dev
libice-dev
libxmu-dev
libxi-dev
libx11-dev
libjpeg62-dev

After building everything, I recommend running the following.
Code:
sudo apt-build update && sudo apt-build upgrade

Building the World
apt build world
It will have you configure some options, but not all that you need. Use the command below to get them all.


Then finally, run the command:
Sudo apt-build update

You can do many things with apt-build, but the most useful are:apt-build update — updates repo list, (like apt-get update)
apt-build upgrade — updates operating system, (like apt-get upgrade)
apt-build install program — installs an application,(like apt-get install)
apt-build world — something for hard-core users, it recompiles whole system!
For example:Lets say you want to compile/install Gedit. Instead of apt-get install you dosudo apt-build install gedit
Apt-build makes use of deb-src entries contained in the /etc/apt/sources.list file so the compilation and installation processes are fully automatic (similar to emerge found in Gentoo). Apt-build downloads sources of the main application and its dependencies, compiles them, creates a deb package, and finally installs the package.


color:#3D3C40;background:white">The whole point of this so far is the do the command apt-build world.Next thing you need to do is remove/disable/uninstall any third party applications (it better to do in a fresh install of Ubuntu) and then do :sudo su
"Arial",sans-serif;color:#3D3C40">
color:#3D3C40;background:white">dpkg --get-selections | awk '{if ($2 == "install") print $1}'> /etc/apt/apt-build.list
exit
The above command will copy your full list of system packages to apt-build.list so that they can be compiled from source. Open that filesudo nano /etc/apt/apt-build.list
Then remove any GCC/G++ entry
After all this, you can finally update world. This will take over 24 hours even on a fast cpu.sudo apt-build world --yes --force-yes


Source http://polishlinux.org/linux/debian/apt-build-optimize-debian/
Source http://askubuntu.com/questions/29856/how-to-build-all-my-installed-package-from-sourceshttp://ubuntuforums.org/archive/index.php/t-1030272.html
 
Last edited:
Joined
Jan 1, 2015
Messages
59 (0.02/day)
Processor Intel Xeon E5-2651 v2
Motherboard ASRock Rack EPC602D8A
Cooling Scythe APSALUS4 120
Memory 8 × Micron MT18KDF1G72PZ-1G6E1
Video Card(s) 2 × AMD FirePro W7000
Storage 2 × Western Digital Ultrastar DC HC320
Display(s) Asus VS239H-P
Case Abee SME-EZ500-SV
Audio Device(s) Audio-Technica ATH-SX1a
Power Supply FSP Hydro GE HGE850
Keyboard Corsair K83
Software Ubuntu Desktop
Monitoring Temperature, Cpu Mhz, and More
Just to list off some other useful software, there is psensor and conky. Psensor will allow you to check the temperature on your cpu. Conky does that and a whole lot more. Conky will let you see nearly any stat about your system that you want. It will check your email, and tell you the weather if you want it too. I only mention psensor in case conky does not work for you.

Concise might also be useful.

concise.png
 
Joined
Jun 27, 2011
Messages
6,683 (1.43/day)
Processor 7800x3d
Motherboard Gigabyte B650 Auros Elite AX
Cooling Custom Water
Memory GSKILL 2x16gb 6000mhz Cas 30 with custom timings
Video Card(s) MSI RX 6750 XT MECH 2X 12G OC
Storage Adata SX8200 1tb with Windows, Samsung 990 Pro 2tb with games
Display(s) HP Omen 27q QHD 165hz
Case ThermalTake P3
Power Supply SuperFlower Leadex Titanium
Software Windows 11 64 Bit
Benchmark Scores CB23: 1811 / 19424 CB24: 1136 / 7687
Joined
Oct 24, 2004
Messages
1,294 (0.18/day)
Yesterday i upgraded boinc-client / boinc-manager from the repository (7.4.2) to a more recent third party version (7.6.2):

fab@se7en-squ4red:~$ sudo aptitude show boinc-client
Packet : boinc-client
Version : 7.6.2+dfsg-0~1343~ubuntu14.04.1
Priority : optional
Section : net
Responsable : Debian BOINC Maintainers <pkg-boinc-devel@lists.alioth.debian.org>
Architecture : amd64
Compressed size : 1 710 k

fab@se7en-squ4red:~$ sudo aptitude show boinc-manager
Packet : boinc-manager
Version : 7.6.2+dfsg-0~1343~ubuntu14.04.1
Priority : optional
Section : x11
Responsable : Debian BOINC Maintainers <pkg-boinc-devel@lists.alioth.debian.org>
Architecture : amd64
Compressed size : 6 237 k

here's how i did :

1/ first adding the new repository to the source.list blob
Code:
sudo nano /etc/apt/sources.list

add the following lines:

Code:
deb http://ppa.launchpad.net/costamagnagianfranco/boinc/ubuntu trusty main
deb-src http://ppa.launchpad.net/costamagnagianfranco/boinc/ubuntu trusty main

2/obtain the signing key and install it so that apt/aptitude/synaptic can use it :

Code:
gpg --keyserver keyserver.ubuntu.com --recv-key 3C2A1859
gpg -a --export 3C2A1859 | sudo apt-key add -

3/ update the repository and upgrade !
Code:
sudo apt-get update && sudo apt-get upgrade

Note : While boinc-client is updated correctly, it's not necesserily the case for boinc-manager.
I had to uninstall boinc-manager and reinstall it in order to have both client and manager version to match each other. No need to say all jobs resumed immediately after upgrading :)

hope this help.
 

Norton

Moderator - Returning from the Darkness
Staff member
Joined
Dec 21, 2011
Messages
14,108 (3.13/day)
Location
Northeast USA
System Name Main PC- Gamer- Main Cruncher/Folder and too many crunching/folding rigs
Processor Ryzen 5900X- Ryzen 5950X- Ryzen 3950X and etc...
Motherboard Asrock X570 Extreme4- MSI X570S Tomahawk MAX WiFi- MSI B450M Bazooka Max and etc...
Cooling Noctua NH-U14S (dual fan)- EK 360 AIO with push/pull fans- Corsair H115i RGB Pro XT and etc...
Memory 2x16GB GSkill FlareX 3200/c14- 4x8GB Corsair Vengeance 3600/c16- 2x16GB Team 3600/c18 and etc..
Video Card(s) MSI Gaming RX 6800- Asus RTX 3070 TUF OC- MSI Ventus GTX 1660Ti and etc...
Storage Main PC (1TB WD SN850- 2TB PNY CS 3040- 2TB Seagate Firecuda) and etc...
Display(s) Main PC (2x24" Dell UltraSharp U2414H)
Case Phanteks P600s- Seasonic Q704- Fractal Meshify C and etc...
Audio Device(s) Logitech Z625 THX 2.1 speakers
Power Supply EVGA 750 G3- SeaSonic DGC 750- EVGA P2 850 and etc...
Mouse G300s
Keyboard Corsair K65
VR HMD N/A
Software Windows 10 Pro or Ubuntu
Benchmark Scores Why sit on the Bench when you can get in the game and Crunch!!!
Subscribed!

Thanks for setting up a thread like this... definitely going to use it as a resource to setup my next Linux cruncher! :toast:
 
Joined
Jun 27, 2011
Messages
6,683 (1.43/day)
Processor 7800x3d
Motherboard Gigabyte B650 Auros Elite AX
Cooling Custom Water
Memory GSKILL 2x16gb 6000mhz Cas 30 with custom timings
Video Card(s) MSI RX 6750 XT MECH 2X 12G OC
Storage Adata SX8200 1tb with Windows, Samsung 990 Pro 2tb with games
Display(s) HP Omen 27q QHD 165hz
Case ThermalTake P3
Power Supply SuperFlower Leadex Titanium
Software Windows 11 64 Bit
Benchmark Scores CB23: 1811 / 19424 CB24: 1136 / 7687
Nice to see the thread already coming along. I did not know how to do that @blobster21

I found the conky config that I made. I like it, but edit it as you please.
Code:
# conky configuration
#
# The list of variables has been removed from this file in favour
# of keeping the documentation more maintainable.
# Check http://conky.sf.net for an up-to-date-list.
#
# For ideas about how to modify conky, please see:
# http://crunchbanglinux.org/forums/topic/59/my-conky-config/
#
# For help with conky, please see:
# http://crunchbanglinux.org/forums/topic/2047/conky-help/
#
# Enjoy! :)
##############################################
#  Settings
##############################################
background yes
    use_xft yes
    xftfont HandelGotD:size=8
    xftalpha 0.5
    update_interval 4.0
    total_run_times 0
    own_window yes
    own_window_type normal
    own_window_transparent yes
    own_window_hints undecorated,below,sticky,skip_taskbar,skip_pager
    double_buffer yes
    minimum_size 200 5
    maximum_width 220
    draw_shades no
    draw_outline no
    draw_borders no
    draw_graph_borders yes
    default_color black
    default_shade_color red
    default_outline_color green
    alignment top_right
    gap_x 10
    gap_y 10
    no_buffers yes
    uppercase no
    cpu_avg_samples 2
    override_utf8_locale no
    temperature_unit Celsius

TEXT
${font sans-serif:bold:size=8}SYSTEM ${hr 2}
${font sans-serif:normal:size=8}$sysname $kernel $alignr $machine
Hostname:$alignr$nodename
Uptime:$alignr$uptime

${font sans-serif:bold:size=8}PROCESSORS ${hr 2}
${font sans-serif:normal:size=8}${execi 5000 cat /proc/cpuinfo | grep 'model name' | sed -e 's/model name.*: //'| uniq | cut -c 1-30}
${font sans-serif:normal:size=8}Temperature:$alignr $acpitemp ${iconv_start UTF-8 ISO_8859-1}°${iconv_stop}C
CPU1: ${exec awk '/cpu MHz/{i++}i==1{printf "%.f",$4; exit}' /proc/cpuinfo} MHz $alignr ${cpu cpu1}% ${cpubar cpu1 8,60}
CPU2: ${exec awk '/cpu MHz/{i++}i==2{printf "%.f",$4; exit}' /proc/cpuinfo} MHz $alignr ${cpu cpu2}% ${cpubar cpu2 8,60}
${font sans-serif:normal:size=8}${cpugraph cpu0 33ffff 0000ff}

${font sans-serif:bold:size=8}GRAPHICS ${hr 2}
${font sans-serif:normal:size=8}Temperature:$alignr ${execi 3 nvidia-settings -query GPUCoreTemp | grep Attribute | grep -o '[0-5]\{2,3\}'}${iconv_start UTF-8 ISO_8859-1}°${iconv_stop}C
Fan Speed: ${alignr}${execi 5 nvidia-settings -q [fan:0]/GPUCurrentFanSpeed -t}%
${font sans-serif:normal:size=8}Core,Vram:$alignr ${execi 1 nvidia-settings -query GPUCurrentClockFreqs | grep Attribute | cut -c50-59}Mhz
Mem Used: ${alignr}${execi 5 nvidia-settings -q [gpu:0]/UsedDedicatedGPUMemory -t} / ${exec nvidia-settings -q [gpu:0]/TotalDedicatedGPUMemory -t} MiB
GPU Clock: ${alignr}${nvidia gpufreq} MHz
Mem Clock: ${alignr}${nvidia memfreq} MHz

${font sans-serif:bold:size=8}TOP PROCESSES ${hr 2}
${font sans-serif:normal:size=8}${top name 1}${alignr}${top cpu 1} %
${top name 2}${alignr}${top cpu 2} %
$font${top name 3}${alignr}${top cpu 3} %
$font${top name 4}${alignr}${top cpu 4} %
$font${top name 5}${alignr}${top cpu 5} %

${font sans-serif:bold:size=8}MEMORY ${hr 2}
${font sans-serif:normal:size=8}RAM $alignc $mem / $memmax $alignr $memperc%
$membar
SWAP $alignc ${swap} / ${swapmax} $alignr ${swapperc}%
${swapbar}

${font sans-serif:bold:size=8}DISK ${hr 2}
${font sans-serif:normal:size=8}Temperature:$alignr ${execi 120 sudo hddtemp /dev/sda -n --unit=C}${iconv_start UTF-8 ISO_8859-1}°${iconv_stop}C
${font sans-serif:normal:size=8}/ $alignc ${fs_used /} / ${fs_size /} $alignr ${fs_used_perc /}%
${fs_bar /}

${font sans-serif:bold:size=8}NETWORK ${hr 2}
${font sans-serif:normal:size=8}IP address: $alignr ${addr eth0}
ESSID: $alignr ${wireless_essid wlan0}
Connection quality: $alignr ${wireless_link_qual_perc wlan0}%
${downspeedgraph eth0 99cc33 006600}
Download:${downspeed eth0} kb/s $alignr total: ${totaldown eth0}
${upspeedgraph eth0  ffcc00 ff0000}
Upload:${upspeed eth0} kb/s $alignr total: ${totalup eth0}
 
Last edited:
Joined
Oct 24, 2004
Messages
1,294 (0.18/day)
thx james888, the setting to force results report immediately is really usefull.

I used to crunch for GPUGRID a couple of years ago with a Windows box / AMD HD4670, so i would love to see somedays a tutorial which describes how to add CUDA support to ubuntu / debian based distros.
 
Joined
Jun 27, 2011
Messages
6,683 (1.43/day)
Processor 7800x3d
Motherboard Gigabyte B650 Auros Elite AX
Cooling Custom Water
Memory GSKILL 2x16gb 6000mhz Cas 30 with custom timings
Video Card(s) MSI RX 6750 XT MECH 2X 12G OC
Storage Adata SX8200 1tb with Windows, Samsung 990 Pro 2tb with games
Display(s) HP Omen 27q QHD 165hz
Case ThermalTake P3
Power Supply SuperFlower Leadex Titanium
Software Windows 11 64 Bit
Benchmark Scores CB23: 1811 / 19424 CB24: 1136 / 7687
thx james888, the setting to force results report immediately is really usefull.

I used to crunch for GPUGRID a couple of years ago with a Windows box / AMD HD4670, so i would love to see somedays a tutorial which describes how to add CUDA support to ubuntu / debian based distros.
I don't have a need of cuda for boinc, but while following your upgrade instructions, apt recommended a few packages to install. I did not need them, but one in perticular might be of use to you. boinc-nvidia-cuda
While googling it, I did find this. https://wiki.debian.org/BOINC

I think this thread for folding@home should get you most of the way there. http://www.techpowerup.com/forums/threads/f-h-ubuntu-14-10-install-for-nvidia-gpus.208199/

With those too information sources you might be able to get it working.
 
Joined
Oct 24, 2004
Messages
1,294 (0.18/day)
I should have googled it before asking, the installation is pretty straightforward according to this page

Actually I couldn't make up my mind to upgrade to 14.10 and drop the LTS, luckily this guide is aimed at Ubuntu 14.04

Thanks for looking into this for me !
 
Joined
Jun 27, 2011
Messages
6,683 (1.43/day)
Processor 7800x3d
Motherboard Gigabyte B650 Auros Elite AX
Cooling Custom Water
Memory GSKILL 2x16gb 6000mhz Cas 30 with custom timings
Video Card(s) MSI RX 6750 XT MECH 2X 12G OC
Storage Adata SX8200 1tb with Windows, Samsung 990 Pro 2tb with games
Display(s) HP Omen 27q QHD 165hz
Case ThermalTake P3
Power Supply SuperFlower Leadex Titanium
Software Windows 11 64 Bit
Benchmark Scores CB23: 1811 / 19424 CB24: 1136 / 7687
Don't use a Desktop
If you have a dedicated cruncher that is running linux, why do you need a desktop? All it does is at a 1-5% cpu load for nothing. Every bit of cpu time is important to us crunchers, as that could be 1-5% more ppd. Especially if you easily accessing your linux cruncher with ssh, which I have a tutorial for, then you don't even need a desktop.
With these directions you will edit your grub config so that you boot without a desktop.

Make a backup by running the command below:
Code:
sudo cp -n /etc/default/grub /etc/default/grub.orig

If for some reason you want to revert to original settings, just run command below in terminal:
Code:
sudo mv /etc/default/grub.orig /etc/default/grub && sudo update-grub

Copy and paste below command into terminal and hit enter:
Code:
sudo nano /etc/default/grub

This opens Grub boot loader config file with text editor.

Do below changes:

  • Comment the lineGRUB_CMDLINE_LINUX_DEFAULT=”quiet splash”, by adding # at the beginning, which will disable the Ubuntu purple screen.
  • Change GRUB_CMDLINE_LINUX=”" toGRUB_CMDLINE_LINUX=”text”, this makes Ubuntu boot directly into Text Mode.
  • Uncomment this line #GRUB_TERMINAL=console, by removing the # at the beginning, this makes Grub Menu into real black & white Text Mode (without background image)


After saved the changes, update grub via command and reboot.
Code:
sudo update-grub && sudo reboot

Source http://ubuntuhandbook.org/index.php/2014/01/boot-into-text-console-ubuntu-linux-14-04/
 
Joined
Jan 1, 2015
Messages
59 (0.02/day)
Processor Intel Xeon E5-2651 v2
Motherboard ASRock Rack EPC602D8A
Cooling Scythe APSALUS4 120
Memory 8 × Micron MT18KDF1G72PZ-1G6E1
Video Card(s) 2 × AMD FirePro W7000
Storage 2 × Western Digital Ultrastar DC HC320
Display(s) Asus VS239H-P
Case Abee SME-EZ500-SV
Audio Device(s) Audio-Technica ATH-SX1a
Power Supply FSP Hydro GE HGE850
Keyboard Corsair K83
Software Ubuntu Desktop
I'm using cron to run the update command every hour. To set up a cron job, run the following commands:
Code:
cat << EOF | sudo tee /etc/cron.hourly/boinc && sudo chmod 0755 /etc/cron.hourly/boinc
#!/bin/sh -e
sudo -u boinc boinccmd --project http://www.worldcommunitygrid.org update
exit 0
EOF
 
Joined
Jun 27, 2011
Messages
6,683 (1.43/day)
Processor 7800x3d
Motherboard Gigabyte B650 Auros Elite AX
Cooling Custom Water
Memory GSKILL 2x16gb 6000mhz Cas 30 with custom timings
Video Card(s) MSI RX 6750 XT MECH 2X 12G OC
Storage Adata SX8200 1tb with Windows, Samsung 990 Pro 2tb with games
Display(s) HP Omen 27q QHD 165hz
Case ThermalTake P3
Power Supply SuperFlower Leadex Titanium
Software Windows 11 64 Bit
Benchmark Scores CB23: 1811 / 19424 CB24: 1136 / 7687
Tried using these instructions today to try and get additional performance gains by compiling boinc from source. They do not immediately show any performance improvements in whetstone or dhrystone, but they did update me to boinc V7.7. This method can be used to keep boinc up to date on the latest client, even nightly builds. @T.R. might be interested in that.

In the process I found out which specific dependencies boinc needs. I am compiling those with apt-build which has the potential to improve performance. Will let you know how it goes.

I plan on adding all this to the OP, and updating the apt-build section.

These are the links that helped me do this.
https://boinc.berkeley.edu/trac/wiki/SourceCodeGit
https://boinc.berkeley.edu/trac/wiki/CompileClient
https://boinc.berkeley.edu/trac/wiki/SoftwarePrereqsUnix
 
Last edited:
Joined
Feb 27, 2006
Messages
1,098 (0.17/day)
Location
Charlotte NC
System Name Rigel / Altair
Processor Ryzen 3900x / Xeon x3440
Motherboard Aorus X570 Pro Wifi / Asus P7P55D
Cooling H110i / CM MASTERLIQUID MAKER 92
Memory 16gb DDR4-3200 / 8GB DD3-2000
Video Card(s) GTX1080ti / 9600gt
Storage Crucial P1 500gb - Crucial MX500 500gb / Unraid NAS
Display(s) LG 43UN700-B
Case Phanteks P500 / CM N400
Audio Device(s) FX Audio DAC 6
Power Supply eVGA 1000GQ / Seasonic Focus 500w
I'm running the latest version of Ubuntu - 15.10

So, just trying to figure out how to ensure that BOINC starts up at launch with the OS

Tried googling, but ./mindblown - everything I read just confused me further. As far as I can tell, the script to start it at boot up is there in etc/default/boinc-client, but the client doesn't autolaunch at reboot (it looks like the service runs though as the CPU loads up to 100% - I did manage to get psensor working on startup)
 
Joined
Jul 2, 2008
Messages
8,068 (1.40/day)
Location
Hillsboro, OR
System Name Main/DC
Processor i7-3770K/i7-2600K
Motherboard MSI Z77A-GD55/GA-P67A-UD4-B3
Cooling Phanteks PH-TC14CS/H80
Memory Crucial Ballistix Sport 16GB (2 x 8GB) LP /4GB Kingston DDR3 1600
Video Card(s) Asus GTX 660 Ti/MSI HD7770
Storage Crucial MX100 256GB/120GB Samsung 830 & Seagate 2TB(died)
Display(s) Asus 24' LED/Samsung SyncMaster B1940
Case P100/Antec P280 It's huge!
Audio Device(s) on board
Power Supply SeaSonic SS-660XP2/Seasonic SS-760XP2
Software Win 7 Home Premiun 64 Bit
Once you install BOINC, it runs at startup. Just launch the client to see.
 
Joined
Feb 27, 2006
Messages
1,098 (0.17/day)
Location
Charlotte NC
System Name Rigel / Altair
Processor Ryzen 3900x / Xeon x3440
Motherboard Aorus X570 Pro Wifi / Asus P7P55D
Cooling H110i / CM MASTERLIQUID MAKER 92
Memory 16gb DDR4-3200 / 8GB DD3-2000
Video Card(s) GTX1080ti / 9600gt
Storage Crucial P1 500gb - Crucial MX500 500gb / Unraid NAS
Display(s) LG 43UN700-B
Case Phanteks P500 / CM N400
Audio Device(s) FX Audio DAC 6
Power Supply eVGA 1000GQ / Seasonic Focus 500w
Joined
Nov 10, 2006
Messages
4,665 (0.73/day)
Location
Washington, US
System Name Rainbow
Processor Intel Core i7 8700k
Motherboard MSI MPG Z390M GAMING EDGE AC
Cooling Corsair H115i, 2x Noctua NF-A14 industrialPPC-3000 PWM
Memory G. Skill TridentZ RGB 4x8GB (F4-3600C16Q-32GTZR)
Video Card(s) ZOTAC GeForce RTX 3090 Trinity
Storage 2x Samsung 950 Pro 256GB | 2xHGST Deskstar 4TB 7.2K
Display(s) Samsung C27HG70
Case Xigmatek Aquila
Power Supply Seasonic 760W SS-760XP
Mouse Razer Deathadder 2013
Keyboard Corsair Vengeance K95
Software Windows 10 Pro
Benchmark Scores 4 trillion points in GmailMark, over 144 FPS 2K Facebook Scrolling (Extreme Quality preset)
Joined
Mar 2, 2011
Messages
1,226 (0.26/day)
Location
Omaha, NE
System Name Graphics Card Free...
Processor Ryzen 5 5600G
Motherboard MSI B450 Gaming Plus MAX Wifi
Cooling Cryorig M9a w/ BeQuiet! PureWings 2 ~ 92mm
Memory Corsair Dominator Platinum DDR4 3200 ~ 16GB(2x8GB)
Storage Samsung EVO 870 SSD - 1TB
Display(s) AOC 24G2
Case Cardboard...
Power Supply eVGA SuperNova 550w G3
Mouse Logitech t400 Zone Touch Mouse
Keyboard IBM Model "M" Keyboard
Software Manjaro ~ KDE Plasma
Benchmark Scores She's a Runner!
Subscribed +1. Thanks for the effort here James888, you might actually get me back into crunching! It's been years....:).

Best,

Liquid Cool
 
Joined
Jun 27, 2011
Messages
6,683 (1.43/day)
Processor 7800x3d
Motherboard Gigabyte B650 Auros Elite AX
Cooling Custom Water
Memory GSKILL 2x16gb 6000mhz Cas 30 with custom timings
Video Card(s) MSI RX 6750 XT MECH 2X 12G OC
Storage Adata SX8200 1tb with Windows, Samsung 990 Pro 2tb with games
Display(s) HP Omen 27q QHD 165hz
Case ThermalTake P3
Power Supply SuperFlower Leadex Titanium
Software Windows 11 64 Bit
Benchmark Scores CB23: 1811 / 19424 CB24: 1136 / 7687
It should start crunching at startup just as bluebumblebee said. Of course you have to log in to your WCG account first. Let us know if we can help you get boinc going if it is not.

If you just want to confirm if boinc is crunching there is a quick way to do that. Type "top" in the terminal. This will give you a live list of processes and the cpu usage they each have. WCG should be at the top.
If you would like more information or a graphical interface read the Monitoring Temperature, Cpu Mhz, and More section in the OP.

Subscribed +1. Thanks for the effort here James888, you might actually get me back into crunching! It's been years....:).
I really appreciate the sentiment.
 
Last edited:
Joined
Nov 29, 2011
Messages
5,975 (1.32/day)
Location
Hi! I'm from the Internet
System Name Selene / Yoda
Processor Fx 8350 @ 4.4 / Phenom II x6 1090t @ 3.6
Motherboard Gigabyte 990FXA-UD3 r4.0 / Gigabyte 890XA-UD3
Cooling H100i / Xig Dark Knight
Memory 4x 8gb G.Skill Snipers / 4x 4gb G.Skill Ares
Video Card(s) Gigabyte R9 290x / XfX DD & VisionTek HD6850's C'fired
Storage 256gb ssd, 2x 2tb Wd Blacks & 1x 1tb Wd black / 1x 1tb
Display(s) Dell Ultra Sharp 2408 WFp / Hp w2207
Case Raidmax Vampire / Chieftec Alum. Dragon Blue
Audio Device(s) Onboard Hd Audio / Onboard Hd Audio
Power Supply Corsair TX 850 watt / Corsair TX 750 watt
Mouse Logitech G500s
Keyboard Corsair Strafe
Software Win 10 pro / Win Vista Home prem. 64 bit
Benchmark Scores What are benchmarks anyway?
Boinc does runs at startup as it does on windows. You just don't have the taskbar icon. Also you can open the client per shortcut. ie. copy shortcut to desktop

 
Joined
Jul 2, 2008
Messages
8,068 (1.40/day)
Location
Hillsboro, OR
System Name Main/DC
Processor i7-3770K/i7-2600K
Motherboard MSI Z77A-GD55/GA-P67A-UD4-B3
Cooling Phanteks PH-TC14CS/H80
Memory Crucial Ballistix Sport 16GB (2 x 8GB) LP /4GB Kingston DDR3 1600
Video Card(s) Asus GTX 660 Ti/MSI HD7770
Storage Crucial MX100 256GB/120GB Samsung 830 & Seagate 2TB(died)
Display(s) Asus 24' LED/Samsung SyncMaster B1940
Case P100/Antec P280 It's huge!
Audio Device(s) on board
Power Supply SeaSonic SS-660XP2/Seasonic SS-760XP2
Software Win 7 Home Premiun 64 Bit
I noticed on WCG that my Linux kernel is looking old. So I'm interested in updating it, but how does this affect WCG? Do I have to finish everything first and then update? Will updating the kernel mid-WU abort the WU?
 
Joined
Jun 27, 2011
Messages
6,683 (1.43/day)
Processor 7800x3d
Motherboard Gigabyte B650 Auros Elite AX
Cooling Custom Water
Memory GSKILL 2x16gb 6000mhz Cas 30 with custom timings
Video Card(s) MSI RX 6750 XT MECH 2X 12G OC
Storage Adata SX8200 1tb with Windows, Samsung 990 Pro 2tb with games
Display(s) HP Omen 27q QHD 165hz
Case ThermalTake P3
Power Supply SuperFlower Leadex Titanium
Software Windows 11 64 Bit
Benchmark Scores CB23: 1811 / 19424 CB24: 1136 / 7687
I updated it mid crunching. I did not notice anything. Linux just seemed to keep going. Linux can do most things without a restart, but updating a kernel is not one of them. WCG probably doesn't even notice a difference.

I really do recommend updating your kernal. Out of all the potential performance improvements I listed it was the only one that I saw real gains in.
 

manofthem

WCG-TPU Team All-Star!
Joined
Jan 9, 2011
Messages
10,960 (2.26/day)
Location
Florida
Processor 3900X @ 4.0
Motherboard Asus ROG Strix X570-E
Cooling DeepCool Castle 360EX
Memory G Skill Trident Z Neo 32GB 3600
Video Card(s) RX 5700 XT Pulse
Storage Sabrent Rocket Q 1TB
Display(s) LG 34UC88
Case Thermaltake P3
Power Supply Super Flower Leadex III 750w
Mouse Logitech G900
Keyboard G Skill KM570 MX Silver
Software Windows 10 Pro
Great guide @james888 :respect: :respect:


Been thinking about giving Mint another try since that's what I used before. If I did, would I need to update the kernel after installation? Also if not Mint, is there another option that would be easy for a noob like me? The pc only is used for BOINC and occasionally Steam.
 

[Ion]

WCG Team Assistant
Joined
Sep 15, 2009
Messages
13,391 (2.51/day)
Location
Raleigh, North Carolina, United States
System Name Niedersachsen / Ribe / Minsk
Processor i3 3240 / i7-3520M / 4x Opteron 6376 @ 2.86GHz
Motherboard BIOSTAR H61M / HP Q77 / Supermicro H8QG7
Cooling Stock / Stock / 4x 1U G34
Memory 1x8GB / 2x4GB / 4x4GB
Video Card(s) GTX260 / Intel HD 4000 / nVidia GT310
Storage 80GB Intel SSD / 256GB Intel SSD / 2x 60GB SSD (RAID1)
Display(s) Dell 3007 + HP 2245w / 12.1" 1366x768 / None
Case Antec NSK3480 / HP / Supermicro 1U
Audio Device(s) Onboard
Power Supply Enermax 500W / HP 130W / Supermicro Gold 1400W
Keyboard IBM Model M
Software Windows 7 (Niedersachsen/Ribe) / Linux Mint 17.2 (Minsk)
Ubuntu is pretty popular and is the base behind Linux Mint.
 
Top