
- Joined
- Sep 20, 2019
- Messages
- 562 (0.27/day)
| Processor | i9-9900K @ 5.1GHz (H2O Cooled) |
|---|---|
| Motherboard | Gigabyte Z390 Aorus Master |
| Cooling | CPU = EK Velocity / GPU = EK Vector |
| Memory | 32GB - G-Skill Trident Z RGB @ 3200MHz |
| Video Card(s) | AMD RX 6900 XT (H2O Cooled) |
| Storage | Samsung 860 EVO - 970 EVO - 870 QVO |
| Display(s) | Samsung QN90A 50" 4K TV & LG 20" 1600x900 |
| Case | Lian Li O11-D |
| Audio Device(s) | Presonus Studio 192 |
| Power Supply | Seasonic Prime Ultra Titanium 850W |
| Mouse | Logitech MX Anywhere 2S |
| Keyboard | Matias RGB Backlit Keyboard |
| Software | Windows 10 & macOS (Hackintosh) |
Hi there I am trying to replace a "drifting" joystick on a PowerA wired enhanced spectra Xbox One controller. Here is a link to it
From everything I read and watched I really thought I was buying the right part. But not until I tore apart the controller and de-soldered the joystick, did I realize the replacements I bought have the "click" (the downward push function of most modern joysticks) in a different position. So what I mean is the pins will not all line up to the PCB. They are all spaced the same, but positioned different. This means I can position it to line up a particular set of pins, but the others wont line up, or vise versa. I also stupidly didn't realize I got the ones with a thicker plastic post instead of the thin metal post, but that seems like something I can work around if need be.
So I have now done a lot more research but have not found the exact same looking joystick yet. Summarizing what I have found.
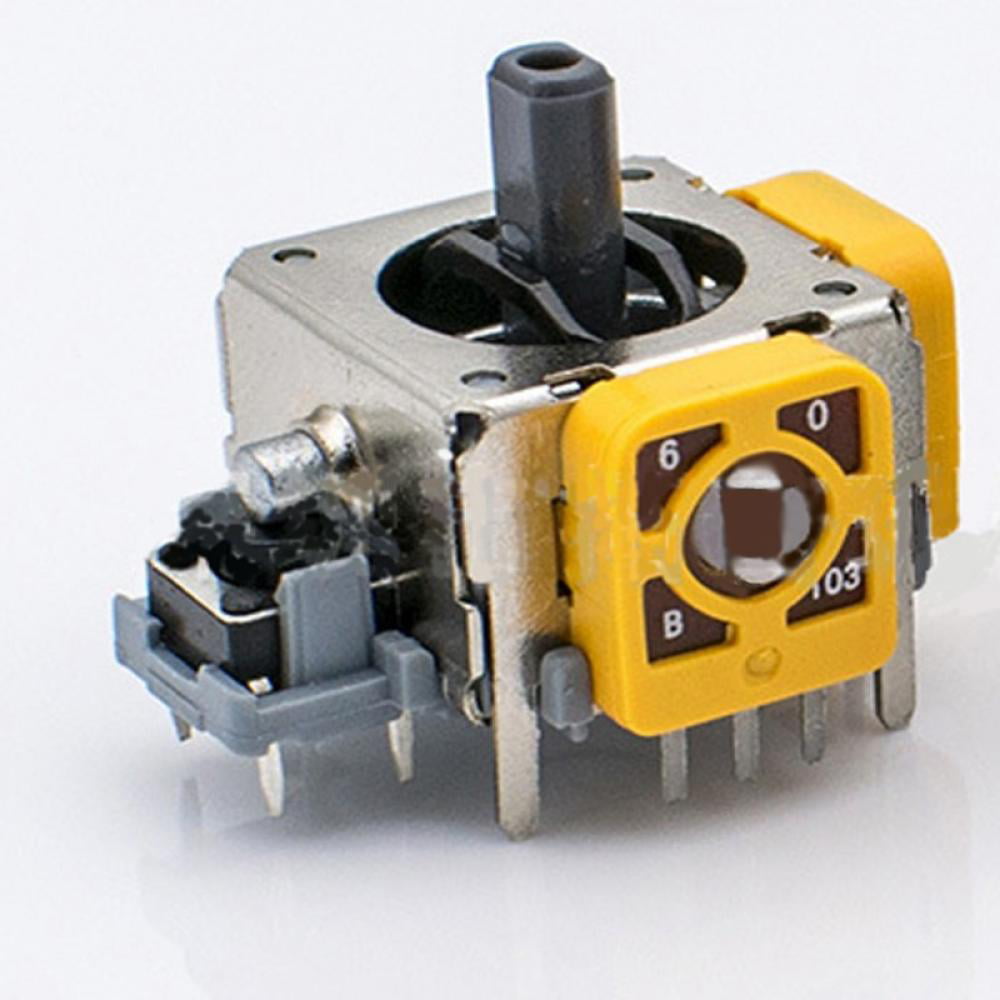
At least one or some Xbox 360 joysticks have the exact same potentiometers evident of the "6 0 B 103" in the corners of them. However, the stick is plastic and larger. I also tore apart an old Microsoft OEM Xbox 360 wireless controller for comparison and the one I have is clearly larger than both the PowerA unit, and the Xbox One replacement unit I bought (which is an ALPS branded unit) Link below showing the Xbox 360 one that seems close
Below are two pics of the one I am trying to replace
I believe it is a Polyshine Favor Union branded unit. And it is likely their model called "FJM10K-S1B10K01N".
Here is link to that, and below that are photos of what I am trying to replace. (I must have gotten a little careless with my heat gun lol the plastic melted a bit on one of the potentiometers as you can see in the 2nd pic)


Here is a pic of what I am trying to replace, next to a pic of what I bought, as well as a link to what I bought. I circled the posts that do not match up because they are closer to the main body of the unit on the ones I bought (the green ones)

So my problem is it seems I cannot find anyone selling what resembles an exact copy of the unit in the PowerA wired controller.
Please, if you have any advice I'd love to hear from you!
From everything I read and watched I really thought I was buying the right part. But not until I tore apart the controller and de-soldered the joystick, did I realize the replacements I bought have the "click" (the downward push function of most modern joysticks) in a different position. So what I mean is the pins will not all line up to the PCB. They are all spaced the same, but positioned different. This means I can position it to line up a particular set of pins, but the others wont line up, or vise versa. I also stupidly didn't realize I got the ones with a thicker plastic post instead of the thin metal post, but that seems like something I can work around if need be.
So I have now done a lot more research but have not found the exact same looking joystick yet. Summarizing what I have found.
At least one or some Xbox 360 joysticks have the exact same potentiometers evident of the "6 0 B 103" in the corners of them. However, the stick is plastic and larger. I also tore apart an old Microsoft OEM Xbox 360 wireless controller for comparison and the one I have is clearly larger than both the PowerA unit, and the Xbox One replacement unit I bought (which is an ALPS branded unit) Link below showing the Xbox 360 one that seems close
Popvcly Universal 3D Joystick Sensor Module Replacement Thumb Stick Controller For Xbox360/PS2/PS3 Game Console Accessories Gray Yellow - Walmart.com
Free 2-day shipping. Buy Popvcly Universal 3D Joystick Sensor Module Replacement Thumb Stick Controller For Xbox360/PS2/PS3 Game Console Accessories Gray Yellow at Walmart.com
www.walmart.com
Below are two pics of the one I am trying to replace
I believe it is a Polyshine Favor Union branded unit. And it is likely their model called "FJM10K-S1B10K01N".
Here is link to that, and below that are photos of what I am trying to replace. (I must have gotten a little careless with my heat gun lol the plastic melted a bit on one of the potentiometers as you can see in the 2nd pic)
FJM10K-S1B10K01N - Favor Electronics
Favor Electronics is one of the largest potentiometer, encoder and switch manufacturers in Asia. Our products have been widely applied to computer, communication, consumer and various industrial fields - all products are RoHS compliant. Favor Electronics obtains certificate of ISO 9001, ISO...
ws029.so-buy.com
Here is a pic of what I am trying to replace, next to a pic of what I bought, as well as a link to what I bought. I circled the posts that do not match up because they are closer to the main body of the unit on the ones I bought (the green ones)
Amazon.com: SOSS GAMING 2021 Genuine Analog Joysticks Repair Kit for Xbox One - Fixes Stick Drift, Broken, and Loose Joysticks on Regular, S, and Elite Series 1 Controllers : Video Games
Buy SOSS GAMING 2021 Genuine Analog Joysticks Repair Kit for Xbox One - Fixes Stick Drift, Broken, and Loose Joysticks on Regular, S, and Elite Series 1 Controllers: Accessory Kits - Amazon.com ✓ FREE DELIVERY possible on eligible purchases
www.amazon.com
So my problem is it seems I cannot find anyone selling what resembles an exact copy of the unit in the PowerA wired controller.
Please, if you have any advice I'd love to hear from you!
Last edited:


")


 did you make a Frankenstein joystick module by chopping up two different ones? you took the joystick part with the potentiometers from an OEM Xbox controller, and combined that with the thumb click down button on the existing module that came installed on the PowerA controller? Did I get that right?! if so....lmao and good job! Does the thumb stick down click still work? Kinda looks like the piece that would push the button down is not quite long enough now as if it's just barely going to touch the edge of the button if at all.