• Welcome to TechPowerUp Forums, Guest! Please check out our forum guidelines for info related to our community.

x7900D Build Log Corsiar 900d asus RIVE Dual Loop Titans

Joined
Apr 12, 2007
Messages
69 (0.01/day)
Location
hershey
[Build Log] x7900D Build Log Corsiar 900d dual loop titans LED Mid Panel!


Hi and Welcome to my First Build Log!

Working Title for this project is x7900D because it is an x79 system in a Corsair 900d!

i was fortunate to get the 900d form one of the first shipments from Amazon, This case is huge! i've never seen any case this big before in person!

I got lucky with a lot of these parts, finding them on craiglist or ebay for cheap.

The Specs:
Motherboard: Asus RIVE
Processor: I7 3930k
SSD- OCZ Vertex 4 256 x 2 in Raid 0
PSU- Corsair ax1200
Case- Corsair 900D
Ram- Kingston Hyper x 1600mhz x 32GB
GPUs- Evga Titans

The Cooling:
Coolgate 480 Rad
Coolgate 360 Rad
EK Supremecy
EK Titan Blocks
Ek 250 res
Ek Res/Pump combo
Switfech MCP655
1/2" fittings
a ton of Corsair AF and SP fans


now for some pictures. This is my first time trying to take nice photos so please dont hate on me too hard. i used my bed sheet that is wrinkled and my iphone :D

This case is massive!
IMG_23971.jpg
[/URL][/IMG]
IMG_24031.jpg
[/URL][/IMG]


Now, i've always wanted a Asus Rampage board but i hate the red and black color scheme, i was so happy to see the Black RIVE only to find out it wasnt a production product, so i painted mine! i didnt get too deep into the RAM slots because they wouldnt be visible
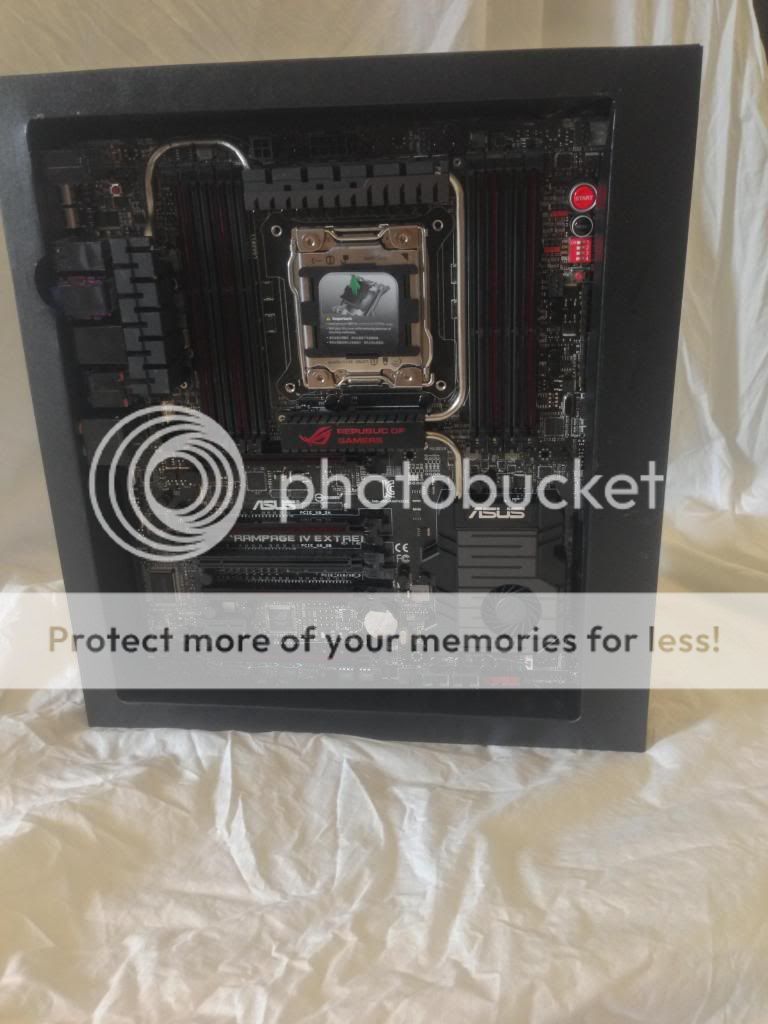


Heres the CPU


Corsair AX1200- my Neighbor gave this to me for free!


This is just half of the fans! i have a total of 17 fans i think?


Ram


Coolgate 480


SSDs, these already had the OS on them so i had to make sure i kept them in the right order


Pump- this thing was way bigger than i though (thats what she said :D)


EK res


and one of two Titans


More photos to come, thanks for looking!

:toast:
 
Last edited:
Subbed. Some pretty sweet parts you have there. Did you test the board after painting it?
 
subbbbbbbbbbbbbbbbbbbbbbbeddd!
 
Update

//

I want to take a second and thank Corsair, especially George from Corsair, for providing amazingly fast customer service to me. My 900D had a few small chips and cracks in the window due to manufacturing error, George emailed me and said that they would send me a new window. They sent a new window from China over night to Pennsylvania.


Again Thanks Corsair, you realized there was a problem and you made it right
 
ok update #2

as i said before Corsair sent me a replacement for my cracked panel, what i didnt know was that they'd send me a whole new door panel! thanks corsair! this ones perfec:thumb:t


Here is some more of my parts, now with wrinkled back drop and a better camera!

the TITAN(S)


EK Clear Plexi Water blocks for the Titans


These things are shiny!


EK Bay Res and Pump


EK HF Supremacy Clear - i got anxious and mounted it before i took a photo


Coolgate 360 Radiator


Box full of Corsair SP120's High performance edition


My New Photo Companion
[/URL

Photos together:
[URL=http://s37.photobucket.com/user/abirli/media/DSCF0380_zps98a8c14d.jpg.html]


<a href="http://s37.photobucket.com/user/abirli/media/DSCF0389_zpseb24a2a3.jpg.html" target="_blank"><img src="http://www.overclock.net/content/type/61/id/1488884/" border="0" alt=" photo DSCF0389_zpseb24a2a3.jpg"/></a>


Thats it for today, heres a teaser of whats to come:


Thanks everyone for taking a look, now that all the parts have been shown, its time to MODDDD

First thing i did was Paint the RAM. This is a temporary soultion until i save up for Dominators.

My color scheme is going to be black with a blittle white =]

so i masked them up, and started priming


Once dry i sprayed it with flat white


I think it turned out pretty good =] using flat paint saves me all the time of sanding and respraying


For the black dimms, i used my favorite paint ever, plasti dip! this stuff is awesome. in case you dont know aht it is , its platic rubbery paint that peels off when your done with it. so i masked the dimms up sprayed them with a couple coats of plastidip and peeled off what i wanted to show through.


Thats it for this update, more to come!

:toast:
 
Subbed! Awesome parts! :toast:
 
so glad you done something with those dim sticks!

what you doing with the cables?

looking great!!
 
Subbed! Awesome parts! :toast:

Thank you! :toast:


so glad you done something with those dim sticks!

what you doing with the cables?

looking great!!


Ha thanks dude, ill be sleeving them, i've got some MDPC sleeve


UPDATE


Ok Last update for the weekend, i've got to go work in New York This week so i have to wait till thursday to do more.

Whats every ones opinion on progress photos, showing how i did what i did? do you prefer just seeing the finished product or seeing how i made/assembled it and then the finished product?

anyway, i installed the fron intake fans, Corsair AF120 Queit Edition


the cables are too short, ill have to fix these later


I also installed the Corsair AX1200


looks so far away!


Next i mounted the EK bay res and pump combo.


But it didnt fit ;(


so for the first time this project, i busted out the dremel and my new Tungsten bit


i had to route like a 1/4' more to fit it


Thats better


Next i made the plexiglass back plate for the SSD's


Mounted the OCZ Vertex 4 SSD's and decided to Carbon wrap it, in white


Unti lnext time, heres something to tide you over =D


UPDATE

Finally got back from work and went right back to work....on the rig!

Got some new goodies!


Using the templates i made before, i traced them onto the new pexiglass.


Now to cut


And Sand


Can any one guess what i did wrong? SMH:mad:

No worries, i have a Doctorate in making do!

Test fit


Mirror panel on the bottom? hmmm :D


It still has the protective film over it, hence why it looks dirty


Unfortuanely its almost impossible to score and snap off a 3/4" strip 23" long with out it breaking in two, so i have to order some more.

Until next time
 
Small Update

While waiting for my acrylic cement to arrive, i sleeved the front panel and the ek res


I used the lamptron tool to get the fan pins out, terrible for ATX pins but awesome for Molex and Fan pins


before sleeve


after sleeve


I used MDPC sleeve, i've used many others before and i finally sprung and bought some. It really is the best out there. it may not be the tightest non-see through weave but if you're serious about sleeving you'll making your own cables anyways, or at least tape up the ones you've got

oh and its thE best heatshrink i've ever used.

thats it until the solvant comes in. i may mount GPU blocks in the mean time

until next time!
 
Very cool. Keep it coming!
 
Tiny Tiny update, while figure out how i'm going to do what im doing haha

i dremeled a hole in some spare plexi to see if one of my ideas will work... i love this tungsten bit!


I think we'll be just fine :thumb:
 
You use MDPC-X srink too??? What size of heatsrink you use for fan connector???
Usual little for sleeve PSU or size for SATA cables???
Build is fantastic, 3930K is still best Intel option for build and today.
I only can imagine Dominator Platinum LED lights with that EK blocks and everything insted of Kingston HyperX. :D
 
i like it!

i put perspex in my window and the faintest touch ruins it! bet plexiglass is worse, be careful!
 
You use MDPC-X srink too??? What size of heatsrink you use for fan connector???
Usual little for sleeve PSU or size for SATA cables???
Build is fantastic, 3930K is still best Intel option for build and today.
I only can imagine Dominator Platinum LED lights with that EK blocks and everything insted of Kingston HyperX. :D

I used the mdpc sata for the fan header and the small for the connection at the fan itself.

thank you

i like it!

i put perspex in my window and the faintest touch ruins it! bet plexiglass is worse, be careful!

yeah it can be fragile, this is 1/8" so it should be able to withstand some pressure
 
Small Update

didnt get a chance to work on the rig at all this weekend, but i did manage to install the water blocks on the Titans

Heres the tools, notice the t6 torx missing, i had to run out and get one

a

the Block


The Card


Heatsink removed


Cleaned off the GPU


Mounted on the cards =D


and heres a sneak peak at the major update coming


Thanks!
 
UPDATE 6/11!!!

Ok so here it is! the major time consuming part of my build is finished! now it all should be smooth sailing.

many of you may know what it is i've been building, but for those that dont, i'll let the pictures speak for themselves? :p

first the how to:

Start off by marking your measurements and clamp it down, measure twice cut once!


After all that plexi cutting and aluminum cutting, a new disk is needed


cutting metal generates a lot of heat. it actually melted my clamp!


Now that the metal pieces are cut, i made a stencil for the remaining layers and transferred it to the plexi. this layer is frosted


uh oh storm clouds! tornado watch for my area last night


hmm?


got anxious and didnt even take the tape off! i needed to know it worked right away!


And now i present to you, my illuminated mid panel for the 900d!!!!!


not that this is done all thats left is the loops, sleeve some more plexi and overclocking, them finally game time!

thank you
 
looks cool.
sub
 
Ok Update Time

where i last left off was with the mid panel completed. now its time to mount the reservoir. so using the template i made before i measured and cut the holes for the bottom piece, the bottom piece isnt a circle so i have to make the bottom layer different than the top two


looks like my epoxy broke off, i fixed that then:thumb:

heres how it looks once back in!


i also mounted the ssd's


marked cut lines for wires


Cut the holes


i didnt take any pictues of the wires :mad: but what i did was cut and splice two power connectors so 10 wires into 5 then soldered on enough wires to route them to the bottom. i also had to make new crimps for the connectors. and i sleeved it all

Next project i undertook was the radiators. i didnt want to run 6 fan wires up top and 8 down below so i cut, soldered and spliced them. now there is only going to be 1 wire per side.

measure/cut/strip/solder/sleeve/crimp/sleeve/test


finished product


i think i went a little heavy on the shrink at the joints but other thank that this side is done! only one more for the top rad and two more for the bottom :thumb:

Thanks
 
UPDATE Time.

things are starting to finally come together, i had a good bit of time this weekend to sit down and crank out the work!

First copied my template over to the white plexi and cut it out. i also marked and cut holes for the cables


Once that was complete, it was time to cut the black plexi piece, so i transferred the template over. and scored it


but when i went to snap it it broke :mad: :doh:


so now that piece is ruined. but not to fear i have an idea to get me close to where i wanted to be!

so i did some masking


and bought out my trusty friend PLASTI DIP!!! i love this stuff

tacked it up


layer 2


layer 3,4,5,6!


peeled the tape off, and there ya go! not exactly how i had it planned but until i take the measurements and what not for the black plexi piece, this will do.


oh in the mean time while the paint was drying, i decided to redo the ssd panel. the carbon got all dirty and i wasnt happy with the cuts


Installed


I also tackled most of the sleeving! i originally wanted to use heatshrink, as i think if you can pull it off perfectly it looks the best. but after many tries, my hat goes off to you all who use heatshrink, it is so hard to get a consistent and uniform look for it even with the tools!

so i went the shrinkless route

4 pin cpu


8 pin and 4 pin cpu together


<a href="http://s37.photobucket.com/user/abirli/media/DSCF0605_zps24d0fdd7.jpg.html" target="_blank"><img src="http://i37.photobucket.com/albums/e73/abirli/DSCF0605_zps24d0fdd7.jpg" border="0" alt=" photo DSCF0605_zps24d0fdd7.jpg"/></a>

24 pin


getting close!


and i leave you for now with some extra led panel bonus picks


and of course

 
Back
Top