 12
12
Aerocool Tor Pro Review
Value & Conclusion »Test System
| System Parts for Case Reviews | |
|---|---|
| Processor: | Intel Core i7-8600K |
| Motherboards: | ATX: MSI Z370 GAMING PRO CARBON AC MATX: Z370M GAMING PRO CARBON Mini-ITX: MSI Z370i GAMING PRO CARBON Provided by: MSI |
| Graphics Card: | Long: ASUS Radeon RX580 Short: HIS Radeon 5350 HD |
| Memory: | 16 GB XPG Dazzle DDR4 2800 MHz CL17-17-17 1.25 V 32 GB GB XPG SPECTRIX D40 3000 MHz. CL16-18-18 1.35 V 16 GB XPG GAMMIX D10 DDR4 2400 MHz CL16-16-16 1.20 V Provided by: ADATA |
| HDD: | Western Digital 320 GB 7200 RPM |
| SSD: | ADATA XPG SX850 256 GB ADATA Ultimate SU800 3D 256 GB ADATA Ultimate SU700 240 GB Provided by: ADATA |
| Power Supply: | Antec High Current Gamer 650 W Antec High Current Gamer 750 W Provided by: Antec |
| Cooling: | be quiet! Dark Rock 4 be quiet! Pure Slim be quiet! Shadow Rock 2 be quiet! Shadow Rock LP Provided by: be quiet! |
Assembly

Installing the motherboard is done by traditional means, using spacers and screws. Thanks to the unique upper layout, you should have no issues reaching any of the connectors and naturally, there is plenty of space around the board.


Interestingly enough, the SSD trays come with two sets of mounting possibilities, so you can use screws on the side or bottom of the drive. This is great as you won't run into any compatibility issues regardless of whether you use a solid state or traditional drive, however thick it may be. Once filled, simply put the whole contraption back into place.


The metal 3.5" trays are as simple as they can get, but they also work well. Simply screw the drive down and put the tray back into its place.

Adding a power supply is also a no-frills endeavor with loads of space for even bigger units. You just have to ensure to install large liquid-cooling setups in the top before adding the PSU on the other side of the perforated divider.


With everything installed and the entire cable mess nicely hidden behind the motherboard tray, how spacious the chassis really is becomes apparent. In fact, it seems there is a lot of potential and space for storage mounts, or dedicated locations for reservoirs and pumps.
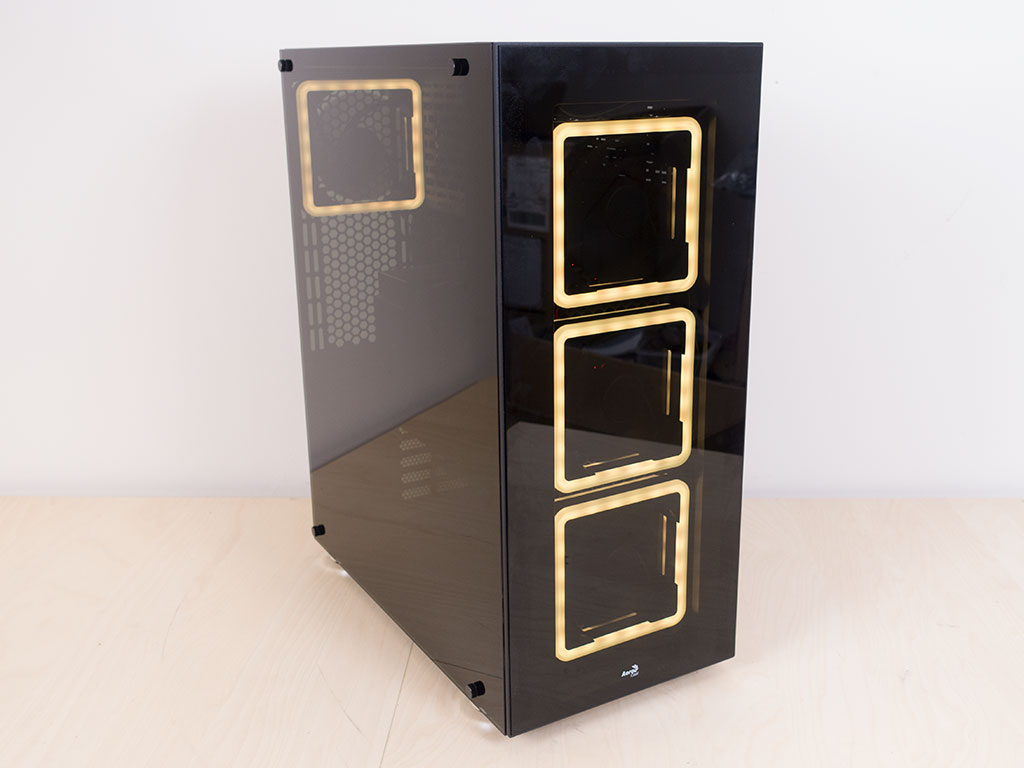
Finished Looks


With everything installed and the system turned on, you can clearly see the three square frames in the front due to the glass panel. In the rear, the same holds true for the fourth unit, and all the other elements are easily accessible because of the enclosure's size. As the main panel is also heavily tinted, you can't really see too much of what is within without taking a closer look.


You may cycle through a vast number of colors, animations, and lighting effect, which is pretty cool and makes the remote especially useful.
May 8th, 2024 03:56 EDT
change timezone
Latest GPU Drivers
New Forum Posts
- Nerdy year long streaming saga [ XD probably] (2)
- High c0% and system idle process (0)
- I wonder how much performance could be gained with m4 chip in iPad pro OLED, if it had an AirJet (1)
- PSU making a clicking sound, PC wont turn on (14)
- POLL: Can you see the difference past 60fps (gaming/other) (20)
- Does anyone here overclock their video cards? Is it really worth it? (29)
- Technical Issues - TPU Main Site & Forum (2024) (54)
- What's your latest tech purchase? (20477)
- Arctic MX-6 shelf life is just a couple months? (96)
- vega 64 gpu frequency problem (6)
Popular Reviews
- CHERRY XTRFY M64 Pro Review
- Corsair iCUE Link RX120 RGB 120 mm Fan Review
- Finalmouse UltralightX Review
- Cougar Hotrod Royal Gaming Chair Review
- Upcoming Hardware Launches 2023 (Updated Feb 2024)
- Meze Audio LIRIC 2nd Generation Closed-Back Headphones Review
- AMD Ryzen 7 7800X3D Review - The Best Gaming CPU
- ASRock NUC BOX-155H (Intel Core Ultra 7 155H) Review
- ASUS Radeon RX 7900 GRE TUF OC Review
- Sapphire Radeon RX 7900 GRE Pulse Review
Controversial News Posts
- Intel Statement on Stability Issues: "Motherboard Makers to Blame" (259)
- AMD to Redesign Ray Tracing Hardware on RDNA 4 (202)
- Windows 11 Now Officially Adware as Microsoft Embeds Ads in the Start Menu (167)
- NVIDIA to Only Launch the Flagship GeForce RTX 5090 in 2024, Rest of the Series in 2025 (137)
- Sony PlayStation 5 Pro Specifications Confirmed, Console Arrives Before Holidays (119)
- AMD's RDNA 4 GPUs Could Stick with 18 Gbps GDDR6 Memory (114)
- NVIDIA Points Intel Raptor Lake CPU Users to Get Help from Intel Amid System Instability Issues (106)
- AMD Ryzen 9 7900X3D Now at a Mouth-watering $329 (104)