 0
0
Antec ISK110 VESA Mini-ITX Desktop Review
Assembly & Finished Looks »A Closer Look - Inside

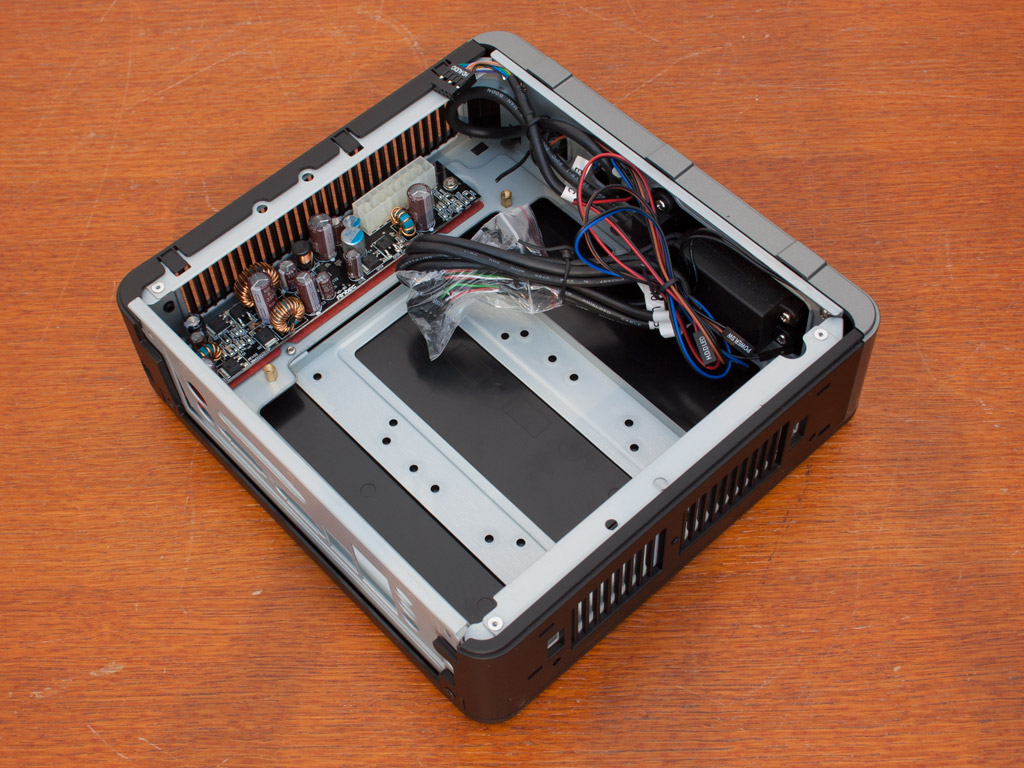
You have to remove a pair of screws and pry the metal mesh cover off to gain access to the case. Its internals only hold the I/O, the case's cables, the PSU converter PCB, and the area for the mini-ITX board. It would have been a nice touch to have an all-black interior, but you will not see much of the metal frame anyways.


Turning the chassis upside down, there are the two 2.5" HDD bays below the mainboard. You can easily install them after inserting the ITX board, but you may find it troublesome to route the power and data cables properly which is why I suggest you go for these drives first.


All the I/O cables are firmly fused together into one big, black block. It would have been good to see a detachable approach instead so that one could remove unwanted leads, or to replace a USB 3.0 cable at the end of the motherboard with one featuring a USB 2.0 plug. The PSU converter board is still exactly the same as the one in the original Antec ISK 100.


It carries the label "MD-80" along with Antec's branding. Looking at the underside, it actually states what the unit is capable of. The single 12V rail can deliver up to 5 A, while the entire PCB is made to push up to 80W, so you should not use components that draw more than 80W, although the PSU brick is intended for up to 90W.


All the cables within the ISK-100 are quite ordinary, but are actually rather long. These are probably the shortest ones that Antec had at their disposal without ordering custom ones for this chassis. They, ultimately, do work. I do believe it would have been a good time to upgrade the case to USB 3.0 since many mini-ITX boards also come with a 20-pin connector.
May 4th, 2024 23:16 EDT
change timezone
Latest GPU Drivers
New Forum Posts
- Apparently Valve is giving refunds on Helldivers 2 regardless of hour count. Details inside. (31)
- Arctic MX-6 shelf life is just a couple months? (85)
- Change GPU or PSU ? Games looks bad with microsuttering (15)
- Keysfan (21)
- Post your 7zip 23.01 scores (16)
- Is updating BIOS to beta versions a good idea if you have the most recent version installed but still face issues? (3)
- Everytime i plug something into my wall, it stutters, and it never goes away (6)
- Unigine Heaven 4.0 Benchmark Scores Part 2 (930)
- Only some humans can see refresh rates faster than others, I am one of those humans. (100)
- Have you got pie today? (16326)
Popular Reviews
- Finalmouse UltralightX Review
- Meze Audio LIRIC 2nd Generation Closed-Back Headphones Review
- ASRock NUC BOX-155H (Intel Core Ultra 7 155H) Review
- Montech Sky Two GX Review
- Upcoming Hardware Launches 2023 (Updated Feb 2024)
- Cougar Hotrod Royal Gaming Chair Review
- Alienware Pro Wireless Gaming Keyboard Review
- HYTE THICC Q60 240 mm AIO Review
- AMD Ryzen 7 7800X3D Review - The Best Gaming CPU
- Logitech G Pro X Superlight 2 Review - Updated with 4000 Hz Tested
Controversial News Posts
- Intel Statement on Stability Issues: "Motherboard Makers to Blame" (237)
- Windows 11 Now Officially Adware as Microsoft Embeds Ads in the Start Menu (167)
- AMD to Redesign Ray Tracing Hardware on RDNA 4 (130)
- Sony PlayStation 5 Pro Specifications Confirmed, Console Arrives Before Holidays (117)
- AMD's RDNA 4 GPUs Could Stick with 18 Gbps GDDR6 Memory (114)
- NVIDIA Points Intel Raptor Lake CPU Users to Get Help from Intel Amid System Instability Issues (106)
- AMD Ryzen 9 7900X3D Now at a Mouth-watering $329 (104)
- AMD "Strix Halo" Zen 5 Mobile Processor Pictured: Chiplet-based, Uses 256-bit LPDDR5X (103)