 25
25
ASUS ROG Claymore II Review - Three Keyboards in One!
Disassembly: Part 1 »Closer Examination


The ASUS ROG Claymore II is something else, and you would not really be able to tell solely based on the photos above. The original Claymore came in different SKUs depending on whether you wanted the numpad or not, with the Claymore Core essentially the TKL form-factor keyboard. With the Claymore II, ASUS has certainly toned down the design language for what is in turn highly in line with other ROG products released recently, including laptops; a two-tone color scheme on the case with an angled, brushed finish to the aluminium frame. Up top is a plastic layer of two parts. A translucent smoked acrylic on the top left has a ROG eye logo as well as another set of indicator LEDs, but this time for battery status and charging. The corners are cut to add some flair while retaining a gamery design. All the edges are beveled too, but we still have larger than average bezels on this keyboard.
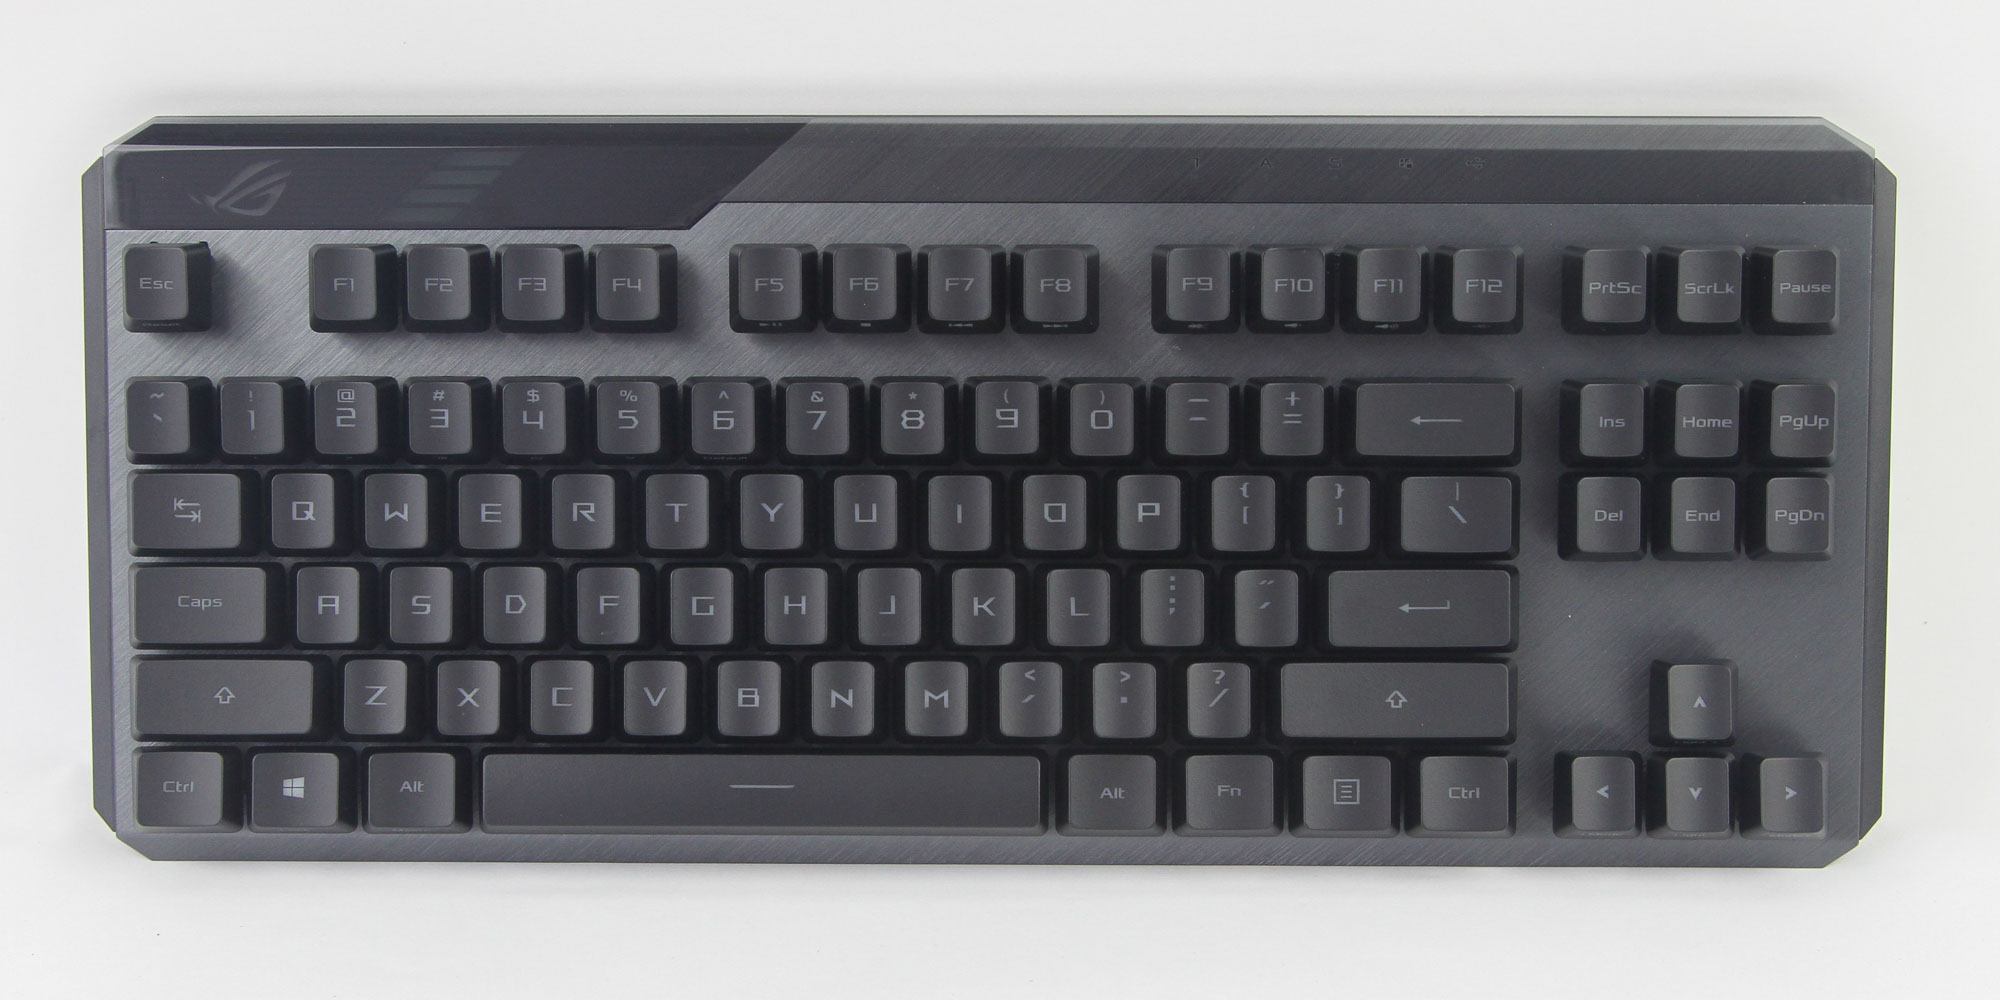
This TKL section otherwise adopts a standard 87-key US ANSI layout. The usual indicator LEDs are still present lest people use it without the numpad, although subtly hidden behind the darker plastic trim above the F9–F12 keys. There are five of these too, with Num Lock, Caps Lock, and Scroll Lock the first three and the other two the Win Lock and wired mode indicators specific to the Claymore II. The legends on the keycaps are quite boxy, matching the boxy top surfaces of the keycaps. Single legend placement is in the center, unlike most mechanical keyboards, where placement tends to be more towards the top, with secondary legends just above the primary ones in a smaller font. This is indicative of central LED placement underneath, which would be unlike the vast majority of keyboards using north-facing LEDs. There are a few front-facing legends that are more keyboard-specific. The typeface for the legends is a safe choice that won't alienate anyone. The modifiers use a mixture of symbols and printed names, and even these are inconsistent as far as whether full names are used or not. ASUS clearly just sought to use a single line here, so it fit in whatever worked in a manner that does irk me somewhat.


So what about the numpad, you say? The original Claymore used clunky magnetic pins to clip the detachable numpad to the left or right of the TKL keyboard. It worked fine on a desk, but there were minor complaints about flexing near either attachable edge, which ASUS addressed with the Claymore II. To begin with, we have plastic covers on the sides of both pieces for when you don't want the two connected. Removing them is as simple as hooking a finger nail into the notch cut out at the top and pulling the cover off. We see magnets again, but this time more to align the connection than anything else. Guide rails in the TKL body also further support a stable connection, and there are electrical pads for power and data transfer.


Connecting the numpad is as simple as sliding it in from the top, but not too far at the top since you want the rails in between. Once it is in, just push it down until it clips in place. It is strong enough a physical connection to where you can lift the keyboard from the other end, and the numpad lifts up smoothly, as if it had always been a part of the TKL unit. This time, there is no flex anywhere, and you can of course do the same on the left side, too. Remember to cover the two sides with the respective plastic covers, and you now have the option of using the ROG Claymore II in three configurations. The TKL option is straightforward and best used for when you do not need the numpad. It allows right-handed users to have it closer to the mouse, and ensures natural hand placement relative to your shoulders when typing. The full-size option with the right-handed numpad is also easy to understand, and the luxury of a left-handed numpad gives you most of the ergonomic benefits of the TKL form factor with the 10-key for number-crunching. Left-handed users would see similar benefits with the TKL keyboard, as well as the right-handed numpad.


Flipping the keyboard around, we see the usual certification sticker. But this sticker is relatively massive and part of another branding exercise, as well as the angled design in the two-tone finish from the front. The numpad has a massive single foot at the top, with the TKL unit having two smaller feet, all three of which have a rubberized bottom to prevent slippage. There are also several rubber pads along the top and bottom should you not want to add any extra elevation courtesy the feet.


It is also now that we find out that the elusive 2.4 GHz dongle is neatly tucked away inside a chamber in the plastic case. Magnets hold it there, and it is, as such, quite simple to remove or store. This dongle allows the ROG Claymore II to be used in 2.4 GHz wireless mode, a definite upgrade over Bluetooth in terms of latency and signal strength at a minor cost to battery life. You can plug it into an available USB Type-A port on your PC or even use the extension adapter with the keyboard cable to place it closer to the mouse if the port is, say, on the back and you have any signal issues.


Wired connectivity comes in the form of the Type-C connector on the cable, over a larger and more open cutout in the case next to a USB Type-A port and toggle button to turn the keyboard off in wireless mode to save battery life. This is where the main advantage of the Type-C cable comes in, especially if you pair it with an available Type-C port on your PC. Capable of providing 1.5 A, the keyboard has plenty of power on tap to drive a second device without a pass-through cable. The increased power on tap compared to the 500 mA maximum with USB 2.0 used more generally also helps with fast charging the battery, similar to your smart phone. If you do not have an available Type-C port, especially one capable of higher power delivery, the second provided adapter will connect the cable to a Type-A port instead.


I forgot to take photos of the keyboard with the wrist rest installed, which is as simple as lining it up and letting the magnets do their job. A small error with a GPU block review meant that I spilled some coolant on my backdrop, and while I await a replacement, I just decided to use ASUS's own photos. Good thing I had already done everything else before! I do wish the wrist rest would go over the beveled edge all the way since the cutouts at the bottom corners now look out of place somewhat.


The keycap profile is interesting; it comes off as an intermediate between the common OEM profile and shorter Cherry profile. It is a shortened OEM profile thus, losing 1 mm compared to the standard OEM keycaps throughout, which ASUS says was done deliberately for aesthetics and balance with wireless mode owing to the thicker case. As such, you still won't have a hard time adapting from an average mechanical keyboard as far as the keycaps go. The boxier top surface somewhat cuts down on the expected contouring, but adds more support when typing. These are made out of ABS plastic, albeit much thicker than average with a measured wall thickness of 1.22 mm. They will develop shine sooner rather than later with finger oils, and longevity is further hurt by the laser-etched legends on the top and front. As seen above, these are backlit nicely, but quite different from the average crosspoint stem keycap for Cherry MX style switches. Instead, there are four stems at the corners with an opening in the center for central backlighting. Don't expect to be able to replace the keycaps thus; it is a shame ASUS didn't go with stock keycaps of better build quality. When asked about this, ASUS said that the stock keycaps were chosen for "better lighting diffusibility" compared to PBT keycaps.


Here is where the rest of that puzzle finishes, with the switches themselves being quite different in design. ASUS is quite proud of the brand-new ROG RX optical mechanical switches, which come in Red (linear) or Blue (tactile and clicky) flavors based on the equivalent Cherry MX switches. These are a completely different design, all the way from the housing to the stem and slider mechanism, and even the lighting. I have the ROG RX Red switches here, characterized by the red sliders, and the top has the four openings in the corners the keycaps slot into. This makes fitting the keycaps a more deliberate process requiring careful positioning in a straight line, but it is easy enough to get used to after a couple of tries. A gap in the middle accommodates a light pillar for central backlighting similar to Omron switches, and you can even see the LED through the clear pillar.
These are optical switches, but unfortunately do not support hot-swapping easily. To be clear, you can take them out, but it is extremely hard given the retaining clips snugly fit into the aluminium frame to where it might as well not be hot-swappable at all. ASUS also strongly discourages the end users from doing so since the switches may get damaged. This is more excusable here given the unique design, as you can really only swap one RX switch for another, and the RX switches aren't available for purchase separately at this time either. The larger keycaps use Cherry-style stabilizers with no lubrication whatsoever, although the keycap design helps mitigate some of that mushy feeling and rattle associated with such implementations.
Apr 24th, 2024 02:40 EDT
change timezone
Latest GPU Drivers
New Forum Posts
- Official Board Game Discussion (13)
- The TPU UK Clubhouse (24772)
- Random blue screen from winload.efi error (0xc000000e) (0)
- What's your latest tech purchase? (20327)
- Which new games will you be buying? (304)
- need help with motherboard/ ram compability certainty (15)
- Flashing lenovo BIOS (11)
- FINAL FANTASY XIV: Dawntrail Official Benchmark (72)
- What phone you use as your daily driver? And, a discussion of them. (1455)
- I am getting artifacting when I change Windows security settings. Is my GPU failing, or is this just a Windows issue? (9)
Popular Reviews
- Fractal Design Terra Review
- Corsair 2000D Airflow Review
- Thermalright Phantom Spirit 120 EVO Review
- Minisforum EliteMini UM780 XTX (AMD Ryzen 7 7840HS) Review
- ASUS GeForce RTX 4090 STRIX OC Review
- NVIDIA GeForce RTX 4090 Founders Edition Review - Impressive Performance
- ASUS GeForce RTX 4090 Matrix Platinum Review - The RTX 4090 Ti
- MSI GeForce RTX 4090 Suprim X Review
- MSI GeForce RTX 4090 Gaming X Trio Review
- Gigabyte GeForce RTX 4090 Gaming OC Review
Controversial News Posts
- Sony PlayStation 5 Pro Specifications Confirmed, Console Arrives Before Holidays (116)
- NVIDIA Points Intel Raptor Lake CPU Users to Get Help from Intel Amid System Instability Issues (106)
- AMD "Strix Halo" Zen 5 Mobile Processor Pictured: Chiplet-based, Uses 256-bit LPDDR5X (101)
- US Government Wants Nuclear Plants to Offload AI Data Center Expansion (98)
- Windows 10 Security Updates to Cost $61 After 2025, $427 by 2028 (84)
- Developers of Outpost Infinity Siege Recommend Underclocking i9-13900K and i9-14900K for Stability on Machines with RTX 4090 (84)
- TechPowerUp Hiring: Reviewers Wanted for Motherboards, Laptops, Gaming Handhelds and Prebuilt Desktops (77)
- Intel Realizes the Only Way to Save x86 is to Democratize it, Reopens x86 IP Licensing (70)